SpingBoot系列教程(一):整合Mybatis-plus+Druid
特别说明
- MyBatis—PLus的3.0+版本对于
LocalDateTime的支持有些差异,对于Druid的版本也有些要求。pom.xml文件里面的俩者的版本是我自己试验过的,可以正常使用,如果自己更换版本,出现LocalDateTime问题,请注意版本问题。 - 代码生成工具使用的是
mybatis-plus-generator,但没有完全按照官方文档来搞,本着能用就行的目的,一些地方与官方有点出入,生成代码之后,还需微调一下,请注意。 - 数据库文件
MySql,末尾我会提供,当然您也可以使用自己的数据库。
整合Mybatis_PLus
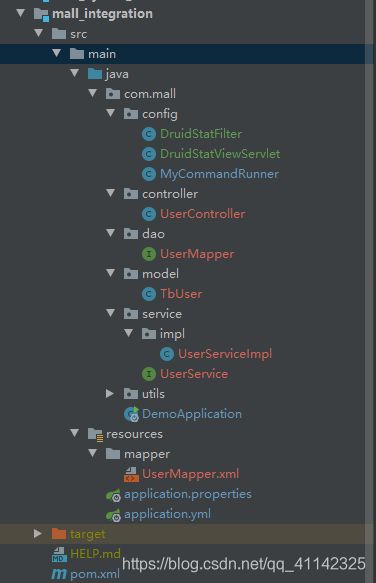
- 整体的项目结构。
-
修改
pom.xml文件<project xmlns="http://maven.apache.org/POM/4.0.0" xmlns:xsi="http://www.w3.org/2001/XMLSchema-instance" xsi:schemaLocation="http://maven.apache.org/POM/4.0.0 http://maven.apache.org/xsd/maven-4.0.0.xsd"> <modelVersion>4.0.0modelVersion> <parent> <groupId>org.springframework.bootgroupId> <artifactId>spring-boot-starter-parentartifactId> <version>2.2.2.RELEASEversion> <relativePath/> parent> <groupId>com.mallgroupId> <artifactId>mallartifactId> <version>0.0.1-SNAPSHOTversion> <name>mallname> <description>Demo project for Spring Bootdescription> <properties> <java.version>1.8java.version> <java.version>1.8java.version> <mybatis-plus.version>3.2.0mybatis-plus.version> <druid.version>1.1.21druid.version> <freemarker.version>2.3.29freemarker.version> properties> <dependencies> <dependency> <groupId>log4jgroupId> <artifactId>log4jartifactId> <version>1.2.16version> <scope>compilescope> dependency> <dependency> <groupId>org.springframework.bootgroupId> <artifactId>spring-boot-starter-webartifactId> <scope>compilescope> dependency> <dependency> <groupId>mysqlgroupId> <artifactId>mysql-connector-javaartifactId> <scope>runtimescope> dependency> <dependency> <groupId>com.alibabagroupId> <artifactId>druid-spring-boot-starterartifactId> <version>${druid.version}version> dependency> <dependency> <groupId>com.baomidougroupId> <artifactId>mybatis-plus-boot-starterartifactId> <version>${mybatis-plus.version}version> dependency> <dependency> <groupId>com.baomidougroupId> <artifactId>mybatis-plus-generatorartifactId> <version>${mybatis-plus.version}version> dependency> <dependency> <groupId>org.freemarkergroupId> <artifactId>freemarkerartifactId> <version>${freemarker.version}version> dependency> <dependency> <groupId>org.springframework.bootgroupId> <artifactId>spring-boot-starter-aopartifactId> dependency> <dependency> <groupId>org.projectlombokgroupId> <artifactId>lombokartifactId> <optional>trueoptional> dependency> <dependency> <groupId>org.springframework.bootgroupId> <artifactId>spring-boot-starter-testartifactId> <scope>testscope> <exclusions> <exclusion> <groupId>org.junit.vintagegroupId> <artifactId>junit-vintage-engineartifactId> exclusion> exclusions> dependency> dependencies> <build> <plugins> <plugin> <groupId>org.springframework.bootgroupId> <artifactId>spring-boot-maven-pluginartifactId> plugin> plugins> <resources> <resource> <directory>src/main/javadirectory> <filtering>falsefiltering> <includes> <include>**/mapper/*.xmlinclude> includes> resource> resources> build> project> -
创建代码生成类。一些配置会给出简单的注释,如果有需要的话,推荐您阅读官方文档。文件创建好之后,就可以运行
main方法了,控制台会打印出创建了哪些文件的信息。package com.mall.utils; import com.baomidou.mybatisplus.annotation.DbType; import com.baomidou.mybatisplus.generator.AutoGenerator; import com.baomidou.mybatisplus.generator.config.DataSourceConfig; import com.baomidou.mybatisplus.generator.config.GlobalConfig; import com.baomidou.mybatisplus.generator.config.PackageConfig; import com.baomidou.mybatisplus.generator.config.StrategyConfig; import com.baomidou.mybatisplus.generator.config.rules.NamingStrategy; import com.baomidou.mybatisplus.generator.engine.FreemarkerTemplateEngine; // 演示例子,执行 main 方法控制台输入模块表名回车自动生成对应项目目录中 public class CodeGenerator { /** * * @Title: main * @Description: 生成 * @param args */ public static void main(String[] args) { AutoGenerator mpg = new AutoGenerator(); mpg.setTemplateEngine(new FreemarkerTemplateEngine()); // 全局配置 GlobalConfig gc = new GlobalConfig(); gc.setOutputDir("D:\\GitHubSpace\\Universal_Mall\\UniversalMall\\mall_integration\\src\\main\\java");//输出文件路径 gc.setFileOverride(true); gc.setActiveRecord(false);// 不需要ActiveRecord特性的请改为false gc.setEnableCache(false);// XML 二级缓存 gc.setBaseResultMap(true);// XML ResultMap gc.setBaseColumnList(false);// XML columList gc.setAuthor("gxp");// 作者 // 自定义文件命名,注意 %s 会自动填充表实体属性! gc.setControllerName("UserController"); gc.setServiceName("UserService"); gc.setServiceImplName("UserServiceImpl"); gc.setMapperName("UserMapper"); gc.setXmlName("UserMapper"); mpg.setGlobalConfig(gc); // 数据源配置 DataSourceConfig dsc = new DataSourceConfig(); dsc.setDbType(DbType.getDbType("com.alibaba.druid.pool.DruidDataSource")); dsc.setDriverName("com.mysql.cj.jdbc.Driver"); dsc.setUsername("root"); dsc.setPassword("myoa888"); dsc.setUrl("jdbc:mysql://localhost:3308/universal_mall?useUnicode=true&characterEncoding=utf-8&zeroDateTimeBehavior=convertToNull&serverTimezone=UTC"); mpg.setDataSource(dsc); // 策略配置 StrategyConfig strategy = new StrategyConfig(); // strategy.setTablePrefix(new String[] { "sys_" });// 此处可以修改为您的表前缀 strategy.setNaming(NamingStrategy.underline_to_camel);// 表名生成策略 strategy.setInclude(new String[] { "tb_user" }); // 需要生成的表 strategy.setSuperServiceClass(null); strategy.setSuperServiceImplClass(null); strategy.setSuperMapperClass(null); mpg.setStrategy(strategy); // 包配置 PackageConfig pc = new PackageConfig(); pc.setParent("com.mall"); pc.setController("controller"); pc.setService("service"); pc.setServiceImpl("service.impl"); pc.setMapper("dao"); pc.setEntity("model"); pc.setXml("mapper"); mpg.setPackageInfo(pc); // 执行生成 mpg.execute(); } } -
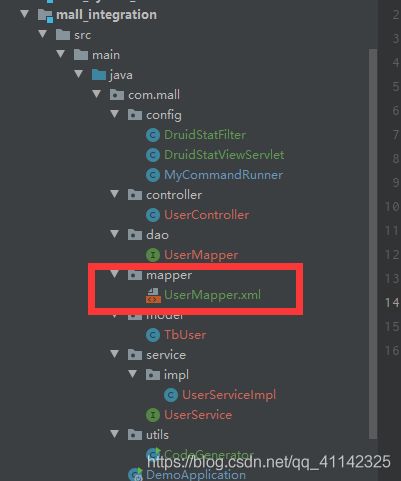
创建完成之后,会发现有个
dao对于的xml文件,会现在java的目录下,请手动把他移到resources目录下。(其实可以完善下那个代码生成类的方法逻辑,比如生成俩个实例对象或者循环俩次一个JAVA目录,一个resources目录,但我比较懒还是喜欢复制下。)
- 打开
UserController文件,修改里面的具体代码为
@RestController
@RequestMapping("user")
public class UserController {

    @Autowired
    public UserService userService;

	@RequestMapping("getAllUser")
    public List<TbUser> getAllUsers(){
        List<TbUser> userList = userService.list();
        return userList;
    }
}
-
Service层的代码暂时不用调整。Mapper的修改如下,@Mapper注解的作用是注入到bean,当然可以在SpringBoot的入口类去添加@MapperScan来设置扫描范围。
@Mapper public interface UserMapper extends BaseMapper<TbUser> { } -
配置配置文件,我这里配置的
YML格式的。# 配置mybatis-plus mybatis-plus: mapper-locations: classpath:/mapper/*.xml # 配置扫描xml type-aliases-package: com.mall.model # 实体扫描,多个package用逗号或者分号分隔
整合Druid
-
配置配置文件,我这里配置的
YML格式的。#数据库连接配置 spring: datasource: url: jdbc:mysql://localhost:3308/universal_mall?useUnicode=true&characterEncoding=utf-8&zeroDateTimeBehavior=convertToNull&serverTimezone=UTC username: root password: myoa888 driver-class-name: com.mysql.jdbc.Driver type: com.alibaba.druid.pool.DruidDataSource platform: mysql # 下面为连接池的补充设置,应用到上面所有数据源中 # 初始化大小,最小,最大 initialSize: 5 minIdle: 3 maxActive: 20 # 配置获取连接等待超时的时间 maxWait: 60000 # 配置间隔多久才进行一次检测,检测需要关闭的空闲连接,单位是毫秒 timeBetweenEvictionRunsMillis: 60000 # 配置一个连接在池中最小生存的时间,单位是毫秒 minEvictableIdleTimeMillis: 30000 validationQuery: select 'x' testWhileIdle: true testOnBorrow: false testOnReturn: false # 打开PSCache,并且指定每个连接上PSCache的大小 poolPreparedStatements: true maxPoolPreparedStatementPerConnectionSize: 20 # 配置监控统计拦截的filters,去掉后监控界面sql无法统计,'wall'用于防火墙 filters: stat,wall,slf4j # 通过connectProperties属性来打开mergeSql功能;慢SQL记录 connectionProperties: druid.stat.mergeSql=true;druid.stat.slowSqlMillis=5000 # 合并多个DruidDataSource的监控数据 #useGlobalDataSourceStat: true -
创建
DruidStatFilter.javapackage com.mall.config; import com.alibaba.druid.support.http.WebStatFilter; import javax.servlet.annotation.WebFilter; import javax.servlet.annotation.WebInitParam; @WebFilter(filterName="druidWebStatFilter",urlPatterns="/*", initParams={ @WebInitParam(name="exclusions",value="*.js,*.gif,*.jpg,*.bmp,*.png,*.css,*.ico,/druid/*")//忽略资源 } ) public class DruidStatFilter extends WebStatFilter{ } -
创建
DruidStatViewServlet.javapackage com.mall.config; import com.alibaba.druid.support.http.StatViewServlet; import javax.servlet.annotation.WebInitParam; import javax.servlet.annotation.WebServlet; @WebServlet(urlPatterns="/druid/*", //启动项目后,访问监控页面的路径。 initParams={ @WebInitParam(name="allow",value=""),// IP白名单(没有配置或者为空,则允许所有访问) /* @WebInitParam(name="deny",value="192.168.1.1"),*/// IP黑名单 (存在共同时,deny优先于allow) @WebInitParam(name="loginUsername",value="admin"),// 用户名 @WebInitParam(name="loginPassword",value="123456"),// 密码 @WebInitParam(name="resetEnable",value="false")// 禁用HTML页面上的“Reset All”功能 }) public class DruidStatViewServlet extends StatViewServlet { private static final long serialVersionUID = -2688872071445249539L; } -
启动类上面添加
@ServletComponentScan注解。自动注册Servlet、Filter、Listener
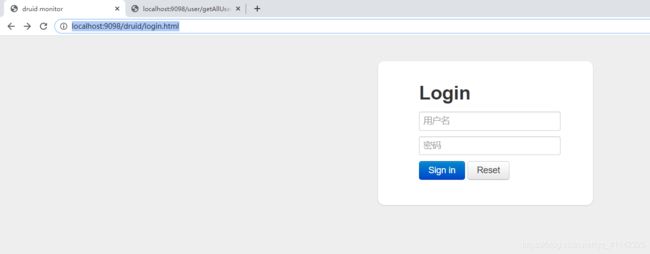
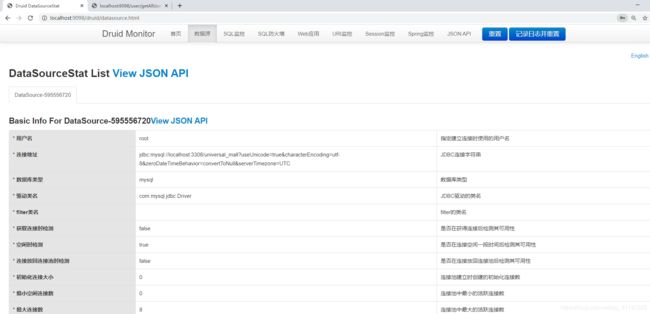
效果图
登录Druid
数据库文件
- 给出表的sql,库的话就自己根据需要创建吧。
/*
 Navicat Premium Data Transfer

 Source Server         : xoa
 Source Server Type    : MySQL
 Source Server Version : 50616
 Source Host           : localhost:3308
 Source Schema         : universal_mall

 Target Server Type    : MySQL
 Target Server Version : 50616
 File Encoding         : 65001

 Date: 19/02/2020 22:13:33
*/

SET NAMES utf8mb4;
SET FOREIGN_KEY_CHECKS = 0;

-- ----------------------------
-- Table structure for tb_user
-- ----------------------------
DROP TABLE IF EXISTS `tb_user`;
CREATE TABLE `tb_user`  (
  `id` bigint(20) NOT NULL AUTO_INCREMENT,
  `username` varchar(32) CHARACTER SET utf8 COLLATE utf8_general_ci NOT NULL COMMENT '用户名',
  `password` varchar(32) CHARACTER SET utf8 COLLATE utf8_general_ci NOT NULL COMMENT '密码,加密存储',
  `phone` varchar(11) CHARACTER SET utf8 COLLATE utf8_general_ci NULL DEFAULT NULL COMMENT '注册手机号',
  `created` datetime(0) NOT NULL COMMENT '创建时间',
  `salt` varchar(32) CHARACTER SET utf8 COLLATE utf8_general_ci NOT NULL COMMENT '密码加密的salt值',
  PRIMARY KEY (`id`) USING BTREE,
  UNIQUE INDEX `username`(`username`) USING BTREE
) ENGINE = InnoDB AUTO_INCREMENT = 31 CHARACTER SET = utf8 COLLATE = utf8_general_ci COMMENT = '用户表' ROW_FORMAT = Compact;

-- ----------------------------
-- Records of tb_user
-- ----------------------------
INSERT INTO `tb_user` VALUES (28, 'zhangsan', 'e21d44f200365b57fab2641cd31226d4', '13600527634', '2018-05-25 17:52:03', '05b0f203987e49d2b72b20b95e0e57d9');
INSERT INTO `tb_user` VALUES (30, 'leyou', '4de9a93b3f95d468874a3c1bf3b25a48', '15855410440', '2018-09-30 11:37:30', '4565613d4b0e434cb496d4eb87feb45f');

SET FOREIGN_KEY_CHECKS = 1;
结尾
只是粗浅的一篇搭建博客,具体的配置,具体的使用请阅度官方文档


