Node-Red EMQ NodeMcu MQTT试验
本文通过 EMQ服务器实现Node-Red与NodeMcu MQTT收发试验.
首先 在ubuntu上安装EMQ服务器
EMQ官网 码云安装指导
我安装deb文件
https://www.emqx.io/downloads/broker/v4.0.3/emqx-ubuntu18.04-v4.0.3_amd64.deb
UBUNTU安装EMQ
ubuntu安装好EMQ可能需要重启。重启之后在命令行输入:
emqx start为了实现开机自动启动可 在/etc/rc.local中加入 emqx start
具体可参照ubuntu 18.04设置开机启动脚本
#!/bin/bash
phddns start
#pm2 start node-red
emqx start
java -jar /home/armxu/server-0.41.12-java8.jar -dataFolder /home/pi/Blynk &
echo "看到这行字,自启动脚本运行成功."> /usr/local/test.log
exit 0
查看emqx运行状态可用:
service emqx status
查询截图:
使用浏览器打开EMQ控制台,本机安装是http://127.0.0.1:18083,我自己的是http://192.168.8.104:18083输入默认用户名:admin,默认密码public。
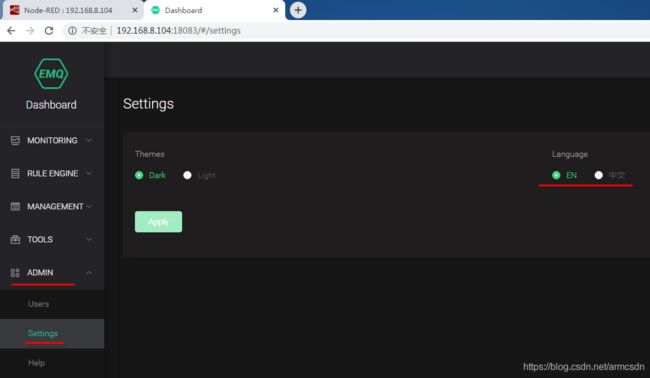
安装好后可以设置界面语言,在ADMIN->Settings里选择中文,然后点击apply按钮。
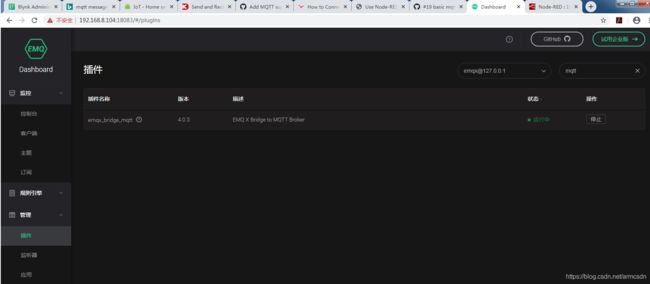
启用mqtt插件,在右边搜索栏里输入mqtt,然后搜索,会发现mqtt是停用的,点击启用即可.
到此EMQX先放一边。
二编写nodemcu arduino程序
本着拿来主义,可直接借用例程。在arduino 库管理器中输入:PunSubClient,安装此库
安装完,选择文件->示例->PunSubClient->mqtt-esp8266例程
/*
 Basic ESP8266 MQTT example

 This sketch demonstrates the capabilities of the pubsub library in combination
 with the ESP8266 board/library.

 It connects to an MQTT server then:
  - publishes "hello world" to the topic "outTopic" every two seconds
  - subscribes to the topic "inTopic", printing out any messages
    it receives. NB - it assumes the received payloads are strings not binary
  - If the first character of the topic "inTopic" is an 1, switch ON the ESP Led,
    else switch it off

 It will reconnect to the server if the connection is lost using a blocking
 reconnect function. See the 'mqtt_reconnect_nonblocking' example for how to
 achieve the same result without blocking the main loop.

 To install the ESP8266 board, (using Arduino 1.6.4+):
  - Add the following 3rd party board manager under "File -> Preferences -> Additional Boards Manager URLs":
       http://arduino.esp8266.com/stable/package_esp8266com_index.json
  - Open the "Tools -> Board -> Board Manager" and click install for the ESP8266"
  - Select your ESP8266 in "Tools -> Board"

*/

#include
#include

// Update these with values suitable for your network.

const char* ssid = "........";
const char* password = "........";
const char* mqtt_server = "broker.mqtt-dashboard.com";

WiFiClient espClient;
PubSubClient client(espClient);
long lastMsg = 0;
char msg[50];
int value = 0;

void setup_wifi() {

  delay(10);
  // We start by connecting to a WiFi network
  Serial.println();
  Serial.print("Connecting to ");
  Serial.println(ssid);

  WiFi.begin(ssid, password);

  while (WiFi.status() != WL_CONNECTED) {
    delay(500);
    Serial.print(".");
  }

  randomSeed(micros());

  Serial.println("");
  Serial.println("WiFi connected");
  Serial.println("IP address: ");
  Serial.println(WiFi.localIP());
}

void callback(char* topic, byte* payload, unsigned int length) {
  Serial.print("Message arrived [");
  Serial.print(topic);
  Serial.print("] ");
  for (int i = 0; i < length; i++) {
    Serial.print((char)payload[i]);
  }
  Serial.println();

  // Switch on the LED if an 1 was received as first character
  if ((char)payload[0] == '1') {
    digitalWrite(BUILTIN_LED, LOW);   // Turn the LED on (Note that LOW is the voltage level
    // but actually the LED is on; this is because
    // it is active low on the ESP-01)
  } else {
    digitalWrite(BUILTIN_LED, HIGH);  // Turn the LED off by making the voltage HIGH
  }

}

void reconnect() {
  // Loop until we're reconnected
  while (!client.connected()) {
    Serial.print("Attempting MQTT connection...");
    // Create a random client ID
    String clientId = "ESP8266Client-";
    clientId += String(random(0xffff), HEX);
    // Attempt to connect
    if (client.connect(clientId.c_str())) {
      Serial.println("connected");
      // Once connected, publish an announcement...
      client.publish("outTopic", "hello world");
      // ... and resubscribe
      client.subscribe("inTopic");
    } else {
      Serial.print("failed, rc=");
      Serial.print(client.state());
      Serial.println(" try again in 5 seconds");
      // Wait 5 seconds before retrying
      delay(5000);
    }
  }
}

void setup() {
  pinMode(BUILTIN_LED, OUTPUT);     // Initialize the BUILTIN_LED pin as an output
  Serial.begin(115200);
  setup_wifi();
  client.setServer(mqtt_server, 1883);
  client.setCallback(callback);
}

void loop() {

  if (!client.connected()) {
    reconnect();
  }
  client.loop();

  long now = millis();
  if (now - lastMsg > 2000) {
    lastMsg = now;
    ++value;
    snprintf (msg, 50, "hello world #%ld", value);
    Serial.print("Publish message: ");
    Serial.println(msg);
    client.publish("outTopic", msg);
  }
}
以下需要修改和注意:
修改上述程序以适合你自己的网络环境。
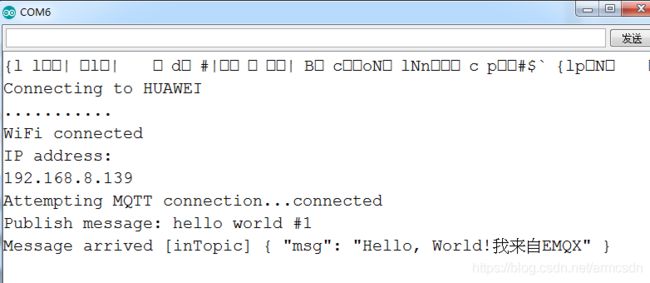
编译下载程序,然后打开串口监视器
三 EMQX与nodemcu的MQTT测试
回到EMQX
首先进行nodemcu与EMQX的连接:工具->Websocket 点击连接按钮。
然后订阅消息:
马上可以从EMQX向nodemcu发布消息了,设置好消息,加入“我来自EMQX",设置如图:
Nodemcu接收道的消息:
四 通过NodeRed 接收和发送mqtt消息
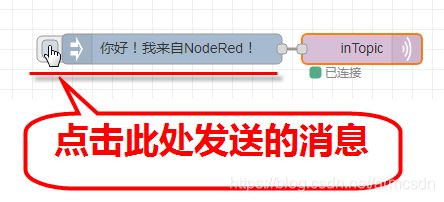
EMQX在两者中充当中间件,NodeRed 连接到EMQX,EMQX在转发消息给NodeMcu
至此试验成功!
NodeRed源码
[{
	"id": "94b84afc.0c4b18",
	"type": "tab",
	"label": "流程1",
	"disabled": false,
	"info": ""
}, {
	"id": "c4a8a5a5.39ef08",
	"type": "inject",
	"z": "94b84afc.0c4b18",
	"name": "",
	"topic": "",
	"payload": "你好!我来自NodeRed!",
	"payloadType": "str",
	"repeat": "",
	"crontab": "",
	"once": false,
	"onceDelay": 0.1,
	"x": 280,
	"y": 240,
	"wires": [
		["4e8e238c.ff767c"]
	]
}, {
	"id": "4e8e238c.ff767c",
	"type": "mqtt out",
	"z": "94b84afc.0c4b18",
	"name": "",
	"topic": "inTopic",
	"qos": "",
	"retain": "",
	"broker": "a2389b67.407ce8",
	"x": 470,
	"y": 240,
	"wires": []
}, {
	"id": "c9111b97.74e1c8",
	"type": "mqtt in",
	"z": "94b84afc.0c4b18",
	"name": "",
	"topic": "outTopic",
	"qos": "2",
	"datatype": "auto",
	"broker": "a2389b67.407ce8",
	"x": 190,
	"y": 360,
	"wires": [
		["5348462e.1d0298", "778fa974.3abb98"]
	]
}, {
	"id": "5348462e.1d0298",
	"type": "debug",
	"z": "94b84afc.0c4b18",
	"name": "",
	"active": true,
	"tosidebar": true,
	"console": false,
	"tostatus": false,
	"complete": "false",
	"x": 490,
	"y": 360,
	"wires": []
}, {
	"id": "778fa974.3abb98",
	"type": "blynk-ws-out-write",
	"z": "94b84afc.0c4b18",
	"name": "",
	"pin": "11",
	"pinmode": 0,
	"client": "32e9553c.afa58a",
	"x": 520,
	"y": 440,
	"wires": []
}, {
	"id": "a2389b67.407ce8",
	"type": "mqtt-broker",
	"z": "",
	"name": "",
	"broker": "192.168.8.104",
	"port": "1883",
	"clientid": "",
	"usetls": false,
	"compatmode": false,
	"keepalive": "60",
	"cleansession": true,
	"birthTopic": "",
	"birthQos": "0",
	"birthPayload": "",
	"closeTopic": "",
	"closeQos": "0",
	"closePayload": "",
	"willTopic": "",
	"willQos": "0",
	"willPayload": ""
}, {
	"id": "32e9553c.afa58a",
	"type": "blynk-ws-client",
	"z": "",
	"name": "",
	"path": "ws://192.168.8.104:8080/websockets",
	"key": "YoWhuF9wHsPdCqo4__sP5QsA0bst2Yzf",
	"dbg_all": false,
	"dbg_read": false,
	"dbg_write": false,
	"dbg_notify": false,
	"dbg_mail": false,
	"dbg_prop": false,
	"dbg_sync": false,
	"dbg_bridge": false,
	"dbg_low": false,
	"dbg_pins": "",
	"multi_cmd": false,
	"proxy_type": "no",
	"proxy_url": "",
	"enabled": true
}]


