声音处理程序---特征头制作(一)
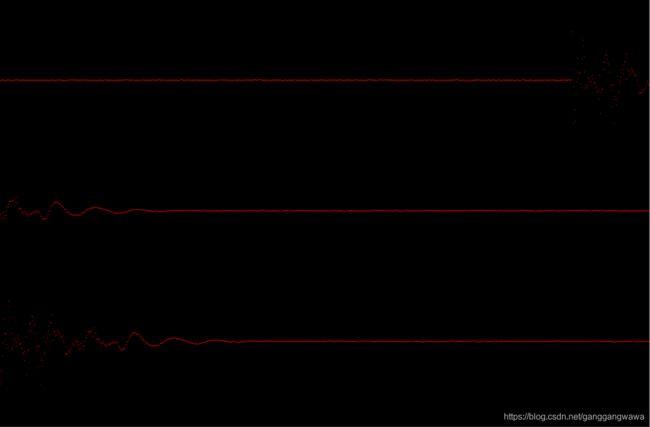
先看一个效果图:
你可以看到三行波形,实质是前两行是960*2=1920字节(我们也只有这么多)波形实时显示,第三行本为空,当声音的幅度超过一定幅度(也叫门槛,小时候,家里的门槛好高啊,经常是翻过去,翻过来玩),实时波形会停止冻住,第三行会记录超过幅度出之后960字节波形。你对比一下,可以发现,第三行是和一二行一样的,只不过未触发之前的,没有记录。这样设计是非常便于观察波形的(看似简单,花了很久才走到这一步)。这是第一个比较满意的设计。
第二个比较满意的设计是,使用了一个list(序列单),可视的,里边保存了三个960字节的像第三行一样的波形,一般情况,这三个960字节的波形会出现一个重复发音(1920字节)里蕴含的特征波形,这个设计使用两个按钮完成,一个是‘恢复取音’,一个是‘删除不满意’,然后我们想办法把他取出来,得以保存,来体现这一个发音,比如wu(钨)音。
我们先来看一看前面两个设计的代码:
第一,我们界面声波是三段设计,并没有使用两段式和四段式,先改过来(无论C++传递过来,还是c#,都是写入byte数组bt ): CopyDataStruct cds = new CopyDataStruct();
Type mytype = cds.GetType();
cds = (CopyDataStruct)msg.GetLParam(mytype);
int _RoiW = cds.cbData / 2;////960
int _RoiH = 640;
if (!m_bRec)//m_bRec初始化为fasle,这个东东可以让实时波形自动停止下来
{
bt = new byte[cds.cbData];
Marshal.Copy(cds.lpData, bt, 0, bt.Length);
}
//显示
byte[] cutvalues = new byte[_RoiW * _RoiH * 3];
int bytes = _RoiW * _RoiH * 3;
Bitmap cutPic24 = new Bitmap(_RoiW, _RoiH, System.Drawing.Imaging.PixelFormat.Format24bppRgb);
BitmapData _cutPic = cutPic24.LockBits(new Rectangle(0, 0, _RoiW, _RoiH), ImageLockMode.ReadWrite,
cutPic24.PixelFormat);
IntPtr ptr = _cutPic.Scan0;//得到首地址
int n = 0;
for (int i = 0; i < _RoiH; i++)//图像复原,即由8位图变成24位图像
{
for (int j = 0; j < _RoiW; j++)
{
int m = 3 * (i * _RoiW + j);
if (i <= 255)
{
n = 0 * _RoiW + j;
}
else
{
n = 1 * _RoiW + j;
}
cutvalues[m] = 0;
cutvalues[m + 1] = 0;
cutvalues[m + 2] = 0;
}
}
for (int j = 0; j < _RoiW; j++)
{
int m = 3 * ((bt[j]) * _RoiW + j);
cutvalues[m] = 0;
cutvalues[m + 1] = 0;
cutvalues[m + 2] = 255;
}//第一段
for (int j = 0; j < _RoiW; j++)
{
int m = 3 * ((bt[j + 960] +192) * _RoiW + j);
cutvalues[m] = 0;
cutvalues[m + 1] = 0;
cutvalues[m + 2] = 255;
}//第二段
//寻找跳动起点,终点在1920中;截取特征图像;在下960显示静态图像//暂时针对单音‘姑’//201712130933
for (int i = 0; i < 1920; i++)
{
if (bt[i] < 98 && i <= 960)//发音小于98,就会触发波形冻住
{
m_RecI = i;
tempstatic = new byte[960]; //这个会在第三行显示出来,并且会存入list lstaImg中。
int d = 0;
for (int c = i; c < i + 960; c++)
{
tempstatic[c - i] = bt[i + d];
d++;
}
if (m_bRec == false)
{
lstaImg.Add(tempstatic);//其实这是一个很能装的东东,界面显示限制,所以存三组,特征就会观察显现
}
m_bRec = true;
i = 1920;
}
}
if(tempstatic!=null)
for (int j = 0; j < _RoiW; j++)
{
int m = 3 * ((tempstatic[j] + 256+128) * _RoiW + j);
cutvalues[m] = 0;
cutvalues[m + 1] = 0;
cutvalues[m + 2] = 255;
}//第三段
System.Runtime.InteropServices.Marshal.Copy(cutvalues, 0, ptr, _RoiH * _RoiW * 3);
cutPic24.UnlockBits(_cutPic);
pictureBox1.Image = cutPic24;//picturebox1用来显示实时和冻住两种状态
//////////////////////////////////////////第二,
恢复取音按钮代码如下: m_bRec = false;//恢复实时取像,简单吧。
删除不满意按钮代码如下: if(lstaImg.Count!=0)
lstaImg.RemoveAt(lstaImg.Count-1);//也简单吧。
关于lstaimg序列单中的波形显示在pictureboxstaticimg控件中,代码如下:
private void pictureBoxStaticImg_Paint(object sender, PaintEventArgs e)
{
int _RoiW = 1920 / 2;
int _RoiH = 640;
//显示
byte[] cutvalues = new byte[_RoiW * _RoiH * 3];
int bytes = _RoiW * _RoiH * 3;
Bitmap cutPic24 = new Bitmap(_RoiW, _RoiH, System.Drawing.Imaging.PixelFormat.Format24bppRgb);
BitmapData _cutPic = cutPic24.LockBits(new Rectangle(0, 0, _RoiW, _RoiH), ImageLockMode.ReadWrite,
cutPic24.PixelFormat);
IntPtr ptr = _cutPic.Scan0;//得到首地址
int n = 0;
for (int i = 0; i < _RoiH; i++)//图像复原,即由8位图变成24位图像
{
for (int j = 0; j < _RoiW; j++)
{
int m = 3 * (i * _RoiW + j);
if (i <= 255)
{
n = 0 * _RoiW + j;
}
else
{
n = 1 * _RoiW + j;
}
cutvalues[m] = 0;
cutvalues[m + 1] = 0;
cutvalues[m + 2] = 0;
}
}
if (lstaImg.Count != 0 && lstaImg.Count <= 3)//显示波形限制了三段,每段960
{
for (int k = 0; k < lstaImg.Count; k++)
for (int nl = 0; nl < _RoiW; nl++)//0,192,384
{
int m = 3 * ((lstaImg[k][nl] + k * 192) * _RoiW + nl);
cutvalues[m] = 0;
cutvalues[m + 1] = 0;
cutvalues[m + 2] = 255;
}
}
else { lstaImg = new List
System.Runtime.InteropServices.Marshal.Copy(cutvalues, 0, ptr, _RoiH * _RoiW * 3);
cutPic24.UnlockBits(_cutPic);
pictureBoxStaticImg.Image = cutPic24;
/////////////////////////////////////////////////////////////////////////////////////////////////////////////////////////
int index = Convert.ToInt32(tb尺度inwave.Text);
int threVal = Convert.ToInt32(tb尺度He.Text);
if (index != -1 && threVal<600)
{
Bitmap tempbmp = (Bitmap)pictureBoxStaticImg.Image;
tempbmp.SetPixel(index, lstaImg[lstaImg.Count - 1][index] + (lstaImg.Count - 1) * 192, Color.Yellow);
tempbmp.SetPixel(index, lstaImg[lstaImg.Count - 1][index] + (lstaImg.Count - 1) * 192 + 1, Color.Yellow);
tempbmp.SetPixel(index, lstaImg[lstaImg.Count - 1][index] + (lstaImg.Count - 1) * 192 - 1, Color.Yellow);
tempbmp.SetPixel(index + 1, lstaImg[lstaImg.Count - 1][index] + (lstaImg.Count - 1) * 192, Color.Yellow);
tempbmp.SetPixel(index, lstaImg[lstaImg.Count - 1][index] + (lstaImg.Count - 1) * 192, Color.Yellow);
if (index == 0)
{
tempbmp.SetPixel(1 - 1, lstaImg[lstaImg.Count - 1][index] + (lstaImg.Count - 1) * 192, Color.Yellow);
}
else { tempbmp.SetPixel(index - 1, lstaImg[lstaImg.Count - 1][index] + (lstaImg.Count - 1) * 192, Color.Yellow); }
}
}
好,准备工作已经完成,可以制作一个发音的特征头了,上面多出来一段没有解释的代码,我们回头再解释,今天到此。
待续(慢慢来!...........)每天一点小改变☺
