VUE + thinkphp5 阿里云视频点播
我这个只是借助了阿里云视频点播服务的转码服务 将各种格式视频传到阿里云 然后获取url播放 其他服务并没有做
首先
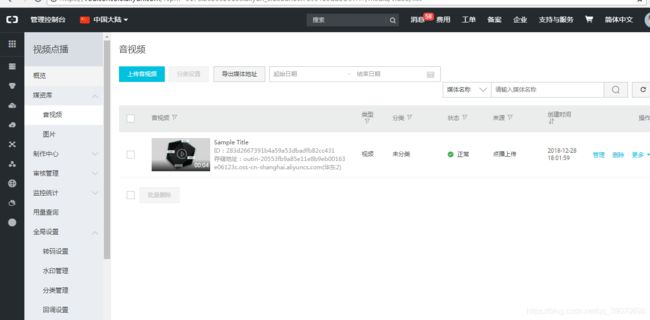
需要在阿里云后台开通视频点播服务 开通之后如图
就可以看到自己之后上传的视频列表 这里还需要做一个回调配置 在全局配置->回调设置 配置一个视频上传成功之后的回调地址 这个后面可以用到
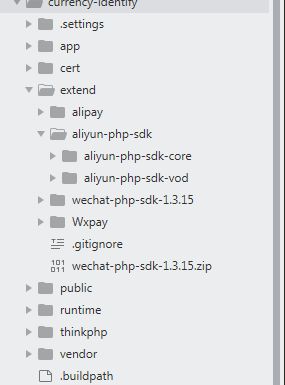
其次 php端引入SDK(根据官方文档 引入其中两个) tp5的存放位置如图 放在extentd 目录下(由于上到服务器 会报一个小错 在不影响我的服务的情况下稍微做了更改)
整个php控制器代码如下
全局设置->转码设置  转码组id


    function initVodClient() {
        include EXTEND_PATH."aliyun-php-sdk/aliyun-php-sdk-core/Profile/DefaultProfile.php";
        include EXTEND_PATH."aliyun-php-sdk/aliyun-php-sdk-core/DefaultAcsClient.php";

        $profile = \DefaultProfile::getProfile($this->regionId,$this->accessKeyId,$this->accessKeySecret);
        return new \DefaultAcsClient($profile);
    }

    //获取上传地址(uploadAddress) 上传凭证(uploadAuth)  视频(videoId)
    function createUploadVideo() {

           try {
                include EXTEND_PATH."aliyun-php-sdk/aliyun-php-sdk-vod/vod/Request/V20170321/CreateUploadVideoRequest.php";

                $client = $this->initVodClient();


                $request = new CreateUploadVideoRequest();
                $request->setTitle("Sample Title");
                $request->setFileName("videoFile.mov");
                $request->setDescription("Video Description");
                $request->setCoverURL("http://img.alicdn.com/tps/TB1qnJ1PVXXXXXCXXXXXXXXXXXX-700-700.png");
                $request->setTags("tag1,tag2");
                $request->setTemplateGroupId($this->TemplateGroupId);
                $request->setAcceptFormat('JSON');

                $aa = $client->getAcsResponse($request);
                $auth['UploadAddress'] = $aa->UploadAddress;
                $auth['RequestId'] = $aa->RequestId;
                $auth['VideoId'] = $aa->VideoId;
                $auth['UploadAuth'] = $aa->UploadAuth;
                $this->ajaxReturn(array('status'=>'0','data'=>$auth));

            } catch (Exception $e) {
                print $e->getMessage()."\n";
            }

    }

    //刷新视频上传凭证
    function refreshUploadVideo() {
        try {
            $client = $this->initVodClient();
            $request = new RefreshUploadVideoRequest();
            $request->setVideoId('47324be263014946b4846704444cc0fc');
            $request->setAcceptFormat('JSON');
            dump($client->getAcsResponse($request));

        } catch (Exception $e) {
            print $e->getMessage()."\n";
        }

    }


    //获取播放地址
    function getPlayInfo($videoId) {
        try {
            $client = $this->initVodClient();
            $request = new GetPlayInfoRequest();

            $request->setVideoId($videoId);
            $request->setAuthTimeout(3600*24);
            $request->setAcceptFormat('JSON');
            $playInfo = $client->getAcsResponse($request);


            //dump($playInfo->PlayInfoList->PlayInfo);
            return $playInfo;
        } catch (Exception $e) {
            print $e->getMessage()."\n";
        }

    }

    //获取播放凭证
    function getPlayAuth() {
        try{
            $client = $this->initVodClient();
            $request = new GetVideoPlayAuthRequest();
            $request->setVideoId('47324be263014946b4846704444cc0fc');
            $request->setAuthInfoTimeout(3600);
            $request->setAcceptFormat('JSON');
            $playInfo = $client->getAcsResponse($request);


            // print($playInfo->PlayAuth."\n");
            // print_r($playInfo->VideoMeta);
            return $playInfo->VideoMeta;
        } catch (Exception $e) {
            print $e->getMessage()."\n";
        }


    }


    //上传图片视频成功回调
    function notify(){

        $str = file_get_contents('php://input');


        if($notify->VideoId){

            $info = $this->getPlayInfo($notify->VideoId);

            $playurl = $info->PlayInfoList->PlayInfo[1]->PlayURL;

            $datainfo = [
                'video_id'=>$notify->VideoId,
                'url' => $playurl,

                'create_time' => date('Y-m-d H:i:s',time())
            ];
            Db::name('aliyun_video')->insert($datainfo);

        }

    }


    //上传成功之后前端轮训获取视频url
    public function getVideoUrl(){
        $param = Request::instance()->param();
        if($param['videoid']){
            $where['video_id'] = $param['videoid'];

            $url = Db::name('aliyun_video')->where($where)->value('url');
            if(!empty($url)){
                $this->ajaxReturn(array('status'=>'0','data'=>$url));
            }else{
                $this->ajaxReturn(array('status'=>'1','data'=>'未查到相关数据'));
            }
        }else{
            $this->ajaxReturn(array('status'=>'1','data'=>'未查到相关数据'));
        }

    }


}
里面可能会出现引入类报错这个自行解决
下面贴出前端vue中的代码(选择文件处代码)
开始上传
主要调取阿里云js上传视频的代码
 getAuths(callback){
      		var param = {}
	      	getAuth(param).then((res) => {
	      			if(res.data.status==0){
	      				this.auth = res.data.data;
	      			}
	      			// console.log('into auth')
			       //  console.log(this.auth)
			        callback();


	        });

      },
      getVideoUrls(){
      		this.num=this.num+1;
      		var that = this;
      		var param = {
      			videoid:this.auth.VideoId
      		}

      		if(this.num>20){
      			that.loading.close();
                clearInterval(this.timer); //关闭
            }else{
                getVideoUrl(param).then((res) => {
		      	     if(res.data.status==0){
		      	     	that.videolist = [{url:res.data.data,introduce:'',type:1}]
		      	     	that.loading.close();
		      	     	clearInterval(this.timer); //关闭
		      	     }


		        });
            }

      },
      onFileChange() {
      		var that = this;

	        const fileChooser = this.$refs['file-chooser']
	        if (fileChooser.files) {
	          const fileList = fileChooser.files
	          for (let i = 0; i < fileList.length; i++) {
	            const file = fileList[i]
	            const fileName = file.name
	            this.VideoForm.fileName = fileName
	            this.VideoForm.title = fileName.substring(0, fileName.lastIndexOf('.'))
	            this.VideoForm.cate = 0
	            this.VideoForm.tags = ''

	            that.getAuths(() => {

	              if (this.isVodMode()) {
	                var userData = '{"Vod":{"UserData":{"IsShowWaterMark":"false","Priority":"7"}}}'

	                this.getUpload()
	               console.log(file)
	               console.log(userData)

	                // 点播上传。每次上传都是独立的OSS object,所以添加文件时,不需要设置OSS的属性
	                this.myUploader.addFile(file, null, null, null, userData)
	              }
	            })

	          }
	        }
	   },
	    isVodMode() {

		    return (this.auth.UploadAuth && this.auth.UploadAuth.length > 0)
		},
		getUpload() {
		    const _this = this

		    if (_this.myUploader === null) {
			      console.log('this.myUploader', _this.myUploader)
			      /* eslint no-undef: "off" */
			      _this.myUploader = new AliyunUpload.Vod({
			        // 分片大小默认1M
			        partSize: 1048576,
			        // 并行上传分片个数,默认5
			        parallel: 5,
			        // 网络原因失败时,重新上传次数,默认为3
			        retryCount: 3,
			        // 网络原因失败时,重新上传间隔时间,默认为2秒
			        retryDuration: 2,
			        // 文件上传失败
			        'onUploadFailed': (uploadInfo, code, message) => {
			          console.log('onUploadFailed: file:' + uploadInfo.file.name + ',code:' + code + ', message:' + message)
			        },
			        // 文件上传完成
			        'onUploadSucceed': (uploadInfo) => {
			          console.log(uploadInfo)
			          _this.isShowProgressDialog = false


			          // --------------上传成功后,把数据给后台
			          	_this.num=0;

					    _this.loading = this.$loading({
					          lock: true,
					          text: '正在解码请耐心等候',
					          spinner: 'el-icon-loading',
					          background: 'rgba(0, 0, 0, 0.7)'
					     });


			            _this.timer = setInterval(() => {
		                    _this.getVideoUrls();
		                },10000)

			        },
			        // 文件上传进度
			        'onUploadProgress': (uploadInfo, totalSize, loadedPercent) => {
			          console.log('onUploadProgress:file:' + uploadInfo.file.name + ', fileSize:' + totalSize + ', percent:' + Math.ceil(loadedPercent * 100) + '%')
			          _this.uploadProgress = Math.ceil(loadedPercent * 100)
			          _this.isShowProgressDialog = true //--------在此调用进度显示,不需要的进度条的可去掉
			        },
			        // STS临时账号会过期,过期时触发函数
			        'onUploadTokenExpired': () => {
			          _this.log('onUploadTokenExpired')
			          if (_this.isVodMode()) {
			            // 实现时,从新获取UploadAuth
			            _this.myUploader.resumeUploadWithAuth(this.uploadAuth)
			          }
			        },
			        // 开始上传
			        'onUploadstarted': (uploadInfo) => {
			          if (_this.isVodMode()) {
			            _this.myUploader.setUploadAuthAndAddress(uploadInfo,
			              _this.auth.UploadAuth, _this.auth.UploadAddress)
			          }
			          console.log('onUploadStarted:' + uploadInfo.file.name + ', endpoint:' + uploadInfo.endpoint + ', bucket:" + uploadInfo.bucket + ", object:' + uploadInfo.object + uploadInfo.userDate)
			        }
			      })
			    }
			    if (_this.isVodMode()) {
			      _this.myUploader.init() // 点播上传。每次上传都是独立的鉴权,所以初始化时,不需要设置鉴权
			    }
	  },
	  start() {

	    this.myUploader.startUpload()

	  },
在main.js中引入的文件
在index.html引入的文件
所有的js文件地址 https://download.csdn.net/download/qq_39070698/10884099
所有的phpSDK文件地址 https://download.csdn.net/download/qq_39070698/10884096
注: 因上传到服务器会报各种错误 好几个都是因为你js版本的问题 上图配套的js我自己用的没报错 大家可酌情引入
可能会报 oss is not definde


