使用Postman进行OAuth2.0的授权码验证(springboot框架)(附加代码,2020.06.10)
1.首先导入相关依赖(数据库就不写了)
		<!--security权限设置框架-->
        <dependency>
            <groupId>org.springframework.boot</groupId>
            <artifactId>spring-boot-starter-security</artifactId>
        </dependency>

        <!--oauth2.0-->
        <dependency>
            <groupId>org.springframework.security.oauth</groupId>
            <artifactId>spring-security-oauth2</artifactId>
            <version>2.3.3.RELEASE</version>
        </dependency>
2.(Security的配置)导入完成后,我们需要定义一个类继承 WebSecurityConfigurerAdapter 来重写相关的配置方法。
我定义一个WebSecurityConfig来继承,如下:
我这里是从数据库获取登录用户,也可以写在内存当中,我前面有些博客讲述在内存或数据库定义登录用户的代码,可以去看一下。
@Configuration
@EnableWebSecurity // 启用Spring Security.
public class WebSecurityConfig extends WebSecurityConfigurerAdapter {

    @Autowired
    private CustomUserDetailsService customUserDetailsService;

    @Bean //注入PasswordEncoder
    public PasswordEncoder passwordEncoder(){
        return new BCryptPasswordEncoder();
    }
    @Override
    protected void configure(AuthenticationManagerBuilder auth) throws Exception {
        //从数据库读取的用户进行身份认证
        auth.userDetailsService(customUserDetailsService)
            .passwordEncoder(passwordEncoder());
    }
    //重写configure(HttpSecurity http)方法,配置允许注册用户的请求访问:
    @Override
    protected void configure(HttpSecurity http) throws Exception {
        http.authorizeRequests().anyRequest().authenticated();
        http.formLogin();
    }
}
在这里,configure(HttpSecurity http)是说对所有的请求均设置拦截,默认登录界面 /login.
3.(OAuth2.0的配置)有两步,第一个是继承ResourceServerConfigurerAdapter重写configure(HttpSecurity http)方法,来对请求进行验证;第二个是继承AuthorizationServerConfigurerAdapter重写configure(ClientDetailsServiceConfigurer clients)方法,来定义我们的客户端id、secret、授权码、token、权限、重定向等等。
第一步:我们拦截请求,对 “/admin/** ” 以下的请求进行权限验证。
@Configuration
@EnableResourceServer
public class OAuth2ResourceServer extends ResourceServerConfigurerAdapter {

    @Override
    public void configure(HttpSecurity http) throws Exception {
        http.authorizeRequests()
                .anyRequest()
                .authenticated()
                .and()
                .requestMatchers()
                // /api/**请求需要OAuth鉴权
                .antMatchers("/admin/**");
    }
}
第二步:指定对应的client_id,client_secret,还有权限scope,重定向地址,和授权码、刷新token。
下面的security.passwoedEncoder()是因为框架升级到2.0版本后,会自动进行加密,我们在这里不让他加密,不然你输入client_secret时会报错,原因是密码不一致。
@Configuration
@EnableAuthorizationServer
public class OAuth2AuthorizationServer extends AuthorizationServerConfigurerAdapter {

    @Override
    public void configure(ClientDetailsServiceConfigurer clients) throws Exception {
        clients.inMemory()
                // 客户端id
                .withClient("client")
                // 客户端密钥
                .secret("123456")
                // 权限
                .scopes("admin","user")
                // 获取授权码后重定向地址
                .redirectUris("http://baidu.com")//localhost:9001/admin/aa
                // 授权码和刷新token
                .authorizedGrantTypes("authorization_code","refresh_token");
    }

    @Override
    public void configure(AuthorizationServerSecurityConfigurer security) throws Exception {
        security.tokenKeyAccess("permitAll()");
        security.checkTokenAccess("isAuthenticated()");
        security.allowFormAuthenticationForClients();
        //解决Encoded password does not look like BCrypt报错
        //因为springsecurity在最新版本升级后,默认把之前的明文密码方式给去掉了
        //https://spring.io/blog/2017/11/01/spring-security-5-0-0-rc1-released#password-storage-updated
        security.passwordEncoder(NoOpPasswordEncoder.getInstance());
    }
}
4.接下来我们需要从数据库获取用户信息,也就是登录的账号密码,可以写一个接口,自己进行插入,入库的时候记得用BCryptPasswordEncoder().encode()进行密码加密。
我们登录的时候填入用户名和密码,会调用下面的方法,传入我们输入的用户名username,进入数据库进行查询,得到对应的用户名和密码,进行比较。这里我加了一个role,这个是权限设置,需要默认加上"ROLE_"才能生效,使用的范围是,我们可以在API上,加上@PreAuthorize(“hasAnyRole(‘admin’)”),就表示,这一个接口,只允许role为admin的用户访问,否则返回403没有权限,这个相应的代码,我写在前面的章节,有兴趣那啥。。。
@Component
public class CustomUserDetailsService implements UserDetailsService {

    @Autowired
    private UserInfoService userInfoService;

    /**
     * 需新建配置类注册一个指定的加密方式Bean,或在下一步Security配置类中注册指定
     */
    @Autowired
    private PasswordEncoder passwordEncoder;

    @Override
    public UserDetails loadUserByUsername(String username) throws UsernameNotFoundException {
        //通过用户名从数据库获取用户信息
        UserInfo userInfo = userInfoService.getUserInfo(username);
        if (userInfo == null){
            throw new UsernameNotFoundException("用户不存在");
        }

        //得到用户角色
        String role = userInfo.getRole();

        //角色集合
        List<GrantedAuthority> authorities = new ArrayList<>();
        //角色必须以'ROLE_'开头,数据库中没有,则在这里加
        authorities.add(new SimpleGrantedAuthority("ROLE_"+role));

        return new User(
                userInfo.getUsername(),
                userInfo.getPassword(),
                authorities
        );
    }
}
这段代码中,有一个数据库查询操作,是输入username查询对应的用户信息,这个的service层、实现层和mapper层我就不写了,很简单的。
5.接下来我们看接口实现
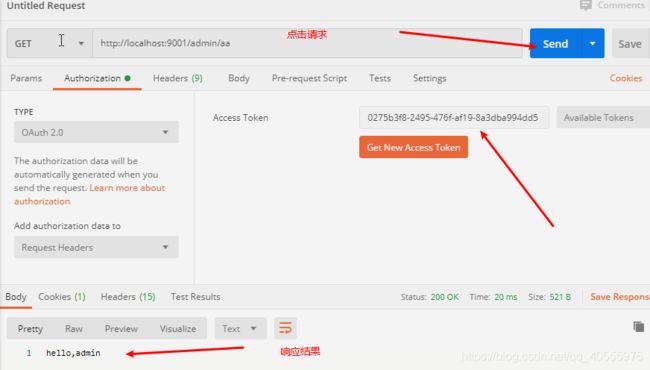
上面写道,所有/admin/** 下的都会被OAuth2.0拦截,所以我们调用这个 “ /admin/aa ” 接口。
@RestController
@RequestMapping("/")
public class HelloController {

    @Autowired
    UserInfoService userInfoService;

    @GetMapping("/admin/aa")
    //可以指定多个身份,普通用户不能进入管理员界面。
//    @PreAuthorize("hasAnyRole('admin')")
    public String helloAdmin(){
        return "hello,admin";
    }
}
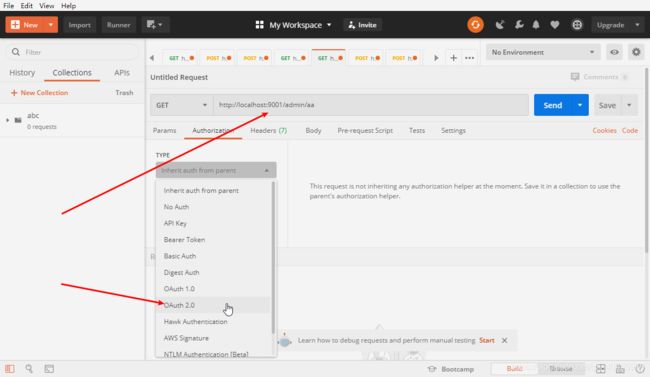
6.启动项目,我的数据库已经有用户admin,密码为123456(已加密)。
打开postman,请求为GET,我已经写好的对应的api,点击OAuth2.0认证模式。
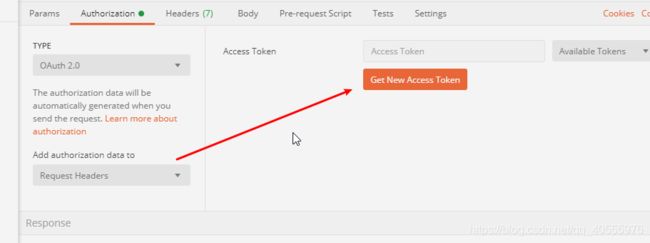
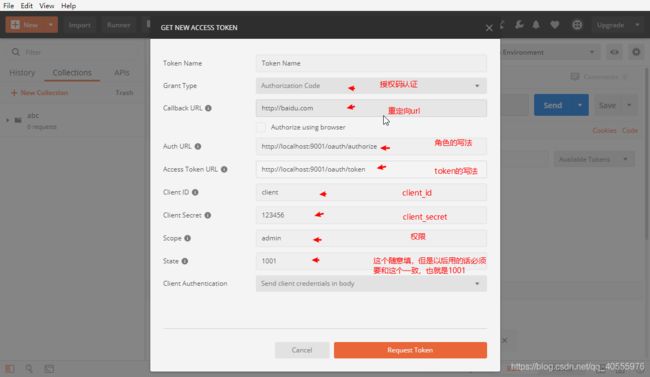
填好之后点击获取,然后弹出登录页面,输入数据库对应账号密码。
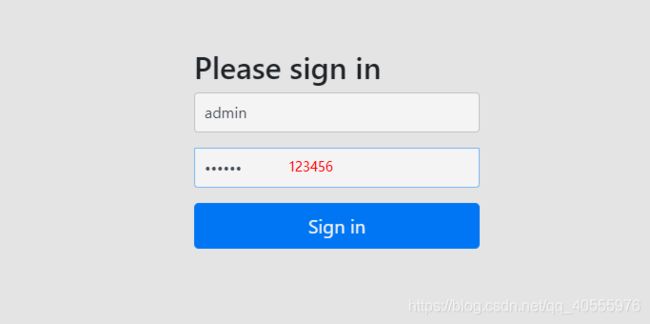
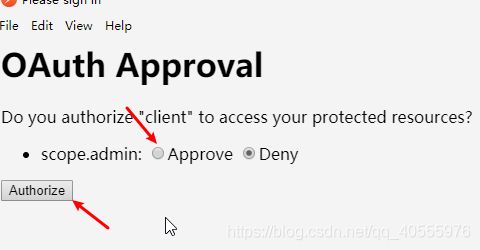
然后点击确认授权
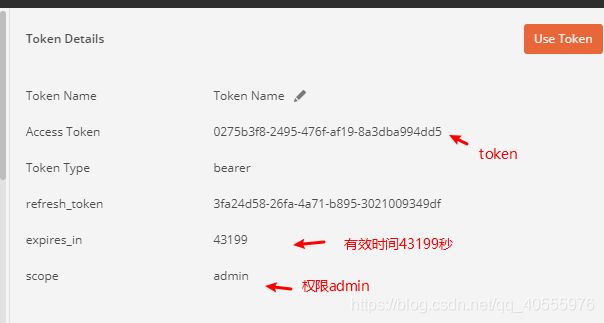
成功之后,展示token,点击use Token
点击请求,会发现响应结果符合预期。
以上就是postman进行OAuth2.0的权限验证了。