SpringCloud微服务学习(二)——Eureka、Ribbon
文章目录
- 二、Eureka注册中心
- 1.认识Eureka
- 2.搭建Eureka的环境
- 3.调试
- (1)修改Eureka-Server
- (2)修改User-Server
- (3)修改Consumer-Server
- 4.Eureka HA
- (1)基础架构
- (2)Eureka Server HA
- <1>HA环境搭建
- <2>调试
- 5.Eureka Server的Register
- (1)Register
- (2)续约
- (3)拉取列表
- (4)失效剔除和自我保护
- 三、Ribbon负载均衡
- 1.概念
- 2.搭建环境
- 3.开启负载均衡
二、Eureka注册中心
1.认识Eureka
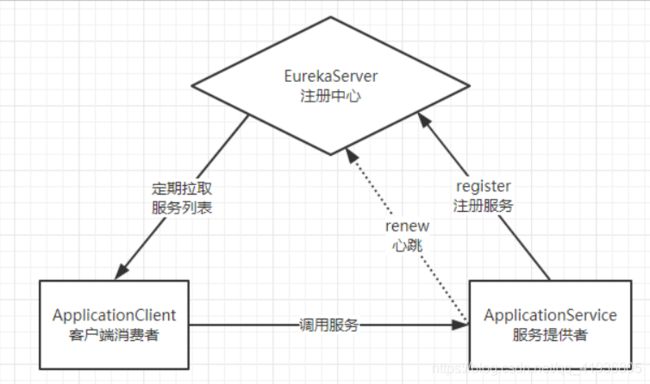
- Eureka:就是服务注册中心(可以是一个集群),对外暴露自己的地址
- 提供者:启动后向Eureka注册自己信息(地址,提供什么服务)
- 消费者:向Eureka订阅服务,Eureka会将对应服务的所有提供者地址列表发送给消费者,并且定期更新
- 心跳(续约):提供者定期通过http方式向Eureka刷新自己的状态
2.搭建Eureka的环境
在之前的cloud工程下,再次启动一个Eureka Module,成为我们的注册中心。
还是创建一个Maven工程,然后导入以下依赖
<dependencies>
        <dependency>
            <groupId>org.springframework.cloudgroupId>
            <artifactId>spring-cloud-starter-netflix-eureka-serverartifactId>
        dependency>
    dependencies>
然后配置我们的Eureka
server:
  port: 10086
eureka:
  client:
    service-url:
      defaultZone: http://127.0.0.1:10086/eureka
写一个启动类启动就好
package itcast;

import org.springframework.boot.SpringApplication;
import org.springframework.boot.autoconfigure.SpringBootApplication;
import org.springframework.cloud.netflix.eureka.server.EnableEurekaServer;

@EnableEurekaServer
@SpringBootApplication
public class EurekaServer {
    public static void main(String[] args) {
        SpringApplication.run(EurekaServer.class, args);
    }
}
3.调试
(1)修改Eureka-Server
运行,来到我们的10086端口

这里我们发现注册Eureka的地址名称是unknown,是因为我们没有设置访问Eureka的Application Name,也就是服务名称,所以我们这里来到配置文件中手动进行修改:
server:
  port: 10086
spring:
  application:
    name: eureka-server-01
eureka:
  client:
    service-url:
      defaultZone: http://127.0.0.1:10086/eureka
(2)修改User-Server
由于我们的User-Server目的就是要往Eureka上去注册信息,所以我们也要对User-Server进行一些配置,能够成功进行注册
<dependency>
            <groupId>org.springframework.cloudgroupId>
            <artifactId>spring-cloud-starter-netflix-eureka-clientartifactId>
        dependency>
然后和以往一样,配置了Eureka就要开启这项集群服务,所以来到启动类,进行启动Eureka
,加上一个注解@EnableDiscoveryClient即可,然后和以上相同,如果我们这个时候重新运行了User-Server是无法被检测到注册了的,所以还需要稍微修改一下配置
server:
  port: 9091
spring:
  datasource:
    username: xxx
    password: xxx
    url: jdbc:oracle:thin:@127.0.0.1:1521:xe
    driver-class-name: oracle.jdbc.OracleDriver
  application:
    name: User-Service-01
mybatis:
  type-aliases-package: itcast.user.POJO
eureka:
  client:
    service-url:
      defaultZone: http://127.0.0.1:10086/eureka
重新运行,就会成功了
(3)修改Consumer-Server
其实步骤和上面两部都是差不多的也是添加依赖
<dependency>
            <groupId>org.springframework.cloudgroupId>
            <artifactId>spring-cloud-starter-netflix-eureka-clientartifactId>
        dependency>
重新进行配置
eureka:
  client:
    service-url:
      defaultZone: http://127.0.0.1:10086/eureka
spring:
  application:
    name: Consumer-Service-01
然后最重要的一部来了,我们使用Eureka的目的就是动态获取到地址,所以要对url的获取方式进行修改
package itcast.consumer.control;

import itcast.consumer.POJO.User;
import org.springframework.beans.factory.annotation.Autowired;
import org.springframework.cloud.client.ServiceInstance;
import org.springframework.cloud.client.discovery.DiscoveryClient;
import org.springframework.web.bind.annotation.GetMapping;
import org.springframework.web.bind.annotation.PathVariable;
import org.springframework.web.bind.annotation.RequestMapping;
import org.springframework.web.bind.annotation.RestController;
import org.springframework.web.client.RestTemplate;

import java.util.List;

@RestController
@RequestMapping("consumer")
public class ConsumerController {
    @Autowired
    private RestTemplate restTemplate;

    @Autowired
    private DiscoveryClient discoveryClient;


    @GetMapping("{id}")
    public User queryById(@PathVariable("id") Long id) {

        //根据服务id来获取实例
        List<ServiceInstance> list = discoveryClient.getInstances("user-Service");
        //从实例中取出ip地址和port
        ServiceInstance serviceInstance = list.get(0);
        String url = "http://" + serviceInstance.getHost() + ":" + serviceInstance.getPort() + "/user/" + id;

        User user = restTemplate.getForObject(url, User.class);
        return user;
    }
}
4.Eureka HA
(1)基础架构
Eureka架构中的三个核心角色:
-
服务注册中心
Eureka的服务端应用,提供服务注册和发现功能,就是刚刚我们建立的eureka-server
-
服务提供者
提供服务的应用,可以是SpringBoot应用,也可以是其它任意技术实现,只要对外提供的是Rest风格服务即可。本例中就是我们实现的user-service
-
服务消费者
消费应用从注册中心获取服务列表,从而得知每个服务方的信息,知道去哪里调用服务方。本例中就是我们实现的consumer-server
(2)Eureka Server HA
Eureka Server即服务的注册中心,在刚才的案例中,我们只有一个EurekaServer,事实上EurekaServer也可以是一个集群,形成高可用的Eureka中心。
服务同步:
多个Eureka Server之间也会互相注册为服务,当服务提供者注册到Eureka Server集群中的某个节点时,该节点会把服务的信息同步给集群中的每个节点,从而实现数据同步。因此,无论客户端访问到Eureka Server集群中的任意一个节点,都可以获取到完整的服务列表信息。

<1>HA环境搭建
server:
  port: 10086
spring:
  application:
    name: eureka-server-01
eureka:
  client:
    service-url:
      defaultZone: http://127.0.0.1:10087/eureka
  instance:
    prefer-ip-address: true
    ip-address: 127.0.0.1
将defaultZone的地址改变成为其他的地址,做到相互连通。
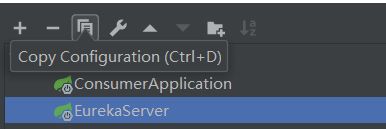
然后将EurekaServer进行复制,让复制出来的也指向Eureka这项服务

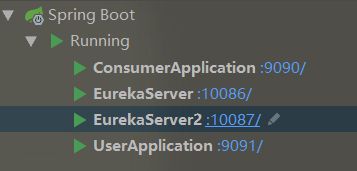
然后先启动其他的服务,然后留下这个新创建的EurekaServer2,然后改变他的端口号和地址
server:
  port: 10087
spring:
  application:
    name: eureka-server-01
eureka:
  client:
    service-url:
      defaultZone: http://127.0.0.1:10086/eureka
  instance:
    prefer-ip-address: true
    ip-address: 127.0.0.1
重新启动


然后呢,由于我们对于Eureka进行了高可用的注册,所以也必须要对UserServer和ConsumerServer进行两个Eureka的注册,而不只是10086端口的了,只需要在yml文件中给defaultZone加一个域名即可
![]()
加了此注册信息主要还是为了防止其中一个集群挂了,还能去另一个节点继续工作。
<2>调试
5.Eureka Server的Register
(1)Register
平时启动Eureka的时候还会首先会报错,然后才能正常启动,现在我们的Eureka一启动首先就会注册自己,但是并不是所有情况下一开始就会注册自己,然后先报错的,这取决于一个设置register-with-eureka: false只要设置为false就不注册了,默认都是注册的。
我们平时注册的时候,都是以Map的形式去进行注册,其中Key就是
而Value,就是InstanceID,也就是
(2)续约
心跳续约的默认时间是30s,每隔30s进行一次心跳的续约,但是时间也是可以配置的,超出时间范围就会被默认为宕机了。
而默认配置是这样的:
eureka:
  instance:
    lease-expiration-duration-in-seconds: 90
    lease-renewal-interval-in-seconds: 30
每隔三十秒发送一次心跳,一共90秒也就是三次,如果都没有发送心跳相应,就是宕机了。
但是也不能心跳发送的太快,Eureka会受不了,也会宕机的,这个设置默认就好了
(3)拉取列表
我们知道,服务的提供方将会注册自己,而消费方则会拉取服务列表,而拉取,也是有一定周期的:
eureka:
  client:
    registry-fetch-interval-seconds: 30
表示每隔30秒重新获取到数据。
(4)失效剔除和自我保护
一般情况下,我们关闭某一项服务,它会触发一个服务下线的REST的请求给EurekaServer,告诉服务中心下线的请求,然后当服务中心接收到请求之后就会下线了。
- 失效剔除
有些时候,我们的服务提供方并不一定会正常下线,可能因为内存溢出、网络故障等原因导致服务无法正常工作。Eureka Server需要将这样的服务剔除出服务列表。因此它会开启一个定时任务,每隔60秒对所有失效的服务(超过90秒未响应)进行剔除。
eureka:
  server:
    eviction-interval-timer-in-ms: 30000
- 自我保护
这是触发了Eureka的自我保护机制。当一个服务未按时进行心跳续约时,Eureka会统计最近15分钟心跳失败的服务实例的比例是否超过了85%。在生产环境下,因为网络延迟等原因,心跳失败实例的比例很有可能超标,但是此时就把服务剔除列表并不妥当,因为服务可能没有宕机。Eureka就会把当前实例的注册信息保护起来,不予剔除。生产环境下这很有效,保证了大多数服务依然可用。
但是这给我们的开发带来了麻烦, 因此开发阶段我们都会关闭自我保护模式:
eureka:
  server:
    enable-self-preservation: false # 关闭自我保护模式(缺省为打开)
    eviction-interval-timer-in-ms: 1000 # 扫描失效服务的间隔时间(缺省为60*1000ms)
三、Ribbon负载均衡
1.概念
Spring Cloud Ribbon是一个基于HTTP和TCP的客户端负载均衡工具,它基于Netflix Ribbon实现。通过Spring Cloud的封装,可以让我们轻松地将面向服务的REST模版请求自动转换成客户端负载均衡的服务调用。Spring Cloud Ribbon虽然只是一个工具类框架,它不像服务注册中心、配置中心、API网关那样需要独立部署,但是它几乎存在于每一个Spring Cloud构建的微服务和基础设施中。因为微服务间的调用,API网关的请求转发等内容,实际上都是通过Ribbon来实现的,包括后续我们将要介绍的Feign,它也是基于Ribbon实现的工具。所以,对Spring Cloud Ribbon的理解和使用,对于我们使用Spring Cloud来构建微服务非常重要。

2.搭建环境
引入Maven依赖:
		<dependency>
            <groupId>org.springframework.cloudgroupId>
            <artifactId>spring-cloud-starter-netflix-ribbonartifactId>
        dependency>
3.开启负载均衡
首先为了搭建测试环境,我们需要再复制一个UserApplication,端口号和之前的要不一样,否则会冲突。

然后对启动类进行修改
package itcast;

import org.springframework.boot.SpringApplication;
import org.springframework.boot.autoconfigure.SpringBootApplication;
import org.springframework.cloud.client.discovery.EnableDiscoveryClient;
import org.springframework.cloud.client.loadbalancer.LoadBalanced;
import org.springframework.context.annotation.Bean;
import org.springframework.web.client.RestTemplate;

@EnableDiscoveryClient
@SpringBootApplication
public class ConsumerApplication {

    @LoadBalanced
    @Bean
    public RestTemplate restTemplate() {
        return new RestTemplate();
    }

    public static void main(String[] args) {
        SpringApplication.run(ConsumerApplication.class, args);
    }

}
然后我们修改一下控制层,通过user-Service直接获取到ip和port
package itcast.consumer.control;

import itcast.consumer.POJO.User;
import org.springframework.beans.factory.annotation.Autowired;
import org.springframework.cloud.client.ServiceInstance;
import org.springframework.cloud.client.discovery.DiscoveryClient;
import org.springframework.cloud.netflix.ribbon.RibbonLoadBalancerClient;
import org.springframework.web.bind.annotation.GetMapping;
import org.springframework.web.bind.annotation.PathVariable;
import org.springframework.web.bind.annotation.RequestMapping;
import org.springframework.web.bind.annotation.RestController;
import org.springframework.web.client.RestTemplate;

import java.util.List;

@RestController
@RequestMapping("consumer")
public class ConsumerController {
    @Autowired
    private RestTemplate restTemplate;

    @Autowired
    private DiscoveryClient discoveryClient;

    @Autowired
    private RibbonLoadBalancerClient ribbonLoadBalancerClient;

    @GetMapping("{id}")
    public User queryById(@PathVariable("id") Long id) {

        //根据服务id来获取实例
//        List list = discoveryClient.getInstances("user-Service");
//        ServiceInstance choose = ribbonLoadBalancerClient.choose("user-Service");
        //从实例中取出ip地址和port
//        ServiceInstance serviceInstance = list.get(0);
//        String url = "http://" + serviceInstance.getHost() + ":" + serviceInstance.getPort() + "/user/" + id;

//        上面缩写的ribbon是属于轮询,一个一个去试,现在我们拦截到js,去判断

        String url = "http://user-Service/user/id";
        User user = restTemplate.getForObject(url, User.class);
        return user;
    }
}
总结:Ribbon默认是使用轮询来达到负载均衡,但是我们也可以去手动修改负载均衡机制,比如说随机
user-Service:
  ribbon:
    NFLoadBalancerRuleClassName: com.netflix.loadbalancer.RandomRule

