cocos2d-x TestCpp例子工程分析
Cocos2d-x 例子工程分析
类继承关系图

程序执行流程
1. 程序从main.cpp执行:
#include"main.h"

#include"CCEGLView.h"

#include"AppDelegate.h"

USING_NS_CC;

int APIENTRY_tWinMain(HINSTANCEhInstance,

                         HINSTANCEhPrevInstance,

                         LPTSTRlpCmdLine,

                         intnCmdShow)
{
  UNREFERENCED_PARAMETER(hPrevInstance);
  UNREFERENCED_PARAMETER(lpCmdLine);

  // create the applicationinstance
  AppDelegate app;
  EGLView* eglView =newEGLView();
  eglView->init("TestCPP", 900, 640);

  return Application::getInstance()->run();
}
2. 执行Application::getInstance()->run();调用applicationDidFinishLaunching()
bool AppDelegate::applicationDidFinishLaunching()
{

  // The default folder path isthe project file path C:\Users\Bruce\Documents\Visual Studio 2012\Projects\MyCocos2dTestCpp\MyCocos2dTestCpp

  Configuration::getInstance() -> loadConfigFile("configs/config-example.plist");

  Director* director =Director::getInstance();

  director ->setOpenGLView(EGLView::getInstance());

  director->setDisplayStats(true);

  director->setAnimationInterval(1.0 / 60);

  auto screenSize =EGLView::getInstance()->getFrameSize();

  auto designSize =Size(480, 320);

  auto pFileUtils =FileUtils::getInstance();

  if(screenSize.height > 320)
  {
       auto resourceSize =Size(960, 640);

       std::vector searchPaths;

       searchPaths.push_back("hd");

       pFileUtils->setSearchPaths(searchPaths);

       director->setContentScaleFactor(resourceSize.height/designSize.height);
  }

  EGLView::getInstance()->setDesignResolutionSize(designSize.width,designSize.height,ResolutionPolicy::NO_BORDER);
  auto scene =Scene::create();
  auto layer =new TestController();
  layer->autorelease();
  scene->addChild(layer);
  director->runWithScene(scene);

  return true;

}
3. 执行auto layer = new TestController();创建图层并添加到场景中,然后导演实例调用runWithScene方法运行场景
4. 主菜单显示完后,点击主菜单按钮将切换场景,此事件由TestController类中menuCallback函数实现
void TestController::menuCallback(Object*sender)
{
Director::getInstance()-> purgeCachedData();
// get the userdata, it's theindex of the menu item clicked
auto menuItem =static_cast
5. 执行auto scene = g_aTestNames[idx].callback();获取父类为TestScene的FontTestScene场景, g_aTestNames数组定义如下:
struct{
constchar *test_name;
function<TestScene*()> callback;
} g_aTestNames[] = {
{"FontTest", [](){returnnewFontTestScene();}}
};
6. 执行scene->runThisTest();则调用FontTestScene类的runThisTest()函数
void FontTestScene::runThisTest()
{
auto layer =FontTest::create();
addChild(layer);
Director::getInstance()->replaceScene(this);
}
7. 当进入TestScene步景层时调用onEnter方法
#include "TestScene.h"
#include "TestController.h"
TestScene::TestScene(boolbPortrait)
{
Scene::init();
}
void TestScene::onEnter()
{
Scene::onEnter();
auto label = LabelTTF::create("MyMainMenu","Arial", 20);
auto menuItem = MenuItemLabel::create(label, [](Object*sender){
auto scene =new Scene();
if(scene && scene->init())
{
auto layer =new TestController();
scene->addChild(layer); // add layer to scene
layer->release();
Director::getInstance()->replaceScene(scene);
scene->release();
}
});
auto menu =Menu::create(menuItem,NULL);
menu->setPosition(Point::ZERO);
menuItem->setPosition(Point(VisibleRect::right().x - 50,VisibleRect::bottom().y + 25) );
addChild(menu, 1);
}
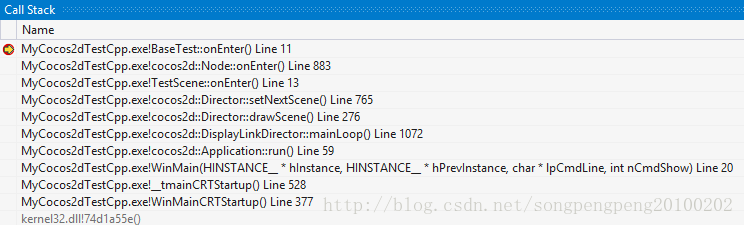
8. 注意:当调用Scene::onEnter();会调用Layer的子类BaseTest的onEnter方法,此处的CallStack如下:
9. 执行BaseTest的onEnter方法会创建菜单并加入后退,重新开始,下一个的菜单项:
void BaseTest::onEnter()
{
Layer::onEnter();
// add title and subtitle
string str = title();
constchar * pTitle = str.c_str();
auto label =LabelTTF::create(pTitle,"Arial", 32);
addChild(label, 9999);
label->setPosition(Point(VisibleRect::center().x,VisibleRect::top().y-30));
string strSubtitle = subtitle();
if(!strSubtitle.empty())
{
auto subLabel =LabelTTF::create(strSubtitle.c_str(),"Thonburi", 16);
addChild(subLabel, 9999);
subLabel->setPosition(Point(VisibleRect::center().x,VisibleRect::top().y-60));
}
// add menu
auto item1 =MenuItemImage::create(s_pathB1, s_pathB2,CC_CALLBACK_1(BaseTest::backCallback,this));
auto item2 =MenuItemImage::create(s_pathR1, s_pathR2,CC_CALLBACK_1(BaseTest::restartCallback,this));
auto item3 =MenuItemImage::create(s_pathF1, s_pathF2,CC_CALLBACK_1(BaseTest::nextCallback,this));
auto menu =Menu::create(item1, item2, item3,NULL);
menu->setPosition(Point::ZERO);
item1->setPosition(Point(VisibleRect::center().x - item2->getContentSize().width*2,
VisibleRect::bottom().y + item2->getContentSize().height/2));
item2->setPosition(Point(VisibleRect::center().x,
VisibleRect::bottom().y + item2->getContentSize().height/2));
item3->setPosition(Point(VisibleRect::center().x + item2->getContentSize().width*2,
VisibleRect::bottom().y + item2->getContentSize().height/2));
addChild(menu, 9999);
}
10. 在执行void TestScene::onEnter()时,会创建主菜单标签Main Menu,单击Main Menu可以回到主菜单
void TestScene::onEnter()
{
Scene::onEnter();
auto label =LabelTTF::create("MainMenu","Arial", 20);
// create menu and callbackto return to main menu
auto menuItem =MenuItemLabel::create(label, [](Object*sender){
auto scene =new Scene();
if(scene && scene->init())
{
auto layer =new TestController();
scene->addChild(layer); // add layer to scene
layer->release();
Director::getInstance()->replaceScene(scene);
scene->release();
}
});
auto menu = Menu::create(menuItem,NULL);
menu->setPosition(Point::ZERO);
menuItem->setPosition(Point(VisibleRect::right().x - 50,VisibleRect::bottom().y + 25) );
addChild(menu, 1);
}
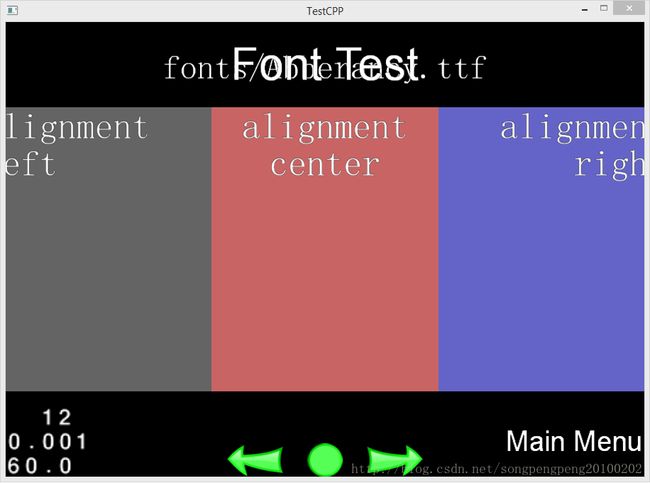
执行效果图片