iOS之NSBundle的使用/打包成bundle文件
参考:http://blog.csdn.net/sjl51060/article/details/43938911
http://www.jianshu.com/p/a8c9e52c80de
1.Bundle 文件,简单理解,就是资源文件包。我们将许多图片、XIB、文本文件组织在一 起,打包成一个 Bundle 文件。方便在其他项目中引用包内的资源。
2.Bundle 文件是静态的,也就是说,我们包含到包中的资源文件作为一个资源包是不参 加项目编译的。bundle 包中不能包含可执行的文件。它仅仅是作为资 源,被解析成为特定的二进制数据。
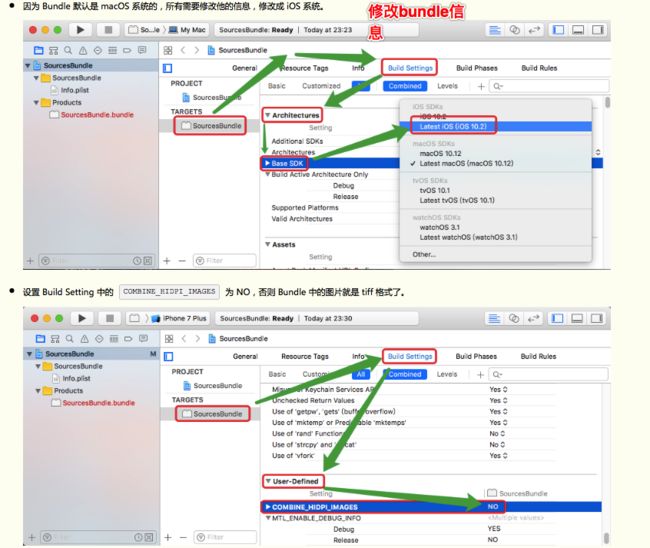
3.前往Build Settings设置参数
- "Base SDK" 设置为 "IOS 8.3" (Xcode 6.3.2为例)
- "Build Active Architecture Only" 设置为 "YES"
- "Debug Information Format" 设置为 "DWARF with dSYM File"
- "OS X Deployment Target" 设置为 "Compiler Default"
- "Skip Install" 设置为 "NO"
- "Strip Debug Symbols During Copy" 中"Release"模式设置为 "YES"
- "IOS Deployment Target" 设置为 "IOS 7.0"
- "COMBINE_HIDPI_IMAGES" 设置为 "NO"
3.bundle的制作-------
将资源文件或文件夹拖动到工程中的 SourcesBundle 文件夹下面。
编译生成 Bundle 文件。---分别选择 Generic iOS Device 和任意一个模拟器各编译一次,编译完后,我们会看到工程中 Products 文件夹下的 SourcesBundle.bundle 由红色变成了黑色。
-
show in finder,看看生成的文件。我们看到它为真机和模拟器都生成了 .bundle 资源文件。
=========bundle资源包的使用一:
吧生成的bundle文件拖到要使用饿工程中;
// 设置文件路径
NSString *bundlePath = [[NSBundlemainBundle]pathForResource:@"SourcesBundle"ofType:@"bundle"];
NSBundle *resourceBundle = [NSBundlebundleWithPath:bundlePath];
// 加载 nib文件
UINib *nib = [UINibnibWithNibName:@"Demo"bundle:resourceBundle];
NSArray *viewObjs = [nibinstantiateWithOwner:niloptions:nil];
// 获取 xib文件
UIView *view = viewObjs.lastObject;
view.frame = CGRectMake(20,50,self.view.bounds.size.width -40,self.view.bounds.size.width -40);
[self.view addSubview:view];
NSString * bundlePath = [[ NSBundle mainBundle] pathForResource: @ "MyBundle"ofType :@ "bundle"];
NSBundle *resourceBundle = [NSBundle bundleWithPath:bundlePath];
UIViewController *vc = [[UIViewController alloc] initWithNibName:@"vc_name"bundle:resourceBundle];
UIImageView *imgView=[[UIImageView alloc] initWithFrame:CGRectMake(50, 50, 50,50)];
UIImage *image = [UIImage imageNamed:@"MyBundle.bundle/img_collect_success"];
[imgView setImage:image];
指定绝对路径的形式:
UIImage *image = [UIImage imageNamed:@"SourcesBundle.bundle/demo.jpg"];
拼接路径的形式:
NSString *bundlePath = [[NSBundle mainBundle] pathForResource:@"SourcesBundle" ofType:@"bundle"];
NSString *imgPath= [bundlePath stringByAppendingPathComponent:@"sb"];
UIImage *image = [UIImageimageWithContentsOfFile:imgPath];
宏定义的形式:
#define MYBUNDLE_NAME @"SourcesBundle.bundle"
#define MYBUNDLE_PATH [[[NSBundle mainBundle] resourcePath] stringByAppendingPathComponent:MYBUNDLE_NAME]
#define MYBUNDLE [NSBundle bundleWithPath:MYBUNDLE_PATH]
NSString *imgPath= [MYBUNDLE_PATH stringByAppendingPathComponent:@"demo4"];
UIImage *image = [UIImage imageWithContentsOfFile:imgPath];
-(instancetype)init{
NSString *bundlePath = [[NSBundlemainBundle] pathForResource:@"WofuSDKBundle"ofType:@"bundle"];
NSBundle *resourceBundle = [NSBundlebundleWithPath:bundlePath];
self=[superinitWithNibName:@"Wofubindbankcarvc"bundle:resourceBundle];
returnself;
}
==========bundle的使用四=====加载bundle中的xib生成的cell
加载nib的时候使用以下代码,最主要的是表明是从那个bundle中获取nib;
NSString *bundlePath = [[NSBundle mainBundle] pathForResource:@"WofuSDKBundle"ofType:@"bundle"];
NSBundle *resourceBundle = [NSBundle bundleWithPath:bundlePath];
UINib *nib=[UINib nibWithNibName:@"Wofucreditcell" bundle:resourceBundle];
[tab registerNib:nib forCellReuseIdentifier:identifier];


