Docker学习(2)-Docker基础1
Docker学习(1)-Docker简介
1.2 Docker安装及基础命令介绍
https://www.docker.com/#Docker官网
Docker 运行系统 OS 版本选择:
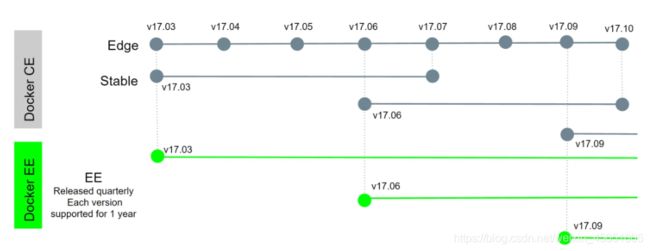
Docker 目前已经支持多种操作系统的安装运行,比如 Ubuntu、CentOS、Redhat、Debian、Fedora,甚至是还支持了 Mac 和 Windows,在 linux 系统上需要内核版本在 3.10 或以上,docker 版本号之前一直是 0.X 版本或 1.X 版本,但是从 2017年 3 月 1 号开始改为每个季度发布一次稳版,其版本号规则也统一变更为 YY.MM,例如 17.09 表示是 2017 年 9 月份发布的。
Docker 版本选择:
Docker 之前没有区分版本(社区版还是企业版),但是 2017 年初推出的新项目 Moby则是 Docker 的完全更名版,Moby 项目是属于 Docker 项目的全新母项目,Docker将是一个隶属于的 Moby 的子产品,而且之后的版本之后开始区分为 CE 版本(社区版本)和 EE(企业收费版),CE 社区版本和 EE 企业版本都是每个季度发布一个新版本,但是 EE 版本提供后期安全维护 1 年,而 CE 版本是 4 个月。Moby 项目的地址:https://github.com/moby/moby
https://github.com/moby/moby#官方博客原文版本细节
下图为 Docker CE 和 Docker EE 的生命周期图示
注意事项
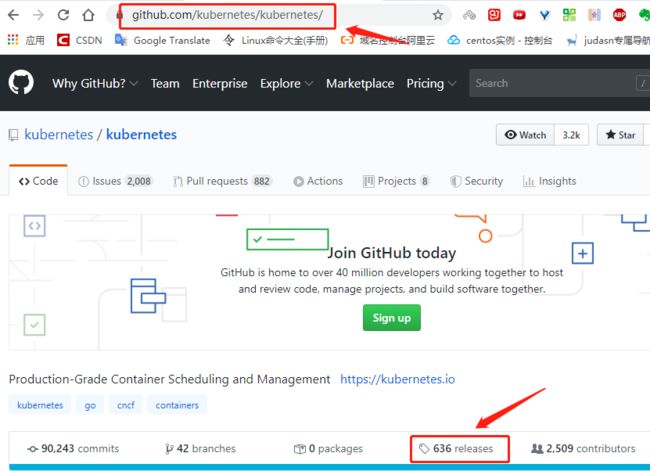
Docker 与 kubernetes 结合使用的时候,要安装经过 kubernetes 官方测试通过的docker 版本,避免出现不兼容等未知的及不可预估的问题发生,kubernetes 测试过的 docker 版本可以在 github 项目地址中的开发更新日志查询,具体如下:
https://github.com/kubernetes/kubernetes/#GitHub开源K8S项目

1.2.1下载 rpm 包安装
| 下载内容 | 下载地址 |
|---|---|
| 官方rpm包下载地址 | https://download.docker.com/linux/centos/7/x86_64/stable/Packages/ |
| aliyunrpm包下载地址 | https://mirrors.aliyun.com/docker-ce/linux/centos/7/x86_64/stable/Packages/ |
| 二进制下载地址-docker | https://download.docker.com/linux/centos/7/x86_64/stable/Packages/ |
| 二进制下载地址-aliyun | https://mirrors.aliyun.com/docker-ce/linux/static/stable/x86_64/ |
1.2.2通过修改 yum 源安装
yum 仓库配置:http://mirrors.aliyun.com/repo/Centos-7.repo
aliyun-epel:http://mirrors.aliyun.com/repo/epel-7.repo
CentOS 7(使用 yum 进行安装)
https://developer.aliyun.com/mirror/docker-ce#参考链接
# step 1: 安装必要的一些系统工具
sudo yum install -y yum-utils device-mapper-persistent-data lvm2
# Step 2: 添加软件源信息
sudo yum-config-manager --add-repo https://mirrors.aliyun.com/docker-ce/linux/centos/docker-ce.repo
# Step 3: 更新并安装Docker-CE
sudo yum makecache fast
sudo yum -y install docker-ce
# Step 4: 开启Docker服务
sudo service docker start

# 注意:
# 官方软件源默认启用了最新的软件,您可以通过编辑软件源的方式获取各个版本的软件包。
例如官方并没有将测试版本的软件源置为可用,您可以通过以下方式开启。同理可以开启各种测试版本等。
# vim /etc/yum.repos.d/docker-ee.repo
#   将[docker-ce-test]下方的enabled=0修改为enabled=1
#
# 安装指定版本的Docker-CE:
# Step 1: 查找Docker-CE的版本:
# yum list docker-ce.x86_64 --showduplicates | sort -r
#   Loading mirror speeds from cached hostfile
#   Loaded plugins: branch, fastestmirror, langpacks
#   docker-ce.x86_64            17.03.1.ce-1.el7.centos            docker-ce-stable
#   docker-ce.x86_64            17.03.1.ce-1.el7.centos            @docker-ce-stable
#   docker-ce.x86_64            17.03.0.ce-1.el7.centos            docker-ce-stable
#   Available Packages
# Step2: 安装指定版本的Docker-CE: (VERSION例如上面的17.03.0.ce.1-1.el7.centos)
# sudo yum -y install docker-ce-[VERSION]
1.2.3untu 安装 docker 、 启动并验证服务
https://docs.docker.com/engine/install/ubuntu/#官网参考
https://developer.aliyun.com/mirror/docker-ce#阿里云Docker CE 镜像
root@Docker-1:~# sudo apt-get remove docker docker-engine docker.io containerd runc
root@Docker-1:~#  sudo apt-get update
root@Docker-1:~# sudo apt-get install \
>     apt-transport-https \
>     ca-certificates \
>     curl \
>     gnupg-agent \
>     software-properties-common
root@Docker-1:~# sudo apt-get -y install apt-transport-https ca-certificates curl software-properties-common
root@Docker-1:~# curl -fsSL https://mirrors.aliyun.com/docker-ce/linux/ubuntu/gpg | sudo apt-key add -
OK
root@Docker-1:~# sudo add-apt-repository "deb [arch=amd64] https://mirrors.aliyun.com/docker-ce/linux/ubuntu $(lsb_release -cs) stable"
root@Docker-1:~# sudo apt-get -y update
root@Docker-1:~# apt-cache madison docker-ce # 查看可获取的版本
 docker-ce | 5:19.03.8~3-0~ubuntu-bionic | https://mirrors.aliyun.com/docker-ce/linux/ubuntu bionic/stable amd64 Packages
 docker-ce | 5:19.03.7~3-0~ubuntu-bionic | https://mirrors.aliyun.com/docker-ce/linux/ubuntu bionic/stable amd64 Packages
 docker-ce | 5:19.03.6~3-0~ubuntu-bionic | https://mirrors.aliyun.com/docker-ce/linux/ubuntu bionic/stable amd64 Packages
 docker-ce | 5:19.03.5~3-0~ubuntu-bionic | https://mirrors.aliyun.com/docker-ce/linux/ubuntu bionic/stable amd64 Packages
 docker-ce | 5:19.03.4~3-0~ubuntu-bionic | https://mirrors.aliyun.com/docker-ce/linux/ubuntu bionic/stable amd64 Packages
 docker-ce | 5:19.03.3~3-0~ubuntu-bionic | https://mirrors.aliyun.com/docker-ce/linux/ubuntu bionic/stable amd64 Packages
 docker-ce | 5:19.03.2~3-0~ubuntu-bionic | https://mirrors.aliyun.com/docker-ce/linux/ubuntu bionic/stable amd64 Packages
 docker-ce | 5:19.03.1~3-0~ubuntu-bionic | https://mirrors.aliyun.com/docker-ce/linux/ubuntu bionic/stable amd64 Packages
 docker-ce | 5:19.03.0~3-0~ubuntu-bionic | https://mirrors.aliyun.com/docker-ce/linux/ubuntu bionic/stable amd64 Packages
 docker-ce | 5:18.09.9~3-0~ubuntu-bionic | https://mirrors.aliyun.com/docker-ce/linux/ubuntu bionic/stable amd64 Packages
 docker-ce | 5:18.09.8~3-0~ubuntu-bionic | https://mirrors.aliyun.com/docker-ce/linux/ubuntu bionic/stable amd64 Packages
 docker-ce | 5:18.09.7~3-0~ubuntu-bionic | https://mirrors.aliyun.com/docker-ce/linux/ubuntu bionic/stable amd64 Packages
 docker-ce | 5:18.09.6~3-0~ubuntu-bionic | https://mirrors.aliyun.com/docker-ce/linux/ubuntu bionic/stable amd64 Packages
 docker-ce | 5:18.09.5~3-0~ubuntu-bionic | https://mirrors.aliyun.com/docker-ce/linux/ubuntu bionic/stable amd64 Packages
 docker-ce | 5:18.09.4~3-0~ubuntu-bionic | https://mirrors.aliyun.com/docker-ce/linux/ubuntu bionic/stable amd64 Packages
 docker-ce | 5:18.09.3~3-0~ubuntu-bionic | https://mirrors.aliyun.com/docker-ce/linux/ubuntu bionic/stable amd64 Packages
 docker-ce | 5:18.09.2~3-0~ubuntu-bionic | https://mirrors.aliyun.com/docker-ce/linux/ubuntu bionic/stable amd64 Packages
 docker-ce | 5:18.09.1~3-0~ubuntu-bionic | https://mirrors.aliyun.com/docker-ce/linux/ubuntu bionic/stable amd64 Packages
 docker-ce | 5:18.09.0~3-0~ubuntu-bionic | https://mirrors.aliyun.com/docker-ce/linux/ubuntu bionic/stable amd64 Packages
 docker-ce | 18.06.3~ce~3-0~ubuntu | https://mirrors.aliyun.com/docker-ce/linux/ubuntu bionic/stable amd64 Packages
 docker-ce | 18.06.2~ce~3-0~ubuntu | https://mirrors.aliyun.com/docker-ce/linux/ubuntu bionic/stable amd64 Packages
 docker-ce | 18.06.1~ce~3-0~ubuntu | https://mirrors.aliyun.com/docker-ce/linux/ubuntu bionic/stable amd64 Packages
 docker-ce | 18.06.0~ce~3-0~ubuntu | https://mirrors.aliyun.com/docker-ce/linux/ubuntu bionic/stable amd64 Packages
 docker-ce | 18.03.1~ce~3-0~ubuntu | https://mirrors.aliyun.com/docker-ce/linux/ubuntu bionic/stable amd64 Packages

root@Docker-1:~# apt-cache madison docker-ce-cli #查看客户端能安装版本
docker-ce-cli | 5:19.03.8~3-0~ubuntu-bionic | https://mirrors.aliyun.com/docker-ce/linux/ubuntu bionic/stable amd64 Packages
docker-ce-cli | 5:19.03.7~3-0~ubuntu-bionic | https://mirrors.aliyun.com/docker-ce/linux/ubuntu bionic/stable amd64 Packages
docker-ce-cli | 5:19.03.6~3-0~ubuntu-bionic | https://mirrors.aliyun.com/docker-ce/linux/ubuntu bionic/stable amd64 Packages
docker-ce-cli | 5:19.03.5~3-0~ubuntu-bionic | https://mirrors.aliyun.com/docker-ce/linux/ubuntu bionic/stable amd64 Packages
docker-ce-cli | 5:19.03.4~3-0~ubuntu-bionic | https://mirrors.aliyun.com/docker-ce/linux/ubuntu bionic/stable amd64 Packages
docker-ce-cli | 5:19.03.3~3-0~ubuntu-bionic | https://mirrors.aliyun.com/docker-ce/linux/ubuntu bionic/stable amd64 Packages
docker-ce-cli | 5:19.03.2~3-0~ubuntu-bionic | https://mirrors.aliyun.com/docker-ce/linux/ubuntu bionic/stable amd64 Packages
docker-ce-cli | 5:19.03.1~3-0~ubuntu-bionic | https://mirrors.aliyun.com/docker-ce/linux/ubuntu bionic/stable amd64 Packages
docker-ce-cli | 5:19.03.0~3-0~ubuntu-bionic | https://mirrors.aliyun.com/docker-ce/linux/ubuntu bionic/stable amd64 Packages
docker-ce-cli | 5:18.09.9~3-0~ubuntu-bionic | https://mirrors.aliyun.com/docker-ce/linux/ubuntu bionic/stable amd64 Packages
docker-ce-cli | 5:18.09.8~3-0~ubuntu-bionic | https://mirrors.aliyun.com/docker-ce/linux/ubuntu bionic/stable amd64 Packages
docker-ce-cli | 5:18.09.7~3-0~ubuntu-bionic | https://mirrors.aliyun.com/docker-ce/linux/ubuntu bionic/stable amd64 Packages
docker-ce-cli | 5:18.09.6~3-0~ubuntu-bionic | https://mirrors.aliyun.com/docker-ce/linux/ubuntu bionic/stable amd64 Packages
docker-ce-cli | 5:18.09.5~3-0~ubuntu-bionic | https://mirrors.aliyun.com/docker-ce/linux/ubuntu bionic/stable amd64 Packages
docker-ce-cli | 5:18.09.4~3-0~ubuntu-bionic | https://mirrors.aliyun.com/docker-ce/linux/ubuntu bionic/stable amd64 Packages
docker-ce-cli | 5:18.09.3~3-0~ubuntu-bionic | https://mirrors.aliyun.com/docker-ce/linux/ubuntu bionic/stable amd64 Packages
docker-ce-cli | 5:18.09.2~3-0~ubuntu-bionic | https://mirrors.aliyun.com/docker-ce/linux/ubuntu bionic/stable amd64 Packages
docker-ce-cli | 5:18.09.1~3-0~ubuntu-bionic | https://mirrors.aliyun.com/docker-ce/linux/ubuntu bionic/stable amd64 Packages
docker-ce-cli | 5:18.09.0~3-0~ubuntu-bionic | https://mirrors.aliyun.com/docker-ce/linux/ubuntu bionic/stable amd64 Packages
root@Docker-1:~# apt install docker-ce=5:18.09.9~3-0~ubuntu-bionic docker-ce-cli=5:18.09.9~3-0~ubuntu-bionic  #安装对应的版本
root@Docker-1:~# systemctl restart docker
root@Docker-1:~# systemctl enable docker

root@Docker-1:~# docker version
Client:                                  #客户端版本
 Version:           18.09.9
 API version:       1.39
 Go version:        go1.11.13
 Git commit:        039a7df9ba
 Built:             Wed Sep  4 16:57:28 2019
 OS/Arch:           linux/amd64
 Experimental:      false

Server: Docker Engine - Community
 Engine:                                 #服务端版本
  Version:          18.09.9
  API version:      1.39 (minimum version 1.12)
  Go version:       go1.11.13
  Git commit:       039a7df
  Built:            Wed Sep  4 16:19:38 2019
  OS/Arch:          linux/amd64
  Experimental:     false
查看 docker0 虚拟网卡信息
在 docker 安装启动之后,默认会生成一个名称为 docker0 的虚拟网卡,其默认
IP 地址为 172.17.0.1
root@Docker-1:~# ifconfig docker0
docker0: flags=4163<UP,BROADCAST,RUNNING,MULTICAST>  mtu 1500
        inet 172.17.0.1  netmask 255.255.0.0  broadcast 172.17.255.255
        inet6 fe80::42:15ff:fe21:6ca8  prefixlen 64  scopeid 0x20<link>
        ether 02:42:15:21:6c:a8  txqueuelen 0  (Ethernet)
        RX packets 4836  bytes 196448 (196.4 KB)
        RX errors 0  dropped 0  overruns 0  frame 0
        TX packets 5993  bytes 8677150 (8.6 MB)
        TX errors 0  dropped 0 overruns 0  carrier 0  collisions 0
docker info 信息解读
root@Docker-1:~# docker info
Containers: 1                       # 当前主机运行的容器总数
 Running: 1                         # 正在运行的容器数
 Paused: 0                          # 暂停的容器
 Stopped: 0                         # 停止的容器数
Images: 1                           # 当前系统所有的镜像
Server Version: 18.09.9
Storage Driver: overlay2            # 存储驱动(存储引擎)
 Backing Filesystem: extfs          # 后端文件系统,OS使用的文件系统
 Supports d_type: true              # 是否支持d_type
 Native Overlay Diff: true          # 是否支持差异数据存储
Logging Driver: json-file           # 日志驱动
Cgroup Driver: cgroupfs             # cgroups 驱动
Plugins:
 Volume: local                      # 卷
 Network: bridge host macvlan null overlay  # overlay夸主机通
 Log: awslogs fluentd gcplogs gelf journald json-file local logentries splunk syslog   # 支持的日志类型
Swarm: inactive                     # 是否支持docker swarm
Runtimes: runc                      # 容器运行时类型为runc
Default Runtime: runc               # 默认的容器运行时为runc
Init Binary: docker-init            # 初始化容器的守护进程,即pid为1的进程
containerd version: 7ad184331fa3e55e52b890ea95e65ba581ae3429   # containerd版本
runc version: dc9208a3303feef5b3839f4323d9beb36df0a9dd    # runc版本
init version: fec3683
Security Options:
 apparmor   #安全模块, https://docs.docker.com/engine/security/apparmor/
 seccomp    # 审计(操作)模块,https://docs.docker.com/engine/security/seccomp/
  Profile: default  # 配置文件,默认的配置文件
Kernel Version: 4.15.0-29-generic
Operating System: Ubuntu 18.04.1 LTS
OSType: linux
Architecture: x86_64
CPUs: 1
Total Memory: 1.861GiB
Name: Docker-1       # 主机名
ID: U2KA:7DNC:OET5:EWRE:SMZ6:BZRY:NEHL:TR5T:Q6HI:FMTY:MFRF:QMOE
Docker Root Dir: /var/lib/docker      # 宿主机数据保存目录
Debug Mode (client): false
Debug Mode (server): false
Registry: https://index.docker.io/v1/
Labels:
Experimental: false    # 是否是测试版
Insecure Registries:
 127.0.0.0/8
Registry Mirrors:
 https://9916w1ow.mirror.aliyuncs.com/
Live Restore Enabled: false  # 是否开启活动重启(重启docker-daemon不关闭容器)
Product License: Community Engine

WARNING: No swap limit support   # 不支持swap限制的警告
解决不支持 swap 限制的警告
root@Docker-1:~# vim /etc/default/grub
GRUB_DEFAULT=0
GRUB_TIMEOUT_STYLE=hidden
GRUB_TIMEOUT=2
GRUB_DISTRIBUTOR=`lsb_release -i -s 2> /dev/null || echo Debian`
GRUB_CMDLINE_LINUX_DEFAULT=""
GRUB_CMDLINE_LINUX="net.ifnames=0 biosdevname=0 cgroup_enable=memory swapaccount=1" #修改处

root@Docker-1:~# update-grub
Sourcing file `/etc/default/grub'
Generating grub configuration file ...
Found linux image: /boot/vmlinuz-4.15.0-29-generic
Found initrd image: /boot/initrd.img-4.15.0-29-generic
done
root@Docker-1:~# reboot
1.2.4 docker 存储引擎
目前 docker 的默认存储引擎为 overlay2,不同的存储引擎需要相应的系统支持,如需要磁盘分区的时候传递 d-type 文件分层功能,即需要传递内核参数开启格式化磁盘的时候的指定功能。
https://docs.docker.com/storage/storagedriver/overlayfs-driver/#OverlayFS存储驱动程序
https://docs.docker.com/storage/storagedriver/overlayfs-driver/#how-the-overlay2-driver-works#how-the-overlay2-driver-works#How the overlay2 driver works
https://docs.docker.com/storage/storagedriver/select-storage-driver/#存储引擎选择文档
1.2.4.1存储引擎驱动类型
AUFS
AUFS:AUFS(AnotherUnionFS)是一种 Union FS 实现,是文件级的存储驱动。UnionFS 支持将不同目录挂载到同一个虚拟文件系统下的文件系统。也就是说支持把不同物理位置的目录合并 mount 到同一个目录中。这种文件系统可以一层一层地叠加修改文件。无论底下有多少层都是只读的,只有最上层的文件系统是可写的。当需要修改一个文件时,AUFS 创建该文件的一个副本,使用copy-on-write 机制将文件从只读层复制到可写层进行修改,结果也保存在可写层。在 Docker 中,底层的只读层就是 image,可写层就是 Container。
Overlay
一种 Union FS 文件系统,Linux 内核 3.18 后支持。
overlay2
Overlay2 文件系统是 Overlay 的升级版,到目前为止,overlay2 位所有 Linux 发行版推荐使用的存储类型。
devicemapper
devicemapper 是 CentOS 和 RHEL 的推荐存储驱动程序,因为之前的内核版本不支持overlay2,但是当前较新版本的 CentOS 和 RHEL 现在已经支持 overlay2,因此推荐使用 overlay2。实际上 devicemapper 只是一个过渡性技术,现在 Docker 生态已经没人使用 devicemapper。
vfs
用于测试环境,适用于无法使用 copy-on-write 文件系统的情况。 此存储驱动程序的性能很差,通常不建议用于生产。
1.2.4.2Docker 首选存储引擎
Docker 官方推荐首选 存储 引擎 为 overlay2 devicemapper 存在使用空间方面的一些限制, 虽然可以通过后期配置解决,但是官方依然推荐使用 overlay2 ,以下是网上查到的部分资料:https://www.cnblogs.com/youruncloud/p/5736718.html#容器运行异常,同时宿主机内核报磁盘I/O错误
[root@centos8 ~]#xfs_info /
meta-data=/dev/nvme0n1p2         isize=512    agcount=4, agsize=6553600 blks
         =                       sectsz=512   attr=2, projid32bit=1
         =                       crc=1        finobt=1, sparse=1, rmapbt=0
         =                       reflink=1
data     =                       bsize=4096   blocks=26214400, imaxpct=25
         =                       sunit=0      swidth=0 blks
naming   =version 2              bsize=4096   ascii-ci=0, ftype=1 # ftype=1表示文件系统支持d_type
log      =internal log           bsize=4096   blocks=12800, version=2
         =                       sectsz=512   sunit=0 blks, lazy-count=1
realtime =none                   extsz=4096   blocks=0, rtextents=0

root@Docker-1:~# docker info |grep type
 Supports d_type: true             # 不支持d_type则docker无法启动
如果 docker 数据目录是一块单独的磁盘分区而且是 xfs 格式的,那么需要在格式化的时候加上参数-n ftype=1,否则后期在启动容器的时候会报错不支持 d_type。
1.2.5docker 服务进程

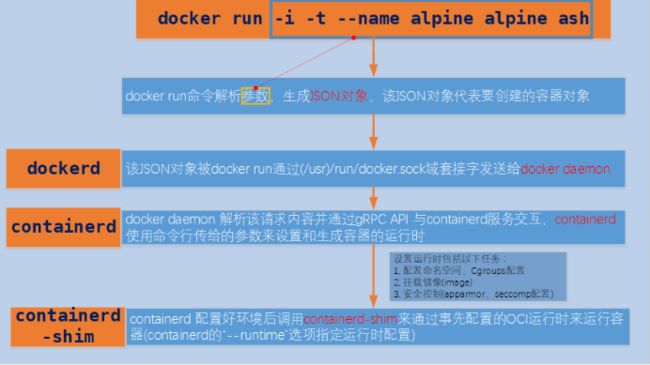
如上图所示在基于镜像创建和运行容器的整个过程中主要涉及的进程有:Docker engine 中的docker daemon、负责配置运行时的containerd、负责运行容器的containerd-shim、及运行在最底层的 runC 库。另外,图中未画的 docker-proxy进程为实现容器通信的,其父进程为 dockerd。
root@Docker-1:~# pstree -lpsT |grep containerd
           |-containerd(843)---containerd-shim(1672)---nginx(1696)---nginx(1734)
#containerd(843):设置运行时
#containerd-shim(1672):运行容器
#nginx(1696)---nginx(1734):具体容器进程
containerd-shim进程实现一下功能:
1.允许允许非守护类容器
2.当container、docker进程故障后容器的STDIO和FDs保持打开
3.报告容器的退出状态给containerd
如上图,一个容器从镜像的创建过程可以大致分为以下步骤:
- docker run命令根据命令行指定的参数创建一个 JSON 对象,并将该对象传给 dockerd。
- dockerd 会检查本地是否有 alpine(不指定版本默认为最新版)镜像,如果没有就去Docker Hub 拉取。
- alpine 镜像拉取后,dockerd 会通过 gRPC API 发送 gRPC 请求与 containerd交互,containerd 会负责配置和准备容器运行时。
- containerd 配置好运行时后调用 containerd-shim 来运行容器的运行时。
- container-shim 被调用后,使用 create 选项调用 runC 进程来运行容器, containerd-shim可以通过 exit、control 文件和 containerd 通信,通过父子进程 关系和 SIGCHLD(信号)监控容器中进程状态。
- 在整个容器生命周期中,containerd 通过 epoll 监控容器文件,监控容器事件。
1.2.6grpc 简介
https://www.grpc.io/#gRPC-官网
gRPC 是 Google 开发的一款高性能、开源和通用的 RPC 框架,支持众多语言客户端。
gRPC (gRPC 远程过程调用)是一个开源远程过程调用(RPC)系统,最初在 2015 年由谷歌开发。它使用 HTTP/2 进行传输,协议缓冲区作为接口描述语言,并提供诸如身份验证、双向流和流控制、阻塞或非阻塞绑定、取消和超时等功能。它为多种语言生成跨平台的客户机和服务器绑定。最常见的使用场景包括在微服务风格的架构中连接服务,并将移动设备、浏览器客户端连接到后端服务。
1.3docker 镜像加速配置
使用 Docker 时,在国内网络环境下载国外的镜像有时候会很慢,因此可以更改 docker配置文件来添加一个加速网址,可以通过加速器达到加速下载镜像的目的。
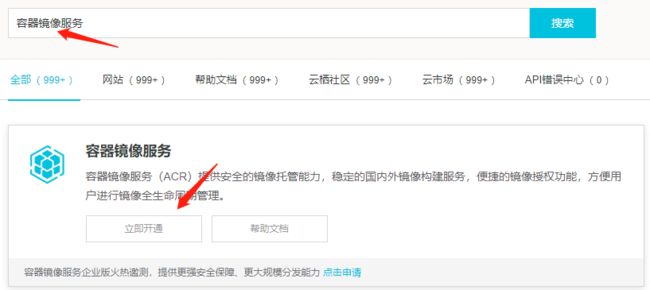
获取加速地址
首先注册一个阿里云账户:https://account.aliyun.com/login/login.htm

root@Docker-1:~# sudo mkdir -p /etc/docker
root@Docker-1:~# sudo tee /etc/docker/daemon.json <<-'EOF'
> {
>   "registry-mirrors": ["https://jcmwo9z2.mirror.aliyuncs.com"]
> }
> EOF #需要手动输入
{
  "registry-mirrors": ["https://jcmwo9z2.mirror.aliyuncs.com"]
}
root@Docker-1:~# sudo systemctl daemon-reload
root@Docker-1:~# sudo systemctl restart docker
https://jcmwo9z2.mirror.aliyuncs.com#加速器地址
这个加速地址谁都可以用,Ubuntu 和 Centos 配置过程相同。
1.4Docker 镜像管理
Docker 镜像含有启动容器所需要的文件系统及所需要的内容,因此镜像主要用于创建并启动 docker 容器。Docker 镜像里面是一层层文件系统,叫做 Union FS(联合文件系统),联合文件系统,可以将几层目录挂载到一起,形成一个虚拟文件系统,虚拟文件系统的目录结构就像普通 linux 的目录结构一样,docker 通过这些文件再加上宿主机的内核提供了一个 linux 的虚拟环境,每一层文件系统我们叫做一层 layer,联合文件系统可以对每一层文件系统设置三种权限,只读(readonly)、读写(readwrite)
和写出(whiteout-able),但是 docker 镜像中每一层文件系统都是只读的,构建镜像的时候,从一个最基本的操作系统开始,每个构建的操作都相当于做一层的修改,增加了一层文件系统,一层层往上叠加,上层的修改会覆盖底层该位置的可见性,这也很容易理解,就像上层把底层遮住了一样,当使用镜像的时候,我们只会看到一个完全的整体,不知道里面有几层也不需要知道里面有几层,结构如下:
一个典型的 Linux 文件系统由 bootfs 和 rootfs 两部分组成,bootfs(boot filesystem) 主要包含 bootloader 和 kernel,bootloader 主要用于引导加载 kernel,当 kernel 被加载到内存中后 bootfs 会被 umount 掉,rootfs (root file system)
包含的就是典型 Linux 系统中的/dev,/proc,/bin,/etc 等标准目录和文件,下图就是 docker image 中最基础的两层结构,不同的 linux 发行版(如 ubuntu 和 CentOS) 在 rootfs 这一层会有所区别。但是对于 docker 镜像通常都比较小,官方提供的
centos 基础镜像在 200MB 左右,一些其他版本的镜像甚至只有几 MB,docker 镜像直接调用宿主机的内核,镜像中只提供 rootfs,也就是只需要包括最基本的命令、工具和程序库就可以了,比如 alpine 镜像,在 5M 左右。下图就是有两个不同的镜像在一个宿主机内核上实现不同的 rootfs。

在不同的层代表了镜像不同的变更,如下图:
Apache 所在的镜像层引用了 emacs 所在层表示的镜像,而 emacs 所在镜像又是基于
Debian 基础镜像创建来的。在使用 Dockerfile 创建镜像时,更能体现下面的分层结构。

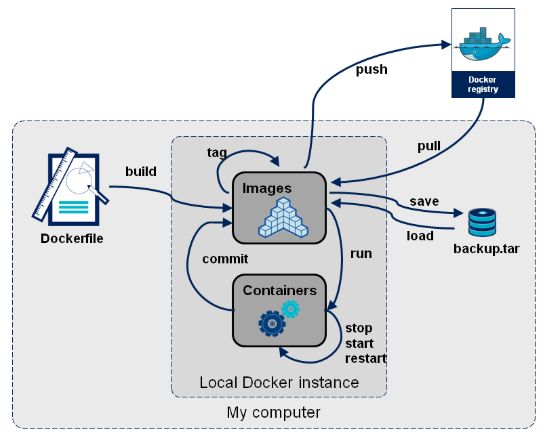
Docker 镜像存在的各个阶段和状态可以从下图看出:
1.4.1搜索镜像
在使用 docker 命令时,可以很方便的使用命令和子命令的帮助:
在官方的 docker 仓库 中搜索指定名称的 docker 镜像, 也会有很多镜像。
# 使用来获取帮助
~$ docker --help
~$ docker image --help
~$ docker container --help  # container是docker的子命令
~$ docker container logs --help  # logs是container的子命令
~$ docker search --help
~$ docker save --help
~$ docker exec --help
在官方的 docker 仓库中搜索指定名称的 docker 镜像:
~$ docker search IMAGE_NAME:TAG
~$ docker search --help
root@Docker-1:~# docker search alpine
NAME                                   DESCRIPTION                                     STARS               OFFICIAL            AUTOMATED
alpine                                 A minimal Docker image based on Alpine Linux…   6359          [OK]
mhart/alpine-node                      Minimal Node.js built on Alpine Linux           465
anapsix/alpine-java                    Oracle Java 8 (and 7) with GLIBC 2.28 over A…   442                               [OK]
frolvlad/alpine-glibc                  Alpine Docker image with glibc (~12MB)          239                                     [OK]
gliderlabs/alpine                      Image based on Alpine Linux will help you wi…   181
alpine/git                             A  simple git container running in alpine li…   125                                     [OK]
mvertes/alpine-mongo                   light MongoDB container                         111                                     [OK]
yobasystems/alpine-mariadb             MariaDB running on Alpine Linux [docker] [am…   64                                      [OK]
alpine/socat                           Run socat command in alpine container           50                                      [OK]
kiasaki/alpine-postgres                PostgreSQL docker image based on Alpine Linux   45                                      [OK]
davidcaste/alpine-tomcat               Apache Tomcat 7/8 using Oracle Java 7/8 with…   43                                      [OK]
jfloff/alpine-python                   A small, more complete, Python Docker image …   36                                      [OK]
zzrot/alpine-caddy                     Caddy Server Docker Container running on Alp…   36                                      [OK]
byrnedo/alpine-curl                    Alpine linux with curl installed and set as …   31                                      [OK]
hermsi/alpine-sshd                     Dockerize your OpenSSH-server with rsync and…   30                                      [OK]
etopian/alpine-php-wordpress           Alpine WordPress Nginx PHP-FPM WP-CLI           24                                      [OK]
hermsi/alpine-fpm-php                  Dockerize your FPM PHP 7.4 upon a lightweigh…   24                                      [OK]
zenika/alpine-chrome                   Chrome running in headless mode in a tiny Al…   19                                      [OK]
bashell/alpine-bash                    Alpine Linux with /bin/bash as a default she…   16                                      [OK]
davidcaste/alpine-java-unlimited-jce   Oracle Java 8 (and 7) with GLIBC 2.21 over A…   13                                      [OK]
spotify/alpine                         Alpine image with `bash` and `curl`.            11                                      [OK]
roribio16/alpine-sqs                   Dockerized ElasticMQ server + web UI over Al…   8                                       [OK]
cfmanteiga/alpine-bash-curl-jq         Docker Alpine image with Bash, curl and jq p…   5                                       [OK]
hermsi/alpine-varnish                  Dockerize Varnish upon a lightweight alpine-…   3                                       [OK]
goodguykoi/alpine-curl-internal        simple alpine image with curl installed no C…   0                                       [OK]
1.4.2下载镜像
从docker 仓库 将镜像下载到本地 命令格式 如下
~$ docker pull hub.docker.com/nginx/nginx:1.16.1
~$ docker pull 仓库服务器:端口/项目名称/镜像名称:tag(版本)号
root@Docker-1:~# docker pull nginx:1.16.1

root@Docker-1:~# docker pull alpine
Using default tag: latest
latest: Pulling from library/alpine
aad63a933944: Pull complete
Digest: sha256:b276d875eeed9c7d3f1cfa7edb06b22ed22b14219a7d67c52c56612330348239
Status: Downloaded newer image for alpine:latest
1.4.3查看本地镜像
#下载完成的镜像比下载的大,因为下载完成后会解压
~$ docker images
root@Docker-1:~# docker images
REPOSITORY          TAG                 IMAGE ID            CREATED             SIZE
nginx               1.16.1              16af99d71a72        15 hours ago        127MB
alpine              latest              a187dde48cd2        3 weeks ago         5.6MB
REPOSITORY            # 镜像所属的仓库名称
TAG                   # 镜像版本号(标识符),默认为latest
IMAGE ID              # 镜像唯一ID标示
CREATED               # 镜像创建时间
VIRTUAL SIZE          # 镜像的大小
1.4.4 镜像导出
可以将镜像从本地导出问为一个压缩文件,然后复制到其他服务器进行导入使用
镜像导出使用 docker save 命令:
~$ docker [image] save nginx -o /opt/nginx-1.16.1.tar.gz
或者不指定-o选项,直接使用标准输出重定向:
~$ docker [image] save nginx > /opt/nginx-1.16.1.tar.gz
root@Docker-1:~# docker images
REPOSITORY          TAG                 IMAGE ID            CREATED             SIZE
nginx               1.16.1              16af99d71a72        15 hours ago        127MB
alpine              latest              a187dde48cd2        3 weeks ago         5.6MB
root@Docker-1:~# docker save nginx -o /opt/nginx-1.16.1.tar.gz
root@Docker-1:~# docker save alpine > /opt/alpine.tar.gz
root@Docker-1:~# ll /opt/
total 133224
drwxr-xr-x  3 root root      4096 Apr 17 09:01 ./
drwxr-xr-x 24 root root      4096 Oct 26 19:34 ../
-rw-r--r--  1 root root   5871104 Apr 17 09:01 alpine.tar.gz
-rw-------  1 root root 130532864 Apr 17 09:00 nginx-1.16.1.tar.gz
1.4.5查看镜像内容
root@Docker-1:~# cd /opt/
root@Docker-1:/opt# mkdir nginx
root@Docker-1:/opt# tar xf nginx-1.16.1.tar.gz -C nginx/
root@Docker-1:/opt# cd nginx/
root@Docker-1:/opt/nginx# ll
total 36
drwxr-xr-x 5 root root 4096 Apr 17 09:03 ./
drwxr-xr-x 4 root root 4096 Apr 17 09:03 ../
-rw-r--r-- 1 root root 6648 Apr 16 18:11 16af99d71a72da0d83975260ed6855961104ac1c4b3d73a80beab7801d8d528b.json
drwxr-xr-x 2 root root 4096 Apr 16 18:11 2b88b180636e9674634a96ba9f1d1e61cfc09ad098960c1b3f35e27ad1ac0cf8/
drwxr-xr-x 2 root root 4096 Apr 16 18:11 db1595149451b379f2313b21ca97702b5bfa1b3f00ab080b090138bd414ecc27/
drwxr-xr-x 2 root root 4096 Apr 16 18:11 f45abcb94bf801d5ea5575637f6c81ec0db2c72acabb27800ec0a49dea281d8a/
-rw-r--r-- 1 root root  355 Jan  1  1970 manifest.json
-rw-r--r-- 1 root root   88 Jan  1  1970 repositories

root@Docker-1:/opt/nginx# cat manifest.json
[{"Config":"16af99d71a72da0d83975260ed6855961104ac1c4b3d73a80beab7801d8d528b.json",  # 该镜像的详细配置
"RepoTags":["nginx:1.16.1"],  # 仓库和镜像tag名称
"Layers":["2b88b180636e9674634a96ba9f1d1e61cfc09ad098960c1b3f35e27ad1ac0cf8/layer.tar","f45abcb94bf801d5ea5575637f6c81ec0db2c72acabb27800ec0a49dea281d8a/layer.tar", # 键Layers记录了目前该镜像的分层情况
"db1595149451b379f2313b21ca97702b5bfa1b3f00ab080b090138bd414ecc27/layer.tar"]}]

root@Docker-1:/opt/nginx# cat repositories   # repositories使用json格式记录了镜像的仓库信息和tag名称
{"nginx":{"1.16.1":"db1595149451b379f2313b21ca97702b5bfa1b3f00ab080b090138bd414ecc27"}}
查看镜像的详细配置和构建历史
root@Docker-1:/opt/nginx# cat 16af99d71a72da0d83975260ed6855961104ac1c4b3d73a80beab7801d8d528b.json
1.4.6镜像导入
将其他容器导出的镜像,导入到 Docker 生成另一个镜像,使用docker load命令
~$ docker [image] load -i /path/to/image.tar.gz
~$ docker [image] load < /path/to/image.tar.gz
root@Docker-1:/opt# scp nginx-1.16.1.tar.gz 172.20.32.102:/opt/
The authenticity of host '172.20.32.102 (172.20.32.102)' can't be established.
nginx-1.16.1.tar.gz                                                                              100%  124MB  62.2MB/s   00:02

# 在172.20.32.102
root@Docker-2:/opt# ll
total 127492
drwxr-xr-x  3 root root      4096 Apr 17 09:21 ./
drwxr-xr-x 24 root root      4096 Oct 26 19:34 ../
drwx--x--x  4 root root      4096 Apr 17 09:21 containerd/
-rw-------  1 root root 130532864 Apr 17 09:15 nginx-1.16.1.tar.gz

root@Docker-2:/opt# docker load -i nginx-1.16.1.tar.gz
b60e5c3bcef2: Loading layer [==================================================>]  72.49MB/72.49MB
1b7f58b2d14e: Loading layer [==================================================>]  58.02MB/58.02MB
0b12ec6fd453: Loading layer [==================================================>]  3.584kB/3.584kB
Loaded image: nginx:1.16.1
root@Docker-2:/opt# docker images
REPOSITORY          TAG                 IMAGE ID            CREATED             SIZE
nginx               1.16.1              16af99d71a72        15 hours ago        127MB
1.4.7 :删除镜像
从 Docker 当前已有的镜像列表中删除镜像
~$ docker image rm ID
~$ docker rmi ID
root@Docker-1:~# docker images
REPOSITORY          TAG                 IMAGE ID            CREATED             SIZE
nginx               1.16.1              16af99d71a72        15 hours ago        127MB
nginx               latest              5a8dfb2ca731        15 hours ago        127MB
alpine              latest              a187dde48cd2        3 weeks ago         5.6MB
root@Docker-1:~# docker image rm a187dde48cd2
Untagged: alpine:latest
Untagged: alpine@sha256:b276d875eeed9c7d3f1cfa7edb06b22ed22b14219a7d67c52c56612330348239
Deleted: sha256:a187dde48cd289ac374ad8539930628314bc581a481cdb41409c9289419ddb72
Deleted: sha256:beee9f30bc1f711043e78d4a2be0668955d4b761d587d6f60c2c8dc081efb203
root@Docker-1:~# docker images
REPOSITORY          TAG                 IMAGE ID            CREATED             SIZE
nginx               1.16.1              16af99d71a72        15 hours ago        127MB
nginx               latest              5a8dfb2ca731        15 hours ago        127MB

root@Docker-1:~# docker rmi  5a8dfb2ca731
Untagged: nginx:latest
Untagged: nginx@sha256:4a1f25606ce84be14bb5b4a4e11825d9ce78affeec62545d0a027dc8a1b2ce76
Deleted: sha256:5a8dfb2ca7312ee39433331b11d92f45bb19d7809f7c0ff19e1d01a2c131e959
Deleted: sha256:eede83f79a434879440e1f6f6f98a135b38057a35ddcdace715ae1bddcd7a884
Deleted: sha256:fa994cfd7aeedcd46b70cf30fea0ccf9f59f990bbb86bfa9b7c02d7ff2a833eb
root@Docker-1:~# docker images
REPOSITORY          TAG                 IMAGE ID            CREATED             SIZE
nginx               1.16.1              16af99d71a72        15 hours ago        127MB
镜像管理命令总结
~$ docker [image] pull
~$ docker search IMAGE[:TAG]
~$ docker images
~$ docker [image] save IMAGE -o /path/to/IMAGE.tar.gz
~$ docker [image] save IMAGE > /path/to/IMAGE.tar.gz
~$ docker [image] load -i /path/to/IMAGE.tar.gz
~$ docker [image] load < /path/to/IMAGE.tar.gz
~$ docker [image] rm ID
~$ docker rmi ID
注意:
删除指定 ID 的镜像时,通过镜像启动容器的时候该镜像不能被删除,除非将容器全部关闭。删除镜像时可以是镜像 ID 也可以是镜像名称。
1.5容器操作基础命令
Docker 容器根据对其不同的操作和不同的情况其可以处于多种状态,这些状态组成了容器的生命周期,主要的状态如下图所示:
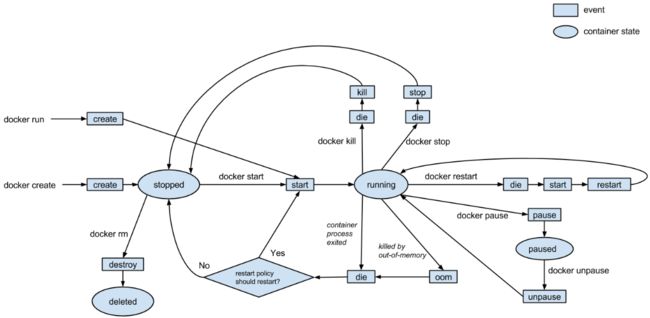
容器管理主要涉及从镜像启动容器、暂停或停止容器、恢复暂停或停止的容器、删除正在运行的容器及显示相应状态的容器等操作。
命令格式:
~$ docker run --help # 获取帮助
~$ docker run [OPT] IMAGE [CMD] [ARG...] # 运行容器
~$ docker ps [OPT] # 显示运行的容器
root@Docker-1:~# docker run --help

Usage:	docker run [OPTIONS] IMAGE [COMMAND] [ARG...]

Run a command in a new container

Options:
......
1.5.1 :从镜像启动一个容器
从镜像启动一个容器后会直接进入到该容器,并随机生成容器 ID 和名称
root@Docker-1:~# docker run --help
...
-i, --interactive                    Keep STDIN open even if not attached
   # 保持标准输入开启,使得容器可以接受命令行的命令,即使用交互式创建容器。

-t, --tty                            Allocate a pseudo-TTY
   # 给创建的容器分配一个伪终端
...
所以可以使用docker run -i -t来创建容器,并进入 Docker 为其分配的终端
root@Docker-1:~# docker images
REPOSITORY          TAG                 IMAGE ID            CREATED             SIZE
nginx               1.16.1              16af99d71a72        15 hours ago        127MB
alpine              latest              a187dde48cd2        3 weeks ago         5.6MB
root@Docker-1:~# docker run -it alpine sh
/ # echo "hello world"
hello world
/ # exit  # 退出交互式运行的容器,其将不再在后台运行

root@Docker-1:~# docker ps
CONTAINER ID        IMAGE               COMMAND             CREATED             STATUS              PORTS               NAMES
root@Docker-1:~# docker ps -a   # 可以看到容器alpine已经退出,-a选项显示所有状态容器
CONTAINER ID        IMAGE               COMMAND                  CREATED              STATUS                         PORTS               NAMES
b15e4ffee417        alpine              "sh"                     About a minute ago   Exited (0) 48 seconds ago                          zen_borg
0efb1d4d3d75        nginx:1.16.1        "nginx -g 'daemon of…"   2 hours ago          Exited (0) About an hour ago
# ctrl+p+q 退出容器,容器任然在后台运行
root@Docker-1:~# tty
/dev/pts/0
root@Docker-1:~# docker run -it alpine sh
/ #   #这里执行了ctrl+p+q 退出容器,容器任然在后台运行
/ # root@Docker-1:~# tty  #退回容器回到当前终端 在执行tty命令查看
/dev/pts/0

root@Docker-1:~# docker ps
CONTAINER ID        IMAGE               COMMAND             CREATED              STATUS              PORTS               NAMES
37c8301af2da        alpine              "sh"                About a minute ago   Up About a minute                       zen_noyce
root@Docker-1:~# docker exec -it 37c8301af2da sh
/ # tty
/dev/pts/1 # docker为alpine容器分配的tty为/dev/pts/1
/ # read escape sequence    #  ctrl+p+q 剥离当前终端的容器
root@Docker-1:~# docker ps  # alpine容器还在
CONTAINER ID        IMAGE               COMMAND             CREATED             STATUS              PORTS               NAMES
37c8301af2da        alpine              "sh"                2 minutes ago       Up 2 minutes                            zen_noyce
1.5.2显示正在运行的容器
~$ docker ps
~$ docker ps --help
root@Docker-1:~# docker ps
CONTAINER ID        IMAGE               COMMAND                  CREATED             STATUS              PORTS               NAMES
46b415548bbd        nginx:1.16.1        "nginx -g 'daemon of…"   10 seconds ago      Up 9 seconds        80/tcp              hardcore_jackson
37c8301af2da        alpine              "sh"                     7 minutes ago       Up 7 minutes                            zen_noyce
root@Docker-1:~# docker ps -f name=zen_noyce  # 以名字过滤容器
CONTAINER ID        IMAGE               COMMAND             CREATED             STATUS              PORTS               NAMES
37c8301af2da        alpine              "sh"                9 minutes ago       Up 9 minutes                            zen_noyce
1.5.3显示所有容器:
~$ docker ps -a
root@Docker-1:~# docker run -it -d nginx:1.16.1
46b415548bbd3f876672c807a8a86e68a171e07b173950465ef5fabfa235f405
root@Docker-1:~# docker ps
CONTAINER ID        IMAGE               COMMAND                  CREATED             STATUS              PORTS               NAMES
46b415548bbd        nginx:1.16.1        "nginx -g 'daemon of…"   10 seconds ago      Up 9 seconds        80/tcp              hardcore_jackson
37c8301af2da        alpine              "sh"                     7 minutes ago       Up 7 minutes                            zen_noyce
root@Docker-1:~# docker container stop 46b415548bbd  #停止nginx容器
46b415548bbd
root@Docker-1:~# docker ps
CONTAINER ID        IMAGE               COMMAND             CREATED             STATUS              PORTS               NAMES
37c8301af2da        alpine              "sh"                11 minutes ago      Up 11 minutes                           zen_noyce
1.5.4删除运行中的容器
删除容器使用docker rm命令
~$ docker [container] rm ID
~$ docker [container] rm -f ID
**注意:**在执行删除容器操作时,指定 -f 选项即使容正在运行当中,也会被强制删除掉
root@Docker-1:~# docker ps  # alpine容器在运行
CONTAINER ID        IMAGE               COMMAND             CREATED             STATUS              PORTS               NAMES
37c8301af2da        alpine              "sh"                13 minutes ago      Up 13 minutes                           zen_noyce
root@Docker-1:~# docker rm 37c8301af2da # 提示无法删除运行的容器
Error response from daemon: You cannot remove a running container 37c8301af2da7784ae645497fd528607ffe16c9228a76a6f6f2d586dc9226ad4.
Stop the container before attempting removal or force remove
root@Docker-1:~# docker stop 37c8301af2da  # 停止容器后删除
37c8301af2da
root@Docker-1:~# docker rm 37c8301af2da
37c8301af2da
root@Docker-1:~# docker ps
CONTAINER ID        IMAGE               COMMAND             CREATED             STATUS              PORTS               NAMES

root@Docker-1:~# docker run -it -d alpine:latest   # 再起一个容器
34de16983e1281a1d189c30c0520e163ebf3f0aa5576d4c857c2394241e6cfc9
root@Docker-1:~# docker ps
CONTAINER ID        IMAGE               COMMAND             CREATED             STATUS              PORTS               NAMES
34de16983e12        alpine:latest       "/bin/sh"           5 seconds ago       Up 4 seconds                            adoring_pike
root@Docker-1:~# docker rm -f 34de16983e12
34de16983e12
root@Docker-1:~# docker ps
CONTAINER ID        IMAGE               COMMAND             CREATED             STATUS              PORTS               NAMES
#强制删除成功
1.5.5随机映射端口
~$ docker run --help
...
-p, --publish list      Publish a container\'s port(s) to the host
   # -p,小写的-p选项用来将容器的端口映射到主机的某端口
-P, --publish-all       Publish all exposed ports to random ports
   # -P,大写的-P选项用来将容器的端口映射到主机的随机端口
...

# 例如:
~$ docker run -it -d -p 主机端口:容器端口 <...>
root@Docker-1:~# docker images
REPOSITORY          TAG                 IMAGE ID            CREATED             SIZE
nginx               1.16.1              16af99d71a72        16 hours ago        127MB
alpine              latest              a187dde48cd2        3 weeks ago         5.6MB
root@Docker-1:~# docker ps
CONTAINER ID        IMAGE               COMMAND             CREATED             STATUS              PORTS               NAMES
root@Docker-1:~# docker run -it -d -P nginx:1.16.1
81718abe85ccd52e91968df20231377226d53fe755dcb3ffb609ecc7a6aba690
root@Docker-1:~# docker ps # 可以看到,nginx的默认80端口被映射到主机的随机端口10001
CONTAINER ID        IMAGE               COMMAND                  CREATED             STATUS              PORTS                   NAMES
81718abe85cc        nginx:1.16.1        "nginx -g 'daemon of…"   3 seconds ago       Up 1 second         0.0.0.0:10001->80/tcp   tender_aryabhata
root@Docker-1:~# ss -ntl
LISTEN          0                20480                   *:10001                    *:*

root@Docker-1:~# docker run -it -d -P --name=kaivi_test nginx:1.16.1 # 再起一个容器后,可以看到nginx的80端口被映射到主机的10002端口
61d042ca633093b3e7b342db8308fc48fc4f777ca8249b320e46df5f289d6217
root@Docker-1:~# docker ps
CONTAINER ID        IMAGE               COMMAND                  CREATED             STATUS              PORTS                   NAMES
61d042ca6330        nginx:1.16.1        "nginx -g 'daemon of…"   8 seconds ago       Up 7 seconds        0.0.0.0:10002->80/tcp   kaivi_test
81718abe85cc        nginx:1.16.1        "nginx -g 'daemon of…"   2 minutes ago       Up 2 minutes        0.0.0.0:10001->80/tcp   tender_aryabhata
root@Docker-1:~# lsof -i:10001 # 查看是谁在占用端口10001
COMMAND    PID USER   FD   TYPE DEVICE SIZE/OFF NODE NAME
docker-pr 3301 root    4u  IPv6  52569      0t0  TCP *:10001 (LISTEN)
root@Docker-1:~# lsof -i:10002 # 查看是谁在占用端口10002
COMMAND    PID USER   FD   TYPE DEVICE SIZE/OFF NODE NAME
docker-pr 3403 root    4u  IPv6  53591      0t0  TCP *:10002 (LISTEN)
root@Docker-1:~# ss -ntl
LISTEN          0                20480                           *:10001                        *:*
LISTEN          0                20480                           *:10002                        *:*
1.5.6指定端口映射
1.将主机端口 80 映射到容器端口 80("-p 主机端口:容器端口")
~$ docker run -it -d -p 主机端口:容器端口 <...>
root@Docker-1:~# docker images
REPOSITORY          TAG                 IMAGE ID            CREATED             SIZE
nginx               1.16.1              16af99d71a72        16 hours ago        127MB
alpine              latest              a187dde48cd2        3 weeks ago         5.6MB
root@Docker-1:~# docker run -it -d -p 80:80 --name=kaivi_test1 nginx:1.16.1 #再起一个容器
93d953d6c30ab768be0d84fa794bbbe140ee46e88fa1d6f9d27eb11cdd27d517
root@Docker-1:~# docker ps
CONTAINER ID        IMAGE               COMMAND                  CREATED             STATUS              PORTS                   NAMES
93d953d6c30a        nginx:1.16.1        "nginx -g 'daemon of…"   7 seconds ago       Up 5 seconds        0.0.0.0:80->80/tcp      kaivi_test1
61d042ca6330        nginx:1.16.1        "nginx -g 'daemon of…"   14 minutes ago      Up 14 minutes       0.0.0.0:10002->80/tcp   kaivi_test
81718abe85cc        nginx:1.16.1        "nginx -g 'daemon of…"   17 minutes ago      Up 17 minutes       0.0.0.0:10001->80/tcp   tender_aryabhata
root@Docker-1:~# ss -ntl
LISTEN          0                20480                        *:80                           *:*
LISTEN          0                20480                        *:10001                        *:*
LISTEN          0                20480                        *:10002                        *:*

root@Docker-1:~# lsof -i:80
COMMAND    PID USER   FD   TYPE DEVICE SIZE/OFF NODE NAME
docker-pr 3529 root    4u  IPv6  56741      0t0  TCP *:http (LISTEN)
2.将主机的 IP 加端口映射到容器的某端口(主机 IP:本地端口:容器端口)
~$ docker run -it -d -p IP:PORT:PORT <...>
root@Docker-1:~# docker run -it -d -p 172.20.32.101:81:80 --name=kaivi_test2 nginx:1.16.1
5522e58261b9581e59c9e2da6ac09336ca1421699813eb002500b67f85f5cf4b
3.将主机 IP 和随机端口映射到容器的某端口(主机 IP::PORT)
root@Docker-1:~# docker run -it -d -p 172.20.32.101::80 --name=kaivi_test3 nginx:1.16.1
93974f01ee647a7fddad7d2bf540f8009bf57e77646d433c1c4560d88401791b
4.将主机的 IP 加端口映射到容器的某端口并指定协议(主机 IP:本地端口:容器端口/协议)
root@Docker-1:~# docker run -it -d -p 172.20.32.101:82:80/udp --name=kaivi_test4 nginx:1.16.1
4ac2c4f97459a4fc4e97e73d371a707bb473d698e30b368174406b8adc52d942
5.映射多个端口
root@Docker-1:~# docker run -it -d -p 172.20.32.101:83:80/udp -p 443:443/tcp -p 50:50/udp  --name=kaivi_test5 nginx:1.16.1
a56a5c0fb4822d91c8d63379e299e76dac938a5fd9b1765cde71e12bdd9295a7
查看端口映射情况
root@Docker-1:~# docker ps
CONTAINER ID        IMAGE               COMMAND                  CREATED             STATUS              PORTS                                                                        NAMES
a56a5c0fb482        nginx:1.16.1        "nginx -g 'daemon of…"   24 seconds ago      Up 23 seconds       0.0.0.0:50->50/udp, 80/tcp, 0.0.0.0:443->443/tcp, 172.20.32.101:83->80/udp   kaivi_test5
4ac2c4f97459        nginx:1.16.1        "nginx -g 'daemon of…"   2 minutes ago       Up 2 minutes        80/tcp, 172.20.32.101:82->80/udp                                             kaivi_test4
93974f01ee64        nginx:1.16.1        "nginx -g 'daemon of…"   4 minutes ago       Up 4 minutes        172.20.32.101:10003->80/tcp                                                  kaivi_test3
5522e58261b9        nginx:1.16.1        "nginx -g 'daemon of…"   6 minutes ago       Up 6 minutes        172.20.32.101:81->80/tcp                                                     kaivi_test2
93d953d6c30a        nginx:1.16.1        "nginx -g 'daemon of…"   10 minutes ago      Up 10 minutes       0.0.0.0:80->80/tcp                                                           kaivi_test1
61d042ca6330        nginx:1.16.1        "nginx -g 'daemon of…"   25 minutes ago      Up 25 minutes       0.0.0.0:10002->80/tcp                                                        kaivi_test
81718abe85cc        nginx:1.16.1        "nginx -g 'daemon of…"   28 minutes ago      Up 28 minutes       0.0.0.0:10001->80/tcp
                                                     tender_aryabhata
root@Docker-1:~# ss -ntl
State           Recv-Q           Send-Q                        Local Address:Port                        Peer Address:Port
LISTEN          0                20480                         172.20.32.101:81                               0.0.0.0:*
LISTEN          0                20480                         172.20.32.101:10003                            0.0.0.0:*
LISTEN          0                128                           127.0.0.53%lo:53                               0.0.0.0:*
LISTEN          0                128                                 0.0.0.0:22                               0.0.0.0:*
LISTEN          0                128                               127.0.0.1:6010                             0.0.0.0:*
LISTEN          0                20480                                     *:80                                     *:*
LISTEN          0                20480                                     *:10001                                  *:*
LISTEN          0                20480                                     *:10002                                  *:*
LISTEN          0                128                                    [::]:22                                  [::]:*
LISTEN          0                128                                   [::1]:6010                                [::]:*
LISTEN          0                20480                                     *:443                                    *:*
查看 nginx 容器的访问日志
~$ docker logs NAME/ID #单次查看
~$ docker logs -f NAME/ID #持续查看
root@Docker-1:~# docker logs kaivi_test
172.20.32.1 - - [17/Apr/2020:02:14:17 +0000] "GET / HTTP/1.1" 200 612 "-" "Mozilla/5.0 (Windows NT 10.0; Win64; x64) AppleWebKit/537.36 (KHTML, like Gecko) Chrome/80.0.3987.163 Safari/537.36" "-"
2020/04/17 02:14:17 [error] 6#6: *1 open() "/usr/share/nginx/html/favicon.ico" failed (2: No such file or directory), client: 172.20.32.1, server: localhost, request: "GET /favicon.ico HTTP/1.1", host: "172.20.32.101:10002", referrer: "http://172.20.32.101:10002/"
172.20.32.1 - - [17/Apr/2020:02:14:17 +0000] "GET /favicon.ico HTTP/1.1" 404 555 "http://172.20.32.101:10002/" "Mozilla/5.0 (Windows NT 10.0; Win64; x64) AppleWebKit/537.36 (KHTML, like Gecko) Chrome/80.0.3987.163 Safari/537.36" "-"
172.20.32.1 - - [17/Apr/2020:02:14:39 +0000] "GET / HTTP/1.1" 304 0 "-" "Mozilla/5.0 (Windows NT 10.0; Win64; x64) AppleWebKit/537.36 (KHTML, like Gecko) Chrome/80.0.3987.163 Safari/537.36" "-"


root@Docker-1:~# docker logs -f kaivi_test #持续查看

root@Docker-1:~# docker logs 61d042ca6330
1.5.7查看容器已经映射的端口
~$ docker port NAME/ID
# 该命令的输出是以容器的角度来看端口映射关系
# 即:容器端口 -> 主机端口
root@Docker-1:~# docker port 4ac2c4f97459
80/udp -> 172.20.32.101:82
root@Docker-1:~# docker port kaivi_test4
80/udp -> 172.20.32.101:82
root@Docker-1:~# docker port kaivi_test5
443/tcp -> 0.0.0.0:443
50/udp -> 0.0.0.0:50
80/udp -> 172.20.32.101:83
自定义容器名称
~$ docker run -it -d --name=cus_name IMAGE/ID
1.5.8自定义容器名称
从镜像运行容器时指定-d选项,可以让容器后台运行, -i -t打开 STDI 并分配 tty 给容器
root@Docker-1:~# docker run -it -d --name=kaivi_test6 alpine
8bc97beeed6fe24560575e6f22f4e03ec6981889a6b6be714c392a4dbf55e954
root@Docker-1:~# docker ps -f name=kaivi_test6 #用名字过滤
CONTAINER ID        IMAGE               COMMAND             CREATED              STATUS              PORTS               NAMES
8bc97beeed6f        alpine              "/bin/sh"           About a minute ago   Up About a minute                       kaivi_test6
1.5.9创建并进入容器
从镜像创建并运行容器时,可以在命令最后指定需要容器运行的命令。这样可以创建容器后直接进入容器,执行 exit 退出后容器并关闭容器。使用ctrl + p + q可以不退出容器将其剥离终端在后台运行。
root@Docker-1:~# docker run -it  --name=kaivi_test7 alpine # 不指定-d选项
/ # ls   # 直接进入运行shell的容器
bin    dev    etc    home   lib    media  mnt    opt    proc   root   run    sbin   srv    sys    tmp    usr    var
/ # pwd
/
/ # ps aux
PID   USER     TIME  COMMAND
    1 root      0:00 /bin/sh
    7 root      0:00 ps aux
/ # exit
1.5.10单次运行
单词运行容器可以用来测试容器是否可以正常创建并运行,使用–rm选项可以让容器单次运行,在容器退出后会被自动删除。
root@Docker-1:~# tty
/dev/pts/0
root@Docker-1:~# docker run -it  --rm --name=kaivi_test8 alpine
/ # exit

# 在新终端/dev/pts/1查看
root@Docker-1:~# docker ps -f name=kaivi_test8   # 未退出时在/dev/pts/1可以看到其运行
CONTAINER ID        IMAGE               COMMAND             CREATED             STATUS              PORTS               NAMES
25e5aa9e6516        alpine              "/bin/sh"           37 seconds ago      Up 36 seconds                           kaivi_test8
root@Docker-1:~# docker ps -f name=kaivi_test8
CONTAINER ID        IMAGE               COMMAND             CREATED             STATUS              PORTS               NAMES
1.5.11传递运行命令
容器需要有一个前台运行的进程才能保持容器的运行,通过传递运行参数是一种方式,另外也可以在构建镜像的时候指定容器启动时运行的前台命令。
# 尝试不给alpine容器分配tty和打开标准输入
root@Docker-1:~# docker run -d alpine
046dd4df9922bd8a9d5ca6d1d3710dcad0e874ea13ad24a35c828322bc0fa680
root@Docker-1:~# docker ps
CONTAINER ID        IMAGE               COMMAND                  CREATED             STATUS              PORTS                                                                        NAMES
root@Docker-1:~# docker ps -a  # 创建后运行了一下/bin/sh就退出了
CONTAINER ID        IMAGE               COMMAND                  CREATED             STATUS                         PORTS                                                                        NAMES
046dd4df9922        alpine              "/bin/sh"                21 seconds ago      Exited (0) 20 seconds ago
# 给alpine容器传一个前台运行的命令(依附于tty和标准输入)
root@Docker-1:~# docker run -d alpine /usr/bin/tail -f '/etc/issue'
e89d3650d99d497f51a7ce31948a09b88a215ea0e92a8958011a64130bc5761d
root@Docker-1:~# docker ps #这次运行成功
CONTAINER ID        IMAGE               COMMAND                  CREATED             STATUS              PORTS                                                                        NAMES
e89d3650d99d        alpine              "/usr/bin/tail -f /e…"   6 seconds ago       Up 5 seconds                                                                                     naughty_davinci
1.5.12容器的启动和关闭
~$ docker stop ID/NAMES
~$ docker start ID/NAMES
root@Docker-1:~# docker ps
CONTAINER ID        IMAGE               COMMAND                  CREATED             STATUS              PORTS                                                                        NAMES
e89d3650d99d        alpine              "/usr/bin/tail -f /e…"   4 minutes ago       Up 4 minutes                                                                                     naughty_davinci
8bc97beeed6f        alpine              "/bin/sh"                30 minutes ago      Up 30 minutes                                                                                    kaivi_test6
a56a5c0fb482        nginx:1.16.1        "nginx -g 'daemon of…"   43 minutes ago      Up 43 minutes       0.0.0.0:50->50/udp, 80/tcp, 0.0.0.0:443->443/tcp, 172.20.32.101:83->80/udp   kaivi_test5
4ac2c4f97459        nginx:1.16.1        "nginx -g 'daemon of…"   45 minutes ago      Up 45 minutes       80/tcp, 172.20.32.101:82->80/udp                                             kaivi_test4
93974f01ee64        nginx:1.16.1        "nginx -g 'daemon of…"   About an hour ago   Up About an hour    172.20.32.101:10003->80/tcp                                                  kaivi_test3
5522e58261b9        nginx:1.16.1        "nginx -g 'daemon of…"   About an hour ago   Up About an hour    172.20.32.101:81->80/tcp                                                     kaivi_test2
93d953d6c30a        nginx:1.16.1        "nginx -g 'daemon of…"   About an hour ago   Up About an hour    0.0.0.0:80->80/tcp                                                           kaivi_test1
61d042ca6330        nginx:1.16.1        "nginx -g 'daemon of…"   About an hour ago   Up About an hour    0.0.0.0:10002->80/tcp                                                        kaivi_test
81718abe85cc        nginx:1.16.1        "nginx -g 'daemon of…"   About an hour ago   Up About an hour    0.0.0.0:10001->80/tcp                                                        tender_aryabhata
root@Docker-1:~# docker stop naughty_davinci
naughty_davinci
root@Docker-1:~# docker ps -f name=naughty_davinci
CONTAINER ID        IMAGE               COMMAND             CREATED             STATUS              PORTS               NAMES
root@Docker-1:~# docker start naughty_davinci
naughty_davinci
root@Docker-1:~# docker ps -f name=naughty_davinci
CONTAINER ID        IMAGE               COMMAND                  CREATED             STATUS              PORTS               NAMES
e89d3650d99d        alpine              "/usr/bin/tail -f /e…"   5 minutes ago       Up 3 seconds                            naughty_davinci
1.5.13进入到正在运行的容器
在单机运行容器时,有的时候涉及到进入容器查看或者修改内容。有几种不同的方式可以进入运行中的容器,比较推荐使用 nsenter 命令进入容器(name space enter)
使用 attach
使用命令 docker attach NAME进入运行的容器,attach 类似于 vnc,在容器中的每个操作会在各个终端显示,所有使用此方式进入容器的操作都是同步显示的且使用 exit 命令退出后容器将被关闭,不推荐使用,其要求需要进入到有 shell环境的容器,这里以centos镜像为例:
root@Docker-1:~# docker pull centos
root@Docker-1:~# docker run -it centos bash
在另外一个终端运行
root@Docker-1:~# docker attach 15188b202e6b
#在另外一个窗口启动测试页面是否同步
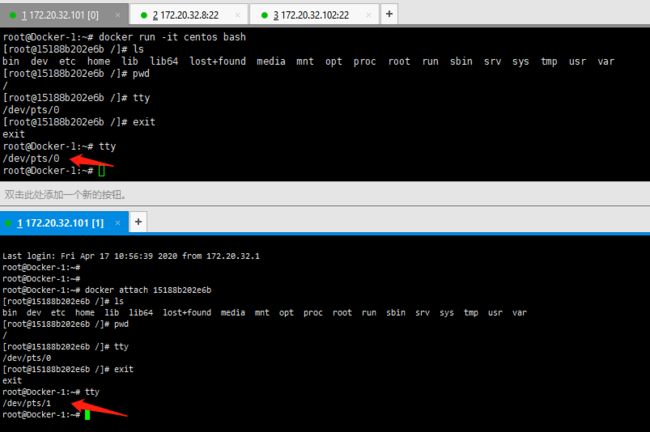
在不同的主机终端进入 ubuntu 容器后,操作都是同步的,在容器中都分配了同一个终端。一边退出后,其它的终端也退出了,退出后容器也关闭了。
使用 exec
可以使用 docker exec 命令在容器中执行单次命令或是进入容器,不大推荐此方式,使用docker exec 命令进入容器后 exit 退出容器其并不会停止。
root@Docker-1:~# docker exec -it kaivi_test6 sh
/ # echo $SHELLS

/ # echo $PATH
/usr/local/sbin:/usr/local/bin:/usr/sbin:/usr/bin:/sbin:/bin
/ # exit
root@Docker-1:~# docker ps -f name=kaivi_test6 # 容器未退出
CONTAINER ID        IMAGE               COMMAND             CREATED             STATUS              PORTS               NAMES
8bc97beeed6f        alpine              "/bin/sh"           41 minutes ago      Up 41 minutes                           kaivi_test6
使用 nsenter
推荐使用 nsenter 命令进入容器,该命令需要通过容器的 PID 进入到容器内部,比较麻烦。
不过可以使用docker inspect 命令获取到容器的 PID。
安装 nsenter 工具,包名 Ubuntu 和 CentOS 一样都要安装 util-linux
root@Docker-1:~# apt install util-linux

root@Docker-1:~#  man nsenter
NAME
       nsenter - run program with namespaces of other processes # 使用其他进程的名称空间运行程序

SYNOPSIS
       nsenter [options] [program [arguments]]
       。。。
docker inspect NAME/ID 命令使用,该命令用来获取当前运行的容器的底层对象信息,以 JSON格式返回到标准输出。
root@Docker-1:~# docker images
REPOSITORY          TAG                 IMAGE ID            CREATED             SIZE
nginx               1.16.1              16af99d71a72        18 hours ago        127MB
alpine              latest              a187dde48cd2        3 weeks ago         5.6MB
centos              latest              470671670cac        3 months ago        237MB
root@Docker-1:~# docker run -it -d alpine
54cd0e05ee0d8f5c4c1f652e3f9e4e5426bec53677721a8886010ff2b9dba14d
root@Docker-1:~# docker ps
CONTAINER ID        IMAGE               COMMAND             CREATED             STATUS              PORTS               NAMES
54cd0e05ee0d        alpine              "/bin/sh"           7 seconds ago       Up 6 seconds                            zealous_tesla
root@Docker-1:~# docker inspect zealous_tesla
[
    {
        "Id": "54cd0e05ee0d8f5c4c1f652e3f9e4e5426bec53677721a8886010ff2b9dba14d",
        "Created": "2020-04-17T04:40:21.494420684Z",
        "Path": "/bin/sh",
        "Args": [],
        "State": {
            "Status": "running",
            "Running": true,
            "Paused": false,
            "Restarting": false,
            "OOMKilled": false,
            "Dead": false,
            "Pid": 7348,
            "ExitCode": 0,
            "Error": "",
            "StartedAt": "2020-04-17T04:40:21.918256845Z",
            "FinishedAt": "0001-01-01T00:00:00Z"
        },
后面省略。。。
可以使用该命令返回的 JSON 格式中的键来获取特定的信息,这样就可以获取当前运行的
容器的任何信息如:
root@Docker-1:~# docker inspect -f "{{.NetworkSettings.IPAddress}}" zealous_tesla
172.17.0.2        #   # -f 选项指定模板,模板是go语言风格的模板

root@Docker-1:~# docker inspect -f "{{.NetworkSettings.MacAddress}}" zealous_tesla
02:42:ac:11:00:02
docker inspect -f “{{.State.Pid}}” NAME/ID 获取容器的 PID。获取到 docker 容器的 PID,就可以使用 nsenter 命令通过 PID 进入到容器内。
root@Docker-1:~# docker run -it  -d -p 80:80 nginx:1.16.1
7016fd0210c6155c26ed0c657ab3f2025e4da39f6e0d33b00ad5435e882b4f15
root@Docker-1:~# docker ps
CONTAINER ID        IMAGE               COMMAND                  CREATED             STATUS              PORTS                NAMES
7016fd0210c6        nginx:1.16.1        "nginx -g 'daemon of…"   9 seconds ago       Up 8 seconds        0.0.0.0:80->80/tcp   ecstatic_kowalevski
54cd0e05ee0d        alpine              "/bin/sh"                23 minutes ago      Up 23 minutes                            zealous_tesla
root@Docker-1:~# docker inspect -f "{{.NetworkSettings.IPAddress}}" ecstatic_kowalevski
172.17.0.3
root@Docker-1:~# docker inspect -f "{{.State.Pid}}" ecstatic_kowalevski
7804
# 获取到docker容器的PID,就可以使用nsenter命令通过PID进入到容器内
root@Docker-1:~# nsenter -t 7804 -m -u -i -n -p
mesg: ttyname failed: No such device
root@7016fd0210c6:/# tty  # 未分配终端
not a tty
root@7016fd0210c6:/# ls
bin  boot  dev	etc  home  lib	lib64  media  mnt  opt	proc  root  run  sbin  srv  sys  tmp  usr  var
root@7016fd0210c6:/# pwd
/
root@7016fd0210c6:/# echo "kaivi test"
kaivi test
root@7016fd0210c6:/# exit
logout
root@Docker-1:~# docker ps   # 退出容器后,容器任然运行
CONTAINER ID        IMAGE               COMMAND                  CREATED             STATUS              PORTS                NAMES
7016fd0210c6        nginx:1.16.1        "nginx -g 'daemon of…"   2 minutes ago       Up 2 minutes        0.0.0.0:80->80/tcp   ecstatic_kowalevski
54cd0e05ee0d        alpine              "/bin/sh"                26 minutes ago      Up 26 minutes                            zealous_tesla
使用脚本
由于使用 nsenter 命令进入容器需要提前使用docker inspect -f "{{.State.Pid}}"来获取容器 PID,比较麻烦,一个折中的方案是将 nsenter 命令和docker inspect命令写入脚本,进入某个容器时,通过脚本和容器名称就可以进入。
脚本可以这样写:将容器名作为参数传给脚本
#!/bin/bash
if [[ $# -eq 0 ]]; then
    echo "Usage: `basename $0` CONTAINER_NAME"
    exit 80;
fi

enter(){
    local C_NAME=$1
    PID=`docker inspect -f "{{.State.Pid}}" ${C_NAME}`
    nsenter -t ${PID} -m -u -n -i -p
}

enter $1
测试脚本是否可以使用:
root@Docker-1:~# cd /data/
root@Docker-1:/data# vim enter_container.sh
root@Docker-1:/data# cat enter_container.sh
#!/bin/bash
if [[ $# -eq 0 ]]; then
    echo "Usage: `basename $0` CONTAINER_NAME"
    exit 80;
fi

enter(){
    local C_NAME=$1
    PID=`docker inspect -f "{{.State.Pid}}" ${C_NAME}`
    nsenter -t ${PID} -m -u -n -i -p
}

enter $1
root@Docker-1:/data# chmod a+x enter_container.sh
root@Docker-1:/data# ./enter_container.sh
Usage: enter_container.sh CONTAINER_NAME
root@Docker-1:/data# echo $?
80
root@Docker-1:/data# docker ps
CONTAINER ID        IMAGE               COMMAND                  CREATED             STATUS              PORTS                NAMES
7016fd0210c6        nginx:1.16.1        "nginx -g 'daemon of…"   6 minutes ago       Up 6 minutes        0.0.0.0:80->80/tcp   ecstatic_kowalevski
54cd0e05ee0d        alpine              "/bin/sh"                29 minutes ago      Up 29 minutes                            zealous_tesla
root@Docker-1:/data# ./enter_container.sh ecstatic_kowalevski
mesg: ttyname failed: No such device
root@7016fd0210c6:/# echo "kaivi test 1"
kaivi test 1
root@7016fd0210c6:/# exit
logout
查看容器内部 hosts 文件
在 Docker 容器实例中,默认容器会将自己的 ID 添加到 hosts 文件中。
这样容器可以将自己的 ID 解析为自己的 IP。
root@Docker-1:~# docker run -it -p 82:80 --name=nginx_host nginx:1.16.1 /bin/bash
root@a56389a0e2df:/# cat /etc/hosts
127.0.0.1	localhost
::1	localhost ip6-localhost ip6-loopback
fe00::0	ip6-localnet
ff00::0	ip6-mcastprefix
ff02::1	ip6-allnodes
ff02::2	ip6-allrouters
172.17.0.4	a56389a0e2df    # 默认容器会将自己的ID添加到hosts文件中
root@a56389a0e2df:/# ping a56389a0e2df
bash: ping: command not found
root@a56389a0e2df:/# apt update
。。。
root@a56389a0e2df:/# apt install iputils-ping -y
。。。
root@a56389a0e2df:/# ping a56389a0e2df   # ping此容器ID后其将ID解析为自己的IP
PING a56389a0e2df (172.17.0.4) 56(84) bytes of data.
64 bytes from a56389a0e2df (172.17.0.4): icmp_seq=1 ttl=64 time=0.013 ms
64 bytes from a56389a0e2df (172.17.0.4): icmp_seq=2 ttl=64 time=0.024 ms
64 bytes from a56389a0e2df (172.17.0.4): icmp_seq=3 ttl=64 time=0.066 ms
1.5.14批量关闭正在运行的容器
root@Docker-1:~# docker ps -a
CONTAINER ID        IMAGE               COMMAND                  CREATED             STATUS                      PORTS                NAMES
a56389a0e2df        nginx:1.16.1        "/bin/bash"              7 minutes ago       Exited (0) 42 seconds ago                        nginx_host
b8b50669060f        nginx:1.16.1        "/bin/bash"              8 minutes ago       Created                                          nginx_host_test
7016fd0210c6        nginx:1.16.1        "nginx -g 'daemon of…"   19 minutes ago      Up 19 minutes               0.0.0.0:80->80/tcp   ecstatic_kowalevski
0c4104ed16c1        nginx:1.16.1        "nginx -g 'daemon of…"   22 minutes ago      Exited (0) 19 minutes ago                        frosty_haslett
54cd0e05ee0d        alpine              "/bin/sh"                42 minutes ago      Up 42 minutes                                    zealous_tesla
15188b202e6b        centos              "bash"                   2 hours ago         Exited (0) 2 hours ago                           lucid_euler
e76aea40683c        centos              "bash"                   2 hours ago         Exited (0) 2 hours ago                           vigilant_perlman
046dd4df9922        alpine              "/bin/sh"                2 hours ago         Exited (0) 2 hours ago                           naughty_wescoff
cbe1a84960ce        alpine              "/bin/sh"                2 hours ago         Exited (0) 2 hours ago                           kaivi_test7
46b415548bbd        nginx:1.16.1        "nginx -g 'daemon of…"   4 hours ago         Exited (0) 4 hours ago                           hardcore_jackson
b15e4ffee417        alpine              "sh"                     4 hours ago         Exited (0) 4 hours ago                           zen_borg
0efb1d4d3d75        nginx:1.16.1        "nginx -g 'daemon of…"   5 hours ago         Exited (0) 5 hours ago                           vigilant_noether
b5cec0fd4a18        nginx:1.16.1        "nginx -g 'daemon of…"   13 hours ago        Exited (0) 12 hours ago                          vigorous_shockley

root@Docker-1:~# docker ps -a -q
a56389a0e2df
b8b50669060f
7016fd0210c6
0c4104ed16c1
54cd0e05ee0d
15188b202e6b
e76aea40683c
046dd4df9922
cbe1a84960ce
46b415548bbd
b15e4ffee417
0efb1d4d3d75
b5cec0fd4a18

root@Docker-1:~# docker stop `docker ps -a -q`
a56389a0e2df
b8b50669060f
7016fd0210c6
0c4104ed16c1
54cd0e05ee0d
15188b202e6b
e76aea40683c
046dd4df9922
cbe1a84960ce
46b415548bbd
b15e4ffee417
0efb1d4d3d75
b5cec0fd4a18
root@Docker-1:~# root@Docker-1:~# docker ps
CONTAINER ID        IMAGE               COMMAND             CREATED             STATUS              PORTS               NAMES
1.5.15批量强制关闭正在运行的容器
root@Docker-1:~# docker start `docker ps -a -q`
a56389a0e2df
b8b50669060f
54cd0e05ee0d
15188b202e6b
e76aea40683c
046dd4df9922
cbe1a84960ce
46b415548bbd
b15e4ffee417

root@Docker-1:~# docker ps
CONTAINER ID        IMAGE               COMMAND                  CREATED             STATUS              PORTS                NAMES
a56389a0e2df        nginx:1.16.1        "/bin/bash"              10 minutes ago      Up 13 seconds       0.0.0.0:82->80/tcp   nginx_host
b8b50669060f        nginx:1.16.1        "/bin/bash"              12 minutes ago      Up 13 seconds       0.0.0.0:80->80/tcp   nginx_host_test
54cd0e05ee0d        alpine              "/bin/sh"                About an hour ago   Up 12 seconds                            zealous_tesla
15188b202e6b        centos              "bash"                   2 hours ago         Up 12 seconds                            lucid_euler
e76aea40683c        centos              "bash"                   2 hours ago         Up 11 seconds                            vigilant_perlman
cbe1a84960ce        alpine              "/bin/sh"                3 hours ago         Up 11 seconds                            kaivi_test7
46b415548bbd        nginx:1.16.1        "nginx -g 'daemon of…"   4 hours ago         Up 10 seconds       80/tcp               hardcore_jackson
b15e4ffee417        alpine              "sh"                     4 hours ago         Up 10 seconds                            zen_borg
root@Docker-1:~# docker kill `docker ps -a -q`
a56389a0e2df
b8b50669060f
54cd0e05ee0d
15188b202e6b
e76aea40683c
cbe1a84960ce
46b415548bbd
b15e4ffee417

root@Docker-1:~# docker ps
CONTAINER ID        IMAGE               COMMAND             CREATED             STATUS              PORTS               NAMES
1.5.16批量删除已退出容器
root@Docker-1:~# docker ps
CONTAINER ID        IMAGE               COMMAND             CREATED             STATUS              PORTS               NAMES
root@Docker-1:~# docker ps -a
CONTAINER ID        IMAGE               COMMAND                  CREATED             STATUS                        PORTS               NAMES
a56389a0e2df        nginx:1.16.1        "/bin/bash"              13 minutes ago      Exited (137) 2 minutes ago                        nginx_host
b8b50669060f        nginx:1.16.1        "/bin/bash"              14 minutes ago      Exited (137) 2 minutes ago                        nginx_host_test
7016fd0210c6        nginx:1.16.1        "nginx -g 'daemon of…"   25 minutes ago      Exited (128) 5 minutes ago                        ecstatic_kowalevski
0c4104ed16c1        nginx:1.16.1        "nginx -g 'daemon of…"   28 minutes ago      Exited (128) 25 minutes ago                       frosty_haslett
54cd0e05ee0d        alpine              "/bin/sh"                About an hour ago   Exited (137) 2 minutes ago                        zealous_tesla
15188b202e6b        centos              "bash"                   2 hours ago         Exited (137) 2 minutes ago                        lucid_euler
e76aea40683c        centos              "bash"                   2 hours ago         Exited (137) 2 minutes ago                        vigilant_perlman
046dd4df9922        alpine              "/bin/sh"                2 hours ago         Exited (0) 2 minutes ago                          naughty_wescoff
cbe1a84960ce        alpine              "/bin/sh"                3 hours ago         Exited (137) 2 minutes ago                        kaivi_test7
46b415548bbd        nginx:1.16.1        "nginx -g 'daemon of…"   4 hours ago         Exited (137) 2 minutes ago                        hardcore_jackson
b15e4ffee417        alpine              "sh"                     4 hours ago         Exited (137) 2 minutes ago                        zen_borg
0efb1d4d3d75        nginx:1.16.1        "nginx -g 'daemon of…"   6 hours ago         Exited (128) 5 hours ago                          vigilant_noether
b5cec0fd4a18        nginx:1.16.1        "nginx -g 'daemon of…"   13 hours ago        Exited (128) 12 hours ago                         vigorous_shockley
root@Docker-1:~# docker start a56389a0e2df
a56389a0e2df
root@Docker-1:~# docker start 15188b202e6b
15188b202e6b
root@Docker-1:~# docker start b15e4ffee417
b15e4ffee417
root@Docker-1:~#
root@Docker-1:~# docker ps
CONTAINER ID        IMAGE               COMMAND             CREATED             STATUS              PORTS                NAMES
a56389a0e2df        nginx:1.16.1        "/bin/bash"         14 minutes ago      Up 23 seconds       0.0.0.0:82->80/tcp   nginx_host
15188b202e6b        centos              "bash"              2 hours ago         Up 13 seconds                            lucid_euler
b15e4ffee417        alpine              "sh"                4 hours ago         Up 5 seconds                             zen_borg
root@Docker-1:~# docker ps -a
CONTAINER ID        IMAGE               COMMAND                  CREATED             STATUS                        PORTS                NAMES
a56389a0e2df        nginx:1.16.1        "/bin/bash"              14 minutes ago      Up 30 seconds                 0.0.0.0:82->80/tcp   nginx_host
b8b50669060f        nginx:1.16.1        "/bin/bash"              15 minutes ago      Exited (137) 3 minutes ago                         nginx_host_test
7016fd0210c6        nginx:1.16.1        "nginx -g 'daemon of…"   26 minutes ago      Exited (128) 6 minutes ago                         ecstatic_kowalevski
0c4104ed16c1        nginx:1.16.1        "nginx -g 'daemon of…"   29 minutes ago      Exited (128) 26 minutes ago                        frosty_haslett
54cd0e05ee0d        alpine              "/bin/sh"                About an hour ago   Exited (137) 3 minutes ago                         zealous_tesla
15188b202e6b        centos              "bash"                   2 hours ago         Up 20 seconds                                      lucid_euler
e76aea40683c        centos              "bash"                   2 hours ago         Exited (137) 3 minutes ago                         vigilant_perlman
046dd4df9922        alpine              "/bin/sh"                2 hours ago         Exited (0) 3 minutes ago                           naughty_wescoff
cbe1a84960ce        alpine              "/bin/sh"                3 hours ago         Exited (137) 3 minutes ago                         kaivi_test7
46b415548bbd        nginx:1.16.1        "nginx -g 'daemon of…"   4 hours ago         Exited (137) 3 minutes ago                         hardcore_jackson
b15e4ffee417        alpine              "sh"                     4 hours ago         Up 11 seconds                                      zen_borg
0efb1d4d3d75        nginx:1.16.1        "nginx -g 'daemon of…"   6 hours ago         Exited (128) 5 hours ago                           vigilant_noether
b5cec0fd4a18        nginx:1.16.1        "nginx -g 'daemon of…"   13 hours ago        Exited (128) 12 hours ago                          vigorous_shockley
root@Docker-1:~# docker rm -f `docker ps -a -q -f status=exited`  # -f 选项指定过滤条件
b8b50669060f
7016fd0210c6
0c4104ed16c1
54cd0e05ee0d
e76aea40683c
046dd4df9922
cbe1a84960ce
46b415548bbd
0efb1d4d3d75
b5cec0fd4a18
root@Docker-1:~# docker ps -a
CONTAINER ID        IMAGE               COMMAND             CREATED             STATUS              PORTS                NAMES
a56389a0e2df        nginx:1.16.1        "/bin/bash"         15 minutes ago      Up About a minute   0.0.0.0:82->80/tcp   nginx_host
15188b202e6b        centos              "bash"              2 hours ago         Up About a minute                        lucid_euler
b15e4ffee417        alpine              "sh"                4 hours ago         Up About a minute                        zen_borg
docker ps命令使用-f选项可以选择性的过滤容器,可以基于容器名称和状态
root@Docker-1:~# docker ps -a
CONTAINER ID        IMAGE               COMMAND             CREATED             STATUS              PORTS                NAMES
a56389a0e2df        nginx:1.16.1        "/bin/bash"         17 minutes ago      Up 3 minutes        0.0.0.0:82->80/tcp   nginx_host
15188b202e6b        centos              "bash"              2 hours ago         Up 3 minutes                             lucid_euler
b15e4ffee417        alpine              "sh"                4 hours ago         Up 3 minutes                             zen_borg

root@Docker-1:~# docker ps -a -f name=nginx_host
CONTAINER ID        IMAGE               COMMAND             CREATED             STATUS              PORTS                NAMES
a56389a0e2df        nginx:1.16.1        "/bin/bash"         18 minutes ago      Up 4 minutes        0.0.0.0:82->80/tcp   nginx_host
1.5.17删除所有容器
使用docker ps命令的-q选项和-a选项就可以获取所有的容器 ID,再使用docker rm IDs命令批量删除容器。
root@Docker-1:~# docker rm -f `docker ps -a -q`
a56389a0e2df
15188b202e6b
b15e4ffee417
root@Docker-1:~# docker ps
CONTAINER ID        IMAGE               COMMAND             CREATED             STATUS              PORTS               NAMES
1.5.18指定容器 DNS
Docker 容器采用的 Dns 服务默认采用宿主机的 dns 地址,也可以在创建和启动容器时指定 dns。
默认的 DNS
# 查看主机DNS
root@Docker-1:~# systemd-resolve --status
Global
         DNS Servers: 114.114.114.114
          DNSSEC NTA: 10.in-addr.arpa
.......
# 创建容器并查看默认的DNS
root@Docker-1:~# docker run -it --name=DNS_ins centos /bin/bash
[root@70c19c138315 /]# cat /etc/resolv.conf
nameserver 114.114.114.114
nameserver 8.8.8.8
指定 DNS
root@Docker-1:~# docker run -it --name=DNS_INI --rm --dns=223.6.6.6 centos /bin/bash
[root@31737e23f8f3 /]# cat /etc/resolv.conf
nameserver 223.6.6.6    # 查看容器中的DNS为指定的DNS
[root@31737e23f8f3 /]#
1.6 参考Reference
Linux Namespace-WIKI
Linux Cgroups 文档 manpage
Docker-pros-and-cons
Discussing Docker. Pros and Cons

