Intel Composer XE 2013 Update 2 Linux (Ubuntu 14.04) 安装笔记
本文以Ubuntu 14.04(64位)为例,介绍ICPC Parallel Studio XE 2013 (Update2,x64)在Linux下的完整安装过程。
【转载请注明出处,多谢支持!】
一、安装前的准备
首先确认下载的安装包存放在Linux内建的磁盘分区上,即格式位EXT,否则后续直接解压时可能出现部分文件的属性设置不对。在Ubuntu下,可以临时将压缩包拷贝到用户根目录的“下载”文件夹中。
启动控制台(Ctrl+Alt+T),输入如下命令($ 表示提示符,不用输入):
$ cd $HOME/下载
或者直接在图形界面中找到“下载”文件夹,然后在右键菜单中选择“在终端中打开“”也可以直接进入到需要操作的目录中。接着输入解压命令:
tar –xzvfname-of-downloaded-file
其中,name-of-downloaded-file是你下载的软件包名称,例如“Intel.Paralle.Studio.XE.2013.Update2.x64.Linux.tgz”。执行命令后稍等一会儿,tar命令会在当前目录下生成一个与压缩包完全一样名称的目录,其中包含的就是整个需要安装的ICPC软件包(其实该文件夹类似于DVD的根目录)。
有关的软件和硬件配置要求,可以查阅文件夹中的“Release_Notes_Studio_XE_2013_L.pdf”。如果软、硬件要求具备,就可以进行下一步了。
注意,对于Ubuntu的支持,文档中只明确说了支持12.04版,但后面将会看到14.04实际上也可以使用,不过需要将GCC编译器的版本指定为V4.4即可。
二、开始安装
安装一共分为7步:
步骤1:启动安装脚本
启动前请确认“install.sh”的文件属性,如下图。
请注意第一组当前用户属性位(从左边开始第2-4位)“rwx”,即具备读、写和运行属性,而且文件是以绿色高亮显示,表示属性正常。
$ ./install.sh
脚本启动后会看到安装提示(如下):
一般根据推荐选择第1项,即让所有用户都可以使用编译器。
随后开始初始化。注意安装过程中千万不要随意按“Ctrl+C”,否则会强行终止脚本。
步骤2:阅读许可协议
这一步主要是阅读和接受许可协议,不用多说。
在阅读完毕后,直接按“q”键盘退出,然后输入“accept”(注意全部小写)
步骤3:激活许可证
如果你手头有许可证,那么请注意这一步的操作(如果没有许可证文件可以选择第1项然后选“Evaluation”)。
选择第3项“I want to activate either remotely, or by using a license file, or by using a license manager”(注意文字说明,有时候该项放在第4个位置)。之后,屏幕上会进一步询问具体的激活方式(如下图):
选择第2项,然后稍等几秒中,安装脚本会接着提示:“Please type the full path to your license file(s)”,此时请输入许可证的完整路径。如果使用粘贴建议从“编辑”菜单操作为妥,以免误按Ctrl+C组合键。
注意路径和文件名一定完整。如果一切顺利,可以看到许可证激活成功。
步骤4:是否参与“Software Improvement Program(软件改进计划)”
这一步是询问用户是否参与“软件改进计划”,一般选择参与(即第1项)。如果非常介意隐私数据就选择第2项。无论选哪项都可以,不用纠结。
步骤5:设定安装路径和组件选项
接下来会让你设定安装路径和选项(如下图),这一步为了省事我选择的是默认选项。如果你的硬盘控件很紧张,可以考虑选择第3项,去掉部分不需要的组件(例如Vtune、Inspector等等)。注意:如果没有特殊原因,不建议修改默认的安装目录(即opt/intel)。
在继续之前,如果需要可以选择第5项,确认一下所有的安装选项(如下图)。
步骤6:安装脚本执行安装配置(等待大约20-30分钟)
在安装正式开始之前,可能会出现Ptrace被锁定的警告(如下图)。
或者由于Ubuntu 14.04的版本不是 Intel官方测试的支持版本,出现兼容性警告。这些都可以在安装时暂时忽略。
步骤7:安装结束及安装过程摘要
整个安装过程顺利结束后,会提示用户结束并给出摘要。以下是摘要全文(在你自己的安装过程中,可能因配置有所差异)。请注意其中红色文字,它们分别给出了如何启动相关组件的概要说明。
| Step no: 7 of 7 | Complete --------------------------------------------------------------------------------Thank you for installing and using the Intel(R) Parallel Studio XE 2013 Update 2 for Linux* Reminder: Intel(R) VTune(TM) Amplifier XE users must be members of the "vtune" permissions group in order to use Event-based Sampling. To register your product purchase, visit https://registrationcenter.intel.com/RegCenter/registerexpress.aspx?media=5G9 To get started using Intel(R) VTune(TM) Amplifier XE 2013 Update 4: - To set your environment variables: source /opt/intel/vtune_amplifier_xe_2013/amplxe-vars.sh - To start the graphical user interface: amplxe-gui - To use the command-line interface: amplxe-cl - For more getting started resources: /opt/intel/vtune_amplifier_xe_2013/ documentation/en/welcomepage/get_started.html. To get started using Intel(R) Inspector XE 2013 Update 4: - To set your environment variables: source /opt/intel/inspector_xe_2013/inspxe-vars.sh - To start the graphical user interface: inspxe-gui - To use the command-line interface: inspxe-cl - For more getting started resources: /opt/intel/inspector_xe_2013/ documentation/en/welcomepage/get_started.html. To get started using Intel(R) Advisor XE 2013 Update 2: - To set your environment variables: source /opt/intel/advisor_xe_2013/advixe-vars.sh - To start the graphical user interface: advixe-gui - To use the command-line interface: advixe-cl - For more getting started resources: /opt/intel/advisor_xe_2013/ documentation/en/welcomepage/get_started.html. To get started using Intel(R) Composer XE 2013 Update 2 for Linux*: - Set the environment variables for a terminal window using one of the following (replace "intel64" with "ia32" if you are using a 32-bit platform). For csh/tcsh: $ source /opt/intel/bin/compilervars.csh intel64 For bash:(注:Ubuntu 选择此项) $ source /opt/intel/bin/compilervars.sh intel64 To invoke the installed compilers: For C++: icpc For C: icc For Fortran: ifort To get help, append the -help option or precede with the man command. - For more getting started resources: /opt/intel/composer_xe_2013/Documentation/en_US/get_started_lc.htm. /opt/intel/composer_xe_2013/Documentation/en_US/get_started_lf.htm. To view movies and additional training, visit http://www.intel.com/software/products. -------------------------------------------------------------------------------- q. Quit [default] -------------------------------------------------------------------------------- |
这一步中只需要按q键退出即可结束整个安装过程。
二、安装验证
1)验证性能调节组件(VTune Amplifier、Inspector和Advisor)的安装
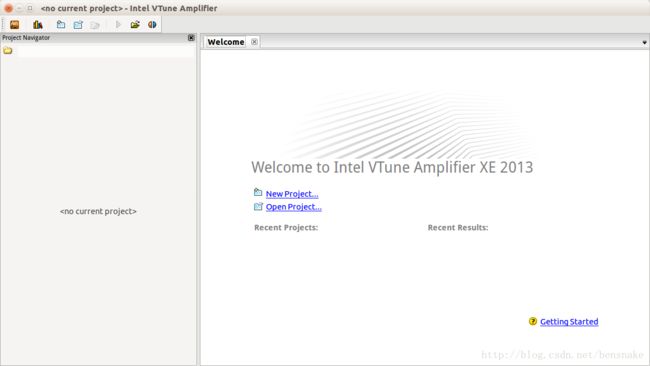
为了验证安装是否正确,可以先尝试着启动一个图形界面的工具试试看。譬如,启动Intel VTune Amplifier的GUI,命令如下。
| $ source /opt/intel/vtune_amplifier_xe_2013/amplxe-vars.sh $ amplxe-gui |
如果安装正确,应该看到GUI环境顺利启动(参考下图)。
其他工具的启动可以参考第7步安装结束摘要中加粗的红色文字。
1)验证编译器的安装(重点)
由于这次安装的主要目的是为了使用Intel的编译器,所以一定要验证ICPC是否正确安装。先准备一个符合C++ 11的迷你测试程序。代码如下,将其保存为“test.cpp”文件。
//Program to test the new C++11 lambda syntax
#include
using namespace std;
int main()
{
cout << [](int m,int n) {return m + n;} (2,4) < $ source /opt/intel/bin/compilervars.sh intel64
不过,正如本文开头说的,因为Ubuntu 14.04中的编译器版本默认是V4.8,所以直接编译有些问题——执行“icpc test.cpp”命令后显示如下出错信息。
查阅CSDN上的许多博文后,没发现有现成的答案。于是,我使用如下命令导出了icpc程序的详细帮助信息。
$ icpc --help >> help.log
结合帮助信息和Intel的官方文档(intel-linux-compiler-14-0-gnu-compatibility-rev4.pdf),终于发现指定GCC V4.4所附带的STL库进行编译可以解决这个问题(其间还花了一些功夫搜索/usr/include/下各种库的目录,发现GCC 4.4版本的目录符合出错位置的依存关系)。于是使用如下命令进行编译:
$ icpc -gcc-name=/usr/bin/gcc-4.4 -std=c++11 test.cpp -o test.out
其中,-gcc-name=
11标准进行编译,否则会提示lamda表达式无法解析。编译成功后可以运行以下test.out程序,会显示结果为“6”。
至此,ICPC的所有安装和测试工作都已完成。另外,顺便说一下,ICPC在发行时已经自带了对Eclipse的支持插件。不过,我更愿意用CodeBlocks,更小而且更快。
三、其他参考资料
1)wikipedia上SSE的介绍
2)Intel C/C++ 编译器各版本对C++ 11 标准的支持程度对比
更新说明:
1) 2015-01-18
修正了一处描述错误,在第二部分(二:安装验证)中,有关GUI界面工具的启动命令进行了更正。
更正前:
| $ source /opt/intel/vtune_amplifier_xe_2013/amplxe-vars.sh |
| $ source /opt/intel/vtune_amplifier_xe_2013/amplxe-vars.sh $ amplxe-gui |
=======================================================================


