Artifactory-oos搭建私有Maven仓库
Artifactory搭建私有Maven仓库及使用
文章目录
- Artifactory搭建私有Maven仓库及使用
- 1.下载并解压 Artifactory
- 2. 启动Artifactory配置
- 3. 创建私有仓库
- 3.1 New Local Repository(新建本地仓库)
- 手动部署包
- 动态部署包
- 3.2 New Remote Repository(新建远程仓库)
- 3.3 New Virtual Repository(新建虚拟仓库)
- 扩展
- 阿里云代理公共仓库列表
- 内网用户访问私有Maven上资源出现401
在涉及到模块化开发过程中,我们想要将公开或公用组件 aar/jar 上传至MavenCenter or JCenter 仓库中心( 将Android项目开源到JCenter两种方式),以便于持续集成。但是对于有些组件我们不想对外公开这时候就需要我们搭建一个私有仓库了(对公司内部提供使用,仅内网用户可访问)。
JFroge的Artifactory 是一款Maven仓库服务端软件,可以用来在内网搭建maven仓库,供公司内部公共库的上传和发布,以提供公共代码使用的便利性。
1.下载并解压 Artifactory
开源的Artifactory-oss下载地址
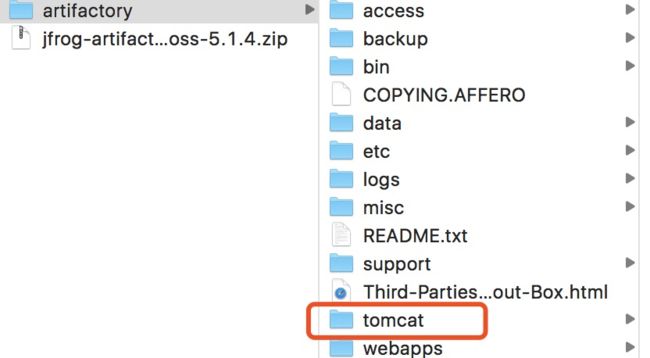
由此可见 artfactory使用的是自带的tomcat进行搭建服务的,而最新版tomcat依赖jdk 1.8 , 故
- 配置
java环境 jdk需要是1.8版本
2. 启动Artifactory配置
进入bin目录下,可以发现以下内容 :
windows下 可以通过.bat和.exe进行操作linux与macOS可以通过.sh文件操作
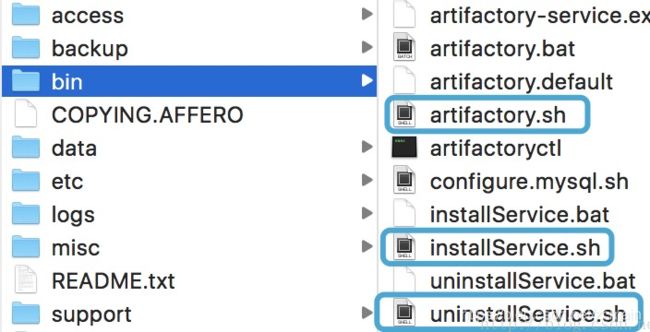
通过两种方式可以进行使用 artifactory :
- 安装方式 及
installService和uninstallService - 非安装方式 :直接使用命令
artifactory.ssh或artifactory.bat
我这里仅仅使用的是非安装方式进行实现。进入bin目录,执行下面命令(macOS),windows双击artifactory.bat
$./artifactory.sh
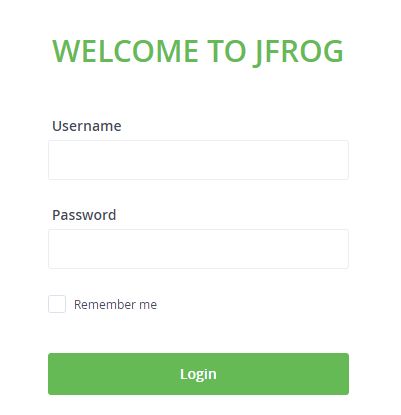
验证运行是否成功浏览器访问:浏览器访问:http://localhost:8081/artifactory/ 如果没问题则会出出现登陆页面(默认账户为:admin/password)
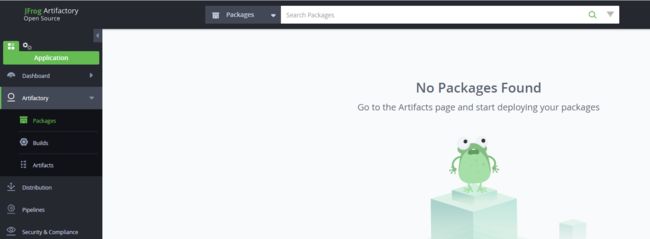
登陆后会让你重置密码和一些配置(在配置CREATE REPOSITORIES仓库类型时候我们可选择gralde即可)
如果选择gradle的话,会生成下面4个Repository:

其他可选择跳过,默认首页没有任何项目
3. 创建私有仓库
初衷
Android Studio 编译速度慢,一般来说,原因有下面几个。
- Gradle下载慢
- 依赖库下载慢
- 依赖库使用"+"(使用最新的),每次都需要去查找新的(尽量不适用这种方式)
这里,大部分的库,我们可以通过阿里云代理仓库。
但是,如果有我们自己的私有库或者插件的话。这个时候,我们就需要搭建我们自己的私有仓库,让私有仓库代理阿里云的公共仓库。这样,既保证了我们私有库的安全性,又让我们的依赖库也享受到了阿里云代理仓库的便利。
使用Artifactory搭建好我们的私有仓库后,然后我们通过Artifactory提供的Local、Remote以及Virtual来创建不同的仓库。
创建之前,先了解一下Local、Remote、Virtual各自仓库的区别
- Local:本地仓库。一般用于
部署私有库以及自定义Gradle插件(上传的组件不会向外部进行同步)。 - Remote:远程仓库。用于
代理及缓存公共仓库,不能向此类型的仓库上传私有组件。 - Virtual:虚拟仓库。不是真实在存储上的仓库,可以将多个本地或远程仓库合并到一起。
接下来我们针对上述三种类型仓库逐个进行实践
3.1 New Local Repository(新建本地仓库)
本地仓库,用于动态部署一些我们开发的库(例如Android aar,jar)或者手动上传部署一些Gradle包,或者自己写的Gradle插件等等。
-
创建本地仓库
-
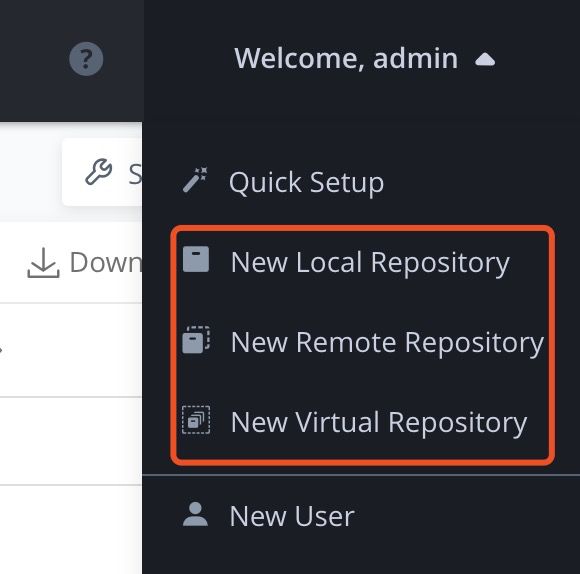
点击Artifactory右上角—>选择New Local Repositories
-
选择Package类型(例如:Maven、Gradle等),填写Repository key(例如:android_local),点击Save & Finish,到这里就创建了一个本地的Maven仓库。

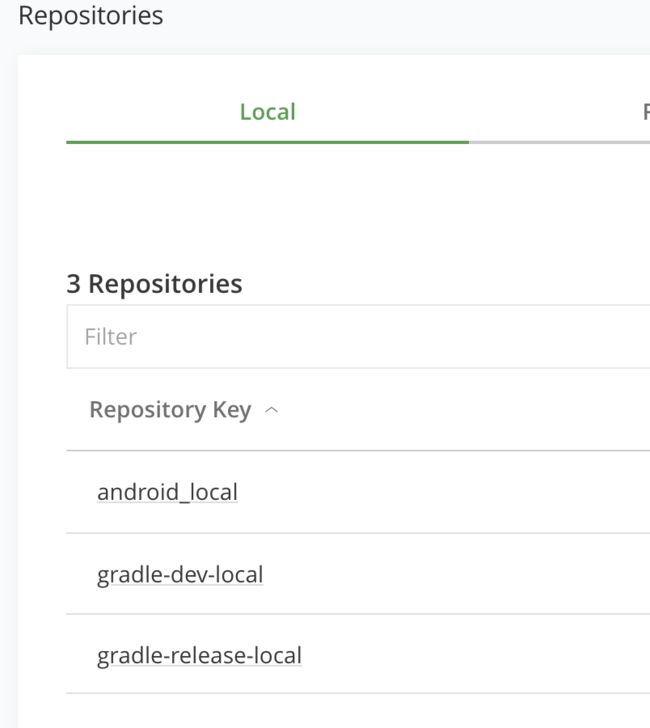
-
然后,我们在Local Repositories下面就看到了,我们创建的本地仓库(android_local)
仓库创建完成,接下来通过手动部署和动态部署我们包或者库
-
手动部署包
以android的gradle包为例,将我们下载的Gradle包手动部署到这个本地仓库。
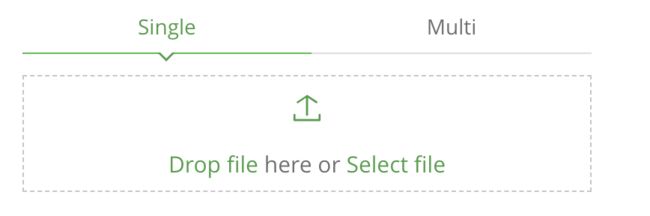
-
点击Artifactory左侧栏目切换到Application选项卡,选择Artifactory—>artifacts下的android_local 然后点击右上角Deploy部署

-
选择部署文件(可选单个文件部署和多个文件部署),我们使用Single单个文件部署,选择我们事先下载好的gradle.zip包上传
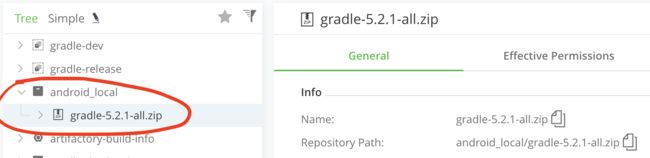
-
上传成功后,返回仓库列表,就看到了这个手动部署Gradle的zip包
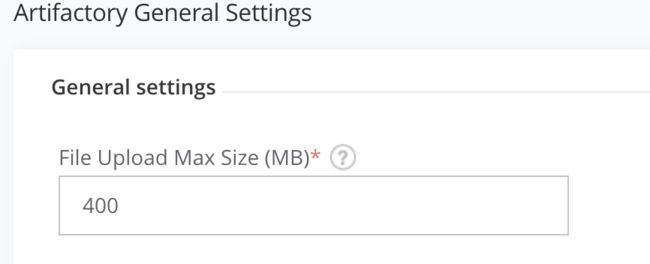
注意:这里,有个细节需要关注一下。仓库默认上传文件大小是100M,我们需要改大一些,不然,上传会失败
点击右上角账号,选择 Edit Profile—>Artifactory—>General—>Settings—>File Upload Max Size (MB) 重置上传文件的大小限制,我们改成400M,点击Save。如下图,修改完后,再上传我们的Gradle的zip就没有问题了。
-
到这里,我们通过手动部署的方式,将gradle包部署到了我们的私有仓库的本地仓库中。使用方式为Android项目根目录下gradle—>wrapper—>gradle-wrapper.properties文件中修改系统默认的
distributionUrl为我们私有Maven本地仓库中的Gradle路径#Wed Jul 01 15:18:06 CST 2020 distributionBase=GRADLE_USER_HOME distributionPath=wrapper/dists zipStoreBase=GRADLE_USER_HOME zipStorePath=wrapper/dists #distributionUrl=https\://services.gradle.org/distributions/gradle-5.1.1-all.zip #将上面Gradle插件下载路径替换为下面我们私有的Maven上本地仓库中的路径 distributionUrl=http\://xxx.xxx.xxx.xxx:xxxx/artifactory/android_local/gradle-5.2.1-all.zip
动态部署包
上面我们通过手动部署的方式,在本地仓库部署了gradle包。接下来我们通过动态部署的方式,将我们自己开发的Android .aar包部署到该私有Maven仓库内的本地仓库中。
-
创建一个Android Module(libpay),配置该库所在项目的根
build.gradle,添加jfrog的classpathdependencies { classpath 'com.android.tools.build:gradle:3.4.1' // 配置 classpath 使用 4.+ 版本 classpath "org.jfrog.buildinfo:build-info-extractor-gradle:4+" } -
配置该Module的
build.gradle-
添加artifactory和maven-publish插件
apply plugin: 'com.jfrog.artifactory' apply plugin: 'maven-publish' -
配置publishing和artifactory
//私有Maven仓库地址
def MAVEN_LOCAL_PATH = 'http://xxx.xxx.xxx.xxx:xxxx/artifactory'

//发布组件的artifactId(这里同时发布debug和release版)
def ARTIFACT_ID_DEBUG = 'libpay-debug'
def ARTIFACT_ID_RELEASE = 'libpay-release'

//发布组件的version版本
def VERSION_NAME = '1.1.0'

//发布组件的groupId
def GROUP_ID = 'com.lib.pay'

//要发布组件目标的仓库名称(Maven上创建的仓库)
def REPO_KEY = 'android_local'

//私有Maven仓库用户名和密码
def USER_NAME = 'xxx'
def PASSWORD = 'xxxxxx'

//组件发布配置
publishing {
    /**
     * 可配置多个,但是artifactId要唯一,否则会认为同一个组件。
     * 如果artifactId相同,发布时只会发布下面 artifactory—>defaults->publications 配置中第一个组件。
     */
    publications {
        /**
         * 发布组件debug版本
         * aar_debug:名可自取,注意配置到下面 artifactory—>defaults->publications 中,
         * 否则无法发布到Maven仓库上
         */
        aar_debug(MavenPublication) {
            groupId GROUP_ID
            version = VERSION_NAME
            artifactId ARTIFACT_ID_DEBUG    //artifactId要唯一
            //要发布到Maven上的aar包的本地路径
            artifact("$buildDir/outputs/aar/${project.getName()}-debug.aar")
            /**
             * pom.withXml 用来生成远程依赖的 pom 文件。
             *
             * 默认下,打包生成的AAR与pom是不包含 library的远程依赖的。
             * 当APP集成此依赖时,还需要手动配置此依赖的远程依赖,对于接入方不是很友好。
             *
             * 使用 pom.withXml 虽然解决远程依赖的问题,但也带来了可能引起依赖冲突的问题,
             * 即APP与本library同时依赖一乐一个三方库,但是引用的版本不同,就可能会带来依赖
             * 冲突的问题,因此需要根据依赖包的业务场景进行考量选择性的配置 pom.withXml 参数。
             */
            pom.withXml {
                def dependencies = asNode().appendNode('dependencies')
                /**
                 *注意:如果该library内有远程依赖,此处需要根据远程依赖方式来配置
                 *例如:
                 *远程依赖是通过api方式实现,此处应为:
                 *	configurations.api.allDependencies.each{}
                 *如果远程依赖为implementation,此处应为:
                 *	configurations.implementation.allDependencies.each{}
                 */
                configurations.implementation.allDependencies.each{
                    // 如果有compile fileTree(),group会为空,需要去除
                    if(it.group != null) {
                        def dependency = dependencies.appendNode('dependency')
                        dependency.appendNode('groupId', it.group)
                        dependency.appendNode('artifactId', it.name)
                        dependency.appendNode('version', it.version)
                    }
                }
            }
        }

        /**
         * 发布组件release版本
         */
        aar_release(MavenPublication) {
            groupId GROUP_ID
            version = VERSION_NAME
            artifactId ARTIFACT_ID_RELEASE
            artifact("$buildDir/outputs/aar/${project.getName()}-release.aar")
            pom.withXml {
                def dependencies = asNode().appendNode('dependencies')
                configurations.implementation.allDependencies.each{
                    if(it.group != null) {
                        def dependency = dependencies.appendNode('dependency')
                        dependency.appendNode('groupId', it.group)
                        dependency.appendNode('artifactId', it.name)
                        dependency.appendNode('version', it.version)
                    }
                }
            }
        }
    }
}

//Artifactory配置
artifactory {
    contextUrl = MAVEN_LOCAL_PATH  //仓库地址
    publish {
        repository {
            repoKey = REPO_KEY     //组件要发布到的目标仓库名称
            username = USER_NAME   //仓库账号
            password = PASSWORD    //仓库密码
        }
        defaults {
            //告诉Maven上面publishing——>publications内哪些组件要发布
            publications('aar_debug',"aar_release")
            publishArtifacts = true
            // Properties to be attached to the published artifacts.
            properties = ['qa.level': 'basic', 'dev.team': 'core']
            // Publish generated POM files to Artifactory (true by default)
            publishPom = true
        }
    }
}
上面仅仅是简单的配置使用,当然你也可以使用高级用法,比如在 gradle.properties或自定义的
xxx.properties中定义仓库的用户名/密码/仓库路径等隐私性信息,然后在library_build内通过Properties对象读取该文件属性(类似于keystore签名文件实现方式),这样假如开源,在上传源码时候,避免了直接将隐私数据写在build.gradle内,而造成信息泄漏。具体配置如下
-
自定义properties文件,存储隐私性信息
artifactory.properties//仓库路径 mavenpath=http://localhost:8081/artifactory //仓库用户名 username=xxxx //仓库密码 password=xxxxxx -
在
library_build中通过Properties对象读取artifactory.properties中相关属性Properties mProperties = new Properties() mProperties.load(project.rootProject.file('artifactory.properties').newDataInputStream()) //从配置文件读取Artifactory属性信息 def MAVEN_LOCAL_PATH = mProperties.getProperty("mavenpath") //仓库地址 def username = mProperties.getProperty("username") //仓库账号 def pwssword = mProperties.getProperty("password") //仓库密码
-
-
编译发布
配置好上述
build.gradle后我们通过脚本或者图形化进行编译发布我们的 .aar 包到Maven仓库-
脚本编译发布
在项目根目录执行下面脚本,会自动编译然后会自动将内部的配置好的aar发布到maven仓库
./gradlew clean assembleRelease artifactoryPublish --stacktrace --info -
图形化编译发布
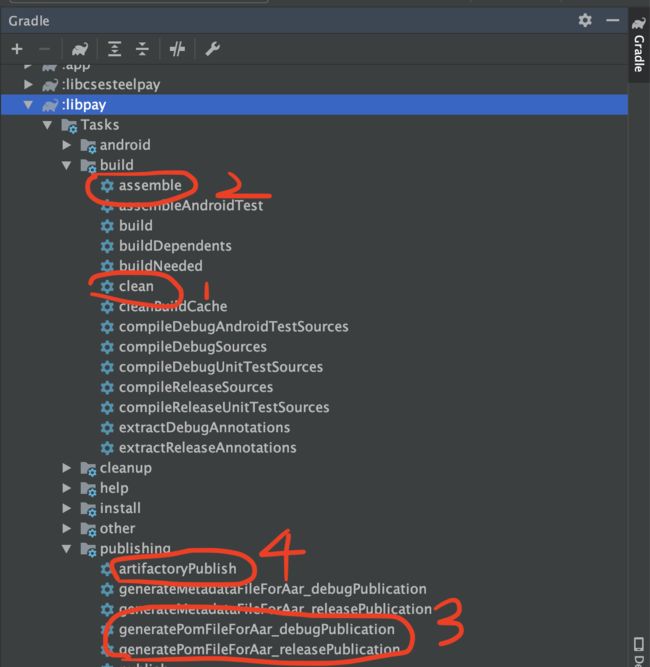
在AS中点击右侧边栏Gradle选项卡选择要发布的Module(libpay)
-
Task—>build—>assemble 进行编译(编译前也可以先clean一下)
然后继续选择
-
Task—>publishing—>generatePomFileForxxxx 生成对应的Pom文件
最后点击
-
artifactoryPubsh 进行发布即可
最终,可通过控制台查看发布结果
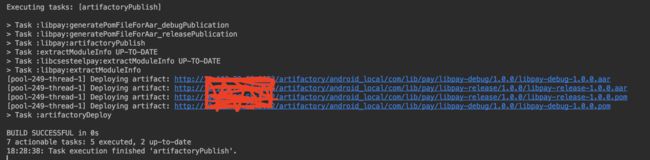
也可前往Maven仓库查看发布结果
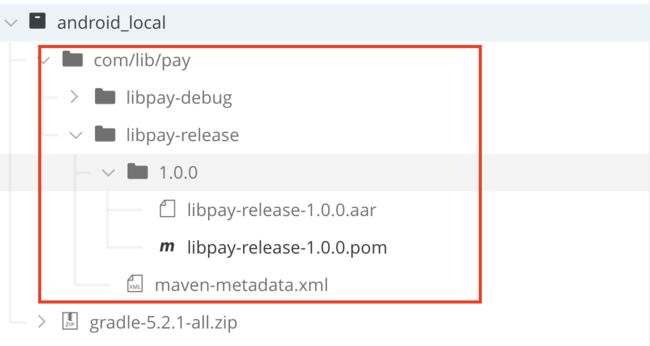
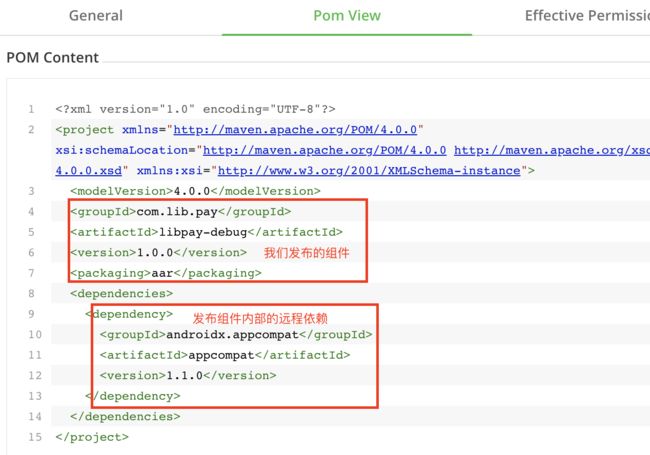
可通过pom文件,查看到发布组件的信息及其远程依赖
-
-
-
其他项目使用
-
首先,将我们组件所在Maven地址,添加到使用方项目(Project)的
build.gradle文件内repositories中buildscript { repositories { google() jcenter() //将依赖库的所在Maven地址添加到项目的repositories内 maven { url 'http://xxx.xxx.xxx.xxx:xxxx/artifactory/android_local/' } } dependencies { classpath 'com.android.tools.build:gradle:3.4.1' } } allprojects { repositories { google() jcenter() //将依赖库的所在Maven地址添加到项目的repositories内 maven { url 'http://xxx.xxx.xxx.xxx:xxxx/artifactory/android_local/' } } } -
其次,配置使用方项目app或者module的
build.gradle文件内的dependencies依赖关系,直接添加所需的依赖库即可implementation 'com.lib.pay:libpay-debug:1.0.0'其中依赖包属性组成为:{group_id} : {artifact_Id} : {version_name}
- group_id : 发布组件的groupId(com.lib.pay)
- artifact_id : 发布组件的artifactId(libpay-debug)
- version_name: 发布组件的version版本(1.0.0)
注意
如果我们的组件内部的远程依赖,需要配置第三方仓库的(ps:不是几大公共仓库 mavenCenter、jcenter等,因为使用方App本身就会配置这几大公共库),那么在使用方APP使用本组件时,也要配置此远程依赖的仓库地址)allprojects { repositories { google() jcenter() //1.将依赖的组件Maven仓库地址,添加到当前项目repositories中 maven { url 'http://xxx.xxx.xxx.xxx.xxxx/artifactory/android_local/' } //2.将依赖组件内部远程依赖的仓库地址(如果有),也添加到当前项目的repositories中 maven { url 'http://xxx.xxx.xxx.xxx.xxxx/xxx/xxxx' } } } -
3.2 New Remote Repository(新建远程仓库)
远程仓库,用于
代理及缓存公共仓库,不能向此类型的仓库上传私有组件。
我们项目除了Gradle以及自己开发的组件以外,开发时会用到很多的第三方库(例如发布在JCenter或者MavenCenter公共仓库中心的库)。
有时我们想通过自己的私有maven仓库统一管理使用公共中心仓库(不是直接使用Jcenter、Mavenenter等中心仓库),这个时候,可通过我们私有Maven来创建一个远程仓库,用来代理公共仓库。而后直接使用我们私有Maven的远程仓库替换公共仓库即可(其代理了公共仓库)。
接下来我们就通过私有maven来创建一个远程仓库,用来代理Jcenter、MavenCenter、google等中心仓库。
注意:这里我们不直接代理Jcenter、MavenCenter、google原始仓库,而是使用 阿里云代理的公共远程仓库 实现(对国内用户而言,其速度更快更稳定)
根据上面的介绍,我们创建远程仓库,通过代理阿里云提供的公共代理实现对Jcenter、Maven、google中心仓库的代理。
- 这里先创建一个
jcenter_aliyun远程仓库,首先,点击右上角的New Remote Repository选择仓库的类型,填写仓库Key,以及依赖阿里云的Jcenter仓库地址
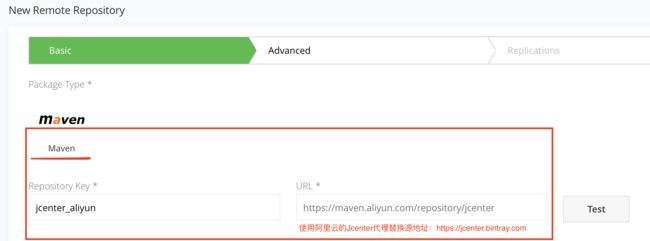
- 填写完成后,点击右下角的Save & Finish。就创建好了,我们的远程jcenter仓库。
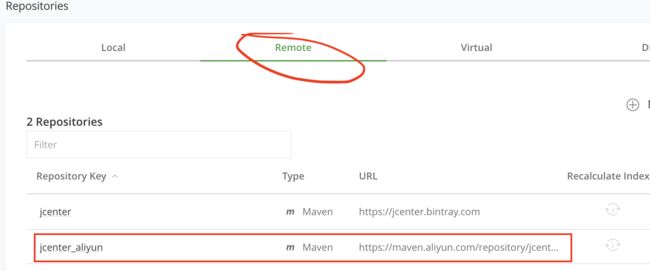
- 同样,我们还要创建
aliyun_google远程仓库,最好再创建一个aliyun_maven远程仓库 (以便我们能够正常访问有些部署在MavenCenter中心的库)或者创建一个aliyun_public仓库(其中public是阿里云提供聚合了Jcenter和Maven的仓库,因此可省略单独创建私有的Jcenter或Maven库了) 。步骤和上面jcenter_aliyun创建方式一样,注意所依赖的地址选择阿里云对应的代理地址即可。创建完成后,我们看下,我们的远程仓库列表:
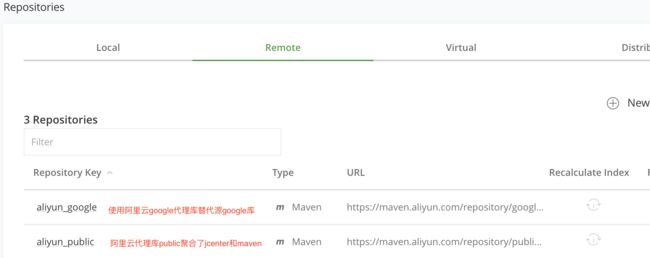
- 可以看到,我们的远程仓库都创建好了,那么在Android项目中,可通过我们创建的远程仓库来替换默认的 google() 、 jcenter() 以及 maven() 仓库了
android项目的根build.gradlebuildscript { ext.kotlin_version = '1.3.50' repositories { // google() // jcenter() //通过自己搭建的私有Maven仓库来取代系统默认google()和jcenter()库 maven{ url 'http://xxx.xxx.xxx.xxx:xxxx/artifactory/aliyun_google/' } maven{ url 'http://xxx.xxx.xxx.xxx:xxxx2/artifactory/aliyun_public/' } } .... } allprojects { repositories { // google() // jcenter() //通过自己搭建的私有Maven仓库来取代系统默认google()和jcenter()库 maven{ url 'http://xxx.xxx.xxx.xxx:xxxx/artifactory/aliyun_google/' } maven{ url 'http://xxx.xxx.xxx.xxx:xxxx/artifactory/aliyun_public/' } } }
3.3 New Virtual Repository(新建虚拟仓库)
虚拟仓库,顾名思义不是真实在存储上的仓库,他可以将多个本地或远程仓库合并到一起。
上面,我们在私有的Maven上创建了本地仓库(android_local)和远程仓库(aliyun_google、aliyun_public),但是在使用远程仓库的时候,我们需要一个个的将远程仓库添加到项目内很不方便。
例如,首先需要写很多maven{url xxx};
//代理的google仓库
maven{
       url 'http://xxx.xxx.xxx.xxx:xxxx/artifactory/aliyun_google/'
  }
//代理的Jcenter和Maven仓库
 maven{
       url 'http://xxx.xxx.xxx.xxx:xxxx/artifactory/aliyun_public/'
  }
//代理的其他公共仓库 ...
其次,就是再添加其他仓库的话,项目中每次还需要改动上面的配置。
而通过虚拟仓库,将多个本地仓库/远程仓库合并到其内部,那么项目中只需要使用这个虚拟仓库即可代替多个独立远程/本地仓库。假若,后面需要引用新的本地/远程仓库,只需要创建新仓库,然后添加到虚拟仓库,而使用方无需任何改动,同步更新一些即可。
-
创建虚拟仓库(
注意这里创建的时候可以选择虚拟仓库所要包含的本地/远程仓库,也可先创建后面再添加)
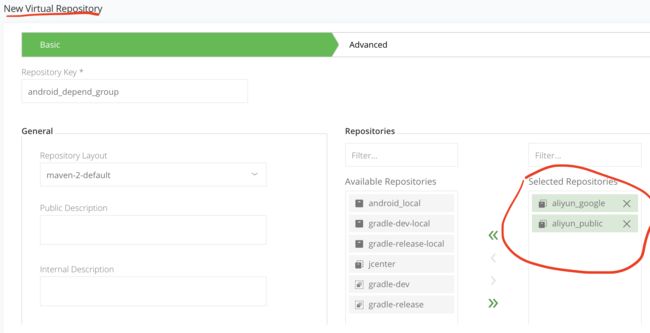
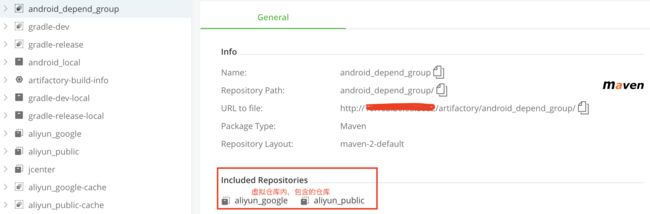
返回到仓库列表可查看到们创建好的虚拟仓库(android_depend_group),可见其内部包含了哪些具体的仓库
-
项目中使用,在Android项目的根(Project)
build.gradle内使用该虚拟仓库替换原来的多条独立的远程仓库buildscript { ext.kotlin_version = '1.3.50' repositories { // google() // jcenter() // /** // *使用多个独立远程仓库替换原来的google、jcenter仓库 // */ // maven{ // url 'http://xxx.xxx.xxx.xxx:xxxx/artifactory/aliyun_google/' // } // maven{ // url 'http://xxx.xxx.xxx.xxx:xxxx/artifactory/aliyun_public/' // } /** *使用一个虚拟仓库替换多个独立的远程仓库(内部聚合/包含了多个独立的远程仓库) */ maven { url 'http://xxx.xxx.xxx.xxx:xxxx/artifactory/android_depend_group/' } } .... }
扩展
阿里云代理公共仓库列表
| 仓库名称 | 代理源地址 | 使用地址 |
|---|---|---|
| central | https://repo1.maven.org/maven2/ | https://maven.aliyun.com/repository/central 或 https://maven.aliyun.com/nexus/content/repositories/central |
| jcenter | http://jcenter.bintray.com/ | https://maven.aliyun.com/repository/jcenter 或 https://maven.aliyun.com/nexus/content/repositories/jcenter |
| public | central仓和jcenter仓的聚合仓 | https://maven.aliyun.com/repository/public 或 https://maven.aliyun.com/nexus/content/groups/public |
| https://maven.google.com/ | https://maven.aliyun.com/repository/google 或 https://maven.aliyun.com/nexus/content/repositories/google |
|
| gradle-plugin | https://plugins.gradle.org/m2/ | https://maven.aliyun.com/repository/gradle-plugin 或 https://maven.aliyun.com/nexus/content/repositories/gradle-plugin |
| spring | http://repo.spring.io/libs-milestone/ | https://maven.aliyun.com/repository/spring 或 https://maven.aliyun.com/nexus/content/repositories/spring |
| spring-plugin | http://repo.spring.io/plugins-release/ | https://maven.aliyun.com/repository/spring-plugin 或 https://maven.aliyun.com/nexus/content/repositories/spring-plugin |
| grails-core | https://repo.grails.org/grails/core | https://maven.aliyun.com/repository/grails-core 或 https://maven.aliyun.com/nexus/content/repositories/grails-core |
| apache snapshots | https://repository.apache.org/snapshots/ | https://maven.aliyun.com/repository/apache-snapshots 或 https://maven.aliyun.com/nexus/content/repositories/apache-snapshots |
内网用户访问私有Maven上资源出现401
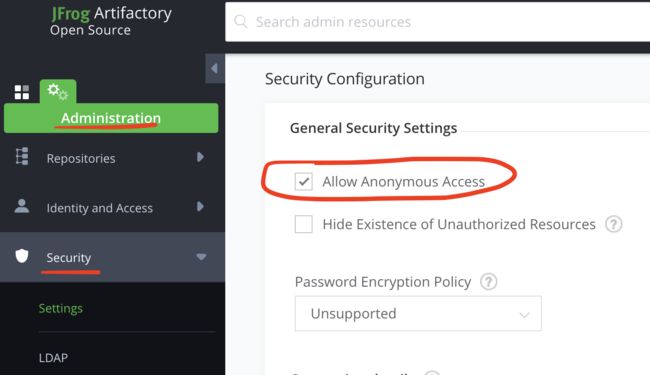
在发布好组件后,使用方(公司内网用户)使用依赖时候,总是出现如下错误!
Could not GET 'http://xxx.xxx.xxx:xxxx/artifactory/android_depend_group/com/lib/pay/libpay-release/1.0.0/libpay-release-1.0.0.pom'. Received status code 401 from server: Unauthorized
Enable Gradle 'offline mode' and sync project
401,应该是无权限访问,是由于Artifactory拒绝了非鉴权用户的访问,我们需要修改Artifactory的安全策略为匿名用户可访问即可
-
点击Artifactory左侧栏切换至Administration选项卡
-
然后点击下面的Security—>Setting—>Allow Anonymous Access,保存即可
参考:
搭建一个本地jFrog Artifactory并上传库文件
Android Studio通过Artifactory搭建本地仓库优化编译速度的方法