Android Studio下AIDL的使用方法
现在是2019年10月28日,最新的Android Studio中,AIDL的用法变了,本文所介绍的方法已行不通,请勿再参考,我将抽空更新一篇最新用法的博客。
过去Android开发工具主要是Eclipse,那时使用AIDL记得挺简单的,这几天找工作复习AIDL,发现在Android Studio上按照书上的做法根本跑不通,又在网上找办法,全他妈的抄来抄去,虽然有图有文看上去一目了然,实际根本跑不通,有些配置根本就没讲,要知道程序开发这玩意儿差一点也不行啊!搞了两个小时,总算知道Android Studio下怎么用AIDL了。将今天下午的经验总结如下。
本教程以两个app---ShenZhen(服务端)和ChengDu(客户端)为例,效果为点击ChengDu中的一个按钮后,从ShenZhen获取到一个String,显示在按钮上。
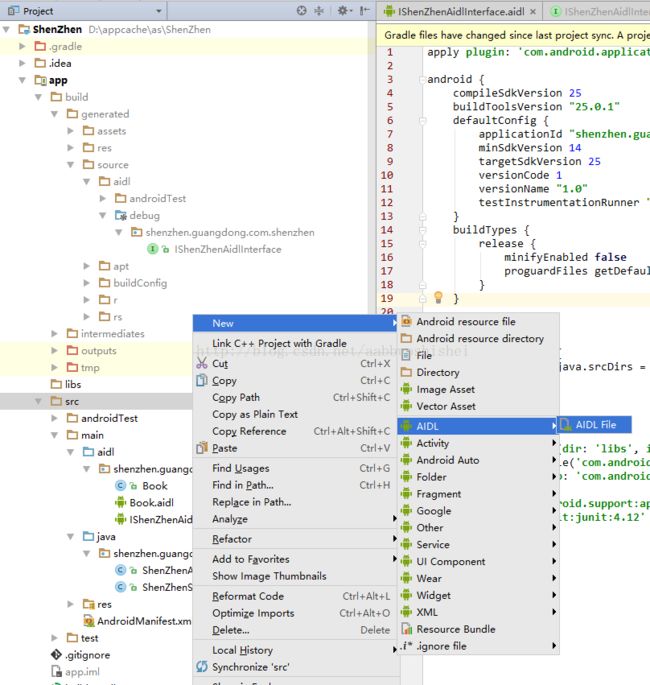
1、先做服务端部分。右键工程的src,如下图 1-a,创建一个.aidl文件IShenZhenAidlInterface.aidl。新建完成后,AS会自动创建一个与java目录同级的目录来存放该aidl文件,结果如下图1-b。
图1-a 创建aidl文件
图1-b 创建第一个aidl文件后src下的目录情况
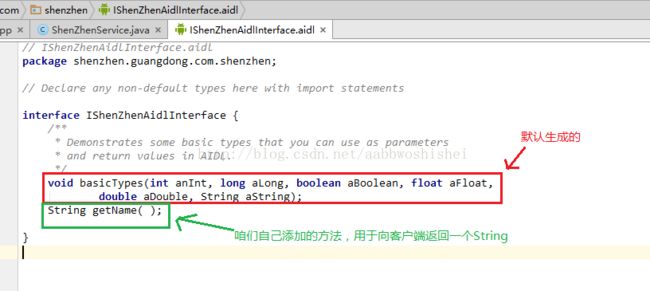
2、编辑该aidl文件,添加一些方法,可供客户端调用。如下图2-a。
图2-a 向aidl文件中添加供客户端调用的方法
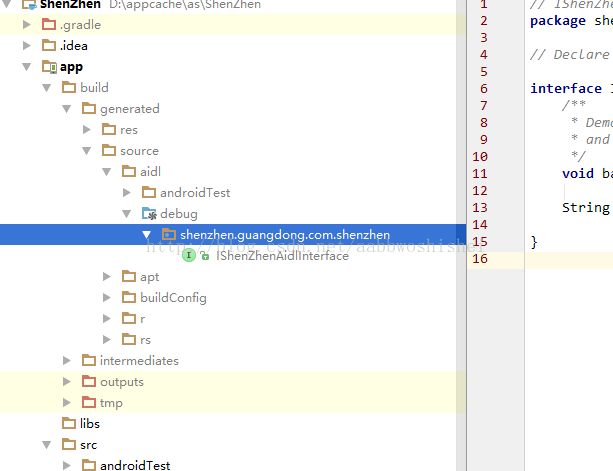
3、编译,如图3-a。编译结束后如图3-b。
图3-a,编译aidl文件,生成相应的.java文件。
图3-b 编译后,可看到在上图所标示的地方生成了相应的.java文件
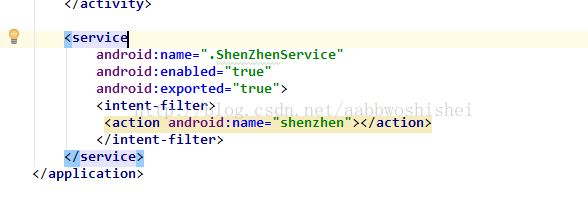
4、创建供客户端调用的Service。如图4-a。
图4-a 供客户端调用的Service
图4-b 配置Service。
至此 ,服务端准备完毕。在手机上运行一下,发现没有问题。
开始客户端部分。
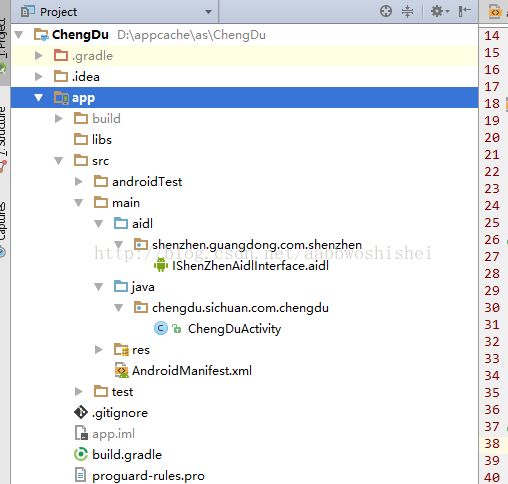
1、复制服务端ShenZhen的aidl目录到客户端ChengDu的main目录下,即直接在Android Studio中右键服务端的aidl目录,复制,然后右键客户端的main目录,粘贴。结果如下图1-a。
图1-a 客户端被粘贴aidl目录后
2、同样。build--make project,在客户端生成.java文件。
3、用bind方式启动Service。代码如下。
package chengdu.sichuan.com.chengdu;

import android.content.ComponentName;
import android.content.Context;
import android.content.Intent;
import android.content.ServiceConnection;
import android.os.IBinder;
import android.os.RemoteException;
import android.support.v7.app.AppCompatActivity;
import android.os.Bundle;
import android.view.View;
import android.widget.Button;
import android.widget.Toast;

import shenzhen.guangdong.com.shenzhen.IShenZhenAidlInterface;


public class ChengDuActivity extends AppCompatActivity {

    Button button;
    IShenZhenAidlInterface shenZhenAidlInterface;

    ServiceConnection serviceConnection = new ServiceConnection() {
        @Override
        public void onServiceConnected(ComponentName name, IBinder service) {
            shenZhenAidlInterface=IShenZhenAidlInterface.Stub.asInterface(service);
            try {
                button.setText(shenZhenAidlInterface.getName());
            } catch (RemoteException e) {
                e.printStackTrace();
            }
        }

        @Override
        public void onServiceDisconnected(ComponentName name) {

        }
    };

    @Override
    protected void onCreate(Bundle savedInstanceState) {
        super.onCreate(savedInstanceState);
        setContentView(R.layout.cheng_du);

        button= (Button) findViewById(R.id.bind);
        button.setOnClickListener(new View.OnClickListener() {
            @Override
            public void onClick(View v) {
                //之所以用Action来启动Service,是因为发现用带有ComponentName的intent启动不了。
                //原因尚未搞清楚。
                bindService(new Intent("shenzhen"),serviceConnection, Context.BIND_AUTO_CREATE);
            }
        });
    }
}
至此,相信很多人都已经成功了,但难处不在这里。这里传递的只是一个String,如果涉及到自定义的类,该如何用呢?下面才是重点。
AIDL可支持的数据类型出了基本数据类型,只有List、Map、Parcelable和本身就是AIDL格式的接口。以网上流行的类Book来讲解,如果我们启动Service后,客户端想获取到一个从服务端传过来的Book对象该怎么办呢?很显然,需要Book去实现Parcelable接口。
首先,
1、在服务端ShenZhen创建一个Book.aidl,如下所示(请一定注意所在目录,为方便,请尽量让所有aidl相关文件在同一目录下)
其中,它的默认代码实现是这样的
// Book.aidl
package shenzhen.guangdong.com.shenzhen;

// Declare any non-default types here with import statements

interface Book {
    /**
     * Demonstrates some basic types that you can use as parameters
     * and return values in AIDL.
     */
    void basicTypes(int anInt, long aLong, boolean aBoolean, float aFloat,
            double aDouble, String aString);
}
我们将其修改成这样
// Book.aidl
package shenzhen.guangdong.com.shenzhen;
parcelable Book;
2、创建一个同名类Book,实现Parcelable接口。
package shenzhen.guangdong.com.shenzhen;

import android.os.Parcel;
import android.os.Parcelable;

/**
 * Created by Bamboo on 2017/2/27.
 */

public class Book implements Parcelable {


    public String bookName;

    public Book(String name)
    {
        bookName=name;
    }

    @Override
    public int describeContents() {
        return 0;
    }

    @Override
    public void writeToParcel(Parcel dest, int flags) {
        dest.writeString(bookName);
    }

    public static Creator CREATOR = new Creator() {
        @Override
        public Book createFromParcel(Parcel source) {

            return new Book(source.readString());
        }

        @Override
        public Book[] newArray(int size) {
            return new Book[0];
        }
    };
}
3、我们为IShenZhenAidlInterface.aidl添加一个方法getBook( ),用以向客户端返回一个Book。
// IShenZhenAidlInterface.aidl
package shenzhen.guangdong.com.shenzhen;
import  shenzhen.guangdong.com.shenzhen.Book;   //注意!这一句的引入很重要
// Declare any non-default types here with import statements

interface IShenZhenAidlInterface {
    /**
     * Demonstrates some basic types that you can use as parameters
     * and return values in AIDL.
     */
    void basicTypes(int anInt, long aLong, boolean aBoolean, float aFloat,
            double aDouble, String aString);
    String getName( );
    Book getBook( );
}
Book getBook( );
}
4、由于接口的改变,我们的Service中Stub也要添加getBook( )方法的实现。
package shenzhen.guangdong.com.shenzhen;

import android.app.Service;
import android.content.Intent;
import android.os.IBinder;
import android.os.RemoteException;
import shenzhen.guangdong.com.shenzhen.Book;


public class ShenZhenService extends Service {

    IShenZhenAidlInterface.Stub iBinder = new IShenZhenAidlInterface.Stub()
    {

        @Override
        public void basicTypes(int anInt, long aLong, boolean aBoolean, float aFloat, double aDouble, String aString) throws RemoteException {

        }

        @Override
        public String getName() throws RemoteException {
            return "我的电脑";
        }

        @Override
        public shenzhen.guangdong.com.shenzhen.Book getBook() throws RemoteException {
            return new Book("西游记");
        }

    };


    public ShenZhenService() {
    }

    @Override
    public IBinder onBind(Intent intent) {
        // TODO: Return the communication channel to the service.
        return iBinder;
    }
}
 @Override
        public shenzhen.guangdong.com.shenzhen.Book getBook() throws RemoteException {
            return new Book("西游记");
        }

    };


    public ShenZhenService() {
    }

    @Override
    public IBinder onBind(Intent intent) {
        // TODO: Return the communication channel to the service.
        return iBinder;
    }
}
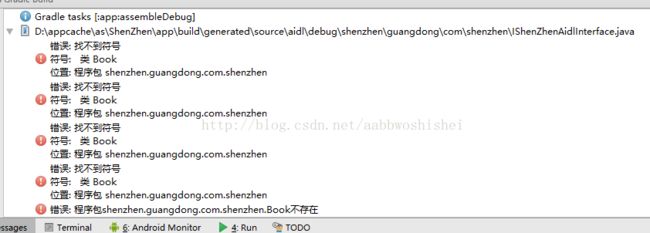
好了,我们试着build一下,看会怎样。结果,如下图。这也是很多教程中都没有提到的地方--找不到Book!
这就需要配置app的gradle
apply plugin: 'com.android.application'
android {
compileSdkVersion 25
buildToolsVersion "25.0.1"
defaultConfig {
applicationId "shenzhen.guangdong.com.shenzhen"
minSdkVersion 14
targetSdkVersion 25
versionCode 1
versionName "1.0"
testInstrumentationRunner "android.support.test.runner.AndroidJUnitRunner"
}
buildTypes {
release {
minifyEnabled false
proguardFiles getDefaultProguardFile('proguard-android.txt'), 'proguard-rules.pro'
}
}
sourceSets
{
main{
java.srcDirs = ['src/main/java', 'src/main/aidl']
}
}
}
dependencies {
compile fileTree(dir: 'libs', include: ['*.jar'])
androidTestCompile('com.android.support.test.espresso:espresso-core:2.2.2', {
exclude group: 'com.android.support', module: 'support-annotations'
})
compile 'com.android.support:appcompat-v7:25.1.1'
testCompile 'junit:junit:4.12'
}
再运行一下,OK!
客户端做类似修改。成功运行。传递对象的关键就在于上面gradle里的红色配置以及即使在相同包下也要import,这是AIDL的特殊之处。
