Java高并发编程详解学习笔记(三)
前言:要秋招了,复习一下应对秋招,纠结该先看啥,最后决定先学习《Java高并发编程详解》,此博客为看书所写的笔记,因为是笔记,所以会只记比较重要的东西,不适合初学者。这里本人经过前面的学习,了解了一些高并发编程的知识了,打算针对几个难点敲点代码加深一下理解。
目录
第一章 interrupt
第二章 wait与notify
2.1 单线程通信
2.2 多线程通信
第三章 自定义显示锁BooleanLock
3.1 synchronized关键字的缺陷
3.2 自定义显示锁
第三章 自定义线程池
3.1 新建
3.2 维护
3.3 销毁
第一章 interrupt
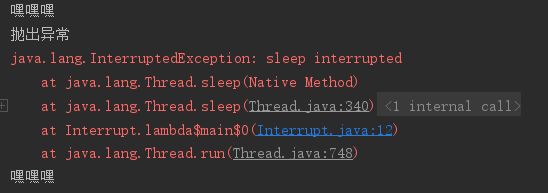
当线程进入阻塞状态时,另一个线程调用被阻塞线程的interrupt()方法,将会使被阻塞线程中断阻塞,一个线程在阻塞的情况下被打断会抛出异常。
可以看到,线程被打断并抛出异常后,继续执行。
public class Interrupt {
    public static void main(String[] args) {
        Thread thread = new Thread(() -> {
            System.out.println("嘿嘿嘿");
            try {
                TimeUnit.MINUTES.sleep(1);
            } catch (InterruptedException e) {
                System.out.println("抛出异常");
                e.printStackTrace();
            }
            System.out.println("嘿嘿嘿");
        });
        thread.start();
        try {
            TimeUnit.MILLISECONDS.sleep(2);
            thread.interrupt();
        } catch (InterruptedException e) {
            e.printStackTrace();
        }

    }
}
第二章 wait与notify
考虑这样一个场景,客服端请求不断到服务器,服务器接收到请求后,新建线程来处理请求然后返回结果给客户端。
这样不断新建销毁线程消耗较大,可以切换为异步非阻塞模式,客户端的请求在一个队列中,服务器的几个线程不断地从队列中取出请求进行处理,将结果保存到结果集中,返回客户端一个凭证,客户端凭借凭证来取数据。
这样出现一个问题就是,怎么知道队列中是否有请求,如果每隔一段时间轮询的话就比较麻烦,可以使用wait与notify来解决这个问题。
2.1 单线程通信
注意:必须在同步方法中使用wait和notify方法,且同步代码的monitor必须与执行wait与notify()的对象一致。
//任务队列
public class EventQueue {
private final int max;
static class Event{
}
public static void main(String[] args) {
}
private final LinkedList eventQueue = new LinkedList<>();
public EventQueue(){
this(10);
}
public EventQueue(int max){
this.max=max;
}
public void offer(Event event){
synchronized (eventQueue){
if(eventQueue.size()==max){
try {
System.out.println("the queue is full");
eventQueue.wait();
} catch (InterruptedException e) {
e.printStackTrace();
}
System.out.println("offer被唤醒了");
}
System.out.println(" the new event is submitted");
eventQueue.addLast(event);
eventQueue.notify();
}
}
public Event take(){
synchronized (eventQueue){
if(eventQueue.isEmpty()){
try{
System.out.println("the queue is empty");
eventQueue.wait();
}catch (InterruptedException e){
e.printStackTrace();
}
System.out.println("take被唤醒了");
}
Event event = eventQueue.removeFirst();
this.eventQueue.notify();
System.out.println("the event "+event+" is handled");
return event;
}
}
}
/**
* 模拟任务的进出
* @author ZhangChen
**/
public class EventClient {
public static void main(String[] args) {
final EventQueue eventQueue = new EventQueue();
new Thread(()->{
for(;;){
eventQueue.offer(new EventQueue.Event());
}
},"Producer").start();
new Thread(()->{
for(;;){
eventQueue.take();
try {
TimeUnit.MILLISECONDS.sleep(10);
} catch (InterruptedException e) {
e.printStackTrace();
}
}
},"Consumer").start();
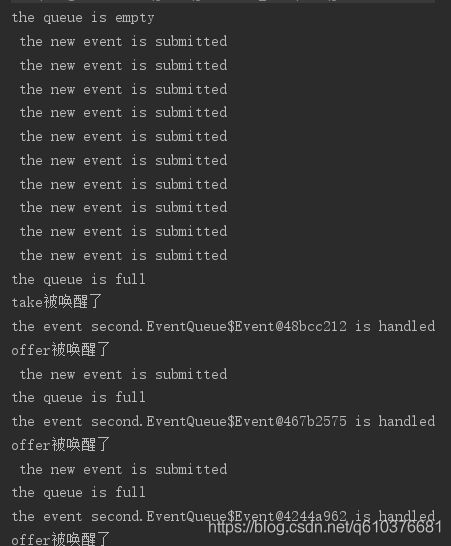
}
} 结果:
2.2 多线程通信
只需把eventQueue.notify()切换成eventQueue.notifyAll()即可
第三章 自定义显示锁BooleanLock
3.1 synchronized关键字的缺陷
1.无法控制阻塞时长
2.阻塞不可被中断
/**
* 测试阻塞打断
* @author ZhangChen
**/
public class SynchronizedDefect {
public synchronized void syncMethod(){
try{
TimeUnit.HOURS.sleep(1);
} catch (InterruptedException e) {
e.printStackTrace();
}
}
public static void main(String[] args) {
SynchronizedDefect defect = new SynchronizedDefect();
Thread t1 = new Thread(defect::syncMethod,"T1");
t1.start();
try {
TimeUnit.MILLISECONDS.sleep(2);
} catch (InterruptedException e) {
e.printStackTrace();
}
Thread t2 = new Thread(defect::syncMethod,"T2");
t2.start();
try {
TimeUnit.MILLISECONDS.sleep(2);
} catch (InterruptedException e) {
e.printStackTrace();
}
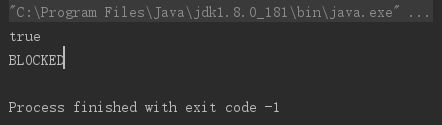
t2.interrupt();
System.out.println(t2.isInterrupted());
System.out.println(t2.getState());
}
}结果:表示interrupt不能打断()
3.2 自定义显示锁
接口:
public interface Lock {
    void lock() throws InterruptedException;
    void lock(long mills) throws InterruptedException, TimeoutException;
    void unlock();
    List getBlockedThreads();
}
自定义锁:
public class BooleanLock implements Lock {
    private Thread currentThread;
    private boolean locked = false;
    private final List blockedList = new ArrayList<>();
    @Override
    public void lock() throws InterruptedException {
        synchronized (this){
            while(locked)
            {
                blockedList.add(currentThread());
                this.wait();
            }
            blockedList.remove(currentThread());
            this.locked=true;
            this.currentThread = currentThread();
        }
    }

    @Override
    public void lock(long mills) throws InterruptedException, TimeoutException {
        synchronized (this){
            if(mills<0){
                this.lock();
            } else{
                long remainingMills = mills;
                long endMills = currentTimeMillis()+remainingMills;
                while(locked){
                    if(endMills<=0){
                        throw new TimeoutException("can not get the lock during"+mills+" ms ");
                    }
                    if(!blockedList.contains(currentThread())){
                        blockedList.add(currentThread());
                    }
                    this.wait(remainingMills);
                    endMills = endMills-currentTimeMillis();
                }
                blockedList.remove(currentThread());
                currentThread=currentThread();
                this.locked=true;
            }

        }
    }

    @Override
    public void unlock() {
        synchronized (this){
            if(currentThread==currentThread()){
                this.locked=false;
                Optional.of(currentThread().getName()+"release the lock.").ifPresent(System.out::println);
                this.notifyAll();
            }
        }
    }

    @Override
    public List getBlockedThreads() {
        return null;
    }
}
分析:
当使某线程使用lock.lock()后,其它线程再使用lock.lock(),就会进入wait状态,同时释放lock对象的monitor锁,加入lock对象的monitor的waitset中,当线程执行结束并调用lock.unlock()后,所有被wait的线程都会被唤醒。
这里说一个个人推测,从上面可以看出,当处于wait阻塞状态的线程,它们都是在synchronized代码块中调用的wait,当被唤醒后按理说应该从代码块中wait后面的位置继续执行,但是这样势必会造成冲突,因为synchronized同步代码块只允许一个线程执行,所以我认为当被wait阻塞的线程被唤醒后,应该不会立即继续执行,而是争抢monitor锁,争抢到锁的才能从wait处继续向后执行。
第三章 自定义线程池
反复创建销毁线程池会耗费大量资源,所以一般都用线程池创建线程,下面将自己实现一个简单的线程池。
懒得敲代码了,大概看懂了,说一下如何自定义线程池吧,这里说的是本书中介绍的线程池实现原理,可能还有其它实现方式。
3.1 新建
线程池就是新建一些线程,这些线程不断地从runnable队列(任务队列)中取出runnable进行start,这里会对runnable队列进行封装,当向runnable队列中添加runnable时,如果队列已满,则执行拒绝策略,如什么都不做或抛出异常等等,当向runnable队列中取出runnable并封装成thread然后调用其run方法时,队列已空,则调用wait方法,这样线程就会进入阻塞,每次有新runnable加入队列时都会调用一下notifyAll方法,唤醒已进入阻塞的线程。
所以说我们每次建立线程池的同时也新建了一堆线程了,它们不断地从队列中取任务执行,如果没有任务则阻塞,等待有任务时它们将被唤醒,所以线程池之所以可以做到不销毁线程,是因为它们将“用完”的线程阻塞了。
3.2 维护
当前任务队列中有任务没处理,且activeCount < coreSize(活跃线程数量少于核心线程数量),增加活跃线程数量到核心线程
数量,然后继续新一轮判断。
当前任务队列中有任务没处理,且activeCount < maxSize(活跃线程数量少于最大线程数量),增加活跃线程数量到最大线程
数量,然后继续新一轮判断。
这里书中把线程池继承了Thread,并在重写的run方法中把上述过程写在了循环里,只要线程池不停止,上述过程会一直执行。
3.3 销毁
线程池停止:将标志位(isShutdown属性)置为true,在run方法中的循环通过此标志位来判断是否循环的,所以run方法将停止。
新建的任务处理线程停止:将标志位(running属性)fasle,线程通过此标志位判断是否循环从任务队列中取出runnble执行,当标志位发生改变时,则循环停止,任务处理线程结束。
应该是怕阻塞,书中在修改标志位时还调用了interrupt()方法,循环通过标志位&&!isInterrupted()来判断循环是否结束,应该是双重保险。