Android5.1 Ethernet添加ip配置(Static DHCP)
博主从业经验不多,本次调试Ethernet参考了许多资料,走了很多弯路,现在也还有点问题,先记录下调试心得,文中提到的未解决的问题或写的错误得地方,还望各位看官大佬不吝赐教。
参考:
https://blog.csdn.net/Purple7826/article/details/80608172
https://blog.csdn.net/qq_34705828/article/details/76283929
https://www.jianshu.com/p/3d95347633a3
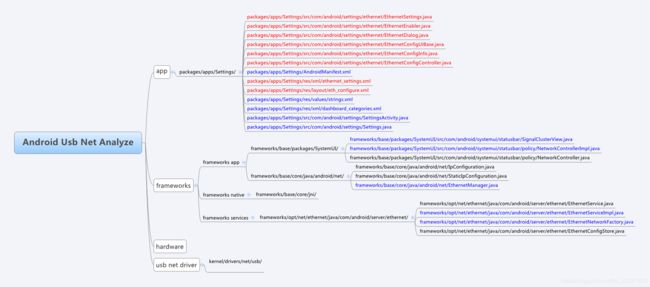
本文基于qcom msm8909平台,先以思维导图的形式展示下调试Ethernet修改或添加的文件。
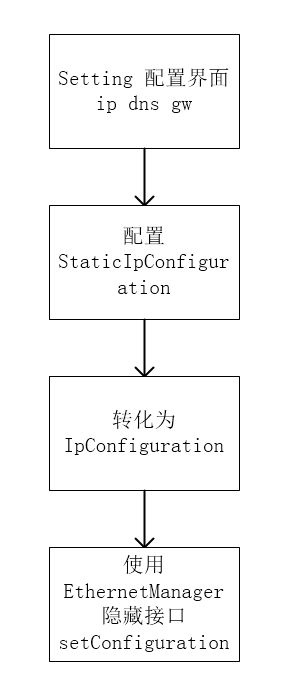
然后在描述下settings app层基本实现思路:
实现步骤:
1:settings 部分
添加一级子菜单:packages/apps/Settings/res/xml/dashboard_categories.xml
修改string :packages/apps/Settings/res/values/strings.xml
Ethernet
Configure Ethernet device
Ethernet
Ethernet Devices:
Connection Type
DHCP
Static IP
DNS address
Gateway address
IP address
Ethernet
Turn on Ethernet
Ethernet configuration
Configure Ethernet devices
Netmask
Turn off Ethernet
Turn on Ethernet
Failed to set: Please enter the valid characters 0~255
can\'t be empty

Network prefix length
Cancle
Save
Setting主类添加:packages/apps/Settings/src/com/android/settings/SettingsActivity.java
import com.android.settings.ethernet.EthernetSettings;
R.id.ethernet_settings,
EthernetSettings.class.getName(),
添加空类:packages/apps/Settings/src/com/android/settings/Settings.java
public static class EthernetSettingsActivity extends SettingsActivity { /* empty */ }AndroidMainfest添加:packages/apps/Settings/AndroidManifest.xml
增加Ethernet主界面布局:packages/apps/Settings/res/xml/ethernet_settings.xml
添加Ethernet主类:packages/apps/Settings/src/com/android/settings/ethernet/EthernetSettings.java
至此:setting里面的界面布局等全部完成,逻辑处理等详情或代码就不具体详叙了。
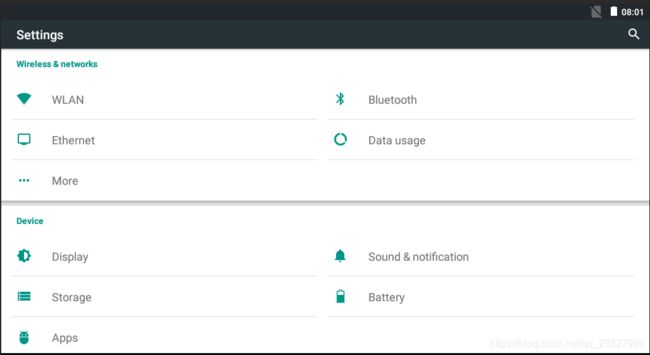
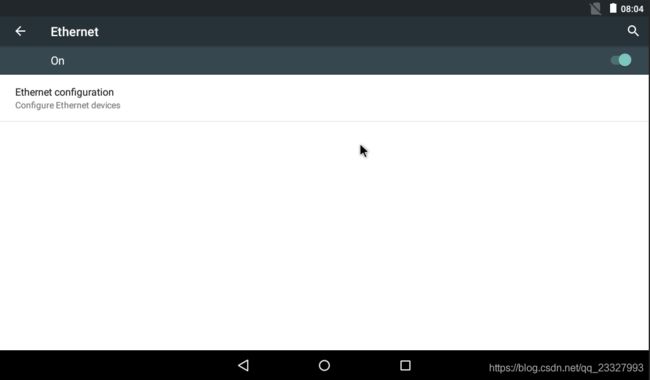
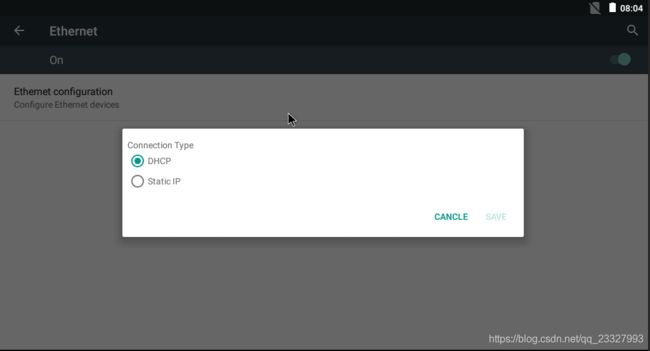
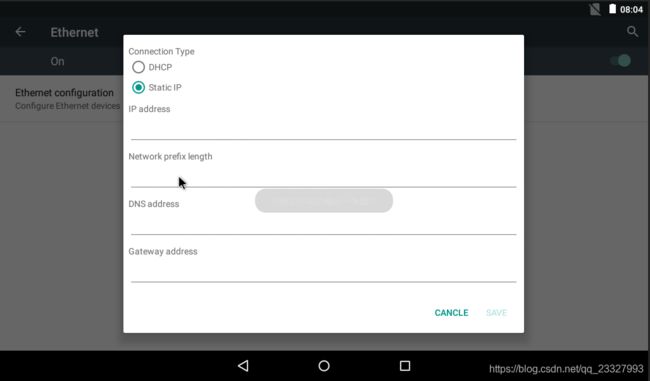
效果图如下:
接下来分析下调用完setConfiguration()之后的流程,惯例,先上一张图。
当我们调用setConfiguration()之后,肯定在想这个方法里面干了些什么,那么我们继续往下走。
先看setConfiguration是通过EthernetManager调用的,我们先找到IEthernetManager.aidl这个通信接口,看看里面的内容。
/*
 * Copyright (C) 2014 The Android Open Source Project
 *
 * Licensed under the Apache License, Version 2.0 (the "License");
 * you may not use this file except in compliance with the License.
 * You may obtain a copy of the License at
 *
 *      http://www.apache.org/licenses/LICENSE-2.0
 *
 * Unless required by applicable law or agreed to in writing, software
 * distributed under the License is distributed on an "AS IS" BASIS,
 * WITHOUT WARRANTIES OR CONDITIONS OF ANY KIND, either express or implied.
 * See the License for the specific language governing permissions and
 * limitations under the License.
 */

package android.net;

import android.net.IpConfiguration;
import android.net.IEthernetServiceListener;

/**
 * Interface that answers queries about, and allows changing
 * ethernet configuration.
 */
/** {@hide} */
interface IEthernetManager
{
    IpConfiguration getConfiguration();
    void setConfiguration(in IpConfiguration config);
    boolean isAvailable();
    void addListener(in IEthernetServiceListener listener);
    void removeListener(in IEthernetServiceListener listener);
}
这里我们看到@hide这个参数,应该就会知道,这个接口被隐藏掉了,应用层的开发是不能调到这个接口的,但我们是在做系统app的调试,没什么关系,正常使用。
但是这里只有方法的定义,实现在哪里呢?简单,实现肯定在EthernetManager.java中,于是找到该文件frameworks/base/core/java/android/net/EthernetManager.java 找到setConfiguration()的实现,
如下:
/**
 * Set Ethernet configuration.
 */
public void setConfiguration(IpConfiguration config) {
    try {
        mService.setConfiguration(config);
    } catch (NullPointerException | RemoteException e) {
    }
}
咋的一看,咦,没干啥啊,实现很简单,原来,通过了aidl的实现,远程通信。
private final IEthernetManager mService;
那既然用了aidl,那接口对应的服务在哪呢,于是首先找到网口服务
frameworks/opt/net/ethernet/java/com/android/server/ethernet/EthernetService.java
看看里面的实现
public final class EthernetService extends SystemService {

    private static final String TAG = "EthernetService";
    final EthernetServiceImpl mImpl;

    public EthernetService(Context context) {
        super(context);
        mImpl = new EthernetServiceImpl(context);
    }

    @Override
    public void onStart() {
        Log.i(TAG, "Registering service " + Context.ETHERNET_SERVICE);
        publishBinderService(Context.ETHERNET_SERVICE, mImpl);
    }

    @Override
    public void onBootPhase(int phase) {
        if (phase == SystemService.PHASE_SYSTEM_SERVICES_READY) {
            mImpl.start();
        }
    }
}
实现很简单,看到构造方法中创建了一个EthernetServiceImpl实例,跟到EthernetServiceImpl.java看看,
frameworks/opt/net/ethernet/java/com/android/server/ethernet/EthernetServiceImpl.java
 * @hide
 */
public class EthernetServiceImpl extends IEthernetManager.Stub {
如图,后面的没有展示出来,详细了解的请查看源码。
果然,EthernetServiceImpl.java继承了IEthernetManager接口并实现里面的方法。
那么现在就一目了然了。
找到setConfiguration的实现方法
/**
 * Set Ethernet configuration
 */
@Override
public void setConfiguration(IpConfiguration config) {
    if (!mStarted.get()) {
        Log.w(TAG, "System isn't ready enough to change ethernet configuration");
    }

    enforceChangePermission();
    enforceConnectivityInternalPermission();

    synchronized (mIpConfiguration) {
        mEthernetConfigStore.writeIpAndProxyConfigurations(config);

        // TODO: this does not check proxy settings, gateways, etc.
        // Fix this by making IpConfiguration a complete representation of static configuration.
        if (!config.equals(mIpConfiguration)) {
            Log.w(TAG, "!config.equals(mIpConfiguration)");
            mIpConfiguration = new IpConfiguration(config);
            mTracker.stop();
            mTracker.start(mContext, mHandler);
        }
    }
}
如图,方法里调用了frameworks/opt/net/ethernet/java/com/android/server/ethernet/EthernetConfigStore.java
里面的writeIpAndProxyConfigurations(),这样就把配置写入指定的文件了。
可以看看该类的实现,实现也很简单,上个代码就好了。
public class EthernetConfigStore extends IpConfigStore {
    private static final String TAG = "EthernetConfigStore";

    private static final String ipConfigFile = Environment.getDataDirectory() +
            "/misc/ethernet/ipconfig.txt";

    public EthernetConfigStore() {
    }

    public IpConfiguration readIpAndProxyConfigurations() {
        SparseArray networks = readIpAndProxyConfigurations(ipConfigFile);

        Log.d(TAG, "readIpAndProxyConfigurations networks.size():"+networks.size());

        if (networks.size() == 0) {
            Log.w(TAG, "No Ethernet configuration found. Using default.");
            return new IpConfiguration(IpAssignment.DHCP, ProxySettings.NONE, null, null);
        }

        if (networks.size() > 1) {
            // Currently we only support a single Ethernet interface.
            Log.w(TAG, "Multiple Ethernet configurations detected. Only reading first one.");
        }

        return networks.valueAt(0);
    }

    public void writeIpAndProxyConfigurations(IpConfiguration config) {
        SparseArray networks = new SparseArray();
        networks.put(0, config);
        writeIpAndProxyConfigurations(ipConfigFile, networks);
    }
}
frameworks/opt/net/ethernet/java/com/android/server/ethernet/EthernetNetworkFactory.java
再回到setConfiguration()实现的地方,我们可以看到在实现写配置之后,进行了一个ip配置是否相同的判断,如果有修改了配置,那么就开了一个线程锁,里面对ipConfigure进行配置,并且启动了EthernetNetworkFactory中的start方法。该start方法主要功能就是监控连接。可以看看该方法的实现。
/**
 * Begin monitoring connectivity
 */
public synchronized void start(Context context, Handler target) {
    // The services we use.
    IBinder b = ServiceManager.getService(Context.NETWORKMANAGEMENT_SERVICE);
    mNMService = INetworkManagementService.Stub.asInterface(b);
    mEthernetManager = (EthernetManager) context.getSystemService(Context.ETHERNET_SERVICE);

    // Interface match regex.
    mIfaceMatch = context.getResources().getString(
            com.android.internal.R.string.config_ethernet_iface_regex);

    // Create and register our NetworkFactory.
    mFactory = new LocalNetworkFactory(NETWORK_TYPE, context, target.getLooper());
    mFactory.setCapabilityFilter(mNetworkCapabilities);
    mFactory.setScoreFilter(-1); // this set high when we have an iface
    mFactory.register();

    mContext = context;

    // Start tracking interface change events.
    mInterfaceObserver = new InterfaceObserver();
    try {
        mNMService.registerObserver(mInterfaceObserver);
    } catch (RemoteException e) {
        Log.e(TAG, "Could not register InterfaceObserver " + e);
    }

    // If an Ethernet interface is already connected, start tracking that.
    // Otherwise, the first Ethernet interface to appear will be tracked.
    try {
        final String[] ifaces = mNMService.listInterfaces();
        for (String iface : ifaces) {
            synchronized(this) {
                if (maybeTrackInterface(iface)) {
                    // We have our interface. Track it.
                    // Note: if the interface already has link (e.g., if we
                    // crashed and got restarted while it was running),
                    // we need to fake a link up notification so we start
                    // configuring it. Since we're already holding the lock,
                    // any real link up/down notification will only arrive
                    // after we've done this.
                    if (mNMService.getInterfaceConfig(iface).hasFlag("running")) {
                        updateInterfaceState(iface, true);
                    }
                    break;
                }
            }
        }
    } catch (RemoteException e) {
        Log.e(TAG, "Could not get list of interfaces " + e);
    }
}
至此,暂时分析到此处了。还有很多地方没分析到,逻辑感觉也不是很清晰,希望大佬们指点。
另外,博主在调试的时候发现,为了应用层更人性化,参照wifi的逻辑和上述提到的参考博客,对Ethernet的网络连接状态,物理接口,网线插拔进行了一些添加,并在systemui中进行一些实时的更新。
这里简单做些说明。
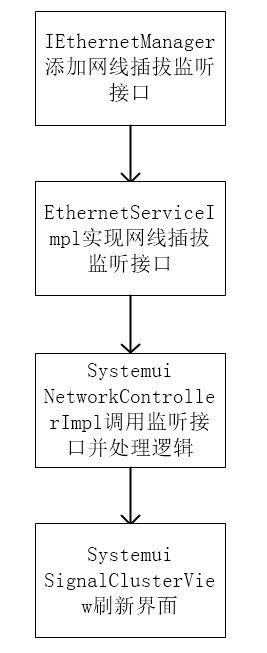
惯例,上图。
先回头看看EthernetManager中的方法里面有个Listener,
    /**
     * A listener interface to receive notification on changes in Ethernet.
     */
    public interface Listener {
        /**
         * Called when Ethernet port's availability is changed.
         * @param isAvailable {@code true} if one or more Ethernet port exists.
         */
        public void onAvailabilityChanged(boolean isAvailable);
    }
这个listener说能检测到一个或者多个网口事件,博主在settings应用层中添加listener后测试确实能够监听到网口事件,但好像不是对网线插拔的,仅仅是对于网口芯片是否接入的检测。
于是,我们得自己添加一个listener来监听网线的接入与拔出。
步骤如下:
1:在网络管理逻辑处理类EthernetNetworkFactory.java中添加一个全局变量用来标志网线的状态
private boolean isEthernetAdded = false;
2:修改网络接口状态监听代码
ps:细心的人可能在刚刚介绍EthernetNetworkFactory.start()中看到了一个叫InterfaceObserver的内部类的使用
// Start tracking interface change events.
mInterfaceObserver = new InterfaceObserver();
这里就解释到这个类是跟踪接口更改事件的。
那既然如此我们刚刚定义的变量就放在这里操作。
private class InterfaceObserver extends BaseNetworkObserver {
    @Override
    public void interfaceLinkStateChanged(String iface, boolean up) {
        Log.i(TAG,"interfaceLinkStateChanged---iface:"+iface+"up:"+up);
        updateInterfaceState(iface, up);
    }

    @Override
    public void interfaceAdded(String iface) {
        Log.i(TAG,"interfaceAdded---iface:"+iface);
        maybeTrackInterface(iface);
    }

    @Override
    public void interfaceRemoved(String iface) {
        Log.i(TAG,"interfaceRemoved---iface:"+iface);
        stopTrackingInterface(iface);
    }
}
因为我这里只想监听eth0 的 usb net,所以我加了一个监听过滤,修改后如下:
private class InterfaceObserver extends BaseNetworkObserver {
    @Override
    public void interfaceLinkStateChanged(String iface, boolean up) {
        Log.i(TAG,"interfaceLinkStateChanged---iface:"+iface+"up:"+up);
        updateInterfaceState(iface, up);
        if("eth0".equals(iface)){
            Log.i(TAG,"interfaceLinkStateChanged---linked:"+up);
            isEthernetAdded = up;
            notifyEthernetInjected(isEthernetAdded); // 监听网线插拔
        }

    }

    @Override
    public void interfaceAdded(String iface) {
        Log.i(TAG,"interfaceAdded---iface:"+iface);
        maybeTrackInterface(iface);
        if("eth0".equals(iface)){
            Log.i(TAG,"interfaceAdded");
            isEthernetAdded = true;
            notifyEthernetInjected(isEthernetAdded);
        }

    }

    @Override
    public void interfaceRemoved(String iface) {
        Log.i(TAG,"interfaceRemoved---iface:"+iface);
        stopTrackingInterface(iface);
        if("eth0".equals(iface)){
            Log.i(TAG,"interfaceRemoved");
            isEthernetAdded = false;
            notifyEthernetInjected(isEthernetAdded);
        }

    }
}
通过改完后的代码可以看出,该类里面重写了三个方法。
interfaceLinkStateChanged:接口状态改变时调用
interfaceAdded:新接口接入时调用
interfaceRemoved:接口移除时调用
看到这里里面好像有个不眼熟的方法notifyEthernetInjected();
对,这个是我们添加用来通知所有注册的listener的方法。
private void notifyEthernetInjected(boolean isInjected){
    int n = mListeners.beginBroadcast();
    Log.i(TAG,"notifyEthernetInjected state listener size : "+n+",isInjected:"+isInjected);
    for (int i = 0; i < n; i++) {
        try {
            mListeners.getBroadcastItem(i).onEthernetInjected(isInjected);
        } catch (RemoteException e) {
            // Do nothing here.
        }
    }
    mListeners.finishBroadcast();
}
参照IEthernetManager.aidl中的isAvailable()方法,我们需要添加获取网线状态的接口isEthernetInjected();
public synchronized boolean isEthernetInjected(){
    return isEthernetAdded;
}
这里我们实现的isEthernetInjected()要想让EthernetManager.java调用,需要在IEthetnetManager.aidl中添加接口,并且在EthernetManager.java,EthernetServiceImpl.java中实现,
IEthetnetManager.aidl:
/*
 * Copyright (C) 2014 The Android Open Source Project
 *
 * Licensed under the Apache License, Version 2.0 (the "License");
 * you may not use this file except in compliance with the License.
 * You may obtain a copy of the License at
 *
 *      http://www.apache.org/licenses/LICENSE-2.0
 *
 * Unless required by applicable law or agreed to in writing, software
 * distributed under the License is distributed on an "AS IS" BASIS,
 * WITHOUT WARRANTIES OR CONDITIONS OF ANY KIND, either express or implied.
 * See the License for the specific language governing permissions and
 * limitations under the License.
 */

package android.net;

import android.net.IpConfiguration;
import android.net.IEthernetServiceListener;

/**
 * Interface that answers queries about, and allows changing
 * ethernet configuration.
 */
/** {@hide} */
interface IEthernetManager
{
    IpConfiguration getConfiguration();
    void setConfiguration(in IpConfiguration config);
    boolean isAvailable();
    void addListener(in IEthernetServiceListener listener);
    void removeListener(in IEthernetServiceListener listener);
    void updateIfaceState(String iface,boolean up);
    boolean isEthernetInjected();
}
EthernetManager.java:
public boolean isEthernetInjected() {
    try {
        return mService.isEthernetInjected();
    } catch (NullPointerException | RemoteException e) {
        return false;
    }
}
EthernetServiceImpl.java
@Override
public boolean isEthernetInjected() {
    enforceAccessPermission();
    return mTracker.isEthernetInjected();
}
到现在,我们还不能在应用层监听网线插拔的状态,因为我们还需要添加一个listener,还是先看IEthernetManager.aidl中的
void addListener(in IEthernetServiceListener listener);
看到参数是一个IEthernetServiceListener的类型,我们跟到IEthernetServiceListener.aidl中发现如下:
/*
 * Copyright (C) 2014 The Android Open Source Project
 *
 * Licensed under the Apache License, Version 2.0 (the "License");
 * you may not use this file except in compliance with the License.
 * You may obtain a copy of the License at
 *
 *      http://www.apache.org/licenses/LICENSE-2.0
 *
 * Unless required by applicable law or agreed to in writing, software
 * distributed under the License is distributed on an "AS IS" BASIS,
 * WITHOUT WARRANTIES OR CONDITIONS OF ANY KIND, either express or implied.
 * See the License for the specific language governing permissions and
 * limitations under the License.
 */

package android.net;

/** @hide */
oneway interface IEthernetServiceListener
{
    void onAvailabilityChanged(boolean isAvailable);
}
发现刚刚在应用层添加的监听里面重写的方法原来在这里,那么好办了,我们添加的监听将要被重写的方法也加在这。
如下:
package android.net;

/** @hide */
oneway interface IEthernetServiceListener
{
    void onAvailabilityChanged(boolean isAvailable);
    void onEthernetInjected(boolean isInjected);
}
在这里添加后,我们得在EthernetManager.java中去实现它,找到
private final IEthernetServiceListener.Stub mServiceListener =
        new IEthernetServiceListener.Stub() {
            @Override
            public void onAvailabilityChanged(boolean isAvailable) {
                Log.i(TAG,"onEthernetInjected---isAvailable:"+isAvailable);
                mHandler.obtainMessage(
                        MSG_AVAILABILITY_CHANGED, isAvailable ? 1 : 0, 0, null).sendToTarget();
            }
        };
参照onAvailabilityChanged,依葫芦画瓢添加onEthernetInjected
添加后如下:
private final IEthernetServiceListener.Stub mServiceListener =
        new IEthernetServiceListener.Stub() {
            @Override
            public void onAvailabilityChanged(boolean isAvailable) {
                Log.i(TAG,"onEthernetInjected---isAvailable:"+isAvailable);
                mHandler.obtainMessage(
                        MSG_AVAILABILITY_CHANGED, isAvailable ? 1 : 0, 0, null).sendToTarget();
            }

            @Override
            public void onEthernetInjected(boolean isInjected) {
                Log.i(TAG,"onEthernetInjected---isInjected:"+isInjected);
                mHandler.obtainMessage(MSG_ETHERNET_INJECTION_CHANGED,isInjected).sendToTarget();
            }
        };
这里我们用handler发出了网线接入拔出的消息,那么得去处理他,还是在EthernetManager.java中
private final Handler mHandler = new Handler() {
    @Override
    public void handleMessage(Message msg) {
        if (msg.what == MSG_AVAILABILITY_CHANGED) {
            boolean isAvailable = (msg.arg1 == 1);
            for (Listener listener : mListeners) {
                listener.onAvailabilityChanged(isAvailable);
            }
        }
    }
};
这里可以看到处理了onAvailabilityChanged发出来的消息,我们在这里继续加上onEthernetInjected发出的消息的处理。
private final Handler mHandler = new Handler() {
    @Override
    public void handleMessage(Message msg) {
        if (msg.what == MSG_AVAILABILITY_CHANGED) {
            boolean isAvailable = (msg.arg1 == 1);
            for (Listener listener : mListeners) {
                listener.onAvailabilityChanged(isAvailable);
            }
        }
        else if(msg.what == MSG_ETHERNET_INJECTION_CHANGED){
            boolean isInjected = (boolean)msg.obj;
            for (EthernetListener listener : mEthernetListeners) {
                listener.onEthernetInjected(isInjected);
            }
        }

    }
};
这里我们可以看到,在消息处理中有个EthernetListener的listener,mEthernetListeners是listener的ArrayList,这是是需要我们自己去实现的。
添加定义:
private final ArrayList mEthernetListeners = new ArrayList(); 添加listener接口,实现add 和 remove方法。
public interface EthernetListener {
    public void onEthernetInjected(boolean isEthernetInjected);
}

public void addEthernetListener(EthernetListener listener){
    if (listener == null) {
        throw new IllegalArgumentException("listener must not be null");
    }
    mEthernetListeners.add(listener);
}

public void removeEthernetListener(EthernetListener listener) {
    if (listener == null) {
        throw new IllegalArgumentException("listener must not be null");
    }
    mEthernetListeners.remove(listener);
}
至此,全部实现!
还有两点问题:
1:开机后默认使用DHCP,IP获取到了,但不能上网,需要插拔一次网线后才可以上网
2:应用层不知道怎么获取当前接入的Ethernet是否能够上网。
