ARM架构服务器centos7.4上yum安装k8s教程
1.环境说明
[root@k8s-master ~]# uname -a
Linux slave1 4.11.0-22.el7a.aarch64 #1 SMP Sun Sep 3 13:39:10 CDT 2017 aarch64 aarch64 aarch64 GNU/Linux
[root@k8s-master ~]# cat /etc/redhat-release
CentOS Linux release 7.4.1708 (AltArch)
| 主机名 | IP | 功能 |
| k8s-master | 10.2.152.78 | master |
| k8s-node1 | 10.2.152.72 | node |
2、修改master和node的hosts文件
[root@k8s-master ~]# vim /etc/hosts
127.0.0.1   localhost localhost.localdomain localhost4 localhost4.localdomain4
::1         localhost localhost.localdomain localhost6 localhost6.localdomain6

10.2.152.78	k8s-master
10.2.152.72	k8s-node1
3、安装ntp实现所有服务器间的时间同步
$:yum install ntp -y
$:vim /etc/ntp.conf
   21 server 10.2.152.72 iburst       #目标服务器网络位置
   22 #server 0.centos.pool.ntp.org iburst    #一下三个是CentOS官方的NTP服务器,我们注释掉
   23 #server 1.centos.pool.ntp.org iburst
   24 #server 2.centos.pool.ntp.org iburst
   25 #server 3.centos.pool.ntp.org iburst
$:systemctl start ntpd.service
$:systemctl enable ntpd.service
$:systemctl status ntpd.service
● ntpd.service - Network Time Service
   Loaded: loaded (/usr/lib/systemd/system/ntpd.service; enabled; vendor preset: disabled)
   Active: active (running) since Thu 2018-09-06 10:44:05 CST; 1 day 3h ago
 Main PID: 2334 (ntpd)
   CGroup: /system.slice/ntpd.service
           └─2334 /usr/sbin/ntpd -u ntp:ntp -g

Sep 06 11:01:33 slave1 ntpd[2334]: new interface(s) found: wak...r
Sep 06 11:06:54 slave1 ntpd[2334]: 0.0.0.0 0618 08 no_sys_peer
Sep 07 09:26:34 slave1 ntpd[2334]: Listen normally on 8 flanne...3
Sep 07 09:26:34 slave1 ntpd[2334]: Listen normally on 9 flanne...3
Sep 07 09:26:34 slave1 ntpd[2334]: new interface(s) found: wak...r
Sep 07 09:56:32 slave1 ntpd[2334]: Listen normally on 10 docke...3
Sep 07 09:56:32 slave1 ntpd[2334]: Listen normally on 11 flann...3
Sep 07 09:56:32 slave1 ntpd[2334]: Deleting interface #9 flann...s
Sep 07 09:56:32 slave1 ntpd[2334]: Deleting interface #7 docke...s
Sep 07 09:56:32 slave1 ntpd[2334]: new interface(s) found: wak...r
Hint: Some lines were ellipsized, use -l to show in full.
4、关闭master和node的防火墙和selinux
$:sudo systemctl stop firewalld
$:sudo systemctl disable firewalld
$:sudo vim /etc/selinux/config

# This file controls the state of SELinux on the system.
# SELINUX= can take one of these three values:
#     enforcing - SELinux security policy is enforced.
#     permissive - SELinux prints warnings instead of enforcing.
#     disabled - No SELinux policy is loaded.
SELINUX=disabled
# SELINUXTYPE= can take one of three two values:
#     targeted - Targeted processes are protected,
#     minimum - Modification of targeted policy. Only selected processes are protected.
#     mls - Multi Level Security protection.
SELINUXTYPE=targeted

$:reboot  //重启服务器
5、master和node上安装docker
(1)安装依赖包
$:yum install -y yum-utils device-mapper-persistent-data lvm2
(2)添加docker软件包的yum源
$:yum-config-manager --add-repo https://download.docker.com/linux/centos/docker-ce.repo(3)关闭测试版本list(只显示稳定版)
$:yum-config-manager --enable docker-ce-edge
$:yum-config-manager --enable docker-ce-test
(4)更新yum包索引
$:yum makecache fast(5)安装Docker
NO.1:直接安装Docker CE(will always install the highest possible version)
$:yum install docker-ceNO.2:安装指定版本的Docker CE
$:yum list docker-ce --showduplicates|sort -r      #找到需要安装的
$:sudo yum install docker-ce-18.06.0.ce -y    #启动docker
$:systemctl start docker & systemctl enable docker
Error:
因为之前安装过旧版本的docker,安装时出现以下报错信息:
Transaction check error:
file /usr/bin/docker from install of docker-ce-17.12.0.ce-1.el7.centos.x86_64 conflicts with file from package docker-common-2:1.12.6-68.gitec8512b.el7.centos.aarch_64
file /usr/bin/docker-containerd from install of docker-ce-17.12.0.ce-1.el7.centos.x86_64 conflicts with file from package docker-common-2:1.12.6-68.gitec8512b.el7.centos.aarch_64
file /usr/bin/docker-containerd-shim from install of docker-ce-17.12.0.ce-1.el7.centos.x86_64 conflicts with file from package docker-common-2:1.12.6-68.gitec8512b.el7.centos.aarch_64
file /usr/bin/dockerd from install of docker-ce-17.12.0.ce-1.el7.centos.x86_64 conflicts with file from package docker-common-2:1.12.6-68.gitec8512b.el7.centos.aarch_64
卸载旧版本的docker包
$:yum erase docker-common-2:1.12.6-68.gitec8512b.el7.centos.aarch_64再次安装docker!!!
Error:
安装完docker用“docker version”chak查看docker版本报:
Cannot connect to the Docker daemon at unix:///var/run/docker.sock. Is the docker daemon running?
解决方法:
配置DOCKER_HOST
$:vim /etc/profile.d/docker.sh
内容如下
export DOCKER_HOST=tcp://localhost:2375
应用
$:source /etc/profile
$:source /etc/bashrc
配置启动文件
$:vim /lib/systemd/system/docker.service
将
ExecStart=/usr/bin/dockerd
修改为
ExecStart=/usr/bin/dockerd -H tcp://0.0.0.0:2375 -H unix:///var/run/docker.sock -H tcp://0.0.0.0:7654
注:2375 是管理端口 ;7654 是备用端口
重载配置和重启
$:systemctl daemon-reload
$:systemctl restart docker.service
查看
docker version
输出
Client:
     Version:      18.03.1-ce
     API version:  1.37
     Go version:   go1.9.5
     Git commit:   9ee9f40
     Built:        Thu Apr 26 07:20:16 2018
     OS/Arch:      linux/amd64
     Experimental: false
     Orchestrator: swarm
Server:
     Engine:
      Version:      18.03.1-ce
      API version:  1.37 (minimum version 1.12)
      Go version:   go1.9.5
      Git commit:   9ee9f40
      Built:        Thu Apr 26 07:23:58 2018
      OS/Arch:      linux/amd64
      Experimental: false
6、master和node上安装k8s
(1)更换yum源为阿里源
vim   /etc/yum.repos.d/kubernetes.repo
[kubernetes]
name=Kubernetes
baseurl=https://mirrors.aliyun.com/kubernetes/yum/repos/kubernetes-el7-aarch64
enabled=1
gpgcheck=1
repo_gpgcheck=1
gpgkey=http://mirrors.aliyun.com/kubernetes/yum/doc/yum-key.gpg http://mirrors.aliyun.com/kubernetes/yum/doc/rpm-package-key.gpg
exclude=kube*
(2)yum安装k8s
$:yum install -y kubelet kubeadm kubectl --disableexcludes=kubernetes(3)启动k8s服务
systemctl enable kubelet && systemctl start kubelet(4)查看版本号
$:kubeadm version
kubeadm version: &version.Info{Major:"1", Minor:"11", GitVersion:"v1.11.2", GitCommit:"bb9ffb1654d4a729bb4cec18ff088eacc153c239", GitTreeState:"clean", BuildDate:"2018-08-07T23:14:39Z", GoVersion:"go1.10.3", Compiler:"gc", Platform:"linux/arm64"}
(5)配置iptable
$:vim  /etc/sysctl.d/k8s.conf
net.bridge.bridge-nf-call-ip6tables = 1
net.bridge.bridge-nf-call-iptables = 1
vm.swappiness=0

$:sysctl --system
7.关掉swap
$:sudo swapoff -a
 #要永久禁掉swap分区,打开如下文件注释掉swap那一行
 # sudo vi /etc/stab
8.安装etcd和flannel(master上安装etcd+flannel,node上只安装flannel)
$:yum  -y  install  etcd
$:systemctl start etcd;systemctl enable etcd

$:yum  -y  install  flannel
9.master上初始化镜像
$:kubeadm init --kubernetes-version=v1.11.2 --pod-network-cidr=10.2.0.0/16 --apiserver-advertise-address=10.2.152.78
#这里是之前所安装K8S的版本号;这里填写集群所在网段
输出:
[init] using Kubernetes version: v1.11.2
[preflight] running pre-flight checks
I0909 11:13:01.251094   31919 kernel_validator.go:81] Validating kernel version
I0909 11:13:01.252496   31919 kernel_validator.go:96] Validating kernel config
[preflight/images] Pulling images required for setting up a Kubernetes cluster
[preflight/images] This might take a minute or two, depending on the speed of your internet connection
[preflight/images] You can also perform this action in beforehand using 'kubeadm config images pull'
[kubelet] Writing kubelet environment file with flags to file "/var/lib/kubelet/kubeadm-flags.env"
[kubelet] Writing kubelet configuration to file "/var/lib/kubelet/config.yaml"
[preflight] Activating the kubelet service
[certificates] Generated ca certificate and key.
[certificates] Generated apiserver certificate and key.
[certificates] apiserver serving cert is signed for DNS names [localhost.localdomain kubernetes kubernetes.default kubernetes.default.svc kubernetes.default.svc.cluster.local] and IPs [10.96.0.1 10.2.152.78]
[certificates] Generated apiserver-kubelet-client certificate and key.
[certificates] Generated sa key and public key.
[certificates] Generated front-proxy-ca certificate and key.
[certificates] Generated front-proxy-client certificate and key.
[certificates] Generated etcd/ca certificate and key.
[certificates] Generated etcd/server certificate and key.
[certificates] etcd/server serving cert is signed for DNS names [localhost.localdomain localhost] and IPs [127.0.0.1 ::1]
[certificates] Generated etcd/peer certificate and key.
[certificates] etcd/peer serving cert is signed for DNS names [localhost.localdomain localhost] and IPs [10.2.152.78 127.0.0.1 ::1]
[certificates] Generated etcd/healthcheck-client certificate and key.
[certificates] Generated apiserver-etcd-client certificate and key.
[certificates] valid certificates and keys now exist in "/etc/kubernetes/pki"
[kubeconfig] Wrote KubeConfig file to disk: "/etc/kubernetes/admin.conf"
[kubeconfig] Wrote KubeConfig file to disk: "/etc/kubernetes/kubelet.conf"
[kubeconfig] Wrote KubeConfig file to disk: "/etc/kubernetes/controller-manager.conf"
[kubeconfig] Wrote KubeConfig file to disk: "/etc/kubernetes/scheduler.conf"
[controlplane] wrote Static Pod manifest for component kube-apiserver to "/etc/kubernetes/manifests/kube-apiserver.yaml"
[controlplane] wrote Static Pod manifest for component kube-controller-manager to "/etc/kubernetes/manifests/kube-controller-manager.yaml"
[controlplane] wrote Static Pod manifest for component kube-scheduler to "/etc/kubernetes/manifests/kube-scheduler.yaml"
[etcd] Wrote Static Pod manifest for a local etcd instance to "/etc/kubernetes/manifests/etcd.yaml"
[init] waiting for the kubelet to boot up the control plane as Static Pods from directory "/etc/kubernetes/manifests"
[init] this might take a minute or longer if the control plane images have to be pulled
[apiclient] All control plane components are healthy after 75.007389 seconds
[uploadconfig] storing the configuration used in ConfigMap "kubeadm-config" in the "kube-system" Namespace
[kubelet] Creating a ConfigMap "kubelet-config-1.11" in namespace kube-system with the configuration for the kubelets in the cluster
[markmaster] Marking the node localhost.localdomain as master by adding the label "node-role.kubernetes.io/master=''"
[markmaster] Marking the node localhost.localdomain as master by adding the taints [node-role.kubernetes.io/master:NoSchedule]
[patchnode] Uploading the CRI Socket information "/var/run/dockershim.sock" to the Node API object "localhost.localdomain" as an annotation
[bootstraptoken] using token: dlo2ec.ynlr9uyocy9vdnvr
[bootstraptoken] configured RBAC rules to allow Node Bootstrap tokens to post CSRs in order for nodes to get long term certificate credentials
[bootstraptoken] configured RBAC rules to allow the csrapprover controller automatically approve CSRs from a Node Bootstrap Token
[bootstraptoken] configured RBAC rules to allow certificate rotation for all node client certificates in the cluster
[bootstraptoken] creating the "cluster-info" ConfigMap in the "kube-public" namespace
[addons] Applied essential addon: CoreDNS
[addons] Applied essential addon: kube-proxy

Your Kubernetes master has initialized successfully!

To start using your cluster, you need to run the following as a regular user:

  mkdir -p $HOME/.kube
  sudo cp -i /etc/kubernetes/admin.conf $HOME/.kube/config
  sudo chown $(id -u):$(id -g) $HOME/.kube/config

You should now deploy a pod network to the cluster.
Run "kubectl apply -f [podnetwork].yaml" with one of the options listed at:
  https://kubernetes.io/docs/concepts/cluster-administration/addons/

You can now join any number of machines by running the following on each node
as root:

  kubeadm join 10.2.152.78:6443 --token dlo2ec.ynlr9uyocy9vdnvr --discovery-token-ca-cert-hash sha256:0457cd2a8ffcf91707a71c4ef6d8717e2a8a6a2c13ad01fa1fc3f15575e28534
根据输出执行:
mkdir -p $HOME/.kube
sudo cp -i /etc/kubernetes/admin.conf $HOME/.kube/config
sudo chown $(id -u):$(id -g) $HOME/.kube/config
集群主节点安装成功,这里要记得保存这条命令,以便之后各个节点加入集群:
You can now join any number of machines by running the following on each node
as root:
kubeadm join 10.2.152.78:6443 --token dlo2ec.ynlr9uyocy9vdnvr --discovery-token-ca-cert-hash sha256:0457cd2a8ffcf91707a71c4ef6d8717e2a8a6a2c13ad01fa1fc3f15575e28534
Error:
执行初始化报错:
ERROR FileAvailable--etc-kubernetes-manifests-kube-apiserver.yaml]: /etc/kubernetes/manifests/kube-apiserver.yaml already exists
[ERROR Port-10250]: Port 10250 is in use
原因及解决方法:
kubeadm会自动检查当前环境是否有上次命令执行的“残留”。如果有,必须清理后再行执行init。我们可以通过”kubeadm reset”来清理环境,以备重来。
10.配置kubetl认证信息
$:echo "export KUBECONFIG=/etc/kubernetes/admin.conf" >> ~/.bash_profile(本人采用)
或
$:export KUBECONFIG=/etc/kubernetes/admin.conf
11.配置flannel网络
参考:https://github.com/coreos/flannel
$:kubectl apply -f https://raw.githubusercontent.com/coreos/flannel/master/Documentation/kube-flannel.yml这里就表示执行完毕了,可以去主节点执行命令:
[root@k8s-master ~]# kubectl get nodes
NAME STATUS ROLES AGE VERSION
k8s-master Ready master 8h v1.11.2
12.添加node节点到mastersh上
在node上执行master初始化保存下来的输出:
kubeadm join 10.2.152.78:6443 --token dlo2ec.ynlr9uyocy9vdnvr --discovery-token-ca-cert-hash sha256:0457cd2a8ffcf91707a71c4ef6d8717e2a8a6a2c13ad01fa1fc3f15575e28534
切换的master上执行:
[root@k8s-master ~]# kubectl get nodes
NAME STATUS ROLES AGE VERSION
k8s-master Ready master 8h v1.11.2
k8s-node1 Ready
注:Ready显示需要等待一会
13.docker补充设置(可有可无)
$:vim /usr/lib/systemd/system/docker.service
 Environment="HTTPS_PROXY=http://www.ik8s.io:10080"
 Environment="NO_PROXY=127.0.0.0/8,127.20.0.0.0/16"
 ExecStart=/usr/bin/dockerd

$:systemctl daemon-reload
$:systemctl start docker
$: docker info
    Containers: 10
     Running: 0
     Paused: 0
     Stopped: 10
    Images: 14
    Server Version: 18.06.0-ce
    Storage Driver: overlay2
    Backing Filesystem: xfs
     Supports d_type: true
     Native Overlay Diff: true
    Logging Driver: json-file
    Cgroup Driver: cgroupfs
    Plugins:
     Volume: local
     Network: bridge host macvlan null overlay
     Log: awslogs fluentd gcplogs gelf journald json-file logentries splunk syslog
    Swarm: inactive
    Runtimes: runc
    Default Runtime: runc
    Init Binary: docker-init
    containerd version: d64c661f1d51c48782c9cec8fda7604785f93587
    runc version: 69663f0bd4b60df09991c08812a60108003fa340
    init version: fec3683
    Security Options:
     seccomp
      Profile: default
    Kernel Version: 4.11.0-22.el7a.aarch64
    Operating System: CentOS Linux 7 (AltArch)
    OSType: linux
    Architecture: aarch64
    CPUs: 40
    Total Memory: 95.15GiB
    Name: k8s-master
    ID: F7B7:H45H:DFR5:BLRY:6EKG:EFV5:JPMR:YOJW:MGMA:HUK2:UMBD:CM6B
    Docker Root Dir: /var/lib/docker
    Debug Mode (client): false
    Debug Mode (server): false
    Registry: https://index.docker.io/v1/
    Labels:
    Experimental: false
    Insecure Registries:
     127.0.0.0/8
    Live Restore Enabled: false
$:cat /proc/sys/net/bridge/bridge-nf-call-ip6tables
1
$:cat /proc/sys/net/bridge/bridge-nf-call-iptables
1
14、服务器配置总结
| 节点 |
运行服务 |
|
Master |
etcd kube-apiserver kube-controller-manager kube-scheduler kube-proxy kubelet docker flanneld |
|
node |
flanneld docker kube-proxy kubelet |
15.k8s测试
部署Dashboard插件
1、下载Dashboard插件配置文件
$:mkdir -p ~/k8s
$:cd ~/k8s
$:wget https://raw.githubusercontent.com/kubernetes/dashboard/master/src/deploy/recommended/kubernetes-dashboard.yaml
2、编辑kubernetes-dashboard.yaml文件,在Dashboard Service中添加type: NodePort,暴露Dashboard服务
# ------------------- Dashboard Service ------------------- #
kind: Service
apiVersion: v1
metadata:
  labels:
    k8s-app: kubernetes-dashboard
  name: kubernetes-dashboard
  namespace: kube-system
spec:
  type: NodePort
  ports:
    - port: 443
      targetPort: 8443
  selector:
    k8s-app: kubernetes-dashboard
3、安装Dashboard插件
$:kubectl create -f kubernetes-dashboard.yaml报错信息:
Error from server (AlreadyExists): error when creating "kubernetes-dashboard.yaml": deployments.extensions "kubernetes-dashboard" already exists
Error from server (AlreadyExists): error when creating "kubernetes-dashboard.yaml": services "kubernetes-dashboard" already exists
原因及解决:
services kubernetes-dashboard已经存在了,但是这个在kubectl get services 是看不到的,可以通过以下命令删除然后重新创建!
$:kubectl delete -f kubernetes-dashboard.yaml4、授予Dashboard账户集群管理权限
创建一个kubernetes-dashboard-admin的ServiceAccount并授予集群admin的权限,创建kubernetes-dashboard-admin.rbac.yaml
---
apiVersion: v1
kind: ServiceAccount
metadata:
  labels:
    k8s-app: kubernetes-dashboard
  name: kubernetes-dashboard-admin
  namespace: kube-system
---
apiVersion: rbac.authorization.k8s.io/v1beta1
kind: ClusterRoleBinding
metadata:
  name: kubernetes-dashboard-admin
  labels:
    k8s-app: kubernetes-dashboard
roleRef:
  apiGroup: rbac.authorization.k8s.io
  kind: ClusterRole
  name: cluster-admin
subjects:
- kind: ServiceAccount
  name: kubernetes-dashboard-admin
  namespace: kube-system
执行
[root@k8s-master ~]# kubectl create -f kubernetes-dashboard-admin.rbac.yaml
serviceaccount "kubernetes-dashboard-admin" created
clusterrolebinding "kubernetes-dashboard-admin" created
5、查看kubernete-dashboard-admin的token
[root@k8s-master ~]# kubectl -n kube-system get secret | grep kubernetes-dashboard-admin
kubernetes-dashboard-admin-token-jxq7l   kubernetes.io/service-account-token   3         22h
[root@k8s-master ~]# kubectl describe -n kube-system secret/kubernetes-dashboard-admin-token-jxq7l
Name:         kubernetes-dashboard-admin-token-jxq7l
Namespace:    kube-system
Labels:
Annotations:  kubernetes.io/service-account.name=kubernetes-dashboard-admin
              kubernetes.io/service-account.uid=686ee8e9-ce63-11e7-b3d5-080027d38be0
Type:  kubernetes.io/service-account-token
Data
====
namespace:  11 bytes
token:      eyJhbGciOiJSUzI1NiIsInR5cCI6IkpXVCJ9.eyJpc3MiOiJrdWJlcm5ldGVzL3NlcnZpY2VhY2NvdW50Iiwia3ViZXJuZXRlcy5pby9zZXJ2aWNlYWNjb3VudC9uYW1lc3BhY2UiOiJrdWJlLXN5c3RlbSIsImt1YmVybmV0ZXMuaW8vc2VydmljZWFjY291bnQvc2VjcmV0Lm5hbWUiOiJrdWJlcm5ldGVzLWRhc2hib2FyZC1hZG1pbi10b2tlbi1qeHE3bCIsImt1YmVybmV0ZXMuaW8vc2VydmljZWFjY291bnQvc2VydmljZS1hY2NvdW50Lm5hbWUiOiJrdWJlcm5ldGVzLWRhc2hib2FyZC1hZG1pbiIsImt1YmVybmV0ZXMuaW8vc2VydmljZWFjY291bnQvc2VydmljZS1hY2NvdW50LnVpZCI6IjY4NmVlOGU5LWNlNjMtMTFlNy1iM2Q1LTA4MDAyN2QzOGJlMCIsInN1YiI6InN5c3RlbTpzZXJ2aWNlYWNjb3VudDprdWJlLXN5c3RlbTprdWJlcm5ldGVzLWRhc2hib2FyZC1hZG1pbiJ9.Ua92im86o585ZPBfsOpuQgUh7zxgZ2p1EfGNhr99gAGLi2c3ss-2wOu0n9un9LFn44uVR7BCPIkRjSpTnlTHb_stRhHbrECfwNiXCoIxA-1TQmcznQ4k1l0P-sQge7YIIjvjBgNvZ5lkBNpsVanvdk97hI_kXpytkjrgIqI-d92Lw2D4xAvHGf1YQVowLJR_VnZp7E-STyTunJuQ9hy4HU0dmvbRXBRXQ1R6TcF-FTe-801qUjYqhporWtCaiO9KFEnkcYFJlIt8aZRSL30vzzpYnOvB_100_DdmW-53fLWIGYL8XFnlEWdU1tkADt3LFogPvBP4i9WwDn81AwKg_Q
ca.crt:     1025 bytes
6、查看Dashboard服务端口
-
[root@master k8s]# kubectl get svc -n kube-system NAME TYPE CLUSTER-IP EXTERNAL-IP PORT(S) AGE kube-dns ClusterIP 10.96.0.1053/UDP,53/TCP 1d kubernetes-dashboard NodePort 10.102.209.161 443:32513/TCP 21h
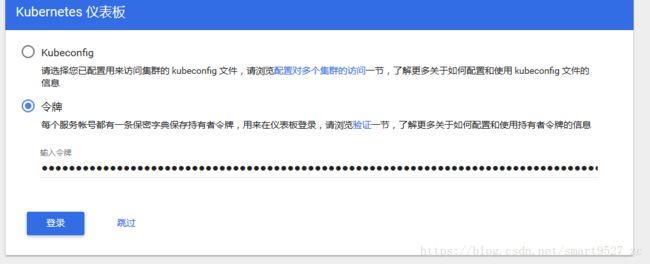
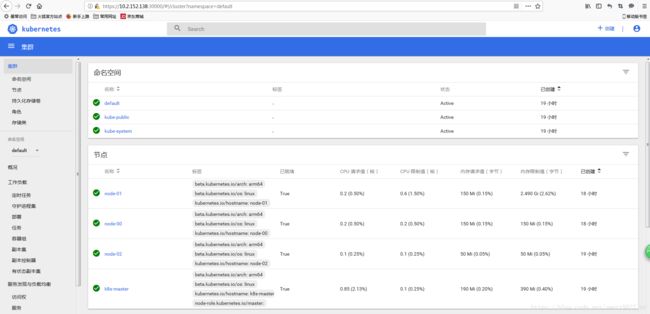
7.打开浏览器访问UI界面:https://10.2.152.78:30000
出错:
浏览器访问web界面失败
8.kubectl使用
$:kubectl version
Client Version: version.Info{Major:"1", Minor:"11", GitVersion:"v1.11.2", GitCommit:"bb9ffb1654d4a729bb4cec18ff088eacc153c239", GitTreeState:"clean", BuildDate:"2018-08-07T23:17:28Z", GoVersion:"go1.10.3", Compiler:"gc", Platform:"linux/arm64"}
Server Version: version.Info{Major:"1", Minor:"11", GitVersion:"v1.11.2", GitCommit:"bb9ffb1654d4a729bb4cec18ff088eacc153c239", GitTreeState:"clean", BuildDate:"2018-08-07T23:08:19Z", GoVersion:"go1.10.3", Compiler:"gc", Platform:"linux/arm64"}
$:kubectl get nodes
NAME         STATUS    ROLES     AGE       VERSION
k8s-master   Ready     master    1d        v1.11.2
k8s-node1    Ready         1d        v1.11.2
[root@k8s-master ~]# kubectl run kubernetes-bootcamp --image=jocatalin/kubernetes-bootcamp
deployment.apps/kubernetes-bootcamp created
[root@k8s-master ~]# kubectl get deployments
NAME                  DESIRED   CURRENT   UP-TO-DATE   AVAILABLE   AGE
kubernetes-bootcamp   1         1         1            0           3s
[root@k8s-master ~]# kubectl get pods
NAME                                   READY     STATUS             RESTARTS   AGE
kubernetes-bootcamp-589d48ddb4-qkn5s   0/1       ImagePullBackOff   0          54s
[root@k8s-master ~]# kubectl get pods -o wide
NAME                                   READY     STATUS             RESTARTS   AGE       IP          NODE        NOMINATED NODE
kubernetes-bootcamp-589d48ddb4-qkn5s   0/1       ImagePullBackOff   0          1m        10.2.1.12   k8s-node1
[root@k8s-master ~]# journalctl -f #查看k8s的运行状态
参考:
https://segmentfault.com/a/1190000015787725
http://blog.51cto.com/douya/1945382


