sharding-jdbc系列(二):在spring boot下的分库分表运用
本文使用的是spring boot+mybatis+sharding-jdbc+druid。
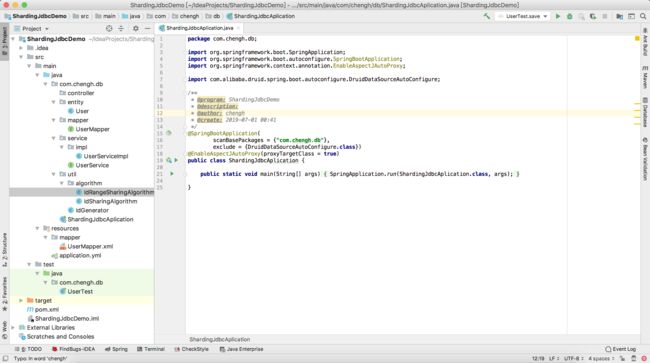
项目整体结构
单库分表集成
项目背景:
创建一个数据库user0,假设只有一张表t_user需要进行分表,分为2张表t_user0、t_user1,分片字段为主键id,采用取余的分片算法(%2)。
创建对应的数据库及表
create database user0;

CREATE TABLE `t_user0` (
  `id` bigint(20) NOT NULL,
  `name` varchar(30) DEFAULT NULL COMMENT '名称',
  `sex` tinyint(2) DEFAULT NULL COMMENT '性别 0-男,1-女',
  `phone` varchar(15) DEFAULT NULL COMMENT '电话',
  `email` varchar(30) DEFAULT NULL COMMENT '邮箱',
  `password` varchar(20) DEFAULT NULL COMMENT '密码',
  `create_time` timestamp NULL DEFAULT CURRENT_TIMESTAMP ON UPDATE CURRENT_TIMESTAMP COMMENT '创建时间',
  PRIMARY KEY (`id`)
) ENGINE=InnoDB DEFAULT CHARSET=utf8;

CREATE TABLE `t_user1` (
  `id` bigint(20) NOT NULL,
  `name` varchar(30) DEFAULT NULL COMMENT '名称',
  `sex` tinyint(2) DEFAULT NULL COMMENT '性别 0-男,1-女',
  `phone` varchar(15) DEFAULT NULL COMMENT '电话',
  `email` varchar(30) DEFAULT NULL COMMENT '邮箱',
  `password` varchar(20) DEFAULT NULL COMMENT '密码',
  `create_time` timestamp NULL DEFAULT CURRENT_TIMESTAMP ON UPDATE CURRENT_TIMESTAMP COMMENT '创建时间',
  PRIMARY KEY (`id`)
) ENGINE=InnoDB DEFAULT CHARSET=utf8;
创建一个spring boot项目,使用sharding-jdbc-spring-boot-starter集成,本文使用版本为3.0.0。pom.xml配置:
    4.0.0

        org.springframework.boot
        spring-boot-starter-parent
        2.1.4.RELEASE

    com.chengh
    dbTest
    1.0.0-SNAPSHOT


        1.3.0
        1.1.10
        4.12
        3.0.0


            org.springframework.boot
            spring-boot-starter-web


            org.mybatis.spring.boot
            mybatis-spring-boot-starter
            ${mybatis.version}


            mysql
            mysql-connector-java
            runtime


            org.springframework.boot
            spring-boot-starter-test
            test


            com.alibaba
            druid-spring-boot-starter
            ${druid.version}


            junit
            junit
            ${junit.version}


            io.shardingsphere
            sharding-jdbc-spring-boot-starter
            ${sharding.jdbc.version}


            org.springframework
            spring-aop
            4.3.12.RELEASE


            org.springframework
            spring-aspects
            4.3.12.RELEASE


            com.alibaba
            fastjson
            1.2.58


                src/main/java

                    **/*.xml

                true


                src/main/resources

                    **/*.xml
                    **/*.yml

                true
添加对应的实体类
public class User {

    private Long id;

    private String name;

    private String phone;

    private String email;

    private String password;

    private Integer sex;

    private Date createTime;
}
创建Mapper
@Mapper
public interface UserMapper {
    /**
     * 保存
     */
    void save(User user);

    /**
     * 查询
     * @param ids
     * @return
     */
    List getByIds(@Param("ids") List ids);
}
UserMapper.xml
INSERT INTO t_user(id,name,phone,email,sex,password,create_time)
VALUES
(
#{id},#{name},#{phone},#{email},#{sex},#{password},#{createTime}
)
application.yml
application.yml进行分片规则及数据源等的一些配置,采用行表达式的形式配置。
server:
  port: 8080

mybatis:
  mapper-locations: classpath*:mapper/*Mapper.xml

sharding:
  jdbc:
    datasource:
      names: ds0
      # 数据源ds0
      ds0:
        type: com.alibaba.druid.pool.DruidDataSource
        driver-class-name: com.mysql.jdbc.Driver
        url: jdbc:mysql://localhost:3306/chengh?useUnicode=true&characterEncoding=utf8
        username: root
        password: 123
    config:
      sharding:
        props:
          sql.show: true
        tables:
          t_user:  #t_user表
            key-generator-column-name: id  #主键
            actual-data-nodes: ds0.t_user${0..1}    #数据节点,均匀分布
            table-strategy:  #分表策略
              inline: #行表达式
                sharding-column: id
                algorithm-expression: t_user${id % 2}  #按模运算分配
启动类
/**
 * @program: ShardingJdbcDemo
 * @description:
 * @author: chengh
 * @create: 2019-07-01 00:41
 */
@SpringBootApplication(
        scanBasePackages = {"com.chengh.db"},
        exclude = {DruidDataSourceAutoConfigure.class})
@EnableAspectJAutoProxy(proxyTargetClass = true)
public class ShardingJdbcAplication {

    public static void main(String[] args) {
        SpringApplication.run(ShardingJdbcAplication.class, args);
    }

}
至此,一个简单的spring boot下的sharding-jdbc分表项目初步完成,下面来编写测试用例,spring boot下我们可以方便的使用注解@SpringBootTest来进行单元测试。
@RunWith(SpringJUnit4ClassRunner.class)
@SpringBootTest(webEnvironment = SpringBootTest.WebEnvironment.MOCK, classes = ShardingJdbcAplication.class)
@WebAppConfiguration
public class UserTest {

    @Autowired
    UserMapper userMapper;

    @Resource
    IdGenerator idGenerator;

    @Test
    public void save() {
        for (Integer i = 0; i < 100; i++) {
            User user = new User();
            user.setId(i.longValue());
            user.setName("chengh" + i);
            user.setCreateTime(new Date());
            user.setSex(i % 2);
            user.setPhone("12345678910");
            user.setEmail("[email protected]");
            user.setPassword("123456");
            userMapper.save(user);
        }
    }

    @Test
    public void getByIds() {
        System.out.println(JSON.toJSONString(
                userMapper.getById(12L)));
    }

}上面采用的是行表达式形式配置的分片策略,我们还可以自己定义自己的分片规则,默认提供了5种分片策略,我们尝试自己编写一个标准的分片策略:
- 标准分片策略:对应StandardShardingStrategy。提供对SQL语句中的=, IN和BETWEEN AND的分片操作支持。StandardShardingStrategy只支持单分片键,提供PreciseShardingAlgorithm和RangeShardingAlgorithm两个分片算法。PreciseShardingAlgorithm是必选的,用于处理=和IN的分片。RangeShardingAlgorithm是可选的,用于处理BETWEEN AND分片,如果不配置RangeShardingAlgorithm,SQL中的BETWEEN AND将按照全库路由处理。
/**
 * @program: ShardingJdbcDemo
 * @description:
 * @author: chengh
 * @create: 2019-07-01 00:41
 */
public class IdSharingAlgorithm implements PreciseShardingAlgorithm {

    @Override
    public String doSharding(Collection collection, PreciseShardingValue preciseShardingValue) {

        System.out.println("collection: " + JSON.toJSONString(collection) + " ,preciseShardingValue: "
                + JSON.toJSONString(preciseShardingValue));

        Long id = preciseShardingValue.getValue();
        for (String name : collection) {
            if (name.endsWith(id % collection.size() + "")) {
                System.out.println("return name: " + name);
                return name;
            }
        }
        throw new IllegalArgumentException();
    }
}
/**
* @program: ShardingJdbcDemo
* @description:
* @author: chengh
* @create: 2019-07-01 00:41
*/
public class IdRangeSharingAlgorithm implements RangeShardingAlgorithm {
@Override
public Collection doSharding(Collection collection, RangeShardingValue rangeShardingValue) {
System.out.println("collection: " + JSON.toJSONString(collection) + " ,rangeShardingValue: "
+ JSON.toJSONString(rangeShardingValue));
Collection collect = new ArrayList<>();
Range valueRange = rangeShardingValue.getValueRange();
for (Long i = valueRange.lowerEndpoint(); i <= valueRange.upperEndpoint(); i++) {
for (String each : collection) {
if (each.endsWith(i % collection.size() + "")) {
collect.add(each);
}
}
}
return collect;
}
} 修改application.yml
server:
  port: 8080

mybatis:
  mapper-locations: classpath*:mapper/*Mapper.xml

sharding:
  jdbc:
    datasource:
      names: ds0
      # 数据源ds0
      ds0:
        type: com.alibaba.druid.pool.DruidDataSource
        driver-class-name: com.mysql.jdbc.Driver
        url: jdbc:mysql://localhost:3306/chengh?useUnicode=true&characterEncoding=utf8
        username: root
        password: 123
    config:
      sharding:
        props:
          sql.show: true
        tables:
          t_user:  #t_user表
            key-generator-column-name: id  #主键
            actual-data-nodes: ds0.t_user${0..2}    #数据节点,均匀分布
            table-strategy:  #分表策略
              standard:
                sharding-column: id
                precise-algorithm-class-name: com.chengh.db.util.algorithm.IdSharingAlgorithm
                range-algorithm-class-name: com.chengh.db.util.algorithm.IdRangeSharingAlgorithm
分库也分表
再创建一个数据库user1,同样创建两张表t_user0、t_user1。再只需要修改一下分片规则就可以了。
server:
  port: 8080

mybatis:
  mapper-locations: classpath*:mapper/*Mapper.xml

sharding:
  jdbc:
    datasource:
      names: dso,ds1
      # 数据源ds0
      dso:
        type: com.alibaba.druid.pool.DruidDataSource
        driver-class-name: com.mysql.jdbc.Driver
        url: jdbc:mysql://localhost:3306/user0?useUnicode=true&characterEncoding=utf8
        username: root
        password: 123
      # 数据源ds1
      ds1:
        type: com.alibaba.druid.pool.DruidDataSource
        driver-class-name: com.mysql.jdbc.Driver
        url: jdbc:mysql://localhost:3306/user1?useUnicode=true&characterEncoding=utf8
        username: root
        password: 123
    config:
      sharding:
        props:
          sql.show: true
        tables:
          t_user:  #t_user表
            key-generator-column-name: id  #主键
            actual-data-nodes: ds${0..1}.t_user${0..1}    #数据节点,均匀分布
            database-strategy:  #分表策略
              inline: #行表达式
                sharding-column: id        #列名称,多个列以逗号分隔
                algorithm-expression: ds${id % 2}    #按模运算分配
            table-strategy:  #分表策略
              standard:
                sharding-column: id
                precise-algorithm-class-name: com.chengh.db.util.algorithm.IdSharingAlgorithm
                range-algorithm-class-name: com.chengh.db.util.algorithm.IdRangeSharingAlgorithm
最后附上一张运行效果图:
运行单元测试的save方法,可以看到控制台打印出的部分信息如下:
2019-07-04 18:04:27.131  INFO 17068 --- [           main] Sharding-Sphere-SQL                      : Rule Type: sharding
2019-07-04 18:04:27.133  INFO 17068 --- [           main] Sharding-Sphere-SQL                      : Logic SQL: INSERT INTO t_user(id,name,phone,email,sex,password)
        VALUES
        (
            ?,?,?,?,?,?
        )
2019-07-04 18:04:27.133  INFO 17068 --- [           main] Sharding-Sphere-SQL                      : SQLStatement: InsertStatement(super=DMLStatement(super=AbstractSQLStatement(type=DML, tables=Tables(tables=[Table(name=t_user, alias=Optional.absent())]), conditions=Conditions(orCondition=OrCondition(andConditions=[AndCondition(conditions=[Condition(column=Column(name=id, tableName=t_user), operator=EQUAL, positionValueMap={}, positionIndexMap={0=0})])])), sqlTokens=[TableToken(skippedSchemaNameLength=0, originalLiterals=t_user), io.shardingsphere.core.parsing.parser.token.InsertValuesToken@3878be7b], parametersIndex=6)), columns=[Column(name=id, tableName=t_user), Column(name=name, tableName=t_user), Column(name=phone, tableName=t_user), Column(name=email, tableName=t_user), Column(name=sex, tableName=t_user), Column(name=password, tableName=t_user)], generatedKeyConditions=[GeneratedKeyCondition(column=Column(name=id, tableName=t_user), index=0, value=null)], insertValues=InsertValues(insertValues=[InsertValue(type=VALUES, expression=(
            ?,?,?,?,?,?
        ), parametersCount=6)]), columnsListLastPosition=51, generateKeyColumnIndex=0, insertValuesListLastPosition=111)
2019-07-04 18:04:27.134  INFO 17068 --- [           main] Sharding-Sphere-SQL                      : Actual SQL: ds0 ::: INSERT INTO t_user0(id,name,phone,email,sex,password)
        VALUES
        (
            ?,?,?,?,?,?
        ) ::: [[0, chengh0, 12345678910, [email protected], 0, 123456]]


2019-07-04 18:04:27.206  INFO 17068 --- [           main] Sharding-Sphere-SQL                      : Rule Type: sharding
2019-07-04 18:04:27.206  INFO 17068 --- [           main] Sharding-Sphere-SQL                      : Logic SQL: INSERT INTO t_user(id,name,phone,email,sex,password)
        VALUES
        (
            ?,?,?,?,?,?
        )
2019-07-04 18:04:27.206  INFO 17068 --- [           main] Sharding-Sphere-SQL                      : SQLStatement: InsertStatement(super=DMLStatement(super=AbstractSQLStatement(type=DML, tables=Tables(tables=[Table(name=t_user, alias=Optional.absent())]), conditions=Conditions(orCondition=OrCondition(andConditions=[AndCondition(conditions=[Condition(column=Column(name=id, tableName=t_user), operator=EQUAL, positionValueMap={}, positionIndexMap={0=0})])])), sqlTokens=[TableToken(skippedSchemaNameLength=0, originalLiterals=t_user), io.shardingsphere.core.parsing.parser.token.InsertValuesToken@3878be7b], parametersIndex=6)), columns=[Column(name=id, tableName=t_user), Column(name=name, tableName=t_user), Column(name=phone, tableName=t_user), Column(name=email, tableName=t_user), Column(name=sex, tableName=t_user), Column(name=password, tableName=t_user)], generatedKeyConditions=[GeneratedKeyCondition(column=Column(name=id, tableName=t_user), index=0, value=null)], insertValues=InsertValues(insertValues=[InsertValue(type=VALUES, expression=(
            ?,?,?,?,?,?
        ), parametersCount=6)]), columnsListLastPosition=51, generateKeyColumnIndex=0, insertValuesListLastPosition=111)
2019-07-04 18:04:27.206  INFO 17068 --- [           main] Sharding-Sphere-SQL                      : Actual SQL: ds1 ::: INSERT INTO t_user1(id,name,phone,email,sex,password)
        VALUES
        (
            ?,?,?,?,?,?
        ) ::: [[1, chengh1, 12345678910, [email protected], 1, 123456]]
根据打印出来的信息,可以看到我们书写的Logic SQL及经过解析改写后选择的数据库和实际执行的Actual SQL。
附项目git地址:https://github.com/chengh1/ShardingJdbcDemo
