vue 图片压缩 转 base64 上传图片
因业务需求,公司项目需要用到 图片上传,压缩,转 base64,而这些都是在前台实现的。我之前也没在 vue 里写过这种逻辑和代码,在我的耐心钻研下,终于交付了代码和功能。
现在想把代码发布出来,分享给大家!!!
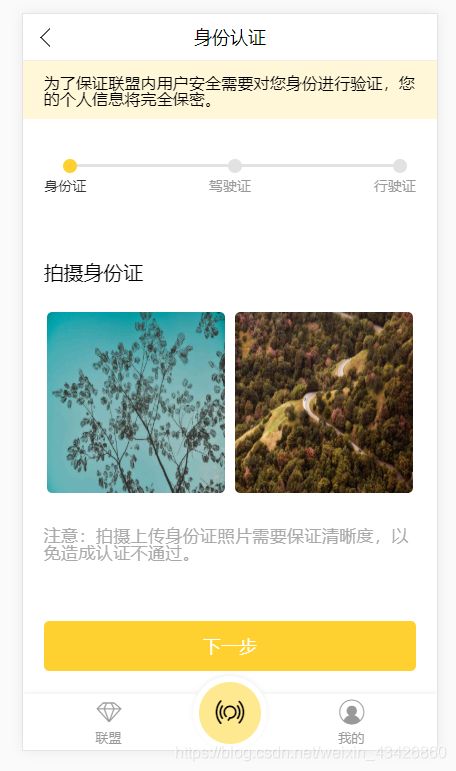
前端页面
一丶template
<template>
  <div class="identityID">
    <x-header :left-options="{backText: ''}" :title="this.$route.meta.title">x-header>
    <div class="toptip">
      <span>为了保证联盟内用户安全需要对您身份进行验证,您的个人信息将完全保密。span>
    div>
    <flow>
      <flow-state is-done title="身份证">flow-state>

      <flow-line :line-span="48">flow-line>

      <flow-state title="驾驶证">flow-state>

      <flow-line :line-span="48">flow-line>

      <flow-state title="行驶证">flow-state>
    flow>
    <div class="content">
      <p class="title">拍摄身份证p>
      <div class="imgbox">
        <img :src="IDc1" alt="">
        <img :src="IDc0" alt="">
        <span class="ltitle" v-show="IDc1T">拍摄正面span>
        <span class="rtitle" v-show="IDc0T">拍摄反面span>
        <input accept="image/png,image/jpeg,image/jpg" class="idimg" id="IDc1" name="IDc1" type="file"
               v-on:change="uploadIMG($event)">
        <input accept="image/png,image/jpeg,image/jpg" class="idimg" id="IDc0" name="IDc0" type="file"
               v-on:change="uploadIMG($event)">
      div>
      <p class="tip">注意:拍摄上传身份证照片需要保证清晰度,以免造成认证不通过。p>
    div>
    <div class="nextstp" v-if="canNext <=1">
      下一步
    div>
    <div @click="next" class="CanNextstp" v-if="canNext ===2">
      下一步
    div>
    <div class="toast" v-transfer-dom>
      <loading :show="show1" :text="text1">loading>
    div>
  div>
template>
二丶vue js 部分
图片处理部分分为
1丶读取上传文件
2丶转换 base64 编码
3丶使用 canvas 压缩图片
4丶上传图片
<script>
  import { Alert, Flow, FlowLine, FlowState, Loading, TransferDomDirective as TransferDom, XHeader } from 'vux'
  import * as types from '@store/mutation-types'

  export default {
    directives: {
      TransferDom
    },
    created() {
    },
    data() {
      return {
        imgList: [],
        base64img: '',
        IDc1: '/static/IDc1.png',
        IDc0: '/static/IDc0.png',
        IDc1T: true,
        IDc0T: true,
        imgUrl: '',
        canNext: 0,
        picavalue: '',
        show1: false,
        text1: ''
      }
    },
    components: {
      Flow,
      FlowState,
      FlowLine,
      XHeader,
      Alert,
      Loading
    },
    methods: {
      uploadIMG(e) {
        this.show1 = true
        this.text1 = '正在解析图片'
        let files = e.target.files || e.dataTransfer.files
        let id = e.target.id
        if (!files.length) return
        this.picavalue = files[0]
        console.log(this.picavalue.size / 1024)
        if (this.picavalue.size / 1024 > 10240) {
          this.$vux.alert.show({
            title: '温馨提示',
            content: '图片过大,请重新上传'
          })
        } else {
          this.text1 = '正在获取图片'
          this.imgPreview(this.picavalue, id)
        }
      },
      //获取图片
      imgPreview(file, id) {
        this.text1 = '正在压缩图片'
        let self = this
        //判断支不支持FileReader
        if (!file || !window.FileReader) return false
        if (/^image/.test(file.type)) {
          //创建一个reader
          let reader = new FileReader()
          //将图片转成base64格式
          reader.readAsDataURL(file)
          //读取成功后的回调
          reader.onloadend = function() {
            let result = this.result
            let img = new Image()
            img.src = result
            console.log('********未压缩前的图片大小********')
            console.log(result.length / 1024)
            img.onload = function() {
              let data = self.compress(img, 0.3)
              self.uploadImg(data, id)
            }
          }
        }
      },
      // 压缩图片
      compress(img, size) {
        let canvas = document.createElement('canvas')
        let ctx = canvas.getContext('2d')
        let initSize = img.src.length
        let width = img.width
        let height = img.height
        canvas.width = width
        canvas.height = height
        // 铺底色
        ctx.fillStyle = '#fff'
        ctx.fillRect(0, 0, canvas.width, canvas.height)
        ctx.drawImage(img, 0, 0, width, height)
        //进行最小压缩
        let ndata = canvas.toDataURL('image/jpeg', size)
        console.log('*******压缩后的图片大小*******')
        // console.log(ndata)
        console.log(ndata.length / 1024)
        return ndata
      },
      uploadImg(base64, id) {
        this.text1 = '正在上传图片'
        let body = {
          'type': 'userAuth',
          'picBase64': base64
        }
        this.$store.dispatch(types.UPLOAD_IDIMG_INFO, body).then(res => {
          this.imgUrl = res.url
          if (id === 'IDc1') {
            this.IDc1 = this.imgUrl
            this.IDc1T = false
            this.canNext++
            this.$store.commit('saveIdCardFrontUrl', this.imgUrl)
          }
          if (id === 'IDc0') {
            this.IDc0 = this.imgUrl
            this.IDc0T = false
            this.canNext++
            this.$store.commit('saveIdCardBackUrl', this.imgUrl)
          }
          this.text1 = '图片上传完成'
          let _this = this
          setTimeout(function() {
            // console.log(1111)
            _this.hideToast()
          }, 800)
        })
      },
      hideToast() {
        this.show1 = false
      },
      next() {
        this.$router.push('/home/identityDI')
      },
    }
  }
</script>
三丶css 样式
采用 less 编写
使用了 vux 组件,含部分修改组件样式代码
文章到处结束,本人菜鸟一枚,有问题欢迎补充!
欢迎访问博主博客:泽林博客

