java使用POI导出图片到Excel
个人学习记录
目录
个人学习记录
1. 使用POI导出图片到Excel中,Excel格式为xls
2. 使用POI导出图片到Excel中,Excel格式为xlsx,图片设置边距
3. 获取图片,生成ByteArray
4. ClientAnchor.AnchorType 枚举值记录
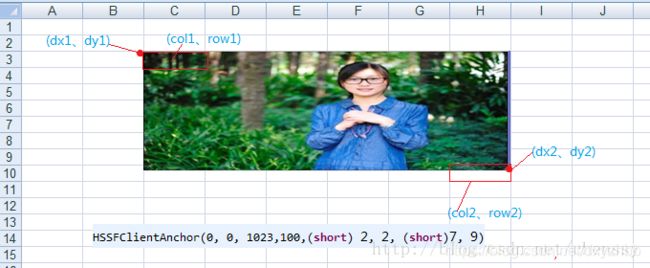
5. 生成anchor构造函数8个参数
6.插入多张图片(参考:插入多张图片)
7.问题记录:利用循环插入多张图片时,Excel中所有图片都是第一个插入的图片
1. 使用POI导出图片到Excel中,Excel格式为xls
/**
     * 说明:生成Excel格式为xls
     * 参数:output为输出文件路径
     * 返回值:输出文件路径
     */
public String setImgXls(String output) throws IOException {
        //输出Excel的文件路径
        FileOutputStream os = new FileOutputStream(output);
        BufferedImage bufferImg = null;
        //先把读进来的图片放到一个ByteArrayOutputStream中,以便产生ByteArray
        try {
            ByteArrayOutputStream byteArrayOut = new ByteArrayOutputStream();
            bufferImg = ImageIO.read(new File("E:/z/图片/test.jpg"));
            ImageIO.write(bufferImg, "jpg", byteArrayOut);

            HSSFWorkbook wb = new HSSFWorkbook();
            HSSFSheet sheet = wb.getSheet("Sheet1");
            if (sheet == null) {
                sheet = wb.createSheet("Sheet1");
            }
            //画图的顶级管理器,一个sheet只能获取一个(一定要注意这点)
            HSSFPatriarch patriarch = sheet.createDrawingPatriarch();
            //anchor主要用于设置图片的属性
            HSSFClientAnchor anchor = new HSSFClientAnchor(2, 2, 20, 20,(short) 6, 10, (short) 6, 10);
            anchor.setAnchorType(ClientAnchor.AnchorType.MOVE_AND_RESIZE);
            //插入图片
            patriarch.createPicture(anchor, wb.addPicture(byteArrayOut.toByteArray(), HSSFWorkbook.PICTURE_TYPE_JPEG));
            // 写入excel文件
            wb.write(os);
            System.out.println("----Excle文件已生成------");
        } catch (Exception e) {
            e.printStackTrace();
        }finally{
            if(os != null){
                try {
                    os.close();
                } catch (IOException e) {
                    e.printStackTrace();
                }
            }
        }
        return output;
    }
2. 使用POI导出图片到Excel中,Excel格式为xlsx,图片设置边距
/**
  * 说明:生成Excel格式为xlsx
  * 参数:input为输入文件路径
  * 返回值:输出文件路径,文件名随机生成
  */
public String setImgXlsx(String input) throws IOException {
        String output = this.tmp + File.separatorChar + UUID.randomUUID() + ".xlsx";
        FileInputStream is = new FileInputStream(input);
        FileOutputStream os = new FileOutputStream(output);
        BufferedImage bufferImg = null;
        //先把读进来的图片放到一个ByteArrayOutputStream中,以便产生ByteArray
        try {
            ByteArrayOutputStream byteArrayOut = new ByteArrayOutputStream();
            bufferImg = ImageIO.read(new File("E:/z/图片/Girl.jpg"));
            ImageIO.write(bufferImg, "jpg", byteArrayOut);
            XSSFWorkbook wb = new XSSFWorkbook(is);
            XSSFSheet sheet = wb.getSheet("Sheet1");
            if (sheet == null) {
                sheet = wb.createSheet("Sheet1");
            }
            //画图的顶级管理器,一个sheet只能获取一个(一定要注意这点)
            Drawing drawing = sheet.createDrawingPatriarch();
            //anchor主要用于设置图片的属性
            //修改前四个参数用于设置边距(暂不清楚原理)
            XSSFClientAnchor anchor = new XSSFClientAnchor(100000, 100000, -100000, -100000, 6, 10, 7, 11);
            anchor.setAnchorType(ClientAnchor.AnchorType.MOVE_AND_RESIZE);
            //插入图片
            Picture picture = drawing.createPicture(anchor, wb.addPicture(byteArrayOut.toByteArray(), XSSFWorkbook.PICTURE_TYPE_JPEG));
//            picture.resize();
            // 写入excel文件
            wb.write(os);
            os.flush();
            is.close();
            System.out.println("----Excle文件已生成------");
        } catch (Exception e) {
            e.printStackTrace();
        }finally{
            if(os != null ){
                try {
                    os.close();
                } catch (IOException e) {
                    e.printStackTrace();
                }
            }
        }
        return output;
    }
3. 获取图片,生成ByteArray
/* 方式一 */
BufferedImage bufferImg = null;
ByteArrayOutputStream byteArrayOut = new ByteArrayOutputStream();
bufferImg = ImageIO.read(new File("E:/z/图片/Girl.jpg"));
ImageIO.write(bufferImg, "jpg", byteArrayOut);
/* 方式二 */
String base64 = "";
//将base64位字符串图片转换为数组
byte[] btye = new BASE64Decoder().decodeBuffer(base64));
bufferImg = ImageIO.read(new ByteArrayInputStream(btye));
ImageIO.write(bufferImg, suffix, byteArrayOut);
4. ClientAnchor.AnchorType 枚举值记录
DONT_MOVE_AND_RESIZE:Do Not Move or Resize With Underlying Rows/Columns (3)
DONT_MOVE_DO_RESIZE:Don't Move but do Resize With Anchor Cells (1)
MOVE_AND_RESIZE:Move and Resize With Anchor Cells (0)
MOVE_DONT_RESIZE:Move With Cells but Do Not Resize (2)
5. 生成anchor构造函数8个参数
/* 方式一 */
// xls
HSSFClientAnchor anchor = new HSSFClientAnchor(2, 2, 20, 20,(short) 6, 10, (short) 6, 10);
// xlsx
XSSFClientAnchor anchor = new XSSFClientAnchor(100000, 100000, -100000, -100000, 6, 10, 7, 11);
/* 方式二 */
anchor.setDx1(100000);
anchor.setDy1(100000);
anchor.setDx2(-100000);
anchor.setDy2(-100000);
anchor.setCol1(6);
anchor.setRow1(10);
anchor.setCol2(7);
anchor.setRow2(11);

/* 参数讲解 */
// 若放置在同一单元格中,需要col1 == col2, row1 == row2
dx1:the x coordinate within the first cell。
dy1:the y coordinate within the first cell。
dx2:the x coordinate within the second cell。
dy2:the y coordinate within the second cell。
col1:the column (0 based) of the first cell。
row1:the row (0 based) of the first cell。
col2:the column (0 based) of the second cell。
row2:the row (0 based) of the second cell。
//这里dx1、dy1定义了该图片在开始cell的起始位置,dx2、dy2定义了在终cell的结束位置。col1、row1定义了开始cell、col2、row2定义了结束cell。
参考:java POI实现向Excel中插入图片
6.插入多张图片(参考:插入多张图片)
public static void main(String[] args) {
    FileOutputStream fileOut = null;
    BufferedImage bufferImg = null;
    BufferedImage bufferImg1 = null;
    try {
    // 先把读进来的图片放到一个ByteArrayOutputStream中,以便产生ByteArray
    // 读入图片1
    ByteArrayOutputStream byteArrayOut = new ByteArrayOutputStream();
    bufferImg = ImageIO.read(new File("d:\\test11.jpg"));
    ImageIO.write(bufferImg, "jpg", byteArrayOut);

    // 读入图片2
    ByteArrayOutputStream byteArrayOut1 = new ByteArrayOutputStream();
    bufferImg1 = ImageIO.read(new File("d:\\test22.png"));
    ImageIO.write(bufferImg1, "png", byteArrayOut1);

    // 创建一个工作薄
    HSSFWorkbook wb = new HSSFWorkbook();
    HSSFSheet sheet1 = wb.createSheet("test picture");
    HSSFPatriarch patriarch = sheet1.createDrawingPatriarch();
    HSSFClientAnchor anchor = new HSSFClientAnchor(0, 0, 255, 255,(short) 1, 1, (short) 5, 5);
    anchor.setAnchorType(3);
    HSSFClientAnchor anchor1 = new HSSFClientAnchor(0, 0, 255, 255,(short) 6, 6, (short) 10, 10);
    anchor1.setAnchorType(3);
    // 插入图片1
    patriarch.createPicture(anchor, wb.addPicture(byteArrayOut.toByteArray(), HSSFWorkbook.PICTURE_TYPE_JPEG));
    // 插入图片2
    patriarch.createPicture(anchor1, wb.addPicture(byteArrayOut1
                    .toByteArray(), HSSFWorkbook.PICTURE_TYPE_PNG));
    fileOut = new FileOutputStream("d:/workbook.xls");
    // 写入excel文件
    wb.write(fileOut);
    fileOut.close();
    } catch (IOException io) {
        io.printStackTrace();
        System.out.println("erorr : " + io.getMessage());
    } finally {
        if (fileOut != null) {
            try {
                fileOut.close();
            } catch (IOException e) {
                e.printStackTrace();
            }
        }
    }
}
7.问题记录:利用循环插入多张图片时,Excel中所有图片都是第一个插入的图片
private void setImgData(XSSFWorkbook wb, XSSFSheet sheet, List> list, int invalidRow) throws IOException {
        BufferedImage bufferImg;
        //anchor主要用于设置图片的属性
        XSSFClientAnchor anchor;
        //先把读进来的图片放到一个ByteArrayOutputStream中,以便产生ByteArray
        ByteArrayOutputStream byteArrayOut;
        //画图的顶级管理器,一个sheet只能获取一个(一定要注意这点)
        Drawing drawing = sheet.createDrawingPatriarch();
        // list.size()是行的数量
        for (int i = 0; i < list.size(); i++) {
            Map stringObjectMap = list.get(i);
            List param = (List) stringObjectMap.get("params");
            // param.size()是列的数量
            for (int i1 = 0; i1 < param.size(); i1++) {
                JSONObject o = (JSONObject) param.get(i1);
                int isPic = (int) o.get("isPic");
                if (isPic > 0) {
                    continue;
                }
                // val的值是base64格式
                byte[] val = (byte[]) o.get("val");
                String suffix = (String)o.get("type");
                bufferImg = ImageIO.read(new ByteArrayInputStream(val));
                // 若省略下面一条语句,则出现问题(所有图片是第一次插入的图片)
                byteArrayOut = new ByteArrayOutputStream();
                ImageIO.write(bufferImg, suffix, byteArrayOut);
                // invalidRow:插入位置行的偏移量
                anchor = new XSSFClientAnchor(1080000, 50000, -1080000, -50000, i1 + 1, i + invalidRow, i1 + 2, i + 1 +invalidRow);
                anchor.setAnchorType(ClientAnchor.AnchorType.MOVE_AND_RESIZE);
                //插入图片
                Picture picture = drawing.createPicture(anchor, wb.addPicture(byteArrayOut.toByteArray(), XSSFWorkbook.PICTURE_TYPE_JPEG));
                //picture.resize(0.9);
            }
        }
    }
