Spring系列:Spring MVC进阶篇
Spring系列:Spring MVC进阶篇
- Spring MVC 简介
- 概述
- DispatcherServlet 组件类
- Spring 整合 Spring MVC
- POM
- 配置 `web.xml`
- CharacterEncodingFilter
- DispatcherServlet
- 配置 Spring MVC
- 系统相关配置
- 去掉 Spring 配置的重复扫描
- 第一个 Controller 控制器
- 概述
- 注解说明
- @Controller
- @RequestMapping
- @ResponseBody
- @ModelAttribute
- RedirectAttributes的用法
- Model的用法
- ModelAndView的用法
- Spring MVC 拦截器的使用
- 拦截器简介
- 常见应用场景
- 第一个 Spring MVC 拦截器
- 创建登录拦截器
- 在 `spring-mvc.xml` 中配置拦截器
- Spring MVC 表单标签库
- 声明表单标签库
- 表单标签
- ``
- 文本框
- ``
- 密码框
- ``
- 文本域
- ``
- 复选框
- ``
- 复选框(多选)
- ``
- 单选按钮
- ``
- 单选按钮(多选)
- ``
- 下拉列表
- 下拉列表(多选)
- 隐藏字段域
- ``
Spring MVC 简介
概述
Spring MVC 也叫 Spring Web MVC ,属于展示层框架。SpringMVC 是 Spring 框架的一部分。
Spring Web MVC 框架提供了 MVC (模型 - 视图 - 控制器) 架构和用于开发灵活和松散耦合的 Web 应用程序的组件。 MVC 模式导致应用程序的不同方面(输入逻辑,业务逻辑和 UI 逻辑)分离,同时提供这些元素之间的松散耦合。
- 模型 (Model):封装了应用程序数据,通常它们将由 POJO 类组成。
- 视图 (View):负责渲染模型数据,一般来说它生成客户端浏览器可以解释 HTML 输出。
- 控制器 (Controller):负责处理用户请求并构建适当的模型,并将其传递给视图进行渲染。
DispatcherServlet 组件类
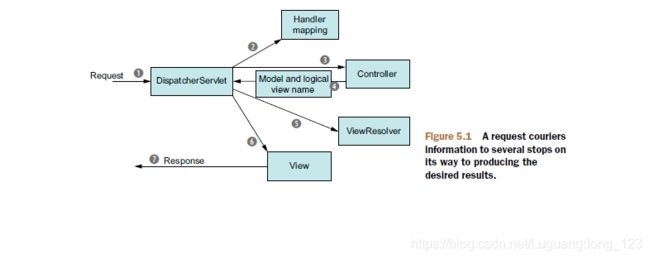
Spring Web MVC 框架是围绕 DispatcherServlet 设计的,它处理所有的 HTTP 请求和响应。 Spring Web MVC DispatcherServlet 的请求处理工作流如下图所示:

以下是对应于到 DispatcherServlet 的传入 HTTP 请求的事件顺序:
- 在接收到 HTTP 请求后,DispatcherServlet 会查询 HandlerMapping 以调用相应的 Controller。
- Controller 接受请求并根据使用的 GET 或 POST 方法调用相应的服务方法。 服务方法将基于定义的业务逻辑设置模型数据,并将视图名称返回给 DispatcherServlet。
- DispatcherServlet 将从 ViewResolver 获取请求的定义视图。
- 当视图完成,DispatcherServlet 将模型数据传递到最终的视图,并在浏览器上呈现。
所有上述组件,即: HandlerMapping,Controller 和 ViewResolver 是 WebApplicationContext 的一部分,它是普通 ApplicationContext 的扩展,带有 Web 应用程序所需的一些额外功能。
Spring 整合 Spring MVC
POM
在 pom.xml 配置文件中增加 org.springframework:spring-webmvc 依赖
<dependency>
    <groupId>org.springframeworkgroupId>
    <artifactId>spring-webmvcartifactId>
    <version>4.3.17.RELEASEversion>
dependency>
配置 web.xml
CharacterEncodingFilter
配置字符集过滤器,用于解决中文编码问题
<filter>
    <filter-name>encodingFilterfilter-name>
    <filter-class>org.springframework.web.filter.CharacterEncodingFilterfilter-class>
    <init-param>
        <param-name>encodingparam-name>
        <param-value>UTF-8param-value>
    init-param>
    <init-param>
        <param-name>forceEncodingparam-name>
        <param-value>trueparam-value>
    init-param>
filter>
<filter-mapping>
    <filter-name>encodingFilterfilter-name>
    <url-pattern>/*url-pattern>
filter-mapping>
DispatcherServlet
配置 Spring 的 Servlet 分发器处理所有 HTTP 的请求和响应
<servlet>
    <servlet-name>springServletservlet-name>
    <servlet-class>org.springframework.web.servlet.DispatcherServletservlet-class>
    <init-param>
        <param-name>contextConfigLocationparam-name>
        <param-value>classpath*:/spring-mvc*.xmlparam-value>
    init-param>
    <load-on-startup>1load-on-startup>
servlet>
<servlet-mapping>
    <servlet-name>springServletservlet-name>
    <url-pattern>/url-pattern>
servlet-mapping>
配置 Spring MVC
创建一个名为 spring-mvc.xml 文件来配置 MVC
<beans xmlns="http://www.springframework.org/schema/beans" xmlns:xsi="http://www.w3.org/2001/XMLSchema-instance"
       xmlns:context="http://www.springframework.org/schema/context"
       xmlns:mvc="http://www.springframework.org/schema/mvc"
       xsi:schemaLocation="http://www.springframework.org/schema/beans http://www.springframework.org/schema/beans/spring-beans.xsd
        http://www.springframework.org/schema/context http://www.springframework.org/schema/context/spring-context.xsd
        http://www.springframework.org/schema/mvc http://www.springframework.org/schema/mvc/spring-mvc.xsd">

    <description>Spring MVC Configurationdescription>


    <context:property-placeholder ignore-unresolvable="true" location="classpath:shop-cloud-web.properties"/>


    <context:component-scan base-package="com.luxiu.beyond.shop" use-default-filters="false">
        <context:include-filter type="annotation" expression="org.springframework.stereotype.Controller"/>
    context:component-scan>


    <mvc:annotation-driven />


    <bean class="org.springframework.web.servlet.view.InternalResourceViewResolver">
        <property name="prefix" value="${web.view.prefix}"/>
        <property name="suffix" value="${web.view.suffix}"/>
    bean>


    <mvc:resources mapping="/static/**" location="/static/" cache-period="31536000"/>
beans>
相关配置说明:
context:property-placeholder:动态加载属性配置文件以变量的方式引用需要的值context:component-scan:当前配置文件为 MVC 相关,故只需要扫描包含@Controller的注解即可,由于spring-context.xml配置文件中也配置了包扫描,所以还需要排除@Controller的注解扫描。InternalResourceViewResolver:视图文件解析器的一种,用于配置视图资源的路径和需要解释的视图资源文件类型,这里有两个需要配置的属性prefix(前缀)以及suffix(后缀)。prefix:配置视图资源路径,如:/WEB-INF/views/suffix:配置视图资源类型,如:.jsp
mvc:resources:静态资源映射,主要用于配置静态资源文件存放路径,如:JS、CSS、Image 等
系统相关配置
在 spring-mvc.xnl 中,我们配置了 .properties 配置文件中便于统一的管理。
创建一个名为 shop-cloud-web.properties 的配置文件,内容如下:
#============================#
#==== Framework settings ====#
#============================#

# \u89c6\u56fe\u6587\u4ef6\u5b58\u653e\u8def\u5f84
web.view.prefix=/WEB-INF/views/
web.view.suffix=.jsp
去掉 Spring 配置的重复扫描
由于 spring-mvc.xml 中已经配置了 @Controller 注解的扫描而 spring-context.xml 中配置的是扫描全部注解,故在这里需要将 @Controller 注解的扫描配置排除。
修改 spring-context.xml 配置:
<context:component-scan base-package="com.luxiu.beyond.shop">
    <context:exclude-filter type="annotation" expression="org.springframework.stereotype.Controller"/>
context:component-scan>
第一个 Controller 控制器
概述
package com.luxiu.beyond.shop.web.controller;

import com.luxiu.beyond.shop.service.UserService;
import org.springframework.beans.factory.annotation.Autowired;
import org.springframework.stereotype.Controller;
import org.springframework.web.bind.annotation.RequestMapping;
import org.springframework.web.bind.annotation.RequestMethod;
import org.springframework.web.bind.annotation.RequestParam;

@Controller
public class LoginController {

    @Autowired
    private UserService userService;

    @RequestMapping(value = {"", "login"}, method = RequestMethod.GET)
    public String login() {
        return "login";
    }

    @RequestMapping(value = "login", method = RequestMethod.POST)
    public String login(@RequestParam(required = true) String email, @RequestParam(required = true) String password) {
        return "redirect:/main";
    }
}
注解说明
@Controller
在 Spring MVC 中,控制器 Controller 负责处理由 DispatcherServlet 分发的请求,它把用户请求的数据经过业务处理层处理之后封装成一个 Model ,然后再把该 Model 返回给对应的 View 进行展示。在 Spring MVC 中提供了一个非常简便的定义 Controller 的方法,你无需继承特定的类或实现特定的接口,只需使用 @Controller 标记一个类是 Controller ,然后使用 @RequestMapping 和 @RequestParam 等一些注解用以定义 URL 请求和 Controller 方法之间的映射,这样的 Controller 就能被外界访问到。此外 Controller 不会直接依赖于 HttpServletRequest 和 HttpServletResponse 等 HttpServlet 对象,它们可以通过 Controller 的方法参数灵活的获取到。
@Controller 用于标记在一个类上,使用它标记的类就是一个 Spring MVC Controller 对象。分发处理器将会扫描使用了该注解的类的方法,并检测该方法是否使用了 @RequestMapping 注解。@Controller 只是定义了一个控制器类,而使用 @RequestMapping 注解的方法才是真正处理请求的处理器。
@RequestMapping
RequestMapping 是一个用来处理请求地址映射的注解,可用于类或方法上。用于类上,表示类中的所有响应请求的方法都是以该地址作为父路径。
RequestMapping 注解有六个属性:
- value, method
- value:指定请求的实际地址,指定的地址可以是 URI Template 模式
- method:指定请求的method类型, GET、POST、PUT、DELETE 等
- consumes,produces
- consumes:指定处理请求的提交内容类型(Content-Type),例如 application/json, text/html
- produces: 指定返回的内容类型,仅当 request 请求头中的(Accept)类型中包含该指定类型才返回
- params,headers
- params:指定 request 中必须包含某些参数值是,才让该方法处理
- headers:指定 request 中必须包含某些指定的 header 值,才能让该方法处理请求
@ResponseBody
@ResponseBody注解表示该方法的返回的结果直接写入 HTTP 响应正文(ResponseBody)中,一般在异步获取数据时使用,通常是在使用@RequestMapping后,返回值通常解析为跳转路径,加上@ResponseBody` 后返回结果不会被解析为跳转路径,而是直接写入HTTP 响应正文中。
作用:
该注解用于将 Controller 的方法返回的对象,通过适当的 HttpMessageConverter 转换为指定格式后,写入到 Response 对象的 body 数据区。
使用时机:
返回的数据不是 html 标签的页面,而是其他某种格式的数据时(如json、xml等)使用
如果需要返回自定义对象为 JSON 数据类型,需要增加 jackson 依赖,pom.xml 配置文件如下:
<dependency>
    <groupId>com.fasterxml.jackson.coregroupId>
    <artifactId>jackson-coreartifactId>
    <version>2.9.5version>
dependency>
<dependency>
    <groupId>com.fasterxml.jackson.coregroupId>
    <artifactId>jackson-databindartifactId>
    <version>2.9.5version>
dependency>
<dependency>
    <groupId>com.fasterxml.jackson.coregroupId>
    <artifactId>jackson-annotationsartifactId>
    <version>${jackson.version}version>
dependency>
@ModelAttribute
加@ModelAttribute的方法一定在加@RequestMapping的方法之前执行
@ModelAttribute 具有如下三个作用:
-
绑定请求参数到命令对象:放在功能处理方法的入参上时,用于将多个请求参数绑定到一个命令对象,从而简化绑定流程,而且自动暴露为模型数据用于视图页面展示时使用
-
暴露
@RequestMapping方法返回值为模型数据:放在功能处理方法的返回值上时,是暴露功能处理方法的返回值为模型数据,用于视图页面展示时使用 -
暴露表单引用对象为模型数据:放在处理器的一般方法(非功能处理方法)上时,是为表单准备要展示的表单引用对象,如注册时需要选择的所在城市等,而且在执行功能处理方法(
@RequestMapping注解的方法)之前,自动添加到模型对象中,用于视图页面展示时使用 -
例子
暴露表单引用对象为模型数据的例子
@ModelAttribute
public User get(@RequestParam(required = false) String id) {
    User entity = null;
    if (StringUtils.isNotBlank(id)) {
        entity = userService.get(id);
    }
    if (entity == null) {
        entity = new User();
    }
    return entity;
}
RedirectAttributes的用法
Model model 中 model.addAttribute(“baseResult”, baseResult)中的信息是放在Request域中的,重定向之后存放在Request中的信息会失效,所以在重定向中带参数跳转的要用RedirectAttributes。用于重定向之后还能带参数跳转的。
redirectAttributes.addFlashAttribute(“param”, value)这种方式也能达到重新向带参,而且能隐藏参数,其原理就是放到session中,session在跳到页面后马上移除对象。所以你刷新一下后这个值就会丢掉。
 @RequestMapping(value = "save", method = RequestMethod.POST)
    public String save(TbUser tbUser, Model model, RedirectAttributes redirectAttributes) {
        BaseResult baseResult = service.save(tbUser);

        // 保存成功
        if (baseResult.getStatus() == 200) {
            redirectAttributes.addFlashAttribute("baseResult", baseResult);
            return "redirect:/user/list";
        }

        // 保存失败
        else {
            model.addAttribute("baseResult", baseResult);
            return "user_form";
        }
    }
Model的用法
spring自动为Model创建实例,并作为controller的入参
@RequestMapping("hello")
public String testVelocity(Model model,String name){
    model.addAttribute("name",name);
    return "hello";
}
ModelAndView的用法
需要手动创建并且设置view跳转地址
@RequestMapping("model")
public ModelAndView testModel(String name) {
    //构建ModelAndView实例,并设置跳转地址
    ModelAndView view = new ModelAndView("test");
    //将数据放置到ModelAndView对象view中,第二个参数可以是任何java类型
    view.addObject("name",name);
    //返回ModelAndView对象view
    return view;
}
Spring MVC 拦截器的使用
拦截器简介
Spring Web MVC 的处理器拦截器,类似于 Servlet 开发中的过滤器 Filter,用于对处理器进行预处理和后处理。
常见应用场景
- 日志记录:记录请求信息的日志,以便进行信息监控、信息统计、计算 PV(Page View)等
- 权限检查:如登录检测,进入处理器检测检测是否登录,如果没有直接返回到登录页面
- 性能监控:有时候系统在某段时间莫名其妙的慢,可以通过拦截器在进入处理器之前记录开始时间,在处理完后记录结束时间,从而得到该请求的处理时间
- 通用行为:读取 Cookie 得到用户信息并将用户对象放入请求,从而方便后续流程使用,还有如提取 Locale、Theme 信息等,只要是多个处理器都需要的即可使用拦截器实现
第一个 Spring MVC 拦截器
Spring MVC 拦截器需要实现 HandlerInterceptor 接口,该接口定义了 3 个方法,分别为 preHandle()、postHandle() 和 afterCompletion(),咱们就是通过重写这 3 个方法来对用户的请求进行拦截处理的。
preHandle(HttpServletRequest request, HttpServletResponse response, Object handle):该方法在请求处理之前进行调用。Spring MVC 中的 Interceptor 是链式调用的,在一个应用中或者说是在一个请求中可以同时存在多个 Interceptor 。每个 Interceptor 的调用会依据它的声明顺序依次执行,而且最先执行的都是 Interceptor 中的preHandle方法,所以可以在这个方法中进行一些前置初始化操作或者是对当前请求做一个预处理,也可以在这个方法中进行一些判断来决定请求是否要继续进行下去。该方法的返回值是布尔值 Boolean 类型的,当它返回为false时,表示请求结束,后续的 Interceptor 和 Controller 都不会再执行;当返回值为true时,就会继续调用下一个 Interceptor 的preHandle方法,如果已经是最后一个 Interceptor 的时候,就会是调用当前请求的 Controller 中的方法。postHandle(HttpServletRequest request, HttpServletResponse response, Object handle, ModelAndView modelAndView):通过preHandle方法的解释咱们知道这个方法包括后面要说到的afterCompletion方法都只能在当前所属的 Interceptor 的preHandle方法的返回值为true的时候,才能被调用。postHandle方法在当前请求进行处理之后,也就是在 Controller 中的方法调用之后执行,但是它会在DispatcherServlet进行视图返回渲染之前被调用,所以咱们可以在这个方法中对 Controller 处理之后的ModelAndView对象进行操作。postHandle方法被调用的方向跟preHandle是相反的,也就是说,先声明的 Interceptor 的postHandle方法反而会后执行。afterCompletion(HttpServletRequest request, HttpServletResponse response, Object handle, Exception ex):也是需要当前对应的 Interceptor 的preHandle方法的返回值为true时才会执行。因此,该方法将在整个请求结束之后,也就是在DispatcherServlet渲染了对应的视图之后执行,这个方法的主要作用是用于进行资源清理的工作。
创建登录拦截器
我们知道对系统的相关操作是需要登录后才可以使用的,当未登录时是无法直接访问需要登录权限的操作的,为了做到这个效果,我们使用登录拦截器来判断用户是否登录,如果用户已登录则放行让用户继续操作,否则就将其跳转到登录页。
定义一个名为 LoginInterceptor 的拦截器,代码如下:
package com.luxiu.beyond.shop.web.interceptor;

import com.luxiu.beyond.shop.entity.User;
import org.springframework.web.servlet.HandlerInterceptor;
import org.springframework.web.servlet.ModelAndView;

import javax.servlet.http.HttpServletRequest;
import javax.servlet.http.HttpServletResponse;

/**
 * 登录拦截器
 * Title: LoginInterceptor
 * Description:
 *
 * @author Luxiu
 * @version 1.0.0
 * @date 2018/6/12 5:44
 */
public class LoginInterceptor implements HandlerInterceptor {
    public boolean preHandle(HttpServletRequest httpServletRequest, HttpServletResponse httpServletResponse, Object o) throws Exception {
        User user = (User) httpServletRequest.getSession().getAttribute("user");

        // 判断用户是否登录
        if (user == null) {
            // 用户未登录,重定向到登录页
            httpServletResponse.sendRedirect("/login");
            return false;
        }

        // 放行
        return true;
    }

    public void postHandle(HttpServletRequest httpServletRequest, HttpServletResponse httpServletResponse, Object o, ModelAndView modelAndView) throws Exception {
        // 如果请求来自登录页
        if (modelAndView.getViewName().endsWith("login")) {
            // 则直接重定向到首页不再显示登录页
            httpServletResponse.sendRedirect("/main");
        }
    }

    public void afterCompletion(HttpServletRequest httpServletRequest, HttpServletResponse httpServletResponse, Object o, Exception e) throws Exception {

    }
}
在 spring-mvc.xml 中配置拦截器
拦截器配置,拦截顺序:先执行后定义的,排在第一位的最后执行
拦截器定义后还需要在 spring-mvc.xml 中配置拦截器,代码如下:
<mvc:interceptors>
    <mvc:interceptor>
        <mvc:mapping path="/**"/>
        <mvc:exclude-mapping path="/static/**"/>
        <mvc:exclude-mapping path="/login"/>
        <bean class="com.luxiu.beyond.shop.web.interceptor.LoginInterceptor"/>
    mvc:interceptor>
mvc:interceptors>
相关配置说明:
-
mvc:interceptor:定义一个拦截器
mvc:mapping:映射路径,需要拦截的请求路径mvc:exclude-mapping:需要排除的请求路径,比如登录页本身是不需要拦截的,这里还包括了静态资源路径也是不需要拦截的bean class:配置指定的拦截器对象
Spring MVC 表单标签库
声明表单标签库
在使用 SpringMVC 的时候我们可以使用 Spring 封装的一系列表单标签,这些标签都可以访问到 ModelMap 中的内容。我们需要先在 JSP 中声明使用的标签,具体做法是在 JSP 文件的顶部加入以下指令:
<%@ taglib prefix="form" uri="http://www.springframework.org/tags/form"%>
表单标签
使用 Spring MVC 的 form 标签主要有两个作用,第一是它会自动的绑定来自 Model 中的一个属性值到当前 form 对应的实体对象,默认是 command 属性,这样我们就可以在 form 表单体里面方便的使用该对象的属性了。第二是它支持我们在提交表单的时候使用除 GET 和 POST 之外的其他方法进行提交,包括 DELETE 和 PUT 等。
            Name:


            Age:
文本框
使用
密码框
使用
文本域
使用