HAproxy的负载均衡,以及基于TCP和HTTP的应用程序代理
HAProxy是一个使用C语言编写的自由及开放源代码软件[1],其提供高可用性、负载均衡,以及基于TCP和HTTP的应用程序代理。
HAProxy特别适用于那些负载特大的web站点,这些站点通常又需要会话保持或七层处理。HAProxy运行在当前的硬件上,完全可以支持数以万计的并发连接。并且它的运行模式使得它可以很简单安全的整合进您当前的架构中,同时可以保护你的web服务器不被暴露到网络上。
一.Haproxy实现负载均衡
配置过程及测试:
1.解压haproxy压缩包,安装源码编译软件,源码编译haproxy软件
tar zxf haproxy-1.6.11.tar.gz
yum install rpm-build -y
rpmbuild -tb haproxy-1.6.11.tar.gz
2.找到haproxty的配置文件
cd haproxy-1.6.11/examples
cp content-sw-sample.cfg /etc/haproxy/haproxy.cfg
3.建立haproxy用户和组。利用linux对haporxy用户的访问控制实现对haporxy服务的控制
grep 20 /etc/passwd
groupadd -g 200 haproxy     # 建立一个haproxy组
useradd -u 200 -g 200 -M haproxy
id haproxy
4.修改配置文件,添加后端真实服务器和负载均衡算法
global    # 全局定义
        maxconn         10000   # 最大连接数
        stats socket    /var/run/haproxy.stat mode 600 level admin
        log             127.0.0.1 local0   # 夲机日志
        uid             200      # haproxy用户的uid
        gid             200      # haproxy用户的gid
        chroot          /var/empty
        daemon
defaults     # 默认条件
        mode            http
        log             global
        option          httplog
        option          dontlognull
        monitor-uri     /monitoruri
        maxconn         8000
        timeout client  30s

        stats uri       /admin/stats

        option prefer-last-server
        retries         2
        option redispatch
        timeout connect 5s
        timeout server  5s
# The public 'www' address in the DMZ
frontend public
        bind            *:80 name clear
        #bind            192.168.1.10:443 ssl crt /etc/haproxy/haproxy.pem

        #use_backend     static if { hdr_beg(host) -i img }
        #use_backend     static if { path_beg /img /css   }
        default_backend  static    # 默认使用static后端服务器集群

# The static backend backend for 'Host: img', /img and /css.
backend static
        balance         roundrobin  # 负载均衡算法rr
        server          statsrv1 172.25.3.2:80 check inter 1000 # 后端服务器server2
        server          statsrv2 172.25.3.3:80 check inter 1000 # 后端服务器servr3
5.打开server1的haproxy服务和后端服务器的httpd服务:
/etc/init.d/haproxy start   ##打开服务
在server2和server3中分别打开httpd
/etc/init.d/httpd  start
测试结果:在浏览器输入172.25.1.1,出现server2与server3的轮调….
二.基于TCP和HTTP的应用程序代理
(一)动态页面和静态页面的分离
1.在server1中的httpd默认发布目录写index.html(server2)
在server3中的httpd默认发布目录写index.php(php测试页面)
写完后重启httpd服务…
2.在haproxy的配置文件中修改访问动态页面和静态页面的路径
frontend public
        bind            *:80 name clear
        #bind            192.168.1.10:443 ssl crt /etc/haproxy/haproxy.pem

        #use_backend     static if { hdr_beg(host) -i img }
        #use_backend     static if { path_beg /img /css   }
        use_backend     static2 if { path_end -i .php   }  # 访问路径以.php结尾,认为是动态页面
        default_backend static1   # 静态页面,采用默认访问路径

# The static backend backend for 'Host: img', /img and /css.
backend static1   # 静态页面的后端服务器群组
        balance         roundrobin
        server          statsrv1 172.25.1.2:80 check inter 1000
backend static2   # 动态页面的后端服务器群组
        balance         roundrobin
        server          statsrv2 172.25.1.3:80 check inter
3.在物理机做访问解析:
4.在浏览器测试页测试
动态访问到server3的php页面

静态访问到server2的httpd默认发布文件

(二)修改haproxy的日志路径:
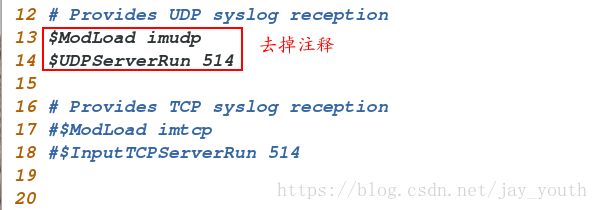
1.修改日志服务配置文件从而修改日志存储位置
*.info;mail.none;authpriv.none;cron.none;local0.none   #                 /var/log/messages

# The authpriv file has restricted access.
authpriv.*                                              /var/log/secure

# Log all the mail messages in one place.
mail.*                                                  -/var/log/maillog


# Log cron stuff
cron.*                                                  /var/log/cron

# Everybody gets emergency messages
*.emerg                                                 *

# Save news errors of level crit and higher in a special file.
uucp,news.crit                                          /var/log/spooler

# Save boot messages also to boot.log
local7.*                                                /var/log/boot.log
local0.* /var/log/haporxy.log # local0的日志放在/var/log/haporxy.log/etc/init.d/rsyslog restart(三)访问控制
1.不允许172.25.1.250访问(实现对黑名单主机的访问)
在配置文件的frontend public部分写:
acl blacklist src 172.25.1.250
http-request deny if blacklist
172.25.1.250主机的浏览器中访问出现下面情况:

而在别的主机中可以访问:

(1)出现错误403,不想将“拒绝”表现的这么直接,可以重定向到某台主机,显示错误提示页面,比如,我们重定向到夲机的8080端口。
errorloc 403 http://172.25.1.1:80802.直接重定向
访问www.westos.org直接重定向到www.baidu.com
在物理机做解析  172.25.1.1   www.westos.org
(四)读写分离:
1.修改配置文件(截取改动部分)
acl write method POST   # POST是写的动作
acl write method PUT    # PUT也是写的动作
#http-request deny if blacklist   # 黑名单直接deny
#errorloc 403 http://172.25.1.1:8080  # 403报错的拒绝重定向到夲机80端口

#redirect  location  http://www.baidu.com   # 直接重定向

#use_backend     static2 if { path_end -i .php   }  # 访问路径是以i.php结尾直接去static2服务器集群
use_backend     static2 if write   # write部分中的两种情况直接去static2的服务器集群
default_backend static1 # 默认去static服务器集群/etc/init.d/haproxy reload3.在server3中的httpd默认发布目录,放进去index.php(选择图片的静态页面)和upload_file.php(上传图片的动态页面),存放上传图片的目录upload目录。
index.php:
<html>
<body>

<form action="upload_file.php" method="post"
enctype="multipart/form-data">
<label for="file">Filename:label>
<input type="file" name="file" id="file" />
<br />
<input type="submit" name="submit" value="Submit" />
form>

body>
html>
upload_file.php:
if ((($_FILES["file"]["type"] == "image/gif")
|| ($_FILES["file"]["type"] == "image/jpeg")
|| ($_FILES["file"]["type"] == "image/pjpeg")) # 图片的三种格式(只能上传着三种)
&& ($_FILES["file"]["size"] < 2000000)) # 上传图片的大小(k为单位),可以自己调节大小
{
if ($_FILES["file"]["error"] > 0)
{
echo "Return Code: " . $_FILES["file"]["error"] . "
";
}
else
{ # 上传成功显示的信息(所以上传图片是个动态的过程)
echo "Upload: " . $_FILES["file"]["name"] . "
";
echo "Type: " . $_FILES["file"]["type"] . "
";
echo "Size: " . ($_FILES["file"]["size"] / 1024) . " Kb
";
echo "Temp file: " . $_FILES["file"]["tmp_name"] . "
";
if (file_exists("upload/" . $_FILES["file"]["name"]))
{
echo $_FILES["file"]["name"] . " already exists. ";
}
else
{
move_uploaded_file($_FILES["file"]["tmp_name"],
"upload/" . $_FILES["file"]["name"]);
echo "Stored in: " . "upload/" . $_FILES["file"]["name"];
}
}
}
else
{
echo "Invalid file"; # 不符合上传条件显示Invalid file
}
?>


