linux环境下安装nginx步骤
开始前,请确认gcc g++开发类库是否装好,默认已经安装。
ububtu平台编译环境可以使用以下指令
apt-
get install build-essentialapt-
get install libtool
centos平台编译环境使用如下指令
安装make:
yum -y install gcc automake autoconf libtool make
安装g++:
yum install gcc gcc-c++
下面正式开始:
一、选定安装文件目录
可以选择任何目录,本文选择 cd /usr/local/src
|
1
|
cd /usr/local/src
|
二、安装PCRE库
ftp://ftp.csx.cam.ac.uk/pub/software/programming/pcre/ 下载最新的 PCRE 源码包,使用下面命令下载编译和安装 PCRE 包:(本文参照下载文件版本:pcre-8.37.tar.gz 经过验证未发现这个版本,若想下载最新版本请打开上面网址。本文选择pcre-8.39.tar.gz)
cd /usr/local/src
wget ftp://ftp.csx.cam.ac.uk/pub/software/programming/pcre/pcre-8.39.tar.gz
tar -zxvf pcre-8.37.tar.gz
cd pcre-8.34
./configure
make
make install
三、安装zlib库
http://zlib.net/zlib-1.2.11.tar.gz 下载最新的 zlib 源码包,使用下面命令下载编译和安装 zlib包:(本文参照下载文件版本:zlib-1.2.8.tar.gz 经过验证未发现这个版本,若想下载最新版本请打开上面网址。本文选择zlib-1.2.11.tar.gz )


cd /usr/local/src
wget http://zlib.net/zlib-1.2.11.tar.gz
tar -zxvf zlib-1.2.11.tar.gz
cd zlib-1.2.11
./configure
make
make install
四、安装openssl(某些vps默认没装ssl)
cd /usr/local/src
wget https://www.openssl.org/source/openssl-1.0.1t.tar.gz
tar -zxvf openssl-1.0.1t.tar.gz
OpenSSL library is not used
问题:
在源码编译安装nginx的时候出现:
- Configuration summary
- + using system PCRE library
- + OpenSSL library is not used
- + using builtin md5 code
- + sha1 library is not found
- + using system zlib library
表象原因:
出现以上问题的表象原因是,在安装nginx的时候没有指定openssl的解压路径。正确的做法如下:
./configure --prefix=/usr/local/nginx --with-openssl=/usr/local/openssl-1.0.1j --with-http_ssl_module
如果pcre和zlib出现类似的问题,指定路径就可。
--with-pcre=/usr/local/pcre-7.7 --with-zlib=/usr/local/zlib-1.2.3 --with-http_stub_status_module
五、安装nginx
Nginx 一般有两个版本,分别是稳定版和开发版,您可以根据您的目的来选择这两个版本的其中一个,下面是把 Nginx 安装到 /usr/local/nginx 目录下的详细步骤:
cd /usr/local/src
wget http://nginx.org/download/nginx-1.1.10.tar.gz
tar -zxvf nginx-1.1.10.tar.gz
cd nginx-1.1.10
./configure
make
make install
Nginx安装到 ,/usr/local/nginx
注:
这里可能会出现报错
按照第四步方法或者
ubuntu下
apt-
get install opensslapt-
get install libssl-dev
centos下
yum -y install openssl openssl-devel
六、启动nginx
因为可能apeache占用80端口,apeache端口尽量不要修改,我们选择修改nginx端口。
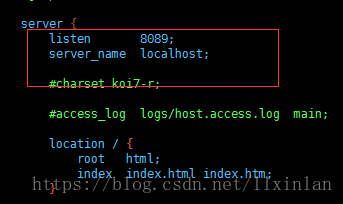
linux 修改路径/usr/local/nginx/conf/nginx.conf,Windows 下 安装目录\conf\nginx.conf。
修改端口为8090,localhost修改为你服务器ip地址。(成功就在眼前!!)

启动nginx
netstat -ano|grep
80
如果查不到执行结果,则忽略上一步(ubuntu下必须用sudo启动,不然只能在前台运行)
sudo /usr/local/nginx/nginx
七、nginx重启、关闭、启动
启动
启动代码格式:nginx安装目录地址 -c nginx配置文件地址
例如:
[root@LinuxServer sbin]#
/usr/local/nginx/sbin/nginx -c /usr/local/nginx/conf/nginx.conf
停止
nginx的停止有三种方式:
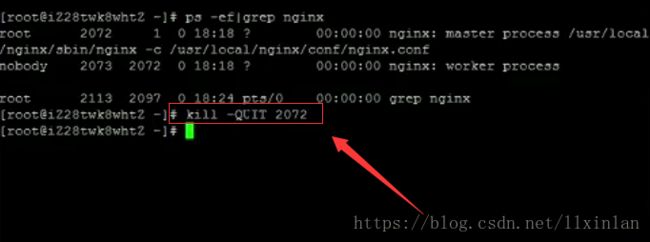
- 从容停止
1、查看进程号
[root@LinuxServer ~]# ps -ef|grep nginx

2、杀死进程
[root@LinuxServer ~]# kill -QUIT 2072
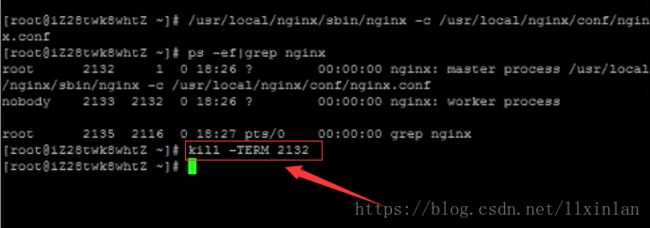
- 快速停止
1、查看进程号
[root@LinuxServer ~]# ps -ef|grep nginx

2、杀死进程
[root@LinuxServer ~]# kill -TERM 2132
或 [root@LinuxServer ~]# kill -INT 2132
- 强制停止
[root@LinuxServer ~]# kill -9 nginx

重启
1、验证nginx配置文件是否正确
方法一:进入nginx安装目录sbin下,输入命令./nginx -t
看到如下显示nginx.conf syntax is ok
nginx.conf test is successful
说明配置文件正确!
方法二:在启动命令-c前加-t

    2、重启Nginx服务


     方法一:进入nginx可执行目录sbin下,输入命令./nginx -s reload 即可


    方法二:查找当前nginx进程号,然后输入命令:kill -HUP 进程号 实现重启nginx服务


    八、最终结果
    :


    九、项目文件存放路径


       放到这个文件下,创建文件夹放入就好。


    启动失败见
    Nginx error while loading shared libraries libpcre.so.1解决.note
    如下面操作


    root@localhost src]# find / -type f -name *libpcre.so.*


    /lib64/libpcre.so.0.0.1


    /usr/local/lib/libpcre.so.1.2.7


    /usr/local/src/pcre-8.39/.libs/libpcre.so.1.2.7


    [root@localhost src]# ln -s /lib/libpcre.so.1.2.7 /lib/libpcre.so.1


    [root@localhost src]# ln -s /usr/local/lib/libpcre.so.1 /lib64/


     [root@localhost src]# /usr/local/nginx/sbin/nginx -c /usr/local/nginx/conf/nginx.conf


     [root@localhost src]# ps -ef |grep nginx


     root 28677 1 0 05:03 ? 00:00:00 nginx: master process /usr/local/nginx/sbin/nginx -c /usr/local/nginx/conf/nginx.conf


     nobody 28678 28677 0 05:03 ? 00:00:00 nginx: worker process


     root 28680 28630 0 05:03 pts/0 00:00:00 grep nginx


     查询端口占用


     netstat -anp | grep :80

附件:
nginx.conf
#user  nobody;
worker_processes  1;

#error_log  logs/error.log;
#error_log  logs/error.log  notice;
#error_log  logs/error.log  info;

#pid        logs/nginx.pid;


events {
    worker_connections  1024;
}


http {
    include       mime.types;
    default_type  application/octet-stream;

    #log_format  main  '$remote_addr - $remote_user [$time_local] "$request" '
    #                  '$status $body_bytes_sent "$http_referer" '
    #                  '"$http_user_agent" "$http_x_forwarded_for"';

    #access_log  logs/access.log  main;

    sendfile        on;
    #tcp_nopush     on;

    #keepalive_timeout  0;
    keepalive_timeout  65;

    #gzip  on;

    server {
        listen       80;
        server_name  localhost;

        #charset koi8-r;

        #access_log  logs/host.access.log  main;

        location / {
            root   html;
            index  index.html index.htm;
        }

        #error_page  404              /404.html;

        # redirect server error pages to the static page /50x.html
        #
        error_page   500 502 503 504  /50x.html;
        location = /50x.html {
            root   html;
        }

        # proxy the PHP scripts to Apache listening on 127.0.0.1:80
        #
        #location ~ \.php$ {
        #    proxy_pass   http://127.0.0.1;
        #}

        # pass the PHP scripts to FastCGI server listening on 127.0.0.1:9000
        #
        #location ~ \.php$ {
        #    root           html;
        #    fastcgi_pass   127.0.0.1:9000;
        #    fastcgi_index  index.php;
        #    fastcgi_param  SCRIPT_FILENAME  /scripts$fastcgi_script_name;
        #    include        fastcgi_params;
        #}

        # deny access to .htaccess files, if Apache's document root
        # concurs with nginx's one
        #
        #location ~ /\.ht {
        #    deny  all;
        #}
    }


    # another virtual host using mix of IP-, name-, and port-based configuration
    #
    #server {
    #    listen       8000;
    #    listen       somename:8080;
    #    server_name  somename  alias  another.alias;

    #    location / {
    #        root   html;
    #        index  index.html index.htm;
    #    }
    #}


    # HTTPS server
    #
    #server {
    #    listen       443 ssl;
    #    server_name  localhost;

    #    ssl_certificate      cert.pem;
    #    ssl_certificate_key  cert.key;

    #    ssl_session_cache    shared:SSL:1m;
    #    ssl_session_timeout  5m;

    #    ssl_ciphers  HIGH:!aNULL:!MD5;
    #    ssl_prefer_server_ciphers  on;

    #    location / {
    #        root   html;
    #        index  index.html index.htm;
    #    }
    #}

}


