Centos7.5-1804部署zabbix4.4
一.升级原因描述
之前在博客中编写过一套Centos7.5部署zabbix4.0的文档,起初也一直在使用,但是后来通过漏洞扫描测试发现4.0中有一个漏洞信息。
http://your_zabbix_ipaddress/zabbix/zabbix.php?action=dashboard.view&dashboardid=1

攻击者通过访问zabbix.php?action=dashboard.view&dashboardid=1进入后台控制面板,可以操作Dashboard/Report/Screen/Map等功能
小伙伴们可以看看自己有没有中招哈,学长就不做过多描述了。但是此处呢也想和大家说几点过于zabbix使用的一些安全信息。毕竟监控服务器是公司的秘密所在,运维的"眼睛",其中包含公司所有业务服务器的详细信息,为了方便我们自己查看我们也会做好备注【例:数据库服务器,WEB服务器,Tomcat服务器,Mysql-server服务器,Mysql-slave服务器等等】并且配置信息中包含数据库服务器IP地址等信息,如果IP地址,服务器备注信息,端口开放,都被爆开了,那么你的网络架构中奖没有安全可言。监控一旦暴露了问题也就跟着来了。
基础安全
1.默认用户名密码及弱口令
WeapPassword = [("admin","zabbix"),("Admin","zabbix"),("guest","")]
这个相信大家都不陌生吧,看看自己有没有做修改吧。
2.数据库SQL注入
latest.php处toogle_ids[]参数SQL注入,可获取系统权限。但是这个是需要在登录系统后才可以做的操作,所以弱口令是必须要禁用的
URL以及payload:
1 """
2 http://your_zabbixserver_address/latest.php?output=ajax&sid=登录后的sessionid的后16位&favobj=toggle&toggle_open_state=1&toggle_ids[]=15385); select * from users where (1=1
3 """
说到这啊可能很多学弟们已经蒙圈了吧,其实预防也简单只需要注意以下两点就可以了
1.关注官方推送信息,定期做系统升级更新【后续的话学长尽快出一版zabbix在线升级的文档】
2.拒绝弱口令,默认用户名密码,密码定期更改且符合安全规范
Centos7.5部署zabbix4.4
好了,不闲谈了,进入今天的正题毕竟咱们不是聊zabbix安全的对吧。
1.基础环境
在描述一下,学长这里的环境默认已经禁用iptables及firewalld防火墙了,也关闭selinux了。yum也配置了阿里云的Centos-7.repo和epel-release。此处就不做过多描述了。yum信息可以参考学长之前的文档文档地址。先给你们看下我的基础环境,避免学弟学妹们出现不一致的现象我也没有做什么只是配置好了yum,关闭了上面说的防火墙等。
[root@localhost ~]# systemctl is-enabled firewalld
disabled
[root@localhost ~]# firewall-cmd --stat
not running
[root@localhost ~]# iptables -nvL
Chain INPUT (policy ACCEPT 0 packets, 0 bytes)
 pkts bytes target     prot opt in     out     source               destination

Chain FORWARD (policy ACCEPT 0 packets, 0 bytes)
 pkts bytes target     prot opt in     out     source               destination

Chain OUTPUT (policy ACCEPT 0 packets, 0 bytes)
 pkts bytes target     prot opt in     out     source               destination
[root@localhost ~]# getenforce
Disabled
[root@localhost ~]# ll /etc/yum.repos.d/
总用量 16
drwxr-xr-x. 2 root root  187 9月   3 2019 bak
-rw-r--r--. 1 root root 2523 9月   3 2019 Centos-7.repo
-rw-r--r--. 1 root root  951 10月  3 2017 epel.repo
-rw-r--r--. 1 root root 1050 10月  3 2017 epel-testing.repo
-rw-r--r--. 1 root root 1245 9月   3 2019 mslinux.repo					//这个是清华大学的yum源,本次实验也用不到
1.安装zabbix4.4的yum源
安装yum源的命令怕你们不方便复制,够贴心吧。
yum install -y https://repo.zabbix.com/zabbix/4.4/rhel/7/x86_64/zabbix-release-4.4-1.el7.noarch.rpm
[root@localhost ~]# yum install -y https://repo.zabbix.com/zabbix/4.4/rhel/7/x86_64/zabbix-release-4.4-1.el7.noarch.rpm
已加载插件:fastestmirror
Repository base is listed more than once in the configuration
Repository updates is listed more than once in the configuration
Repository extras is listed more than once in the configuration
Repository centosplus is listed more than once in the configuration
zabbix-release-4.4-1.el7.noarch.rpm                                                                                                                                                                                                             |  14 kB  00:00:00
正在检查 /var/tmp/yum-root-KV14y8/zabbix-release-4.4-1.el7.noarch.rpm: zabbix-release-4.4-1.el7.noarch
/var/tmp/yum-root-KV14y8/zabbix-release-4.4-1.el7.noarch.rpm 将被安装
正在解决依赖关系
--> 正在检查事务
---> 软件包 zabbix-release.noarch.0.4.4-1.el7 将被 安装
--> 解决依赖关系完成

依赖关系解决

=======================================================================================================================================================================================================================================================================
 Package                                                       架构                                                  版本                                                        源                                                                               大小
=======================================================================================================================================================================================================================================================================
正在安装:
 zabbix-release                                                noarch                                                4.4-1.el7                                                   /zabbix-release-4.4-1.el7.noarch                                                 22 k

事务概要
=======================================================================================================================================================================================================================================================================
安装  1 软件包

总计:22 k
安装大小:22 k
Downloading packages:
Running transaction check
Running transaction test
Transaction test succeeded
Running transaction
  正在安装    : zabbix-release-4.4-1.el7.noarch                                                                                                                                                                                                                    1/1
  验证中      : zabbix-release-4.4-1.el7.noarch                                                                                                                                                                                                                    1/1

已安装:
  zabbix-release.noarch 0:4.4-1.el7

完毕!
[root@localhost ~]# ll /etc/yum.repos.d/
总用量 20
drwxr-xr-x. 2 root root  187 9月   3 2019 bak
-rw-r--r--. 1 root root 2523 9月   3 2019 Centos-7.repo
-rw-r--r--. 1 root root  951 10月  3 2017 epel.repo
-rw-r--r--. 1 root root 1050 10月  3 2017 epel-testing.repo
-rw-r--r--. 1 root root 1245 9月   3 2019 mslinux.repo
-rw-r--r--  1 root root  633 10月  7 19:26 zabbix.repo			//已经生成了zabbix的yum源了。
2.安装并配置LAMP环境
之前前面描述过用LNMP做zabbix但是发现其兼容性还是不如LAMP好所以就还用LAMP架构了。
[root@localhost ~]# yum install -y httpd mariadb-server mariadb php php-mysql php-gd libjpeg* php-ldap php-odbc php-pear php-xml php-xmlrpc php-mhash php-mbstring php-bcmath
......
已安装:
  httpd.x86_64 0:2.4.6-90.el7.centos        libjpeg-turbo-static.x86_64 0:1.2.90-8.el7     libjpeg-turbo-utils.x86_64 0:1.2.90-8.el7     mariadb.x86_64 1:5.5.64-1.el7             mariadb-server.x86_64 1:5.5.64-1.el7        php.x86_64 0:5.4.16-46.1.el7_7
  php-bcmath.x86_64 0:5.4.16-46.1.el7_7     php-common.x86_64 0:5.4.16-46.1.el7_7          php-gd.x86_64 0:5.4.16-46.1.el7_7             php-ldap.x86_64 0:5.4.16-46.1.el7_7       php-mbstring.x86_64 0:5.4.16-46.1.el7_7     php-mysql.x86_64 0:5.4.16-46.1.el7_7
  php-odbc.x86_64 0:5.4.16-46.1.el7_7       php-pear.noarch 1:1.9.4-21.el7                 php-xml.x86_64 0:5.4.16-46.1.el7_7            php-xmlrpc.x86_64 0:5.4.16-46.1.el7_7

作为依赖被安装:
  apr.x86_64 0:1.4.8-5.el7                       apr-util.x86_64 0:1.5.2-6.el7          httpd-tools.x86_64 0:2.4.6-90.el7.centos    libzip.x86_64 0:0.10.1-8.el7             mailcap.noarch 0:2.1.41-2.el7          perl-Compress-Raw-Bzip2.x86_64 0:2.061-3.el7
  perl-Compress-Raw-Zlib.x86_64 1:2.061-4.el7    perl-DBD-MySQL.x86_64 0:4.023-6.el7    perl-DBI.x86_64 0:1.627-4.el7               perl-IO-Compress.noarch 0:2.061-2.el7    perl-Net-Daemon.noarch 0:0.48-5.el7    perl-PlRPC.noarch 0:0.2020-14.el7
  php-cli.x86_64 0:5.4.16-46.1.el7_7             php-pdo.x86_64 0:5.4.16-46.1.el7_7     php-process.x86_64 0:5.4.16-46.1.el7_7      t1lib.x86_64 0:5.1.2-14.el7              unixODBC.x86_64 0:2.3.1-14.el7

更新完毕:
  libjpeg-turbo.x86_64 0:1.2.90-8.el7                                                                                             libjpeg-turbo-devel.x86_64 0:1.2.90-8.el7

作为依赖被升级:
  mariadb-libs.x86_64 1:5.5.64-1.el7

完毕!
//当然了学长我人品是比较好的,有问题可以评论或者私聊哈。

配置mariadb及php信息
[root@localhost ~]# systemctl start mariadb
[root@localhost ~]# systemctl enable mariadb
Created symlink from /etc/systemd/system/multi-user.target.wants/mariadb.service to /usr/lib/systemd/system/mariadb.service.
[root@localhost ~]# systemctl is-enabled mariadb
enabled
[root@localhost ~]# mysqladmin -uroot password 123123           #注意生产环境别学我,我这是图方便
[root@localhost ~]# mysql -u root -p123123
Welcome to the MariaDB monitor.  Commands end with ; or \g.
Your MariaDB connection id is 3
Server version: 5.5.64-MariaDB MariaDB Server

Copyright (c) 2000, 2018, Oracle, MariaDB Corporation Ab and others.

Type 'help;' or '\h' for help. Type '\c' to clear the current input statement.

MariaDB [(none)]> show databases;
+--------------------+
| Database           |
+--------------------+
| information_schema |
| mysql              |
| performance_schema |
| test               |
+--------------------+
4 rows in set (0.00 sec)

MariaDB [(none)]> create database zabbix character set utf8 collate utf8_bin;
Query OK, 1 row affected (0.00 sec)

MariaDB [(none)]> grant all privileges on zabbix.* to 'zabbix'@'%' identified by 'zabbix';
Query OK, 0 rows affected (0.00 sec)

MariaDB [(none)]> grant all privileges on zabbix.* to zabbix@localhost identified by 'zabbix';
Query OK, 0 rows affected (0.00 sec)

MariaDB [(none)]> flush privileges;
Query OK, 0 rows affected (0.00 sec)

MariaDB [(none)]> \q
Bye
配置php适配zabbix的参数
[root@localhost ~]# vim /etc/php.ini
384 max_execution_time = 300
394 max_input_time = 300
672 post_max_size = 16M
878 date.timezone = Asia/Shanghai
配置apache支持默认php页面
[root@localhost ~]# vim /etc/httpd/conf/httpd.conf
164     DirectoryIndex index.html index.php
配置apache的index.php页面并测试访问
[root@localhost ~]# vim /var/www/html/index.php

[root@localhost ~]# systemctl start httpd
[root@localhost ~]# systemctl enable httpd
Created symlink from /etc/systemd/system/multi-user.target.wants/httpd.service to /usr/lib/systemd/system/httpd.service.
访问一下php页面确认下,到此处必须能访问到要不就是你php环境有问题了
http://your_local_ipaddress
有点秘密书签就打个马赛克哈。

来吧php页面也出来了我们干掉他然后准备zabbix了,看看是能不能成功哈,实不相瞒我是基于以前的信息直接怼的,看看有没有变化。没有特殊需要就弄掉有特殊需要就改个名字或者放到一个深层目录下
[root@localhost ~]# rm -rf /var/www/html/index.php
安装zabbix-server
不知道你们啥子情况我第一遍因为网络的原因报错了,重新安装就解决了
[root@localhost ~]# yum install -y zabbix-server-mysql zabbix-web-mysql
...
作为依赖被安装:
  OpenIPMI.x86_64 0:2.0.27-1.el7    OpenIPMI-libs.x86_64 0:2.0.27-1.el7    OpenIPMI-modalias.x86_64 0:2.0.27-1.el7    fping.x86_64 0:3.10-4.el7    libevent.x86_64 0:2.0.21-4.el7    net-snmp-libs.x86_64 1:5.7.2-43.el7_7.3    zabbix-web.noarch 0:4.4.6-1.el7

完毕!
[root@localhost ~]# zcat /usr/share/doc/zabbix-server-mysql-4.4.6/create.sql.gz | mysql -u zabbix -pzabbix zabbix
导入sql文件
配置zabbixserver
[root@localhost ~]# egrep -v '^#|^$' -n /etc/zabbix/zabbix_server.conf
38:LogFile=/var/log/zabbix/zabbix_server.log
49:LogFileSize=0
72:PidFile=/var/run/zabbix/zabbix_server.pid
82:SocketDir=/var/run/zabbix
100:DBName=zabbix
116:DBUser=zabbix
124:DBPassword=zabbix				//此处写的是数据库的密码上面三个都是默认的很容易被攻击,生产环境请修改
356:SNMPTrapperFile=/var/log/snmptrap/snmptrap.log
473:Timeout=4
516:AlertScriptsPath=/usr/lib/zabbix/alertscripts
527:ExternalScripts=/usr/lib/zabbix/externalscripts
563:LogSlowQueries=3000
678:StatsAllowedIP=127.0.0.1
[root@localhost ~]# grep -n DocumentRoot /etc/httpd/conf/httpd.conf | grep -v '#'
120:DocumentRoot "/usr/share/zabbix/"
[root@localhost ~]# chown -R apache:apache /usr/share/zabbix/
[root@localhost ~]# systemctl restart httpd
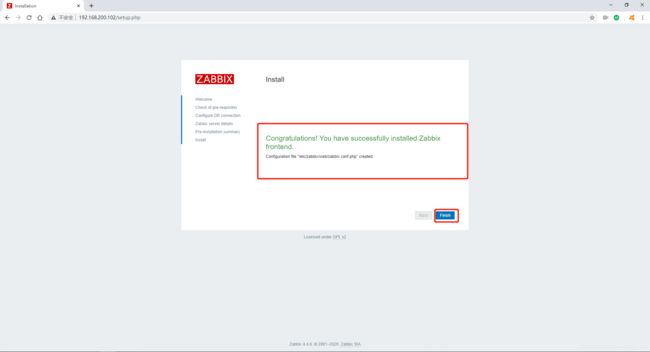
接下来就比较简单了访问WEB安装zabbix,人品不错很是顺利啊
http://your_ip_address
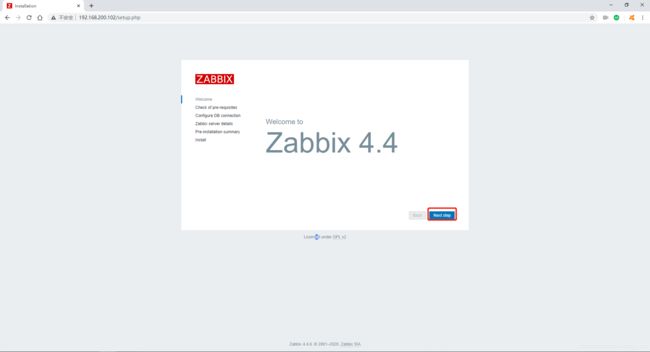

没有一点问题
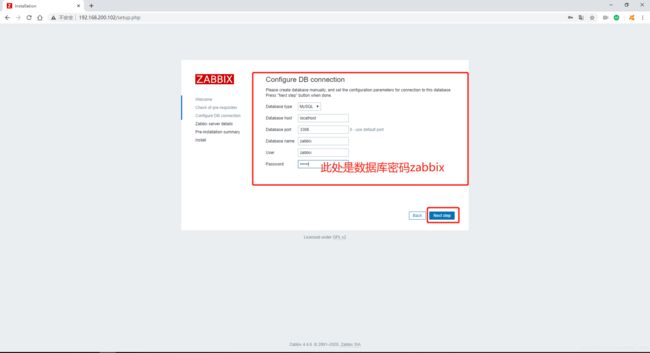
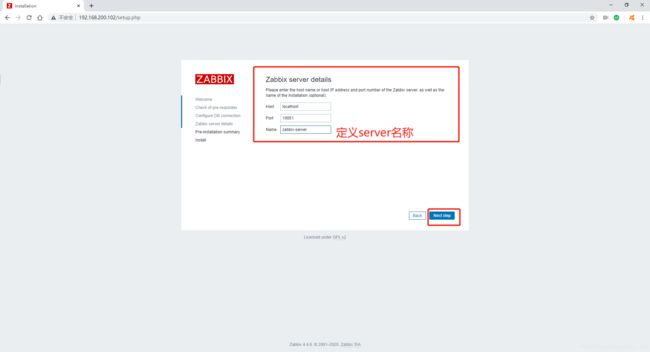
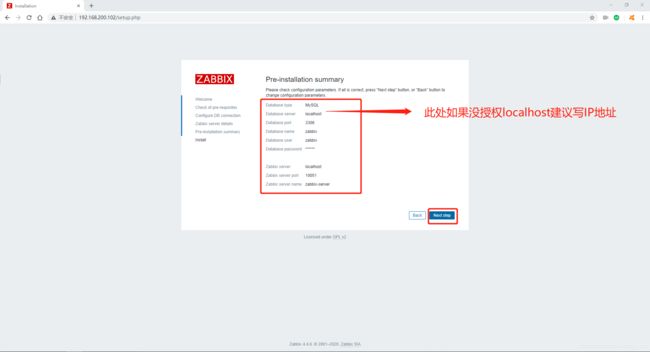
登录查看
此处就是默认的用户名和密码Admin/zabbix
[root@localhost ~]# systemctl start zabbix-server
[root@localhost ~]# systemctl enable zabbix-server
Created symlink from /etc/systemd/system/multi-user.target.wants/zabbix-server.service to /usr/lib/systemd/system/zabbix-server.service.

注意下版本号,此处不是喷,但是不说一下真心不爽,某些博主很恶心,我起初部署4.0的时候本来想在网上看看,安装页面是4.0.*但是到进来的页面直接变成3.4不是说别的能别做只会复制粘贴的运维吗??
关于基础配置可以参考写我的其他博客
agent端配置文档最底端
中文乱码及修改密码
