利用 CoreGraphics 绘制折线图
效果与元素分析
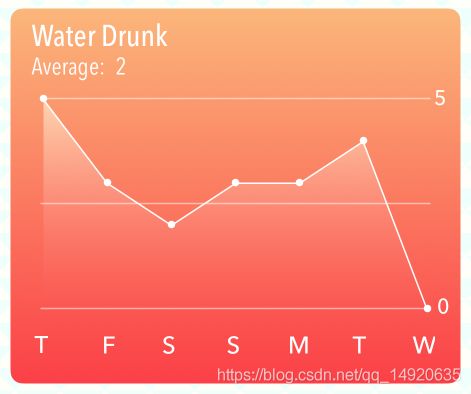
实现效果图如下:
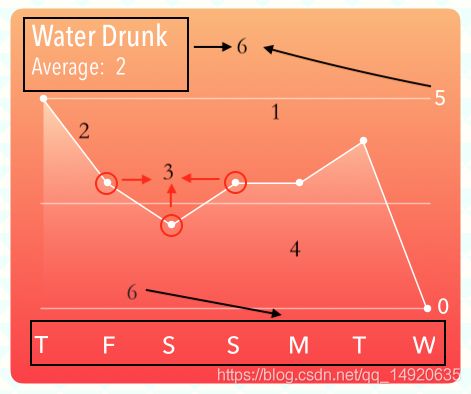
首先对折线图进行元素分割
包含以下六部分元素
- 渐变背景
- 折线
- 折线上的点
- 折线范围内渐变
- 参考线
- 文本显示的 Label
除了6之外,其他几个元素都在 draw(_:)方法中利用 CoreGraphics 和 UIBezierPath 进行绘制。
绘制背景渐变色
主要绘制手段是 利用 UIBezierPath 和 CoreGraphicContext, UIBezerPath 能方便的绘制一些简单的几何图形, 但是 更复杂的绘制还是借助 CGContext 来完成,比如渐变色。
利用 UIBezierPath绘制有效矩形区间
				// 添加圆角 和 有效区
        let cornerPath = UIBezierPath(roundedRect: rect, byRoundingCorners: .allCorners, cornerRadii: Constants.cornerRadiusSize)
        cornerPath.addClip() //相当于裁剪, 接下来的绘制在这个区域以外都会被忽略
UIBezierPath 的 addClip():
可以简单理解为 裁剪闭合区域。官方解释:将接收器路径所包围的区域与当前图形上下文的剪切路径相交,并使生成的形状为当前剪切路径。此方法修改当前图形上下文的可见绘制区域。在调用它之后,后续的绘图操作只会在指定路径的填充区域内产生呈现的内容
重要提示:如果您需要删除裁剪区域来执行后续的绘图操作,那么您必须在调用此方法之前保存当前图形状态(使用saveGState()函数)。当不再需要剪切区域时,可以使用restoreGState()函数恢复以前的绘制属性和剪切区域。
利用 CGContext 绘制渐变色
			// 1. 绘制背景渐变色
        guard let context = UIGraphicsGetCurrentContext() else {
            return
        }
        let cfColors = [startColor.cgColor, endColor.cgColor] as CFArray
        let colorLocation: [CGFloat] = [0.0, 1.0]  // 颜色所在位置, 值为0-1, 有多少颜色, 对应多少个值
				// 渐变设置
        guard let gradient = CGGradient(colorsSpace: CGColorSpaceCreateDeviceRGB(),
                                        colors: cfColors,
                                        locations: colorLocation)
           else {
            return
        	}
				// 线性绘制渐变。
        context.drawLinearGradient(gradient, start: CGPoint(x: 0, y: height), end: CGPoint(x: 0, y: 0), options: 				[]) // 从下开始
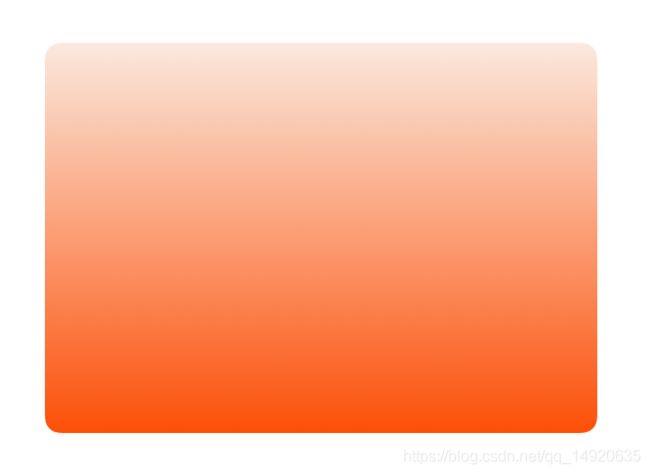
效果图:
绘制折线
由于接下来会产生折线区操作,所以应该先将当前 Context环境保存以下,以便恢复使用。
context.saveGState() // 保存一次上下文状态,
计算每个点的位置,利用 UIBezierPath 进行折线绘制。
利用定义闭包分别计算 X, Y
				// 2. 绘制折线
        let margin = Constants.margin
        let graphWidth = width - margin*2 - 4
        // 定义 X 计算闭包
        let columnXPoint = { (column: Int) -> CGFloat in
            let columnWidth = graphWidth/CGFloat(self.graphPoints.count-1)
            return CGFloat(column)*columnWidth + margin + 2
        }
        let graphHeight = height - Constants.bottomBorder - Constants.topBorder
        guard let maxValue = graphPoints.max() else { return }

        // 定义 Y 计算闭包
        let columnYPoint = { (graphPoint: Int) -> CGFloat in
            let yPoint = CGFloat(graphPoint) / CGFloat(maxValue) * graphHeight
            return graphHeight + Constants.topBorder - yPoint
        }
计算每个点的位置
				// 2.1 计算折线点
        let graphPath = UIBezierPath()
        graphPath.lineWidth = 2.0
        graphPath.move(to: CGPoint(x: columnXPoint(0), y: columnYPoint(graphPoints[0])))
        for i in 1..<graphPoints.count {
            graphPath.addLine(to: CGPoint(x: columnXPoint(i), y: columnYPoint(graphPoints[i])))
        }
        UIColor.white.setStroke() // 设置线条颜色 而 UIColor.White.setFilll 设置的是填充色
        graphPath.stroke() // 绘制
路径绘制完成后需要调用 stroke()或者 fill()方法才可以有绘制作用。
结果图:
绘制折线区域渐变
				// 4. 绘制折线范围内的渐变
        // 4.1 确定渐变区间
        guard let clippingPath = graphPath.copy() as? UIBezierPath else { return }
        clippingPath.addLine(to: CGPoint(x: columnXPoint(graphPoints.count-1), y: height))
        clippingPath.addLine(to: CGPoint(x: columnXPoint(0), y: height))
        clippingPath.close() // 最后一点和起点连接成闭合区间
        clippingPath.addClip() // 闭合取消有效

        // 4.2 折线区间内绘制渐变
        let startPoint = CGPoint(x: Constants.margin, y: height)
        let endPoint = CGPoint(x: Constants.margin, y: columnYPoint(maxValue))
        context.drawLinearGradient(gradient, start: startPoint, end: endPoint, options: [])
最后绘制点和线段
在开始绘制之前, 需要将 CGContext 恢复到之前的状态,否则就会就只有折线区域绘制有效。
context.restoreGState() // 恢复到上一次的绘画状态, 否则下面绘制的点和线只有折线闭合区域有效。
绘制点
       // 3. 绘制折线上的点
        for i in 0..<graphPoints.count {
            var point = CGPoint(x: columnXPoint(i), y: columnYPoint(graphPoints[i]))
            point.x -= Constants.circleDiameter/2
            point.y -= Constants.circleDiameter/2
            let circleSize = CGSize(width: Constants.circleDiameter, height: Constants.circleDiameter)
            let circle = UIBezierPath(ovalIn: CGRect(origin: point, size: circleSize))
            UIColor.white.setFill()
            circle.fill()
        }
绘制参考线
				// 5. 绘制参考线
        let linePath = UIBezierPath()
        linePath.lineWidth = 1.0

        let topBorder = Constants.topBorder
        let bottomBorder = Constants.bottomBorder
        linePath.move(to: CGPoint(x: margin, y: topBorder))
        linePath.addLine(to: CGPoint(x: width - margin, y: topBorder))
        linePath.move(to: CGPoint(x: margin, y: graphHeight / 2 + topBorder))
        linePath.addLine(to: CGPoint(x: width - margin, y: graphHeight / 2 + topBorder))

        linePath.move(to: CGPoint(x: margin, y: height - bottomBorder))
        linePath.addLine(to: CGPoint(x: width - margin, y: height - bottomBorder))
        let lineColor = UIColor.white.withAlphaComponent(Constants.colorAlpha)  // 使用透明颜色,效果更佳。
        lineColor.setStroke()
        linePath.stroke()
效果图
其他文本元素可以通过在 xib 或者代码添加 UILabel 及布局来完成, 没有必要在 draw 方法中绘制。
CGContext的saveGState()与 restoreGState
saveGState
保存一次当前的绘画环境,使用 restoreGState() 来恢复
每个图形上下文维护一个图形状态堆栈。请注意,当前绘图环境的所有方面都不是图形状态的元素。例如,当前路径不被认为是图形状态的一部分,因此在调用此函数时不会保存。保存的图形状态参数为:
- CTM (current transformation matrix)
- clip region
- image interpolation quality
- line width
- line join
- miter limit
- line cap
- line dash
- flatness
- should anti-alias
- rendering intent
- fill color space
- stroke color space
- fill color
- stroke color
- alpha value
- font
- font size
- character spacing
- text drawing mode
- shadow parameters
- the pattern phase
- the font smoothing parameter
- blend mode
restroeGState
恢复到上一次的绘画环境
简单理解就是,如果你需要保存上一次的绘画环境,你就应该成对调用。或者理解为 PS 中 一层蒙版,save之后就相当于新建一个蒙版, restore 之后就相当返回上一个蒙版。
比如上面折线图,如果将保存环境和恢复环境注释,则运行结果如下:

异常:
1. 折线点显示不全
2. 参考线显示异常(没有显示三根, 且线条应该超出折线区 2 像素 )
原因:在进行折线区域绘制之后进行过一次addClip(), 则在之后的绘制中只有折线区域才有效,所以点不显示不全。
解决:我们需要在绘制折线区域之前进行一次绘画状态保存,以便绘制完成折线后可以恢复到之前的状态。
Clip - 切割
根据 path只绘制指定区域,在区域外的都不会绘制。切割会影响绘制上下文环境变化。
clip(usring:)
按照规则切割
clip(to rect: CGRect)
切割到指定矩形
clip(to rects: [CGRect])
切割指定某些矩形区域
clip(to rect: CGRect, mask: CGImage)
将mask映射到指定的矩形中,并使其与图形上下文的当前剪切区域相交
参考
项目源码
Core Graphics Tutorial – raywenderlich
通过 CoreGraphics 绘制渐变颜色 – SwiftGG
CoreGraphics 绘画框架详解 – 航哥


