Python Web接入公众号开发者服务
开发者服务可以做什么?
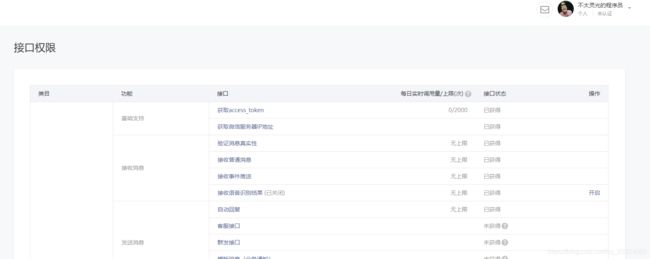
当我们想在公众号中添加特别的功能,比如说聊天机器人、消息推送等,都会用到公众号提供的开发者工具,下面截图是提供的部分基础功能,那需要准备些什么呢?
微信官方文档中的描述
接入微信公众平台开发,开发者需要按照如下步骤完成:
1、填写服务器配置
2、验证服务器地址的有效性
3、依据接口文档实现业务逻辑
下面详细介绍这3个步骤。
简单的解释下:
1、填写服务器配置
-
按照官方要求是需要准备一台架设在互联网中的服务器,可以是云服务器也可以是物理机,这台服务器需要开通443和80端口,如果云服务器的话在安全组中进行配制就可以了,物理机可能还需要联系运行商进行配置;
【华为云年中大促】1核2G云服务器低至257元/3年,其他云产品低至1折 -
对于一般的功能这台服务器是不用绑定域名的,例如消息接收和发送,小程序的接入就需要域名了;
-
URL是在这台服务器上部署的来接收微信消息和事件的服务接口地址。
-
Token可由开发者可以任意填写,用作生成签名(该Token会和接口URL中包含的Token进行比对,从而验证安全性)。
-
EncodingAESKey由开发者手动填写或随机生成,将用作消息体加解密密钥。
2、验证服务器地址的有效性
#!/usr/bin/env python
# -*- coding: utf-8 -*-
#########################################################################
# Author: jonyqin
# Created Time: Thu 11 Sep 2014 01:53:58 PM CST
# File Name: ierror.py
# Description:定义错误码含义
#########################################################################
WXBizMsgCrypt_OK = 0
WXBizMsgCrypt_ValidateSignature_Error = -40001
WXBizMsgCrypt_ParseXml_Error = -40002
WXBizMsgCrypt_ComputeSignature_Error = -40003
WXBizMsgCrypt_IllegalAesKey = -40004
WXBizMsgCrypt_ValidateAppid_Error = -40005
WXBizMsgCrypt_EncryptAES_Error = -40006
WXBizMsgCrypt_DecryptAES_Error = -40007
WXBizMsgCrypt_IllegalBuffer = -40008
WXBizMsgCrypt_EncodeBase64_Error = -40009
WXBizMsgCrypt_DecodeBase64_Error = -40010
WXBizMsgCrypt_GenReturnXml_Error = -40011
WXBizMsgCrypt.py
#!/usr/bin/env python
#-*- encoding:utf-8 -*-
""" 对公众平台发送给公众账号的消息加解密示例代码.
@copyright: Copyright (c) 1998-2014 Tencent Inc.
"""
# ------------------------------------------------------------------------
import base64
import string
import random
import hashlib
import time
import struct
from Crypto.Cipher import AES
import xml.etree.cElementTree as ET
import sys
import socket
reload(sys)
import ierror
sys.setdefaultencoding('utf-8')
"""
关于Crypto.Cipher模块,ImportError: No module named 'Crypto'解决方案
请到官方网站 https://www.dlitz.net/software/pycrypto/ 下载pycrypto。
下载后,按照README中的“Installation”小节的提示进行pycrypto安装。
"""
class FormatException(Exception):
pass
def throw_exception(message, exception_class=FormatException):
"""my define raise exception function"""
raise exception_class(message)
class SHA1:
"""计算公众平台的消息签名接口"""
def getSHA1(self, token, timestamp, nonce, encrypt):
"""用SHA1算法生成安全签名
@param token: 票据
@param timestamp: 时间戳
@param encrypt: 密文
@param nonce: 随机字符串
@return: 安全签名
"""
try:
sortlist = [token, timestamp, nonce, encrypt]
sortlist.sort()
sha = hashlib.sha1()
sha.update("".join(sortlist))
return ierror.WXBizMsgCrypt_OK, sha.hexdigest()
except Exception,e:
#print e
return ierror.WXBizMsgCrypt_ComputeSignature_Error, None
class XMLParse:
"""提供提取消息格式中的密文及生成回复消息格式的接口"""
# xml消息模板
AES_TEXT_RESPONSE_TEMPLATE = """
%(timestamp)s
"""
def extract(self, xmltext):
"""提取出xml数据包中的加密消息
@param xmltext: 待提取的xml字符串
@return: 提取出的加密消息字符串
"""
try:
xml_tree = ET.fromstring(xmltext)
encrypt = xml_tree.find("Encrypt")
touser_name = xml_tree.find("ToUserName")
return ierror.WXBizMsgCrypt_OK, encrypt.text, touser_name.text
except Exception,e:
#print e
return ierror.WXBizMsgCrypt_ParseXml_Error,None,None
def generate(self, encrypt, signature, timestamp, nonce):
"""生成xml消息
@param encrypt: 加密后的消息密文
@param signature: 安全签名
@param timestamp: 时间戳
@param nonce: 随机字符串
@return: 生成的xml字符串
"""
resp_dict = {
'msg_encrypt' : encrypt,
'msg_signaturet': signature,
'timestamp' : timestamp,
'nonce' : nonce,
}
resp_xml = self.AES_TEXT_RESPONSE_TEMPLATE % resp_dict
return resp_xml
class PKCS7Encoder():
"""提供基于PKCS7算法的加解密接口"""
block_size = 32
def encode(self, text):
""" 对需要加密的明文进行填充补位
@param text: 需要进行填充补位操作的明文
@return: 补齐明文字符串
"""
text_length = len(text)
# 计算需要填充的位数
amount_to_pad = self.block_size - (text_length % self.block_size)
if amount_to_pad == 0:
amount_to_pad = self.block_size
# 获得补位所用的字符
pad = chr(amount_to_pad)
return text + pad * amount_to_pad
def decode(self, decrypted):
"""删除解密后明文的补位字符
@param decrypted: 解密后的明文
@return: 删除补位字符后的明文
"""
pad = ord(decrypted[-1])
if pad<1 or pad >32:
pad = 0
return decrypted[:-pad]
class Prpcrypt(object):
"""提供接收和推送给公众平台消息的加解密接口"""
def __init__(self,key):
#self.key = base64.b64decode(key+"=")
self.key = key
# 设置加解密模式为AES的CBC模式
self.mode = AES.MODE_CBC
def encrypt(self,text,appid):
"""对明文进行加密
@param text: 需要加密的明文
@return: 加密得到的字符串
"""
# 16位随机字符串添加到明文开头
text = self.get_random_str() + struct.pack("I",socket.htonl(len(text))) + text + appid
# 使用自定义的填充方式对明文进行补位填充
pkcs7 = PKCS7Encoder()
text = pkcs7.encode(text)
# 加密
cryptor = AES.new(self.key,self.mode,self.key[:16])
try:
ciphertext = cryptor.encrypt(text)
# 使用BASE64对加密后的字符串进行编码
return ierror.WXBizMsgCrypt_OK, base64.b64encode(ciphertext)
except Exception,e:
#print e
return ierror.WXBizMsgCrypt_EncryptAES_Error,None
def decrypt(self,text,appid):
"""对解密后的明文进行补位删除
@param text: 密文
@return: 删除填充补位后的明文
"""
try:
cryptor = AES.new(self.key,self.mode,self.key[:16])
# 使用BASE64对密文进行解码,然后AES-CBC解密
plain_text = cryptor.decrypt(base64.b64decode(text))
except Exception,e:
#print e
return ierror.WXBizMsgCrypt_DecryptAES_Error,None
try:
pad = ord(plain_text[-1])
# 去掉补位字符串
#pkcs7 = PKCS7Encoder()
#plain_text = pkcs7.encode(plain_text)
# 去除16位随机字符串
content = plain_text[16:-pad]
xml_len = socket.ntohl(struct.unpack("I",content[ : 4])[0])
xml_content = content[4 : xml_len+4]
from_appid = content[xml_len+4:]
except Exception,e:
#print e
return ierror.WXBizMsgCrypt_IllegalBuffer,None
if from_appid != appid:
return ierror.WXBizMsgCrypt_ValidateAppid_Error,None
return 0,xml_content
def get_random_str(self):
""" 随机生成16位字符串
@return: 16位字符串
"""
rule = string.letters + string.digits
str = random.sample(rule, 16)
return "".join(str)
class WXBizMsgCrypt(object):
#构造函数
#@param sToken: 公众平台上,开发者设置的Token
# @param sEncodingAESKey: 公众平台上,开发者设置的EncodingAESKey
# @param sAppId: 企业号的AppId
def __init__(self,sToken,sEncodingAESKey,sAppId):
try:
self.key = base64.b64decode(sEncodingAESKey+"=")
assert len(self.key) == 32
except:
throw_exception("[error]: EncodingAESKey unvalid !", FormatException)
#return ierror.WXBizMsgCrypt_IllegalAesKey)
self.token = sToken
self.appid = sAppId
def EncryptMsg(self, sReplyMsg, sNonce, timestamp = None):
#将公众号回复用户的消息加密打包
#@param sReplyMsg: 企业号待回复用户的消息,xml格式的字符串
#@param sTimeStamp: 时间戳,可以自己生成,也可以用URL参数的timestamp,如为None则自动用当前时间
#@param sNonce: 随机串,可以自己生成,也可以用URL参数的nonce
#sEncryptMsg: 加密后的可以直接回复用户的密文,包括msg_signature, timestamp, nonce, encrypt的xml格式的字符串,
#return:成功0,sEncryptMsg,失败返回对应的错误码None
pc = Prpcrypt(self.key)
ret,encrypt = pc.encrypt(sReplyMsg, self.appid)
if ret != 0:
return ret,None
if timestamp is None:
timestamp = str(int(time.time()))
# 生成安全签名
sha1 = SHA1()
ret,signature = sha1.getSHA1(self.token, timestamp, sNonce, encrypt)
if ret != 0:
return ret,None
xmlParse = XMLParse()
return ret,xmlParse.generate(encrypt, signature, timestamp, sNonce)
def DecryptMsg(self, sPostData, sMsgSignature, sTimeStamp, sNonce):
# 检验消息的真实性,并且获取解密后的明文
# @param sMsgSignature: 签名串,对应URL参数的msg_signature
# @param sTimeStamp: 时间戳,对应URL参数的timestamp
# @param sNonce: 随机串,对应URL参数的nonce
# @param sPostData: 密文,对应POST请求的数据
# xml_content: 解密后的原文,当return返回0时有效
# @return: 成功0,失败返回对应的错误码
# 验证安全签名
xmlParse = XMLParse()
ret,encrypt,touser_name = xmlParse.extract(sPostData)
if ret != 0:
return ret, None
sha1 = SHA1()
ret,signature = sha1.getSHA1(self.token, sTimeStamp, sNonce, encrypt)
if ret != 0:
return ret, None
if not signature == sMsgSignature:
return ierror.WXBizMsgCrypt_ValidateSignature_Error, None
pc = Prpcrypt(self.key)
ret,xml_content = pc.decrypt(encrypt,self.appid)
return ret,xml_content
Sample.py
#!/usr/bin/env python
# -*- coding: utf-8 -*-
#########################################################################
# Author: jonyqin
# Created Time: Thu 11 Sep 2014 03:55:41 PM CST
# File Name: demo.py
# Description: WXBizMsgCrypt 使用demo文件
#########################################################################
from WXBizMsgCrypt import WXBizMsgCrypt
if __name__ == "__main__":
"""
1.第三方回复加密消息给公众平台;
2.第三方收到公众平台发送的消息,验证消息的安全性,并对消息进行解密。
"""
encodingAESKey = "abcdefghijklmnopqrstuvwxyz0123456789ABCDEFG"
to_xml = """ 1407743423 1409735668 6054768590064713728 以上这么多都是瞎扯的,不用看,和你的web项目代码打包放一起就行了
验证消息
- 检验消息的真实性,并且获取解密后的明文
- encodingAESKey 是在上面生成的,写到你的配置文件里
- token 是在上面生成的,写到你的配置文件里
- signature 微信加密签名,signature结合了开发者填写的token参数和请求中的timestamp参数、nonce参数。 get请求参数
- timestamp 时间戳 get请求参数
- nonce 随机数 get请求参数
- echostr 随机字符串 get请求参数
解密接口DecryptMsg
- sMsgSignature 对应参数 signature
- sTimeStamp 对应参数 timestamp
- sNonce 对应参数 nonce
- 成功0,失败返回对应的错误码
然后我们在对应的web框架中加个接口来调用DecryptMsg,判断返回值就ok了
然后把echostr返回给微信服务
在Flask框架中:
#!/usr/bin/env python
# -*- coding: utf-8 -*-
from WXBizMsgCrypt import WXBizMsgCryp
from flask import Flask
app = Flask(__name__)
@app.route('/test', methods=['GET'])
def test():
encodingAESKey = '================='
token = "spamtest"
appid = "wx2c2769f8efd9abc2"
signature = request.args.get('signature')
timestamp = request.args.get('timestamp')
nonce = request.args.get("nonce")
echostr= request.args.get("echostr")
from_xml = """1409735668 6054768590064713728 在Django框架中:
#!/usr/bin/env python
# -*- coding: utf-8 -*-
from WXBizMsgCrypt import WXBizMsgCryp
from django.http import HttpResponse
from django.shortcuts import render
# Create your views here.
def test(request):
encodingAESKey = '================='
token = "spamtest"
appid = "wx2c2769f8efd9abc2"
signature = request.GET.get('signature')
timestamp = request.GET.get('timestamp')
nonce = request.GET.get("nonce")
echostr= request.GET.get("echostr")
from_xml = """1409735668 6054768590064713728 验证URL有效性成功后即接入生效,成为开发者。然后就可以愉快的开发定制的功能了。

