Android高仿QQ小红点
上一篇文章分析了QQ侧滑栏的实现,
文章地址: http://www.jianshu.com/p/1834ce7a2ce7 ,本篇继续来实现一下QQ小红点的功能,闲言少叙,先上效果图:
代码已上传至Github:高仿QQ小红点,如对您有帮助,欢迎star~感谢
绘制贝塞尔曲线:
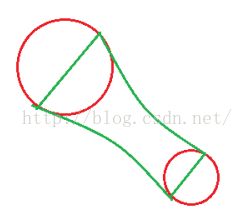
主要是当在一定范围内拖拽时算出固定圆和拖拽圆的外切直线以及对应的切点,就可以通过path.quadTo()来绘制二阶贝塞尔曲线了~
整体思路:
1、当小红点静止时,什么都不做,只需要给自定义小红点QQBezierView(extends TextView)添加一个.9文件当背景即可
2、当滑动时,通过getRootView()获得顶级根View,然后new一个DragView ( extends View ) 来绘制各种状态时的小红点,并且通过getRootView().addView()的方式把DragView 加进去,这样DragView 就可以实现全屏滑动了
实现过程:
自定义QQBezierView ( extends TextView ) 并复写onTouchEvent来处理各种情况,代码如下:
@Override
public boolean onTouchEvent(MotionEvent event) {
    //获得根View
    View rootView = getRootView();
    //获得触摸位置在全屏所在位置
    float mRawX = event.getRawX();
    float mRawY = event.getRawY();
    switch (event.getAction()) {
        case MotionEvent.ACTION_DOWN:
            //请求父View不拦截
            getParent().requestDisallowInterceptTouchEvent(true);
            //获得当前View在屏幕上的位置
            int[] cLocation = new int[2];
            getLocationOnScreen(cLocation);
            if (rootView instanceof ViewGroup) {
                //初始化拖拽时显示的View
                dragView = new DragView(getContext());
                //设置固定圆的圆心坐标
                dragView.setStickyPoint(cLocation[0] + mWidth / 2, cLocation[1] + mHeight / 2, mRawX, mRawY);
                //获得缓存的bitmap,滑动时直接通过drawBitmap绘制出来
                setDrawingCacheEnabled(true);
                Bitmap bitmap = getDrawingCache();
                if (bitmap != null) {
                    dragView.setCacheBitmap(bitmap);
                    //将DragView添加到RootView中,这样就可以全屏滑动了
                    ((ViewGroup) rootView).addView(dragView);
                    setVisibility(INVISIBLE);
                }
            }
            break;
        case MotionEvent.ACTION_MOVE:
            //请求父View不拦截
            getParent().requestDisallowInterceptTouchEvent(true);
            if (dragView != null) {
                //更新DragView的位置
                dragView.setDragViewLocation(mRawX, mRawY);
            }
            break;
        case MotionEvent.ACTION_UP:
            getParent().requestDisallowInterceptTouchEvent(false);
            if (dragView != null) {
                //手抬起时来判断各种情况
                dragView.setDragUp();
            }
            break;
    }
    return true;
}
上面代码注释已经很详细了,总结一下就是通过内部拦截法来请求父View是否拦截分发事件,并通过event.getRawX()和event.getRawY()来不断更新DragView的位置,那么DragView都做了哪些事呢,接下来就看一下DragView,DragView是QQBezierView 的一个内部View类:
 private int mState;//当前红点的状态
 private static final int STATE_INIT = 0;//默认静止状态
 private static final int STATE_DRAG = 1;//拖拽状态
 private static final int STATE_MOVE = 2;//移动状态
 private static final int STATE_DISMISS = 3;//消失状态
首先声明了小红点的四种状态,静止状态,拖拽状态,移动状态和消失状态。
在QQBezierView 的onTouchEvent的DOWN事件中调用了setStickyPoint()方法:
/**
 * 设置固定圆的圆心和半径
 * @param stickyX 固定圆的X坐标
 * @param stickyY 固定圆的Y坐标
 */
 public void setStickyPoint(float stickyX, float stickyY, float touchX, float touchY) {
     //分别设置固定圆和拖拽圆的坐标
     stickyPointF.set(stickyX, stickyY);
     dragPointF.set(touchX, touchY);
     //通过两个圆点算出圆心距,也是拖拽的距离
     dragDistance = MathUtil.getTwoPointDistance(dragPointF, stickyPointF);
     if (dragDistance <= maxDistance) {
         //如果拖拽距离小于规定最大距离,则固定的圆应该越来越小,这样看着才符合实际
         stickRadius = (int) (defaultRadius - dragDistance / 10) < 10 ? 10 : (int) (defaultRadius - dragDistance / 10);
         mState = STATE_DRAG;
     } else {
         mState = STATE_INIT;
     }
 }
接着,在QQBezierView 的onTouchEvent的MOVE事件中调用了setDragViewLocation()方法:
 /**
  * 设置拖拽的坐标位置
  *
  * @param touchX 拖拽时的X坐标
  * @param touchY 拖拽时的Y坐标
  */
 public void setDragViewLocation(float touchX, float touchY) {
     dragPointF.set(touchX, touchY);
     //随时更改圆心距
     dragDistance = MathUtil.getTwoPointDistance(dragPointF, stickyPointF);
     if (mState == STATE_DRAG) {
        if (isInsideRange()) {
             stickRadius = (int) (defaultRadius - dragDistance / 10) < 10 ? 10 : (int) (defaultRadius - dragDistance / 10);
         } else {
             mState = STATE_MOVE;
             if (onDragListener != null) {
                 onDragListener.onMove();
             }
         }
     }
     invalidate();
 }
最后在QQBezierView 的onTouchEvent的UP事件中调用了setDragUp()方法:
public void setDragUp() {
   if (mState == STATE_DRAG && isInsideRange()) {
       //拖拽状态且在范围之内
        startResetAnimator();
     } else if (mState == STATE_MOVE) {
         if (isInsideRange()) {
            //在范围之内 需要RESET
            startResetAnimator();
        } else {
           //在范围之外 消失动画
            mState = STATE_DISMISS;
            startExplodeAnim();
        }
    }
}
最后来看下DragView的onDraw方法,拖拽时的贝塞尔曲线以及拖拽滑动时的状态都是通过onDraw实现的:
 @Override
 protected void onDraw(Canvas canvas) {
     if (isInsideRange() && mState == STATE_DRAG) {
         mPaint.setColor(Color.RED);
         //绘制固定的小圆
         canvas.drawCircle(stickyPointF.x, stickyPointF.y, stickRadius, mPaint);
         //首先获得两圆心之间的斜率
         Float linK = MathUtil.getLineSlope(dragPointF, stickyPointF);
         //然后通过两个圆心和半径、斜率来获得外切线的切点
         PointF[] stickyPoints = MathUtil.getIntersectionPoints(stickyPointF, stickRadius, linK);
         dragRadius = (int) Math.min(mWidth, mHeight) / 2;
         PointF[] dragPoints = MathUtil.getIntersectionPoints(dragPointF, dragRadius, linK);
         mPaint.setColor(Color.RED);
         //二阶贝塞尔曲线的控制点取得两圆心的中点
         controlPoint = MathUtil.getMiddlePoint(dragPointF, stickyPointF);
         //绘制贝塞尔曲线
         mPath.reset();
         mPath.moveTo(stickyPoints[0].x, stickyPoints[0].y);
         mPath.quadTo(controlPoint.x, controlPoint.y, dragPoints[0].x, dragPoints[0].y);
         mPath.lineTo(dragPoints[1].x, dragPoints[1].y);
         mPath.quadTo(controlPoint.x, controlPoint.y, stickyPoints[1].x, stickyPoints[1].y);
         mPath.lineTo(stickyPoints[0].x, stickyPoints[0].y);
         canvas.drawPath(mPath, mPaint);
     }
     if (mCacheBitmap != null && mState != STATE_DISMISS) {
         //绘制缓存的Bitmap
         canvas.drawBitmap(mCacheBitmap, dragPointF.x - mWidth / 2,
                        dragPointF.y - mHeight / 2, mPaint);
     }
     if (mState == STATE_DISMISS && explodeIndex < explode_res.length) {
         //绘制小红点消失时的爆炸动画
         canvas.drawBitmap(bitmaps[explodeIndex], dragPointF.x - mWidth / 2, dragPointF.y - mHeight / 2, mPaint);
     }
 }
PS:最开始使用的是 android:clipChildren=”false” 这个属性,如果父View只是一个普通的ViewGroup(如LinearLayout、RelativeLayout等),此时在父View中设置android:clipChildren=”false”后,子View就可以超出自己的范围,在ViewGroup中也可以滑动了,此时也没问题;但是当是RecycleView时,只要ItemView设置了background属性,滑动时的DragView就会显示在background的下面了,好蛋疼~如有知其原因的还望不吝赐教~
最后再贴下源码下载地址:Android高仿QQ小红点
参考:
http://blog.csdn.net/qq_31715429/article/details/54386934
http://blog.csdn.net/harvic880925/article/details/51615221

