【交叉编译】ubantu交叉编译Android平台动态库(.so文件)、静态库(.a文件)
前言:
本文主要写给C工程师,如何提供Android平台的C库给第三方使用。
平台:ubantu14.04 64bit
交叉编译工具:android-ndk64-r10-linux-x86_64.tar
交叉编译工具下载地址: 链接:https://pan.baidu.com/s/1VCttTraUoSh82ENVA4t3Og 提取码:sjwo
搭建交叉编译环境:
1、将android-ndk64-r10-linux-x86_64.tar工具拷贝到工作目录。(注意:交叉编译工具安装位置、包括后续编译的代码禁止放在共享文件夹)
2、使用【root】用户进入工作目录并运行解压命令:tar -jxvf android-ndk64-r10-linux-x86_64.tar.bz2
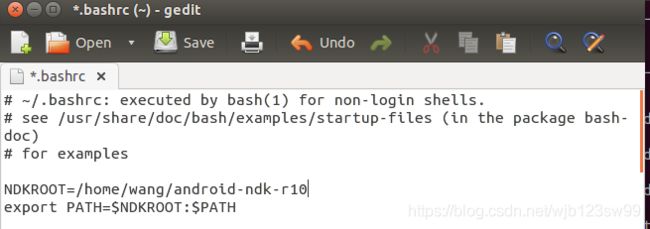
3、解压后得到【android-ndk-r10】文件夹,将文件夹加入到用户环境中运行命令:gedit ~/.bashrc
4、将【NDKROOT=文件夹位置/android-ndk-r10】、【export PATH=$NDKROOT:$PATH】二行语句写入文件夹后保存退出。
5、重置用户环境,运行命令:source ~/.bashrc
6、交叉编译环境搭建完成。
使用交叉编译工具编写动态库
1、进入之前解压出来的【android-ndk-r10】文件夹,运行命令:cd samples/hello-jni
2、【hello-jni】文件夹是官方提供的一个编写动态库的例子,可以看到该文件夹下包含下图所示文件、其中我们只用到【jni】文件夹,
该文件夹为存放C/C++的编译源码及相关mk文件的地方,交叉编译工具【ndk-build】自动识别【jni】文件夹里的相关文件并生成动态库或者静态库。进入文件夹运行:cd jni
3、【jni】文件夹下包含三个文件:【Android.mk】 、【Application.mk】、【hello-jni.c】;
【Android.mk】 文件定义里编译源码、需要连接动态库、以及生成结果;
【LOCAL_MODULE】定义了模块名称;【LOCAL_SRC_FILE】定义了所要编译的源码;
这里And文件roid.mk建议修改成以下内容,将自动编译jni目录底下的所有.c文件:Android.mk
# Copyright (C) 2009 The Android Open Source Project
#
# Licensed under the Apache License, Version 2.0 (the "License");
# you may not use this file except in compliance with the License.
# You may obtain a copy of the License at
#
#      http://www.apache.org/licenses/LICENSE-2.0
#
# Unless required by applicable law or agreed to in writing, software
# distributed under the License is distributed on an "AS IS" BASIS,
# WITHOUT WARRANTIES OR CONDITIONS OF ANY KIND, either express or implied.
# See the License for the specific language governing permissions and
# limitations under the License.
#
LOCAL_PATH := $(call my-dir)

include $(CLEAR_VARS)

#定义了模块名称
LOCAL_MODULE    := hello-jni
#编译当前目录下所有.c文件
MY_CPP_LIST := $(wildcard $(LOCAL_PATH)/*.c)
LOCAL_SRC_FILES := $(MY_CPP_LIST:$(LOCAL_PATH)/%=%)

#生成动态库
include $(BUILD_SHARED_LIBRARY)
【Application.mk】文件定义里生成库的平台
【APP_ABI】为最终生成的动态库,CPU架构;【all】代表生成当前交叉编译工具所能支持的所有CPU架构;(建议设置为all)
如果你只需要指定CPU架构,例如armeabi架构 可以写为【APP_ABI := armeabi 】
【hello-jni.c】文件为官方提供的C文件例子,这里你可以自己重写【hello-jni.c】文件,定义你喜欢的C函数。
4、在【jni】目录下运行交叉编译命令:ndk-build
如下图所示,编译成功。
5、查看生成结果,运行命令:cd ../libs
当前【libs】目录下包含ndk支持的所有cpu架构的C语言动态库
使用交叉编译工具编写静态库
1、编写静态库流程与动态库基本相同,主要是修改【jni】文件夹下的【Android.mk】文件内容,将【BUILD_SHARED_LIBRARY】改为【BUILD_STATIC_LIBRARY】。
# Copyright (C) 2009 The Android Open Source Project
#
# Licensed under the Apache License, Version 2.0 (the "License");
# you may not use this file except in compliance with the License.
# You may obtain a copy of the License at
#
#      http://www.apache.org/licenses/LICENSE-2.0
#
# Unless required by applicable law or agreed to in writing, software
# distributed under the License is distributed on an "AS IS" BASIS,
# WITHOUT WARRANTIES OR CONDITIONS OF ANY KIND, either express or implied.
# See the License for the specific language governing permissions and
# limitations under the License.
#
LOCAL_PATH := $(call my-dir)

include $(CLEAR_VARS)

#定义了模块名称
LOCAL_MODULE    := hello-jni
#编译当前目录下所有.c文件
MY_CPP_LIST := $(wildcard $(LOCAL_PATH)/*.c)
LOCAL_SRC_FILES := $(MY_CPP_LIST:$(LOCAL_PATH)/%=%)

#生产静态库
include $(BUILD_STATIC_LIBRARY)2、在【jni】文件夹下运行编译命令:ndk-build
3、查看生成的静态库,运行命令:cd ../obj/local/
番外
如果你在编写动态库时引用了第三方库,请参考【android-ndk-r10/samples/two-libs】例子;
如果你还有什么疑问,可以加我QQ一起讨论:Q869538952


