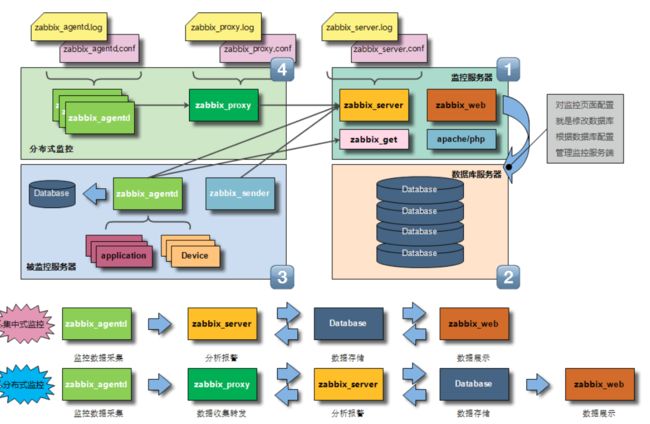
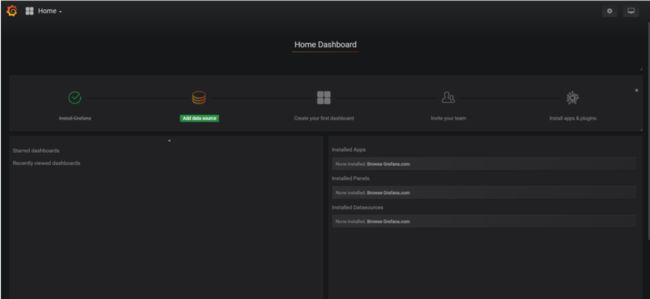
zabbix监控
监控服务概述
1、实时查看服务状态
2、可以发送报警信息(邮件报警、短信报警、电话报警、微信报警、值班(大屏幕)报警)
3、可以进行数据分析(潜在风险、对业务部门给出数据建议)
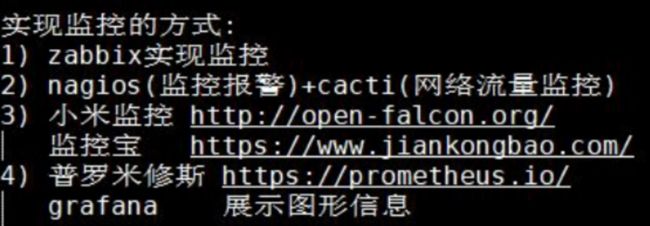
实现监控的方式:
如何搭建监控平台
###通过多个维度进行描述
1、网络模型OSI七层模型分析
2、网站安全、性能、业务等角度进行分析
####监控维度说明:
1)硬件监控:需要规划好硬件设备(服务器、路由器、交换机、防火墙)
2)系统监控:CPU、内存、磁盘、网络、进程、TCP连接状态
3)服务监控:nginx、php、tomcat、redis、memcache、mysql
4)网站监控:请求时间、响应时间、加载时间(定一个规范化时间用来衡量网站是否合格)
5)日志监控:及早发现日志运行异常 ELK(收集、存储、分析、展示)日志易
6)安全监控:Firewalld WAF(Nginx+Lua)安全宝、牛顿云、安全狗
7)网络监控:smokeping 监控宝、站长工具、奇云测、多机房
8)业务监控:活动时产生的流量、带来的价值
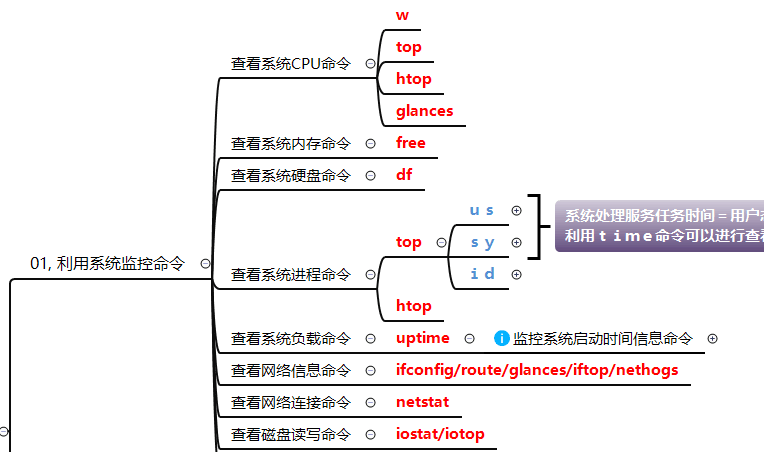
系统基础监控命令
zabbix监控服务部署
###zabbix服务端部署
####第一个里程: 下载安装zabbix yum 源文件
LTS long time support
- aliyun zabbix yum 源
- 清华源
rpm -ivh https://mirrors.tuna.tsinghua.edu.cn/zabbix/zabbix/4.0/rhel/7/x86_64/zabbix-release-4.0-1.el7.noarch.rpm

rpm -ivh https://mirrors.tuna.tsinghua.edu.cn/zabbix/zabbix/3.4/rhel/7/x86_64/zabbix-release-4.0-1.el7.noarch.rpm -- 老版本
第二个里程: 下载安装zabbix服务端相关软件
LAMP架构中 httpd + PHP + mariadb
zabbix服务程序软件: zabbix-server-mysql
zabbix服务web软件: zabbix-web-mysql httpd php
数据库服务软件: mariadb-server
yum install -y zabbix-server-mysql zabbix-web-mysql httpd php mariadb-server
第三个里程: 软件配置
vim /etc/zabbix/zabbix_server.conf

126 DBPassword=zabbix

vim /etc/httpd/conf.d/zabbix.conf

21 php_value date.timezone Asia/Shanghai
第四个里程: 编写配置数据库服务
systemctl start mariadb.service

systemctl status mariadb.service

创建zabbix数据库--zabbix

create database zabbix character set utf8 collate utf8_bin;

创建数据库管理用户

grant all privileges on zabbix.* to zabbix@localhost identified by 'zabbix';

在zabbix数据库中导入相应的表信息

zcat /usr/share/doc/zabbix-server-mysql-4.0.0/create.sql.gz|mysql -uzabbix -pzabbix zabbix
第五个里程: 启动zabbix程序相关服务
数据库服务 zabbix服务 httpd服务
systemctl start zabbix-server.service httpd mariadb.service

systemctl enable zabbix-server.service httpd mariadb.service
说明: 至此zabbix-server命令行操作结束
第六个里程: 登录zabbix服务端web界面, 进行初始化配置
http://10.0.0.71/zabbix/setup.php

10051 zabbix-server 服务端端口号

10050 zabbix-agent 客户端端口号

/etc/zabbix/web/zabbix.conf.php -- 记录web页面初始化信息
第七个里程: 登录zabbix服务web页面
用户名Admin 密码zabbix

zabbix客户端部署
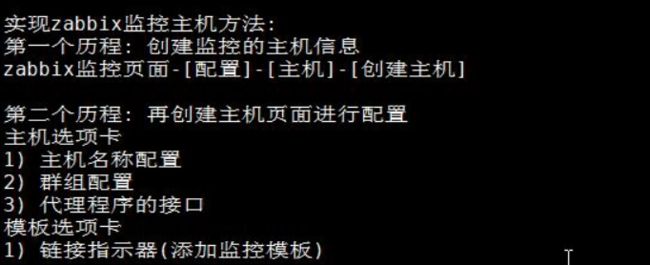
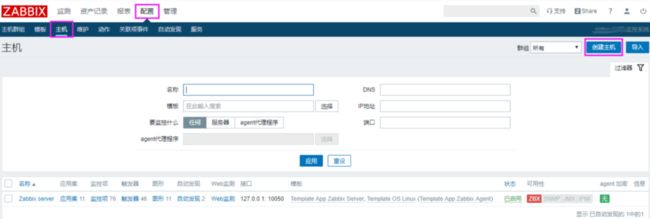
实现zabbix监控主机方法:
####异常问题总结:无法实现zabbix监控
1)服务端没有指定配置好监控的主机
2)客户端没有安装好软件或者启动好服务
如果客户端已经安装过旧版监控软件,使用新版软件时需要卸载(否则新版无法安装)
客户端配置文件需要编写正确
###如何设置自定义监控项
需求: 监控内存使用率情况,低于20%就报警
第一个历程: 利用命令获取监控信息
free -m|awk 'NR==2{print int($7/$2*100)}'
第二个历程: 编写zabbix-agent程序配置文件
UserParameter --- 定义监控的命令信息

[root@web01 yum.repos.d]# cd /etc/zabbix/zabbix_agentd.d/

[root@web01 zabbix_agentd.d]# vim mem.conf

UserParameter=mem.use,free -m|awk 'NR==2{print int($7/$2*100)}'
第三个历程: 调取监控的数据信息
利用命令进行调取监控信息

yum install -y zabbix-get --- 安装收集信息的命令(zabbix-server端进行安装)

zabbix_get -s 172.16.1.7 -k mem.use
利用监控服务调取监控信息
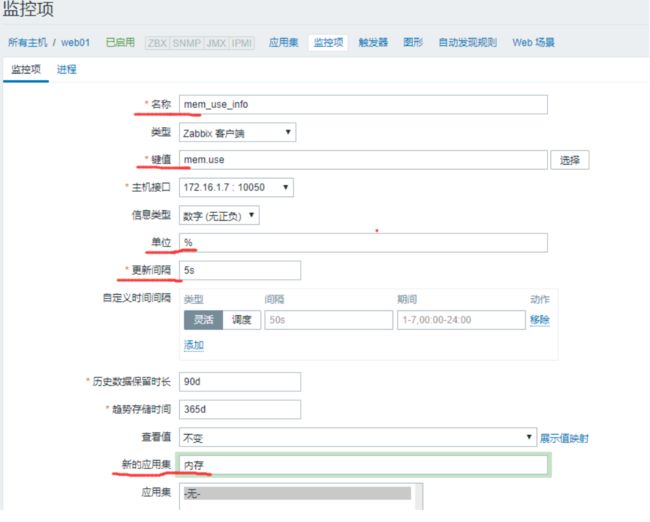
- 创建监控项
[配置]–选择要监控的主机–[监控项]–创建监控项
[监测]–[最新数据]–查看监控的数据信息
第四个历程: 进行监控报警
[配置]–选择要监控的主机–[触发器]–创建触发器
实现邮件告警
需求:当系统超过5个用户登录,发送邮件告警
需求: 当系统超过5个用户登陆,发送邮件告警
第一个历程: 利用命令获取监控信息
w|awk 'NR==1{print $6}'
第二个历程: 编写zabbix-agent程序配置文件
UserParameter --- 定义监控的命令信息

[root@web01 yum.repos.d]# cd /etc/zabbix/zabbix_agentd.d/

[root@web01 zabbix_agentd.d]# vim login.conf

UserParameter=login.user,w|awk 'NR==1{print $6}'

systemctl restart zabbix-agent.service
第三个历程: 调取监控的数据信息
利用命令进行调取监控信息

yum install -y zabbix-get --- 安装收集信息的命令(zabbix-server端进行安装)

zabbix_get -s 172.16.1.7 -k login.user

利用监控服务调取监控信息

1) 创建监控项

[配置]--选择要监控的主机--[监控项]--创建监控项

[监测]--[最新数据]--查看监控的数据信息
第四个历程: 进行监控报警
[配置]--选择要监控的主机--[触发器]--创建触发器
第五个历程: 发送邮件告警
[配置]--[动作]--将动作条目信息开启

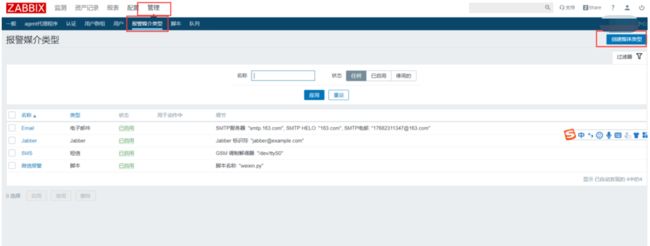
定义发件人信息

[管理]--[报警媒介类型]--[创建新的报警媒介]

定义接收人信息

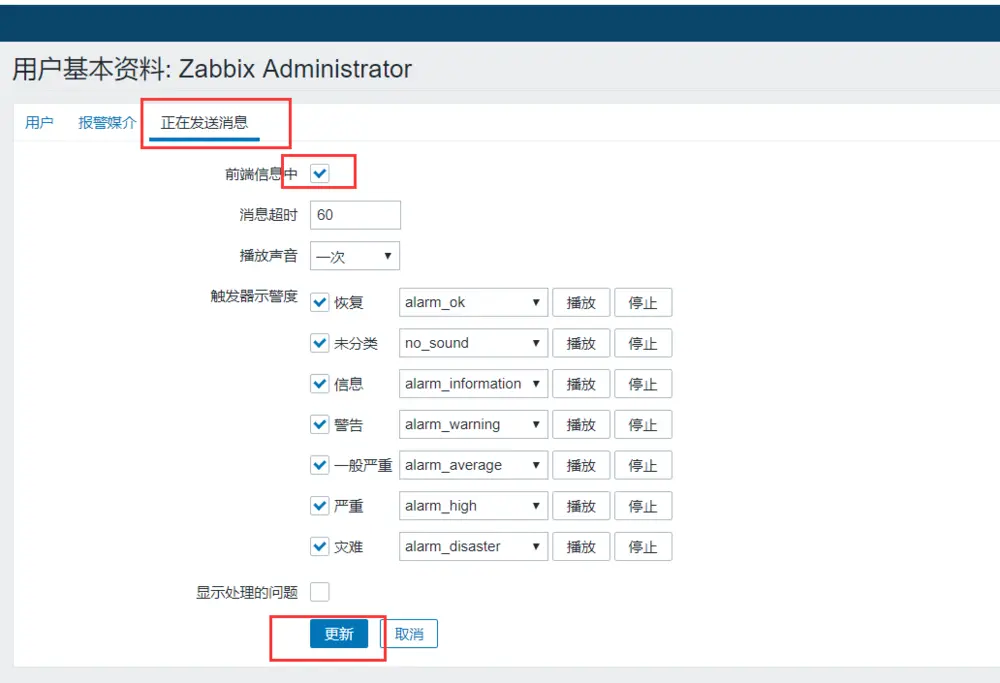
[小人头]--[报警媒介]
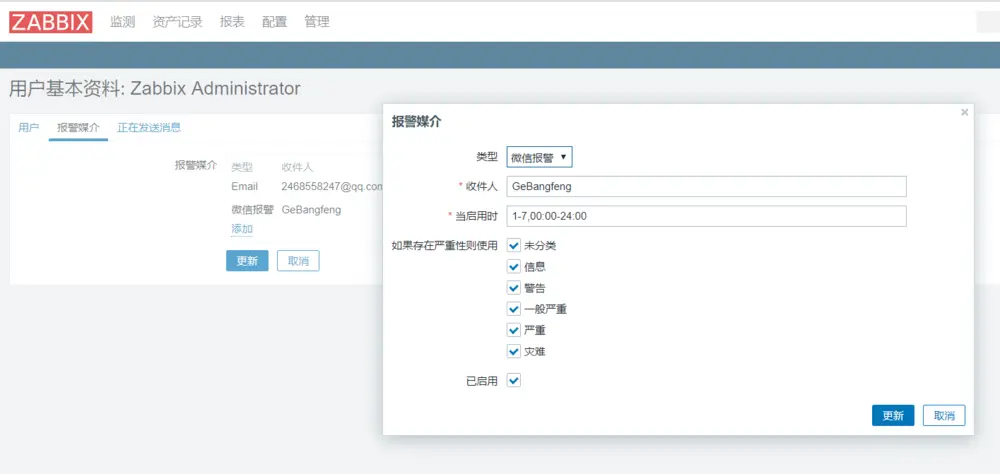
添加微信报警
编写微信报警脚本
[root@zabbix-server /usr/lib/zabbix/alertscripts]# vim weixin.py
token_url='https://qyapi.weixin.qq.com/cgi-bin/gettoken?corpid=' + corpid + '&corpsecret=' + appsecret
req=requests.get(token_url)
accesstoken=req.json()['access_token']

#发送消息
msgsend_url='https://qyapi.weixin.qq.com/cgi-bin/message/send?access_token=' + accesstoken

touser=sys.argv[1]
subject=sys.argv[2]
#toparty='3|4|5|6'
message=sys.argv[2] + "\n\n" +sys.argv[3]

params={
        "touser": touser,
#       "toparty": toparty,
        "msgtype": "text",
        "agentid": agentid,
        "text": {
                "content": message
        },
        "safe":0
}

req=requests.post(msgsend_url, data=json.dumps(params))

logging.info('sendto:' + touser + ';;subject:' + subject + ';;message:' + message)
这里调用的是企业微信的的接口,需要申请企业微信才可以用.脚本下载地址链接:https://pan.baidu.com/s/1X8WqJ7BUsnwWT2A-UOYYOA
提取码:a5o7
将脚本放到 /usr/lib/zabbix/alertscripts 目录下
可以在/etc/zabbix/zabbix-server.conf文件下找到脚本的路径,用到的命令是
[root@zabbix-server /usr/lib/zabbix/alertscripts]# egrep -v '^$|#' /etc/zabbix/zabbix_server.conf |grep scripts
AlertScriptsPath=/usr/lib/zabbix/alertscripts
添加执行权限
[root@zabbix-server /usr/lib/zabbix/alertscripts]# chmod +x weixin.py
[root@zabbix-server /usr/lib/zabbix/alertscripts]# ll
total 4
-rwxr-xr-x 1 root root 1344 Jul  9 10:55 weixin.py
尝试发送微信消息
[root@m01 ~]# python weixin.py
Traceback (most recent call last):
  File "weixin.py", line 7, in
    import requests
ImportError: No module named requests
我这里是找了一台新的机器测试发送的,不用在意路径。尝试运行脚本却提示缺少requests库
安装缺少的库
[root@m01 ~]# yum install -y python2-pip
[root@m01 ~]# pip install   requests
再次尝试发送
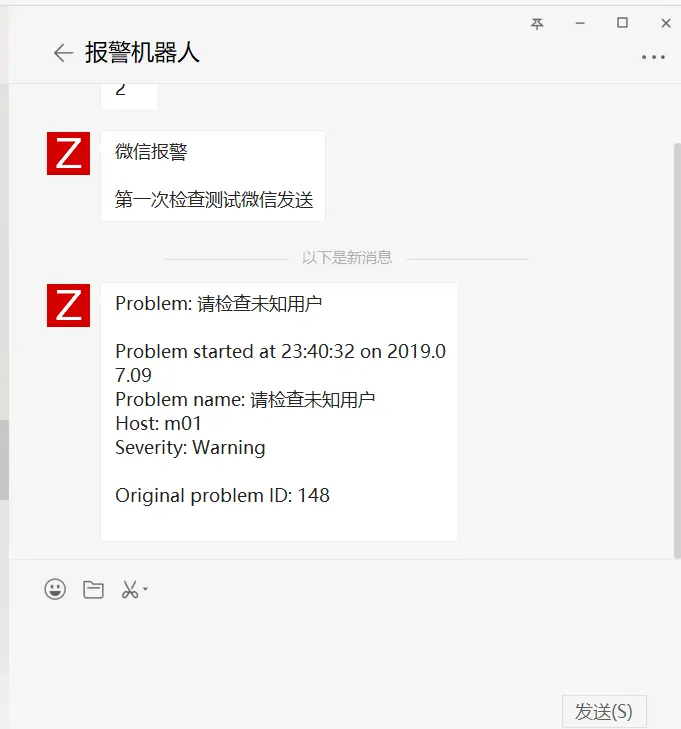
[root@m01 ~]# python weixin.py GeBangfeng '微信报警' '第一次检查测试微信发送'
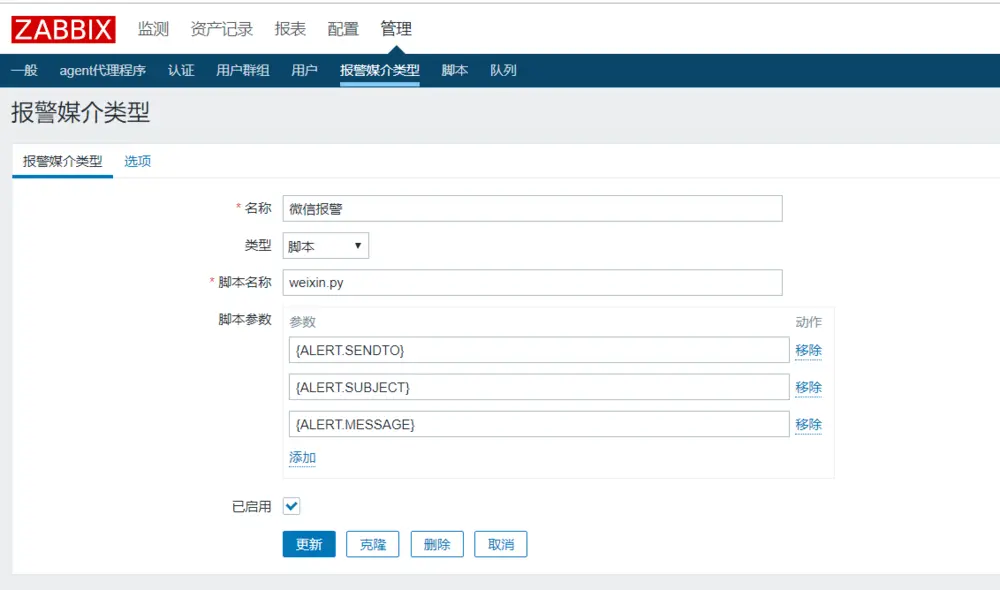
zabbix-web上面添加发送者
{ALERT.SENDTO}, {ALERT.SUBJECT} and {ALERT.MESSAGE}, 这是三个变量分别代表,收件人标题,主机名。不能乱循序
添加微信报警接收者
触发报警,就可以收到了
监控一台服务器主机
10.0.0.7 zabbix-agent
a:安装zabbix-agent
rpm -ivh https://mirrors.tuna.tsinghua.edu.cn/zabbix/zabbix/3.0/rhel/7/x86_64/zabbix-agent-3.0.24-1.el7.x86_64.rpm
b:配置zabbix-agent
vim /etc/zabbix/zabbix_agentd.conf
95行:Server=10.0.0.71
c:启动zabbix-agent
systemctl start zabbix-agent.service
systemctl enable zabbix-agent.service
d:再zabbix-web上面添加监控主机
添加自定义监控项
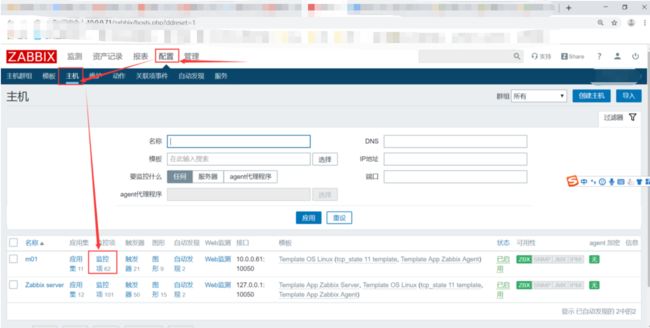
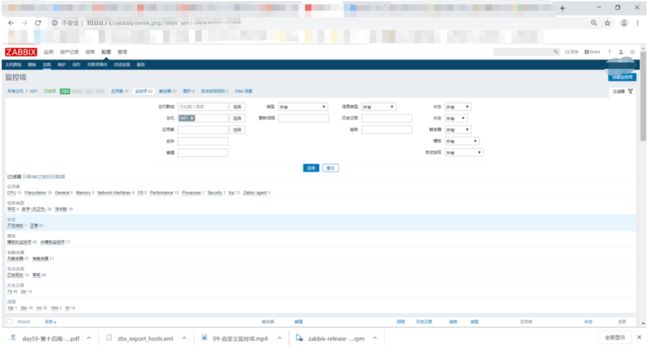
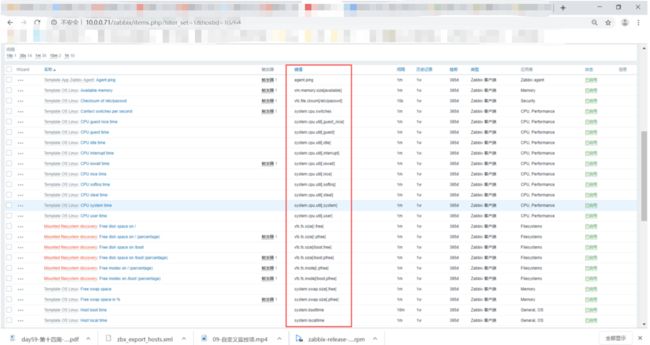
查看已经存在的监控项
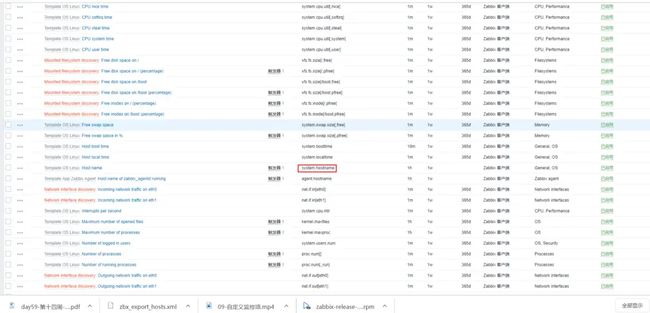
这里就是zabbix自带的一些监控项,图中圈起来的就是一些键值(key).键值就是zabbix用于监控的类式余脚本的东西。我们可以尝试取下键的值。
安装zabbix-get
yum install -y zabbix-get
尝试取值
[root@zabbix-server /etc/zabbix/zabbix_agentd.d]# zabbix_get -s 127.0.0.1 -p 10050 -k system.hostname
zabbix-server
安装之后命令是zabbix_get ,参数-s 为要取值的ip -p 为端口 -k为要取的值
这些值都是zabbix-agent来取的。
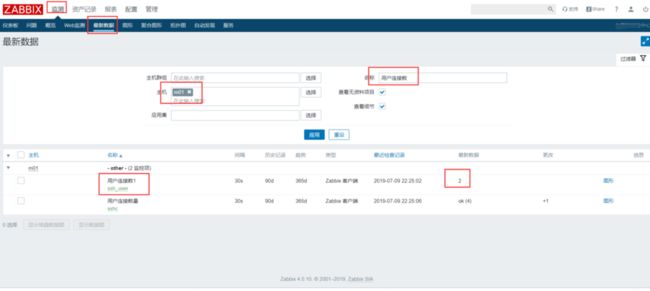
取出用户连接数
[root@m01 ~]# who
root     pts/0        2019-07-09 22:09 (10.0.0.1)
root     pts/6        2019-07-09 14:44 (10.0.0.1)
[root@m01 ~]# who|wc -l
2
设置自定义key
格式为:UserParameter=, 。因为zabbix-agend 是用来取值的,所以把自定义key放到它的配置文件里
[root@m01 ~]# grep '^User' /etc/zabbix/zabbix_agentd.conf
UserParameter=tps,iostat|awk '/^sda/{print $2}'
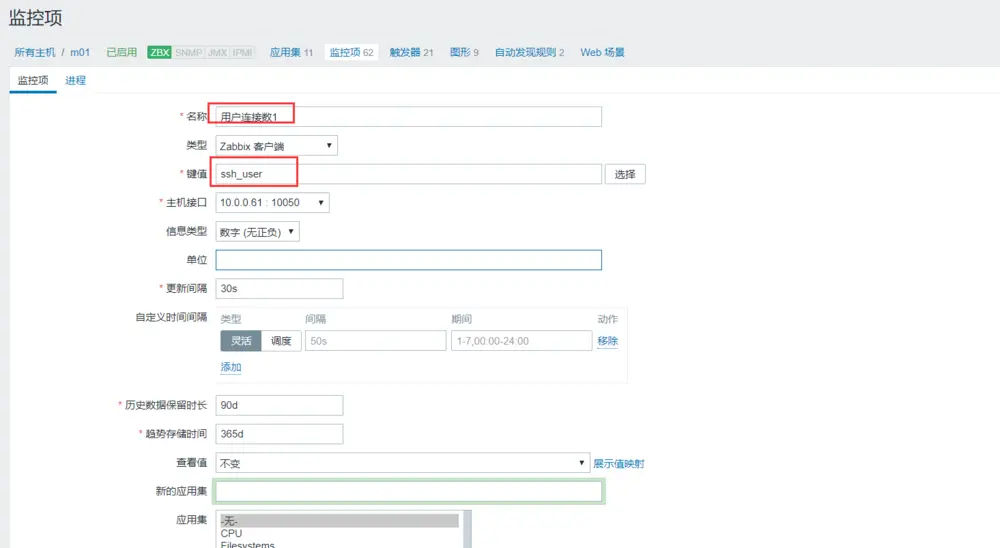
UserParameter=ssh_user,who|wc -l
[root@ m01/etc/zabbix]# systemctl restart zabbix-agent.service
修改了配置文件记得重启
zabbix-get测试取值。
[root@zabbix-server ~]# zabbix_get -s 10.0.0.61 -k ssh_user
2
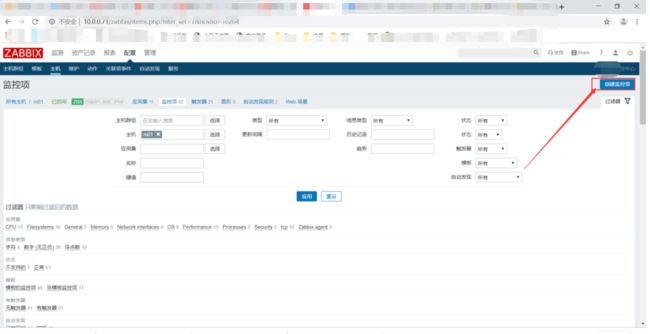
命令行测试没问题,去web界面添加自定义监控
添加自定义监控
zabbix自带的监控项满足不了我们需求
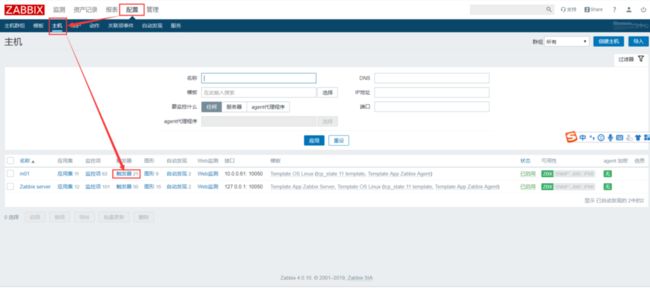
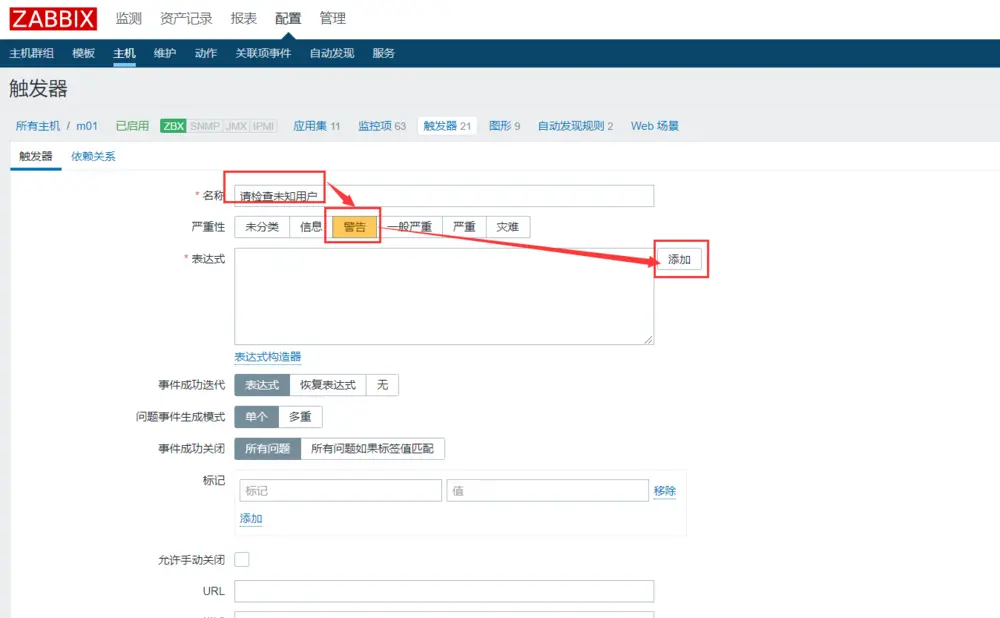
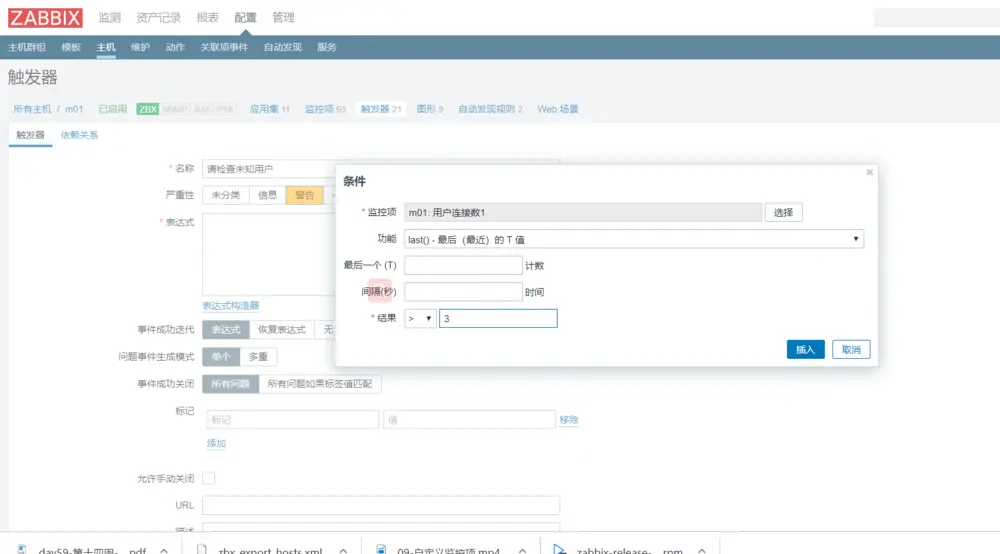
添加自定义触发器
触发监控
多开几个窗口
[root@m01 ~]# who
root     pts/0        2019-07-09 22:09 (10.0.0.1)
root     pts/1        2019-07-09 22:33 (10.0.0.1)
root     pts/2        2019-07-09 22:34 (10.0.0.1)
root     pts/6        2019-07-09 14:44 (10.0.0.1)
[root@m01 ~]# who|wc -l
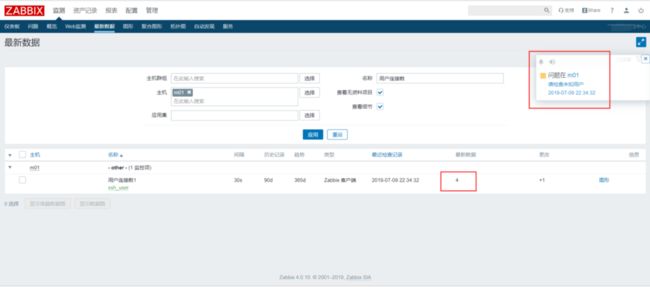
4
自定义触发器的时候选择的大于4个就报警。
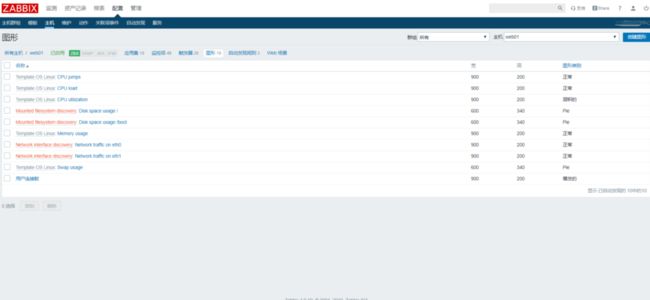
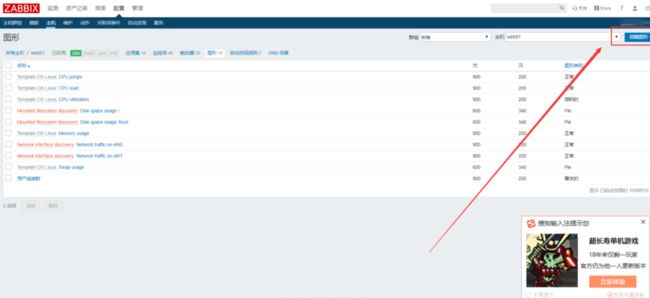
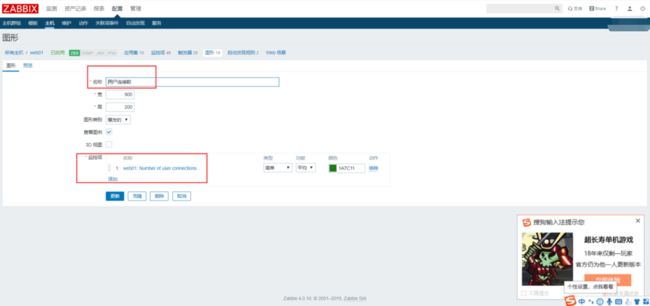
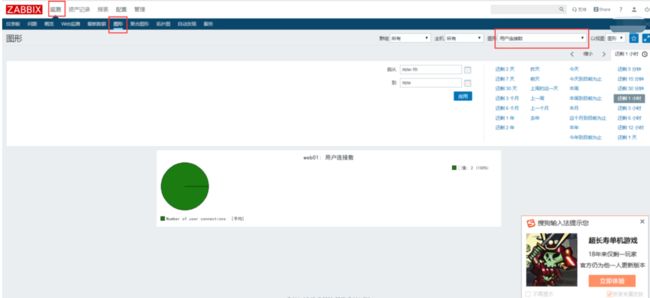
zabbix自定义图形
zabbix图形文字的乱码问题
这是因为我们web界面现在设置的是中文,而zabbix用的默认是英文的字符集,所以中文乱码了。
找到zabbix的站点目录
[root@zabbix-server ~]# vim /etc/httpd/conf.d/zabbix.conf
Alias /zabbix Alias /zabbix /usr/share/zabbix
[root@zabbix-server ~]# cd /usr/share/zabbix
[root@zabbix-server /usr/share/zabbix]# cd assets/fonts/
[root@zabbix-server /usr/share/zabbix/assets/fonts]# ls
graphfont.ttf
找到字体后替换他即可,在windows C:\Windows\Fonts 目录下有大量的字体。
自定义图像(利用grafana软件)
查看已经存在的图形
自定义图像
zabbix上面的图形比较难看,一般使用grafana 出图 grafana官网,因为是国外的网站下载比较慢,所以我们也可以去清华源下载,清华源
安装granfana
[root@zabbix-server ~]# ls
anaconda-ks.cfg  grafana-5.4.2-1.x86_64.rpm
[root@zabbix-server ~]# rpm -ivh grafana-5.4.2-1.x86_64.rpm
warning: grafana-5.4.2-1.x86_64.rpm: Header V4 RSA/SHA1 Signature, key ID 24098cb6: NOKEY
error: Failed dependencies:
    fontconfig is needed by grafana-5.4.2-1.x86_64
    urw-fonts is needed by grafana-5.4.2-1.x86_64
[root@zabbix-server ~]# yum localinstall grafana-5.4.2-1.x86_64.rpm
很多时候我们直接装rpm包装不上,这是因为他依赖太多包导致的,我们可以使用yum解决依赖
启动granfana
[root@zabbix-server ~]# systemctl start grafana-server
[root@zabbix-server ~]# systemctl enable grafana-server
Created symlink from /etc/systemd/system/multi-user.target.wants/grafana-server.service to /usr/lib/systemd/system/grafana-server.service.
[root@zabbix-server ~]# netstat -lntup|grep 3000
tcp6       0      0 :::3000                 :::*                    LISTEN      9735/grafana-server
这样就可以去浏览器访问了。默认3000端口
安装zabbix插件
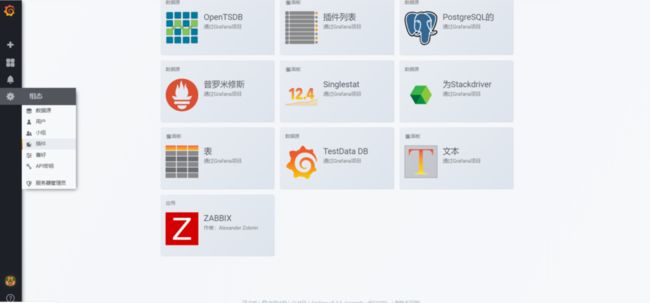
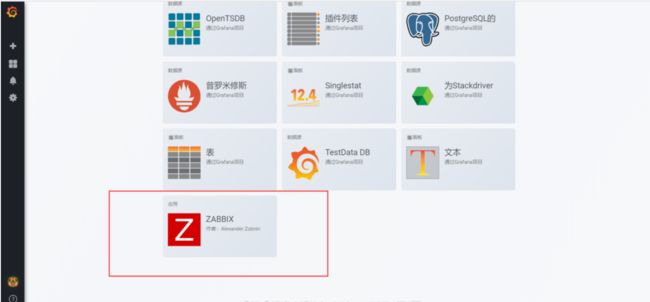
granfana默认不支持zabbix ,所以我们需要安装插件。官方参考文档
grafana-cli plugins list-remote  #列出所有插件
[root@zabbix-server ~]# grafana-cli plugins list-remote|grep zabbix
id: alexanderzobnin-zabbix-app version: 3.10.2
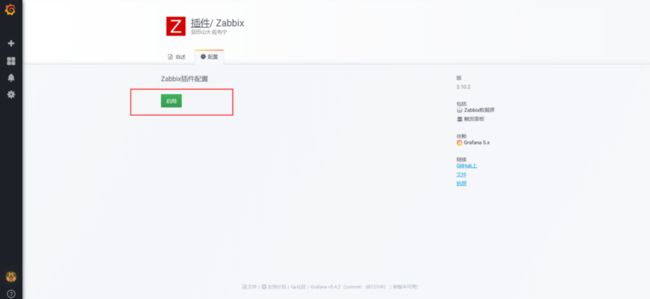
[root@zabbix-server ~]# grafana-cli plugins install alexanderzobnin-zabbix-app #安装zabbix 插件
[root@zabbix-server ~]# service grafana-server restart
Restarting grafana-server (via systemctl):                 [  OK  ]
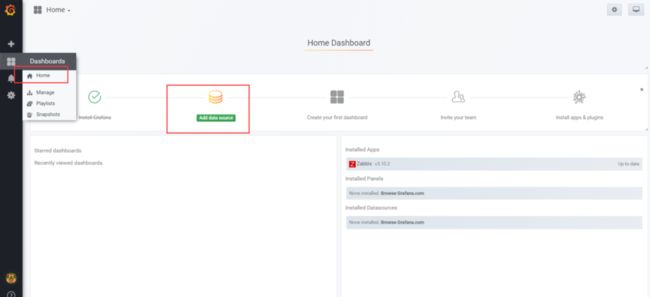
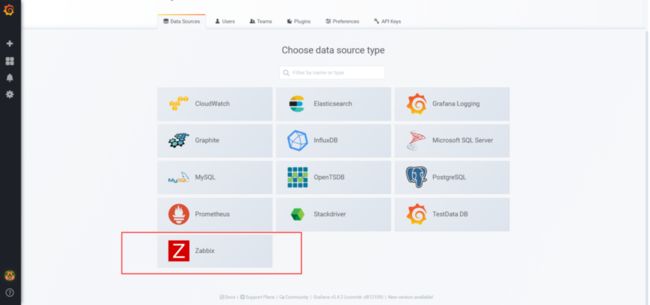
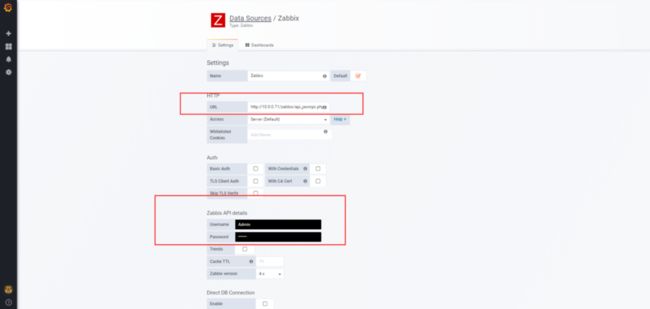
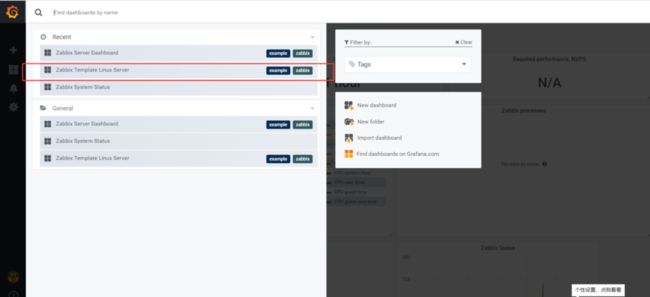
简单配置
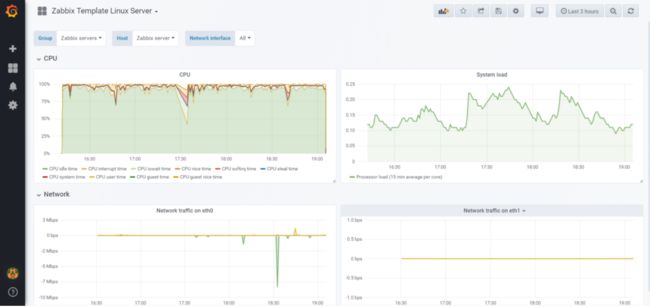
[外链图片转存失败,源站可能有防盗链机制,建议将图片保存下来直接上传(img-92c2b4lZ-1576224396251)(https://upload-images.jianshu.io/upload_images/16953283-f89c425322573c44.png?imageMogr2/auto-orient/strip%7CimageView2/2/w/1240)]
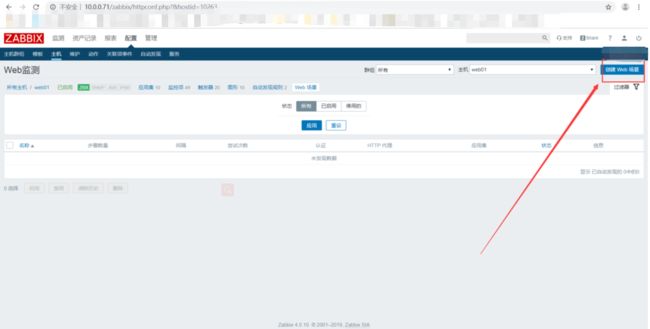
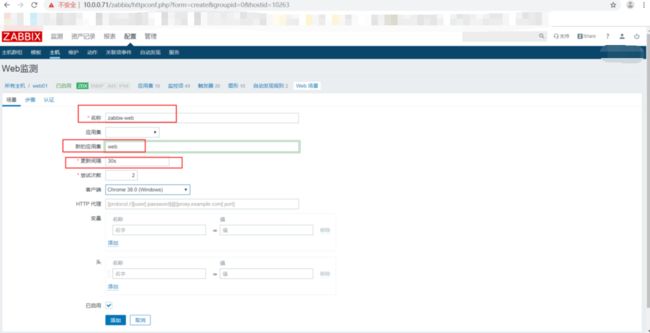
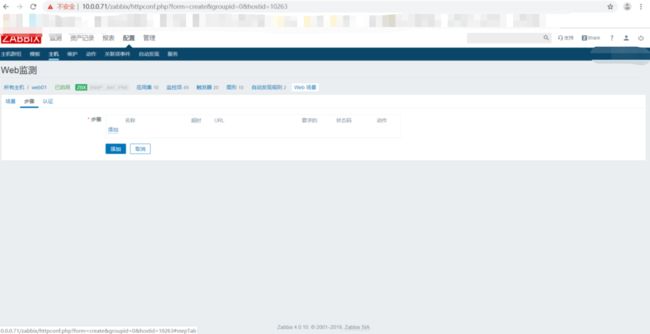
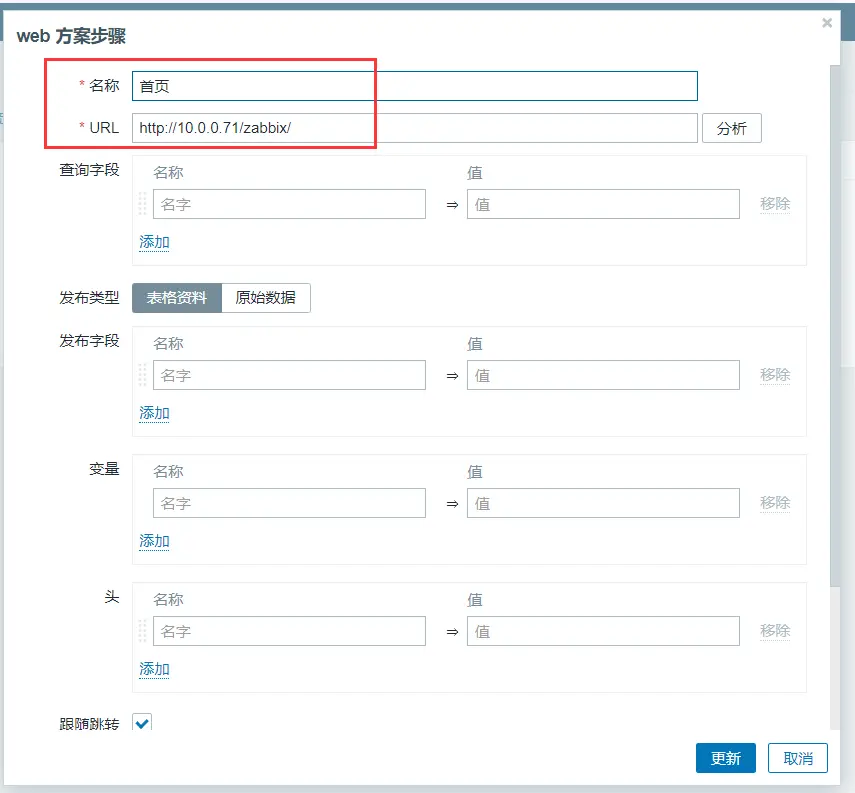
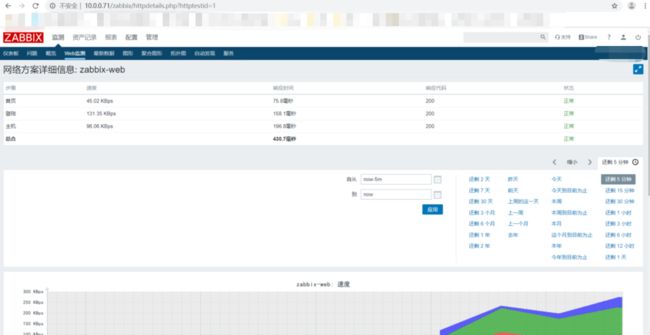
zabbix web监测
什么是cookie 和session
cookie:指某些网站为了辨别用户身份、进行 session 跟踪而储存在用户本地终端上的数据 存放在客户端
session: 是服务器记录用户登录信息的,用户登录网址后会生成一个 session id ,存放在服务器内,使整个用户会话中一直存在下去
curl 命令模拟登录网站
安装apache 方便查看登录模拟过程
[root@web01 ~]# yum install -y httpd
[root@web01 ~]# systemctl start httpd
访问网站,生成sessid
[root@web01 ~]# cd /var/www/html/
[root@web01 /var/www/html]# curl -b cookil -c cookil http://10.0.0.71/zabbix/ >index.html
[root@web01 /var/www/html]# cat cookil   ##可以看到有了一个sessid
# Netscape HTTP Cookie File
# http://curl.haxx.se/docs/http-cookies.html
# This file was generated by libcurl! Edit at your own risk.

#HttpOnly_10.0.0.71 FALSE   /zabbix/    FALSE   0   PHPSESSID   sqivdr4jpfn6c2bohre1ipfs33
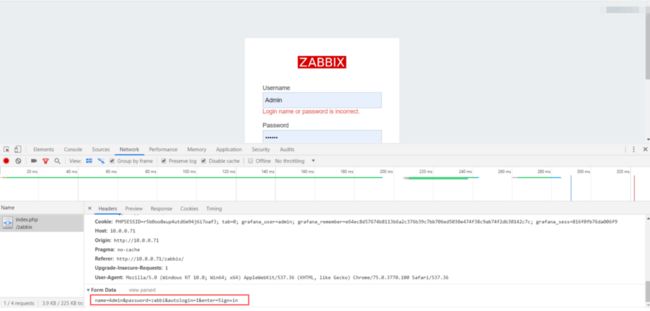
浏览器真实登录一次查看post请求发送的数据,
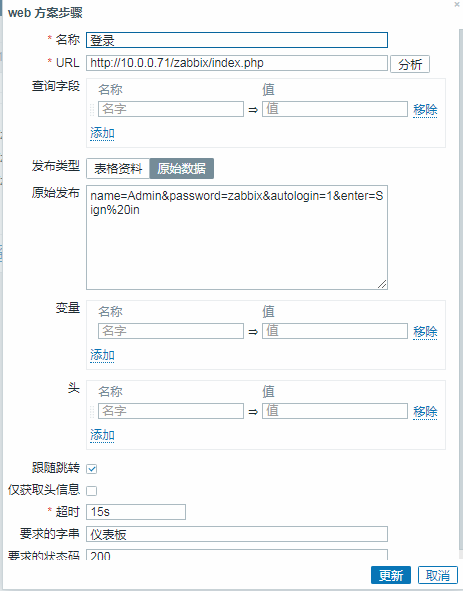
故意把密码输错。可以看到登陆的时候就是发送的请求数据为:name=Admin&password=zabbi&autologin=1&enter=Sign+in
修改密码为正常的,命令行去模拟登录
curl 模拟数据请求
[root@web01 /var/www/html]# curl -L -b cookil -c cookil -d 'name=Admin&password=zabbix&autologinin' 'http://10.0.0.71/zabbix/' >loging.html
验证登录
正常情况下我们登录一个网站后的一个页面,没有登录的时候是访问不了的,我们取一个登录后的页面访问下如果可以访问说明登录成功
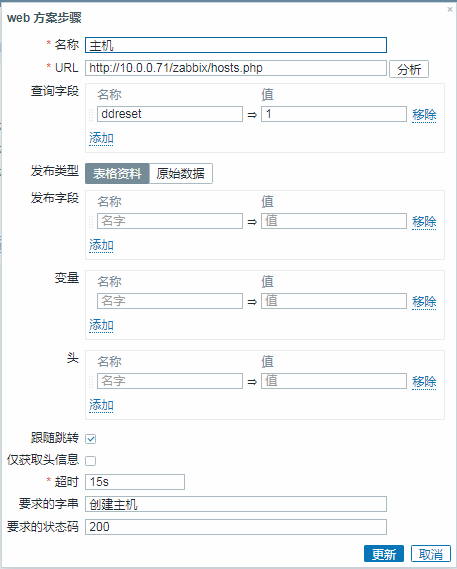
[root@web01 /var/www/html]# curl -b cookil -c cookil http://10.0.0.71/zabbix/hosts.php?ddreset=1 >host.html
  % Total    % Received % Xferd  Average Speed   Time    Time     Time  Current
                                 Dload  Upload   Total   Spent    Left  Speed
100 19336    0 19336    0     0  59009      0 --:--:-- --:--:-- --:--:-- 59131
这样就说明登录成功了
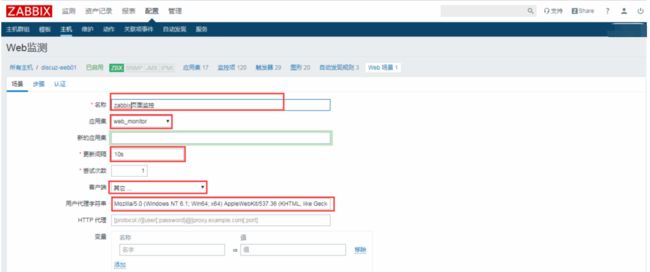
web 监测
自定义触发器
[外链图片转存失败,源站可能有防盗链机制,建议将图片保存下来直接上传(img-JN0UOldQ-1576224396260)(https://upload-images.jianshu.io/upload_images/16953283-b89be5fe48354d6e.png?imageMogr2/auto-orient/strip%7CimageView2/2/w/1240)]
ZABBIX模板的使用
模板的好处
模板利用快速可以添加监控点的项
模板可以分享
文章中用到的模板网盘连接
链接:https
://pan.baidu.com/s/1PPjiK1kEbSOiT9WquERVTQ提取码:0yw8
ZABBIX模板的使用思路
1)开启监控页面
2)导入模板
3)上传配置文件到ZABBIX剂目录下,上传脚本到指定目录
4)ZABBIX-得到取值测试
5)链接模板
根据tcp的11种状态
命令行测试命令
[root@web01 /etc/zabbix/zabbix_agentd.d]# netstat -ant|grep -c 'LISTEN'
7
对于循环生成配置文件
[root@web01 /etc/zabbix/zabbix_agentd.d]# cat a.txt
LISTEN
SYN-SENT
SYN-RECEIVED
ESTABLISHED
FIN-WAIT-1
FIN-WAIT-2
CLOSE-WAIT
CLOSING
LAST-ACK
TIME-WAIT
CLOSED
[root@web01 /etc/zabbix/zabbix_agentd.d]# for n in `cat a.txt`; do echo "UserParameter=$n,netstat -antp|grep -c '$n'" >>tcp.conf; done
[root@web01 /etc/zabbix/zabbix_agentd.d]# cat tcp.conf
UserParameter=LISTEN,netstat -antp|grep -c 'LISTEN'
UserParameter=SYN-SENT,netstat -antp|grep -c 'SYN-SENT'
UserParameter=SYN-RECEIVED,netstat -antp|grep -c 'SYN-RECEIVED'
UserParameter=ESTABLISHED,netstat -antp|grep -c 'ESTABLISHED'
UserParameter=FIN-WAIT-1,netstat -antp|grep -c 'FIN-WAIT-1'
UserParameter=FIN-WAIT-2,netstat -antp|grep -c 'FIN-WAIT-2'
UserParameter=CLOSE-WAIT,netstat -antp|grep -c 'CLOSE-WAIT'
UserParameter=CLOSING,netstat -antp|grep -c 'CLOSING'
UserParameter=LAST-ACK,netstat -antp|grep -c 'LAST-ACK'
UserParameter=TIME-WAIT,netstat -antp|grep -c 'TIME-WAIT'
UserParameter=CLOSED,netstat -antp|grep -c 'CLOSED
重启ZABBIX
systemctl restart zabbix-agent.service
zabbix_get取值测试
[root@zabbix-server ~]# zabbix_get -s 10.0.0.7 -k LISTEN
(Not all processes could be identified, non-owned process info
 will not be shown, you would have to be root to see it all.)
7
这里的故障是自定义的key中加入了-p参数,-p只有root可以使用
去掉-p之后测试成功
[root@zabbix-server ~]# zabbix_get -s 10.0.0.7 -k LISTEN
7
zabbix的Web界面创建模板
nginx的模板
nginx的模板主要用于监控的nginx的状态
开启监控页面
[root@web01 ~]# vim /etc/nginx/conf.d/www.conf
server {
    listen       80;
    server_name  localhost;
        root   /app/www;
    location / {
        index index.php index.html index.htm;
    }
    location  /nginx_status {
    stub_status;
       allow 127.0.0.1;
       allow 10.0.0.1;
       deny all;
}
       location ~ \.php$ {
        fastcgi_pass   127.0.0.1:9000;
        fastcgi_index  index.php;
        fastcgi_param  SCRIPT_FILENAME $document_root$fastcgi_script_name;
        include        fastcgi_params;
    }

}
[root@web01 ~]# systemctl restart nginx
[root@web01 ~]# curl 10.0.0.7/nginx_status
Active connections: 1
server accepts handled requests
 1 1 1
Reading: 0 Writing: 1 Waiting: 0
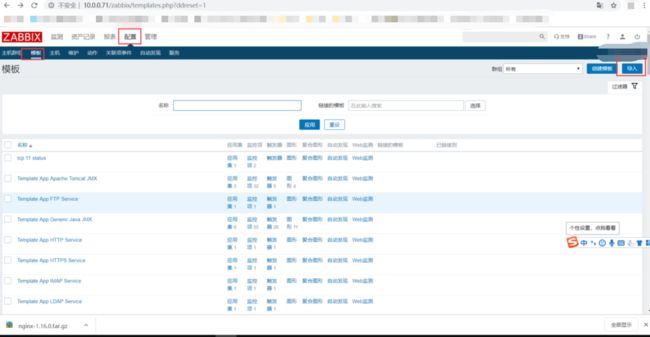
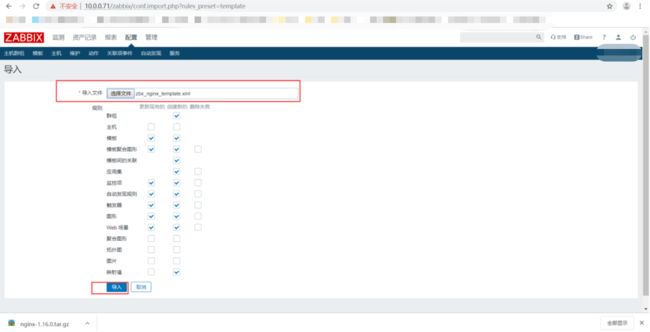
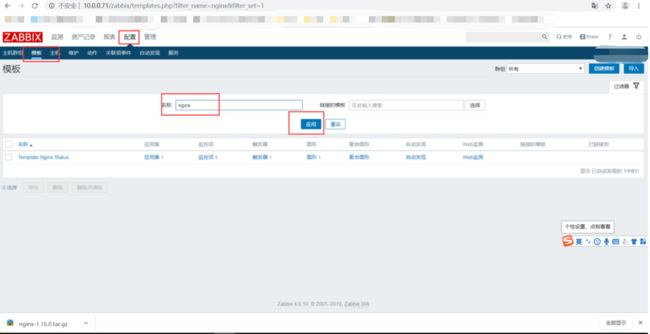
导入模板
上传脚本到特定目录
[root@web01 ~]# ls
anaconda-ks.cfg  nginx.zip
[root@web01 ~]# unzip nginx.zip
Archive:  nginx.zip
  inflating: nginx/nginx.conf
  inflating: nginx/nginx_monitor.sh
  inflating: nginx/zbx_nginx_template.xml
[root@web01 ~]# cd nginx/
[root@web01 ~/nginx]# ls
nginx.conf  nginx_monitor.sh  zbx_nginx_template.xml
[root@web01 ~/nginx]# mkdir -p  /server/scripts/
[root@web01 ~/nginx]# mv nginx_monitor.sh /server/scripts/
[root@web01 ~/nginx]# cd /server/scripts/
[root@web01 /server/scripts]# ls
nginx_monitor.sh
[root@web01 /server/scripts]# chmod +x nginx_monitor.sh
[root@web01 /server/scripts]# ll
total 4
-rwxr-xr-x 1 root root 1231 Jul 10 09:38 nginx_monitor.sh
上传nginx key的配置文件到指定目录
[root@web01 ~/nginx]# mv nginx.conf /etc/zabbix/zabbix_agentd.d/
[root@web01 ~/nginx]# cd /etc/zabbix/zabbix_agentd.d/
[root@web01 /etc/zabbix/zabbix_agentd.d]# ls
a.txt  cookil  nginx.conf  tcp.conf  userparameter_mysql.conf
[root@web01 /etc/zabbix/zabbix_agentd.d]# cat nginx.conf
UserParameter=nginx_status[*],/bin/bash /server/scripts/nginx_monitor.sh $1
[root@web01 /etc/zabbix/zabbix_agentd.d]# systemctl restart zabbix-agent.service
zabbix_get测试取值
[root@zabbix-server ~]# zabbix_get -s 10.0.0.7 -k nginx_status[accepts]
发现执行键取不到值,尝试去直接执行脚本
[root@web01 /server/scripts]# sh nginx_monitor.sh accepts
通过查看脚本得知。查看状态的网址不对,修改为正确后测试
[root@web01 /server/scripts]# sh  nginx_monitor.sh accepts
10
执行脚本可以取到值了,尝试去执行关键
[root@zabbix-server /server/scripts]# zabbix_get -s 10.0.0.7 -k nginx_status[accepts]
rm: cannot remove ‘/tmp/nginx_status.txt’: Operation not permitted
10
这时候出现报错,原因是执行zabbix_get取值是以zabbix身份去执行,刚才执行脚本是以root身份执行了,root执行时创建的一个文件zabbix用户删除不掉。自己删除这个文件解决
[root@web01 /server/scripts]# rm -rf /tmp/nginx_status.txt
删除后测试成功
[root@zabbix-server /server/scripts]# zabbix_get -s 10.0.0.7 -k nginx_status[accepts]
11
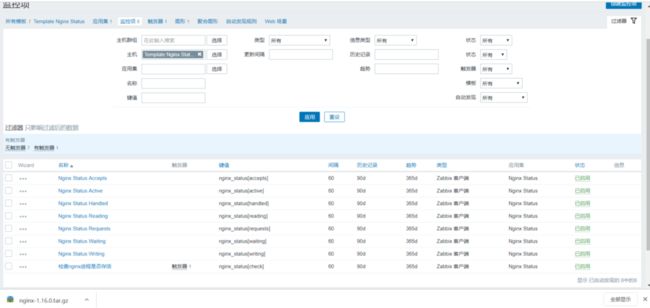
连接模板、检查取值状态
PHP模板
开启PHP监控页面
[root@web01 ~]# vim /etc/php-fpm.d/www.conf
;pm.status_path = /status
修改为
pm.status_path = /php_status
[root@web01 ~]# vim /etc/nginx/conf.d/www.conf
server {
    listen       80;
    server_name  localhost;
        root   /app/www;
    location / {
        index index.php index.html index.htm;
    }
    location  /nginx_status {
    stub_status;
}
    location /php_status {
         fastcgi_pass   127.0.0.1:9000;
        fastcgi_index  index.php;
        fastcgi_param  SCRIPT_FILENAME $document_root$fastcgi_script_name;
        include        fastcgi_params;

}
}
[root@web01 ~]# systemctl restart php-fpm
[root@web01 ~]# systemctl restart nginx
[root@web01 ~]# curl 10.0.0.7/php_status
pool:                 www
process manager:      dynamic
start time:           14/Jul/2019:12:45:53 +0800
start since:          258
accepted conn:        2
listen queue:         0
max listen queue:     0
listen queue len:     128
idle processes:       4
active processes:     1
total processes:      5
max active processes: 1
max children reached: 0
slow requests:        0
上传模板
上传脚本和配置文件
[root@web01 /server/scripts]# ls
fpm.sh            nginx_monitor.sh
[root@web01 /server/scripts]# chmod +x fpm.sh
[root@web01 /server/scripts]# cd /etc/zabbix/zabbix_agentd.d/
[root@web01 /etc/zabbix/zabbix_agentd.d]# vim fpm.conf
UserParameter=php-fpm[*],/server/scripts/fpm.sh "$1" "$2"
[root@web01 /etc/zabbix/zabbix_agentd.d]# systemctl restart zabbix-agent.service
zabbix_get取值测试
[root@zabbix-server /server/scripts]# zabbix_get -s 10.0.0.7 -k php-fpm["total processes",10.0.0.7/php_status]
5
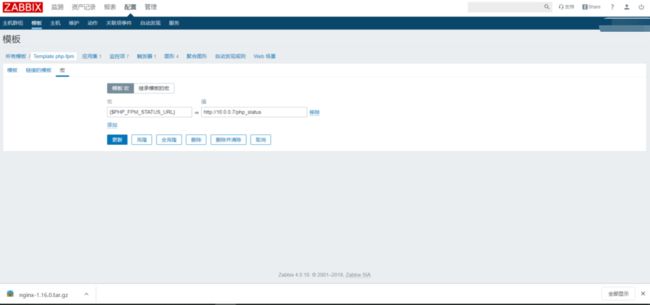
修改模板的宏,模板中的变量
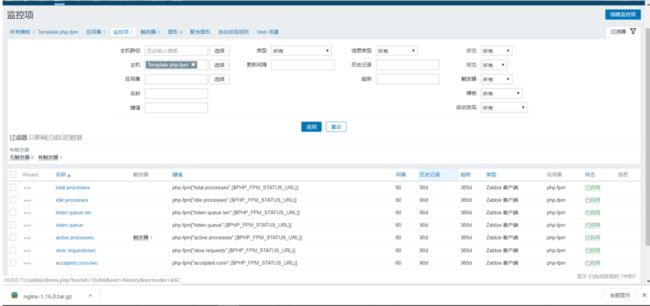
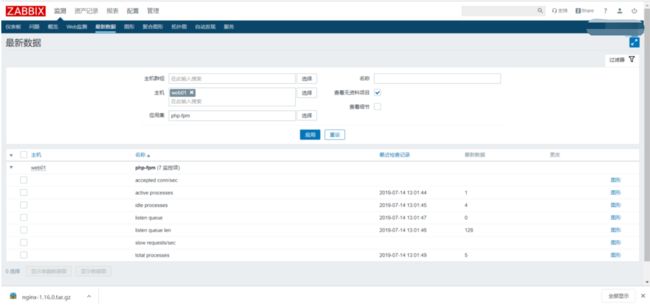
连接模板检查数据
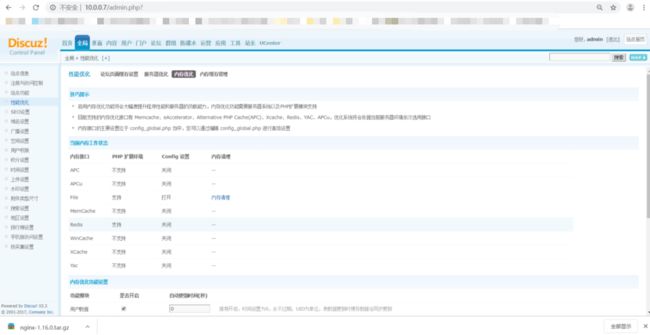
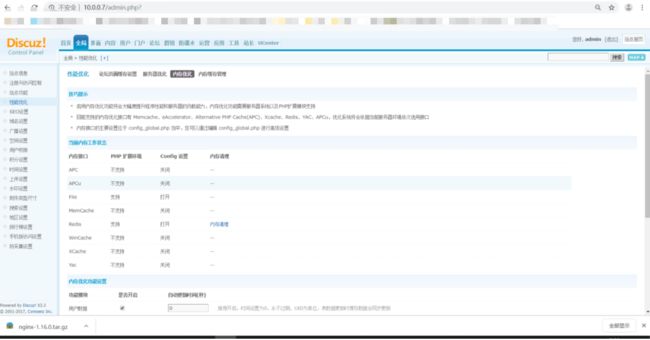
Discuz论坛开启redis加速
安装Redis的
[root@web01 /etc/zabbix/zabbix_agentd.d]# yum install -y redis
[root@web01 /etc/zabbix/zabbix_agentd.d]# systemctl start redis
[root@web01 /etc/zabbix/zabbix_agentd.d]# systemctl enable redis
Created symlink from /etc/systemd/system/multi-user.target.wants/redis.service to /usr/lib/systemd/system/redis.service.

[root@web01 /etc/zabbix/zabbix_agentd.d]# yum list |grep php|grep redis
php-nrk-Predis.noarch                   1.0.4-1.el7                    epel
php-pecl-redis.x86_64                   2.2.8-1.el7                    epel
php-phpiredis.x86_64                    1.0.0-2.el7                    epel
[root@web01 /etc/zabbix/zabbix_agentd.d]# yum install -y php-pecl-redis
systemctl restart php-fpm
开启Redis的加速
[root@web01 ~]# cd /app/www/
[root@web01 /app/www]# vim config/config_global.php
$_config['memory']['redis']['server'] = '127.0.0.1';
配置上的Redis的地址
redis模板
监控页面默认开启的,不用开了
上传模板
上传配置文件和脚本
[root@web01 /server/scripts]# ls
fpm.sh  nginx_monitor.sh  redis.sh
[root@web01 /server/scripts]# chmod +x redis.sh
[root@web01 /server/scripts]# ls
fpm.sh  nginx_monitor.sh  redis.sh
[root@web01 /server/scripts]# cd /etc/zabbix/zabbix_agentd.d/
[root@web01 /etc/zabbix/zabbix_agentd.d]# ls
a.txt  cookil  fpm.conf  nginx.conf  redis.conf  tcp.conf  userparameter_mysql.conf
[root@web01 /etc/zabbix/zabbix_agentd.d]# vim redis.conf
UserParameter=redis.discovery,/servers/cripts/redis.sh localhost list_key_space_db
UserParameter=redis[*],/server/scripts/redis.sh $1 $2 $3
[root@web01 /etc/zabbix/zabbix_agentd.d]# systemctl restart zabbix-agent.service
测试取值
[root@zabbix-server /server/scripts]# zabbix_get -s 10.0.0.7 -k redis[127.0.0.1,redis_git_sha1,none]
00000000
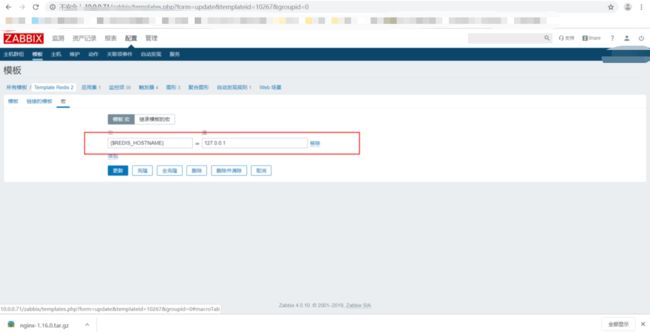
检查自定义宏
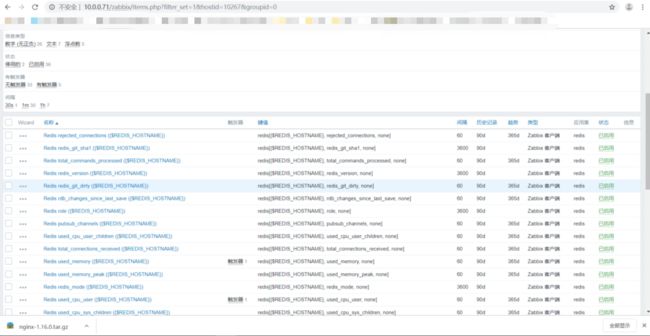
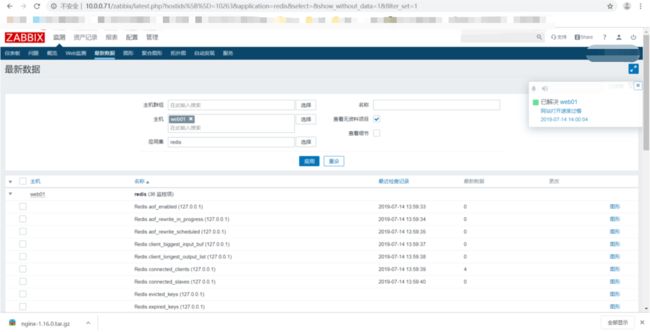
连接模板,检查最新数据
pv-uv-ip监控手段
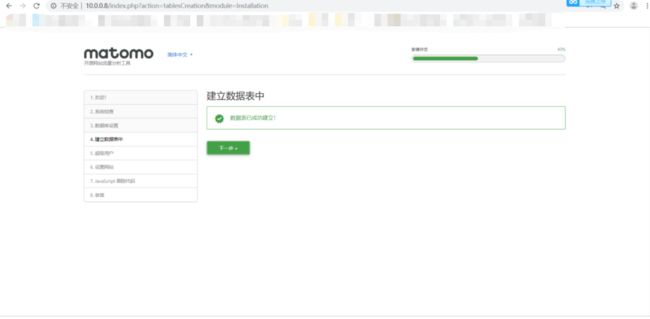
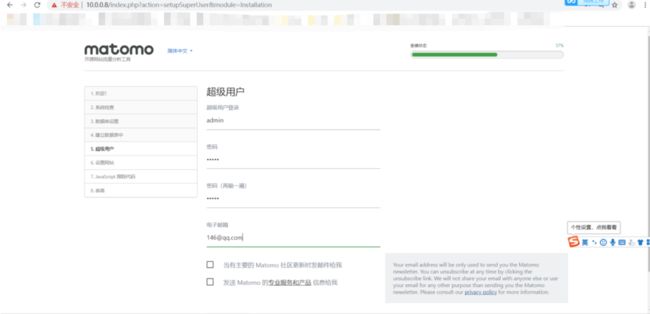
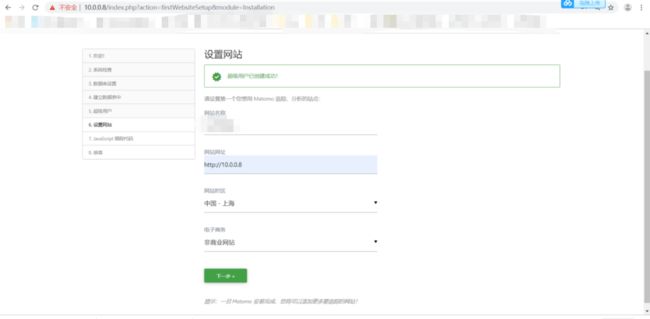
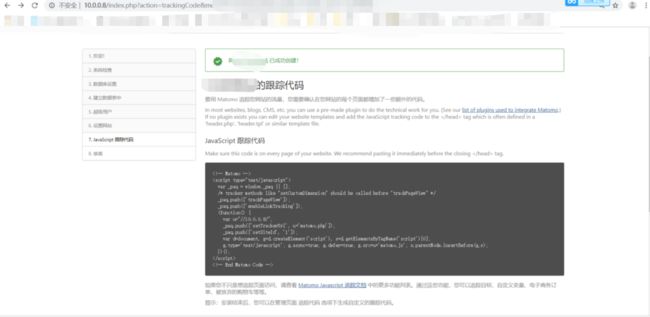
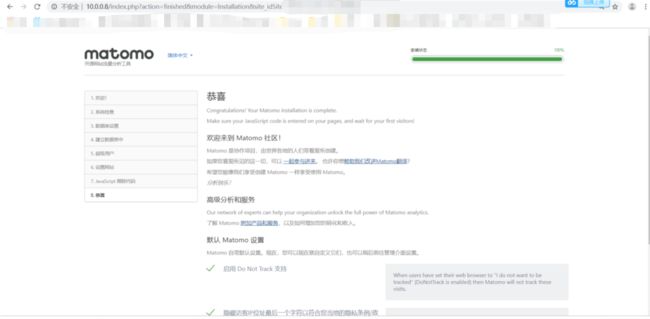
搭建matomo(piwik)–安装完成会提示需要将js代码放置到网站服务器的web相应界面中
yum install -y php-fpm nginx mariadb-serer
配置文件,放置代码,启动服务
页面安装,js代码放置到discuz网站–全局–站点信息–网站第三方统计代码
wordpress网站可以直接下载piwik插件,设置piwik的服务器url,以及wordpress的api填写到TOKEN令牌
AWstates软件
第三方统计(腾讯统计)
zabbix页面监控模拟登录
cookie 存储在浏览器
session 存储在服务器
用户第一次访问网站,会分配一个session_id,并将cookie存储在浏览器,将session存储在服务器;之后用户即可使用session_id重新访问页面;
登陆成功会在cookie中会新增token(令牌),下次用户登录即可不用输入密码登录
使用curl模拟用户登录
systemctl stop nginx
yum install -y httpd
systemctl start httpd
进入apache默认站点目录/var/www/html
[root@welkin html]# curl --help|grep cookie
 -b, --cookie STRING/FILE  String or file to read cookies from (H)
 -c, --cookie-jar FILE  Write cookies to this file after operation (H)
 -j, --junk-session-cookies Ignore session cookies read from file (H)


[root@welkin html]# curl -b cookie -c cookie http://10.0.0.71/zabbix/index.php				--模拟访问(会在当前目录生成cookie文件)
[root@welkin html]# curl -b cookie -c cookie http://10.0.0.71/zabbix/index.php >index.html		将访问信息输出到html文件
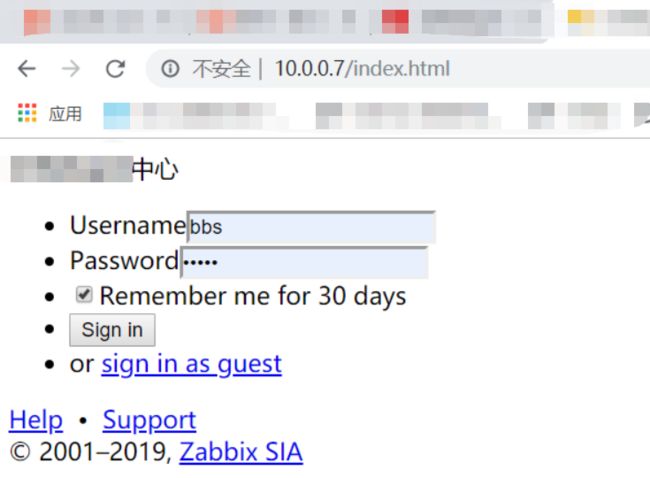
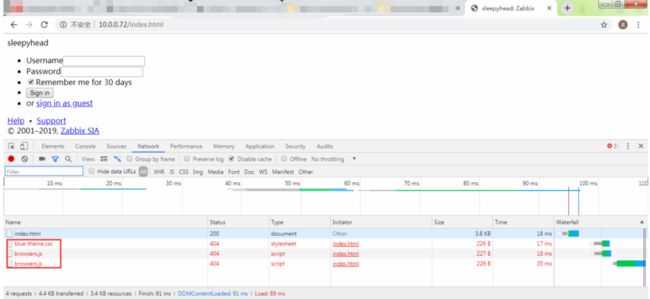
浏览器访问10.0.0.72/index.html--显示登录页面
创建目录
[root@welkin html]# mkdir assets/10am2h0/styles   -p
将10.0.0.71的文件下载到10.0.72
[root@welkin html]# wget -O assets/10am2h0/styles/blue-theme.css  http://10.0.0.71/zabbix/assets/10am2h0/styles/blue-theme.css
10.0.0.72再次访问(使用正确密码)
[root@welkin html]# curl -L -X POST -d "name=Admin&password=zabbix&autologin=1&enter=%E7%99%BB%E5%BD%95" [http://10.0.0.71/zabbix/index.php](http://10.0.0.71/zabbix/index.php) >login.html

-L 收取跳转信息

-X 指定请求方法

[root@welkin html]# curl -b cookie -c cookie -L -X POST -d "name=Admin&password=zabbix&autologin=1&enter=Sign+in" http://10.0.0.71/zabbix/index.php > login.html
浏览器访问10.0.0.72/index.html–显示登录页面
测试其他页面
[root@welkin html]# curl -b cookie -c cookie -L "http://10.0.0.71/zabbix/report2.php?ddreset=1" > test.html
由此,批量创建监控项,获取到页面数据,批量创建.
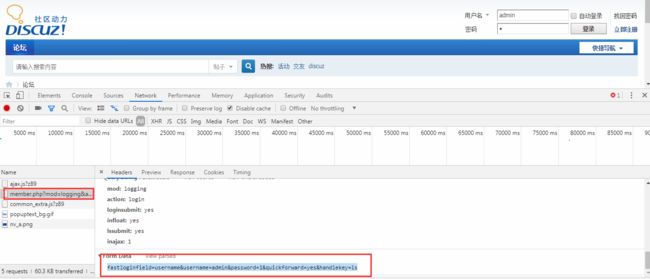
discuz测试登录
关闭验证码验证–[管理中心]–[防灌水]–[验证设置]
[root@welkin html]# curl -b cookie -c cookie http://10.0.0.7/forum.php >index.html
[root@welkin html]# curl -b cookie -c cookie -L -X POST -d "fastloginfield=username&username=admin&password=123456&quickforward=yes&handlekey=ls" "http://10.0.0.7/member.php?mod=logging&action=login&loginsubmit=yes&infloat=yes&lssubmit=yes&inajax=1" > login.html
zabbix页面监控
解决zabbix页面字体无法显示问题
[root@zabbix-server fonts]# cd /usr/share/zabbix/assets/fonts
上传字体
[root@zabbix-server fonts]# mv STXINWEI.TTF graphfont.ttf
percona监控mysql
[root@zabbix-server ~]# cd /var/lib/zabbix/percona/
[root@zabbix-server percona]# ll
total 0
drwxr-xr-x 2 root root 70 Jun  4 17:27 scripts
drwxr-xr-x 2 root root 79 Jun  4 16:43 templates
[root@zabbix-server percona]# tree
.
├── scripts
│?? ├── get_mysql_stats_wrapper.sh
│?? └── ss_get_mysql_stats.php
└── templates
    └── zabbix_agent_template_percona_mysql_server_ht_2.0.9-sver1.1.8.xml
![]()
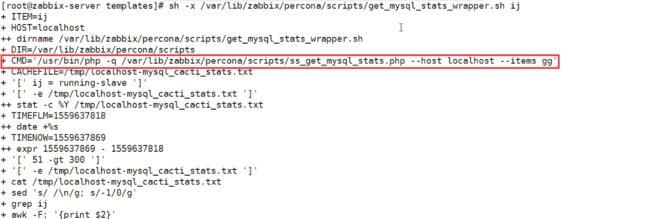
查看配置文件执行的脚本
提示数据库密码错误
修改数据库用户名密码
脚本设置缓存小于300删除以下文件,但执行角色为zabbix,可手动删除或授权
zabbix升级
配置zabbix清华源3.0源
[root@welkin html]# wget https://mirrors.tuna.tsinghua.edu.cn/zabbix/zabbix/3.0/rhel/7/x86_64/zabbix-release-3.0-1.el7.noarch.rpm
[root@welkin ~]# rpm -ivh zabbix-release-3.0-1.el7.noarch.rpm(替换源文件为清华源)
[root@welkin ~]# yum install -y zabbix-server-mysql zabbix-web-mysql httpd mariadb-serer
[root@welkin ~]# systemc start mariadb
[root@welkin ~]# systemc enable mariadb
[root@welkin ~]# mysql_secure_installation
创建zabbix数据库–zabbix
MariaDB [(none)]> create database zabbix character set utf8 collate utf8_bin;
创建数据库管理用户
MariaDB [(none)]> grant all privileges on zabbix.* to zabbix@localhost identified by 'zabbix';
导入zabbix表结构和初始数据以及模块
...
/usr/share/doc/zabbix-server-mysql-3.0.28/create.sql.gz
[root@welkin ~]# zcat /usr/share/doc/zabbix-server-mysql-*/create.sql.gz |mysql -uzabbix -pzabbix zabbix
软件配置
[root@zabbix-server ~]# vim /etc/zabbix/zabbix_server.conf
DBPassword=zabbix
[root@zabbix-server ~]# vim /etc/httpd/conf.d/zabbix.conf
php_value date.timezone Asia/Shanghai

[root@welkin ~]# systemctl start httpd
[root@welkin ~]# systemctl enable httpd
[root@welkin yum.repos.d]# systemctl start zabbix-server.service
[root@welkin yum.repos.d]# systemctl enable zabbix-server.service
升级
[root@welkin yum.repos.d]# mysqldump -uroot -B  zabbix >/tmp/zabbix.sql
[root@welkin yum.repos.d]# rpm -e zabbix-release
[root@welkin tmp]# wget https://mirrors.tuna.tsinghua.edu.cn/zabbix/zabbix/4.0/rhel/7/x86_64/zabbix-release-4.0-1.el7.noarch.rpm
[root@welkin ~]#  systemctl stop zabbix-server.service
[root@welkin yum.repos.d]# rpm -ivh zabbix-release-4.0-1.el7.noarch.rpm
[root@welkin yum.repos.d]# yum clean all            +++++
[root@welkin yum.repos.d]# chown -R apache.apache /usr/share/zabbix/

[root@welkin ~]# cat /var/log/zabbix/zabbix_server.log
snmp监控window和Linux
snmp简单网络管理协议:用以监控网络设备,将每一个指标使用一个oid进行区别分类,oid集成为MIB库(分公有,私有),目前分v1,v2c,v3版本,端口默认为udp的163端口
例如: .1.3.6.1.2.1.1.1.0 获取系统基本信息 SysDesc GET
服务端:10.0.0.72
客户端10.0.0.71
服务端安装
配置community(安全配置项,默认为public)和监控项目
[root@welkin ~]# vim /etc/snmp/snmpd.conf
#       sec.name  source          community
com2sec notConfigUser  default       welkin
...
# Make at least  snmpwalk -v 1 localhost -c public system fast again.
#       name           incl/excl     subtree         mask(optional)
view    systemview    included   .1
view    systemview    included   .1.3.6.1.2.1.1
view    systemview    included   .1.3.6.1.2.1.25.1.1
客户端安装
[root@zabbix-server ~]# yum install -y net-snmp-utils
客户端从服务端取值
[root@zabbix-server ~]# snmpwalk -c welkin  -v2c 10.0.0.72 [oid]
zabbix链接模板
[配置]–[主机]
主机名称
设置群组(snmp)
使用snmp接口(默认为agent代理)–配置客户端地址
[模板]–(搜索linux)[Template OS Linux SNMPv2]
修改[宏]–[继承模板的宏]为之前修改的自定义community–welkin
将自动发现规则设置10s,系统会自动添加更多的监控项
zabbix-agent主动模式
[模板]–[选择模板全克隆(更改名称,后缀active区分)]–[批量更新]–[类型(zabbix-server端主动式)]
由于默认的模式是服务端主动取采集客户端数据,采集数据间隔至少一秒,浪费时间,所以设置客户端主动提供数据给服务端
修改客户端配置文件
Serve=10.0.0.71
ServerActive=10.0.0.71
Hostname=piwik ---------必须和页面设置的一致(服务器主机名建议修改一致)
(web界面创建的主机存储在数据库,客户端索取任务清单,zabbix获会从数据库取得监控主机名称和任务)
无zabbix-agent客户端的监控(zabbix-sender)–渣渣功能
客户端安装zabbix-sender
zabbix页面设置–监控项–设置监控项类型(zabbix采集器)
客户端使用命令:zabbix_sender -z 10.0.0.71(服务器) -s pwiki(客户端) -k test -o脚本采集数据
先执行脚本拿到结果,采集时直接发送结果。
效率高,麻烦(每一个监控项都需要手动写脚本取值)!
zabbix自动发现和自动注册
自动发现
配置自动发现规则和自动发现动作
[配置]–[自动发现]–[修改IP范围等自动发现规则]–[启用]
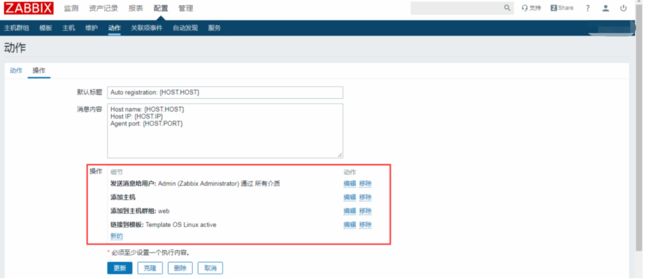
[配置]–[动作]–[事件源修改为自动发现]–[配置动作和操作(其中操作需要添加主机,其他监控项注意需要配置文件,按需配置)]
查看[监测]–[自动发现] /[配置]–[主机] 查看发现是否生效
自动注册
配置zabbix-agent
Server=10.0.0.71
ServerActive=10.0.0.71
Hostname=piwik --配置页面设置主机名
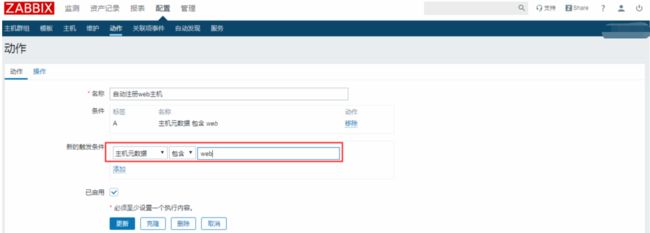
HostMetadata=web --配置元数据
配置主动注册的动作
[配置]–[动作]–[事件源-自动注册]
zabbix分布式监控proxy
10.0.0.71 zabbix服务端
10.0.0.72 zabbix代理端(开启内网网卡)
10.0.0.7 zabbix内网代理端(ip更改为172.16.1.7)
安装zabbix-proxy代理zabbix-server,在一个局域网收集数据,没有web界面,没有数据分析
安装zabbix-proxy
yum install zabbix-proxy-mysql -y
yum install mariadb-server -y
systemctl start mariadb
systemctl enable mariadb
mysql_secure_installation
create database zabbix_proxy character set utf8 collate utf8_bin;
grant all privileges on zabbix_proxy.* to zabbix@localhost identified by 'zabbix';
rpm -ql zabbix-proxy-mysql
zcat /usr/share/doc/zabbix-proxy-mysql*/schema.sql.gz | mysql -uzabbix -pzabbix zabbix_proxy
配置zabbix-proxy
vim /etc/zabbix/zabbix_proxy.conf
Server=10.0.0.71
Hostname=sh-proxy
DBHost=localhost
DBName=zabbix
DBUser=zabbix
DBPassword=zabbix
代理主机名称一致:hostnamectl set-hostname sh-proxy
systemctl start zabbix-proxy.service
systemctl enable zabbix-proxy.service
zabbix界面添加代理–管理–agent代理程序–创建代理–[sh-proxy]–重启代理查看效果
10.0.0.72 zabbix代理端(开启内网网卡)
cp eth0 eth1(修改ip地址为172.16.1.72,网卡设备名称eth1,删除网关)–>ifup eth110.0.0.7 zabbix内网代理端(ip更改为172.16.1.7)
更改为LAN区段,设置ip为172.16.1.7
安装zabbix-agent软件,修改配置文件
Server=172.16.1.72
ServerActive=172.16.1.72
Hostname=sh-web01
systemctl start zabbix-agent
zabbix页面创建主机
[创建主机]–[名称,IP地址,选择agent代理程序监测sh-proxy]–
[配置]–[动作]–[名称,新的触发条件(agent代理程序=sh-proxy)]
重启代理–systemctl restart zabbix-proxy.service
数据获取原理:在zabbix-web(zabbix-server)上创建主机–>zabbix-proxy(重启或默认1h读取监控主机)–>获取zabbix-agent监控项
zabbix监控jvm原理(tomcat resin )
配置jdk虚拟机和环境变量配置文件
Java Development Kit-----java开发环境(oracle官网下载或者选择openjdk linux开源)
[root@web02 tools]# ll
total 206220
-rw-r--r-- 1 root root   9128610 Oct  5  2015 apache-tomcat-8.0.27.tar.gz
-rw-r--r-- 1 root root 181238643 Oct  5  2015 jdk-8u60-linux-x64.tar.gz
-rw-r--r-- 1 root root  20797013 Mar  3  2017 jpress-web-newest.war
[root@web02 tools]# mkdir /application/
[root@web02 tools]# tar xf jdk-8u60-linux-x64.tar.gz
[root@web02 tools]# mv jdk1.8.0_60/ /application/
[root@web02 tools]# ln -s /application/jdk1.8.0_60/ /application/jdk
[root@web02 tools]# ll /application/
total 0
lrwxrwxrwx 1 root root  25 Mar 20 09:15 jdk -> /application/jdk1.8.0_60/
drwxr-xr-x 8   10  143 255 Aug  5  2015 jdk1.8.0_60
[root@web02 tools]#
配置jdk使用的环境变量
[root@web02 tools]# cat >>/etc/profile <<'EOF'
export JAVA_HOME=/application/jdk
export PATH=$JAVA_HOME/bin:$JAVA_HOME/jre/bin:$PATH
export CLASSPATH=.:$JAVA_HOME/lib:$JAVA_HOME/jre/lib:$JAVA_HOME/lib/tools.jar
[root@web02 tools]# source /etc/profile
[root@web02 tools]# java -version   --查看java环境版本
部署tomcat(apache软件)
[root@web02 tools]# tar  xf  apache-tomcat-8.0.27.tar.gz
[root@web02 tools]# mv apache-tomcat-8.0.27 /application/tomcat-8.0.27
[root@web02 tools]# ln -s   /application/tomcat-8.0.27/ /application/tomcat
[root@web02 tools]# ll /application/tomcat
配置环境变量
[root@web02 tools]# vim /etc/profile
export TOMCAT_HOME=/application/tomcat
[root@web02 ~]# source /etc/profile
yum install mariadb-server mariadb -y
systemctl start mariadb.service
systemctl enable mariadb.service
mysql_secure_installation
数据库服务器创建数据库并授权用户
create database jpress DEFAULT CHARACTER SET utf8;
grant all on jpress.* to jpress@localhost identified by '123456';
开启tomcat
[root@web02 conf.d]# /application/tomcat/bin/startup.sh
关闭tomcat
[root@web02 conf.d]# /application/tomcat/bin/shutdown.sh
验证tomcat服务开启
[root@web02 conf.d]# ss -lntup |grep java
tcp    LISTEN     0      1      ::ffff:127.0.0.1:8005                 :::*                   users:(("java",pid=2165,fd=66))
tcp    LISTEN     0      100      :::8009                 :::*                   users:(("java",pid=2165,fd=51))
tcp    LISTEN     0      100      :::8080                 :::*
上传war包到站点目录
mv jpress-web-newest.war /application/tomcat/webapps/jpress.war
页面访问
http://10.0.0.72:8080/jpress/
新增的jar包放置(上传后需重启)
/application/tomcat/webapps/jpress/WEB-INF
默认的java项目并不支持监控,需要修改配置文件,开启jmx
vim /application/tomcat/bin/catalina.sh
# -----------------------------------------------------------------------------
CATALINA_OPTS="$CATALINA_OPTS
-Dcom.sun.management.jmxremote				开启jmx
-Djava.rmi.server.hostname=10.0.0.72                    	修改为本机地址
-Dcom.sun.management.jmxremote.port=12345	远程端口
-Dcom.sun.management.jmxremote.ssl=false		ssl认证
-Dcom.sun.management.jmxremote.authenticate=false"		账号密码认证
# OS specific support.  $var _must_ be set to either true or false.
生效需重启(检查12345端口)
性能调优格式
#JAVA_OPTS="$JAVA_OPTS -Dorg.apache.catalina.security.SecurityListener.UMASK=`umask`"
JAVA_OPTS="$JAVA_OPTS -server -Xms256m -Xmx256m -Xss256k -XX:PermSize=192m -XX:MaxPermSize=192m -XX:+UseParallelOldGC -XX:+HeapDumpOnOutOfMemoryError -XX:HeapDumpPath=/usr/aaa/dump -XX:+PrintGCDetails -XX:+PrintGCTimeStamps -Xloggc:/usr/aaa/dump/heap_trace.txt -XX:NewSize=64m -XX:MaxNewSize=64m"

# ----- Execute The Requested Command -----------------------------------------
mkdir /usr/aaa/dump/ && touch /usr/aaa/dump/heap_trace.tx
windows查看
C:\Program Files\Java\jdk1.8.0_31\bin
执行jconsole.exe
使用远程连接 ip地址:12345
桌面查看详情
zabbix监控服务器页面配置
安装zabbix-java-gateway(相当于代理的作用,可以在zabbix-server和其他主机上安装均可,从而获得java项目主机的监控信息(需开启12345端口)),代理地址填写在zabbix-server配置文件中,通过zabbix-java-gateway的配置文件监控
[root@zabbix-server ~]# yum install -y zabbix-java-gateway
[root@zabbix-server ~]# vim /etc/zabbix/zabbix_java_gateway.conf
START_POLLERS=5       配置启动的收集进程
[root@zabbix-server ~]# systemctl start zabbix-java-gateway.service
[root@zabbix-server ~]# systemctl enable zabbix-java-gateway.service
配置zabbix-server文件,识别java-gateway地址
[root@zabbix-server ~]#vim /etc/zabbix/zabbix_server.conf
JavaGateway=127.0.0.1
JavaGatewayPort=10052
zabbix-web页面设置
zabbix-web页面设置
[配置]–[主机]–[创建主机(主机名称,群组,JMX接口)]–[模板]–[Template App Generic Java JMX] 默认的tomcat模板只支持tomcat 6版本
zabbix低级自动发现(LLD)之mysql多实例
创建多实例环境
[https://www.qstack.com.cn/archives/108.html](https://www.qstack.com.cn/archives/108.html)

cp /etc/my.cnf /etc/my3307.cnf

vim /etc/my3307.cnf

cp /etc/my3307.cnf /etc/my3308.cnf

vim /etc/my3308.cnf

mysql_install_db --user=mysql --defaults-file=/etc/my3307.cnf

mysql_install_db --user=mysql --defaults-file=/etc/my3308.cnf

ls /data/

ls /data/3307

ls /data/3308

mysqld_safe --defaults-file=/etc/my3307.cnf &

mysqld_safe --defaults-file=/etc/my3308.cnf &
取得端口
netstat -lntup|awk -F "[ :]+" '/mysqld/{print $5}'
编辑脚本
[root@zabbix-server ~]# cat /server/scripts/mysql_discovery.sh
#!/bin/bash
#mysql low-level discovery
res=`netstat -lntup|awk -F "[ :]+" '/mysqld/{print $5}'`
port=($res)
printf '{'
printf '"data":['
for key in ${!port[@]}
do
if [[ "${#port[@]}" -gt 1 && "${key}" -ne "$((${#port[@]}-1))" ]];then
printf '{'
printf "\"{#MYSQLPORT}\":\"${port[${key}]}\"},"
else [[ "${key}" -eq "((${#port[@]}-1))" ]]
printf '{'
printf "\"{#MYSQLPORT}\":\"${port[${key}]}\"}"
fi
done
printf ']'
printf '}\n'
配置zabbix-agent文件
[root@zabbix-server ~]# cat /etc/zabbix/zabbix_agentd.d/mysql_discovery.conf
UserParameter=mysql_discovery,/bin/bash /server/scripts/mysql_discovery.sh

[root@zabbix-server ~]# which netstat
/usr/bin/netstat
[root@zabbix-server ~]# chmod u+s /usr/bin/netstat
[root@zabbix-server ~]# chmod u+x /server/scripts/mysql_discovery.sh
测试查看
[root@zabbix-server zabbix_agentd.d]# zabbix_get -s 127.0.0.1 -k mysql_discovery
{"data":[{"{#MYSQLPORT}":"3306"},{"{#MYSQLPORT}":"3307"},{"{#MYSQLPORT}":"3308"}]}
页面配置
在[配置]–[主机]–[监控项,筛选应用集,(选择非模板监控项)]----查看是否生效,查看最新数据进一步确认
补充:进一步监控数据库的开启时间和打开文件数
[root@zabbix-server ~]# cat /etc/zabbix/zabbix_agentd.d/mysql_discovery.conf
UserParameter=mysql_discovery,/bin/bash /server/scripts/mysql_discovery.sh
UserParameter=mysql_alive[*],mysqladmin -uroot -h 127.0.0.1 -P $1 ping  2>/dev/null |grep -c alive
UserParameter=my_mysql[*],mysql -uroot -h 127.0.0.1 -P $1  -e 'show status;'|awk '$$1 ~ /^'$2'$/{print $$2}
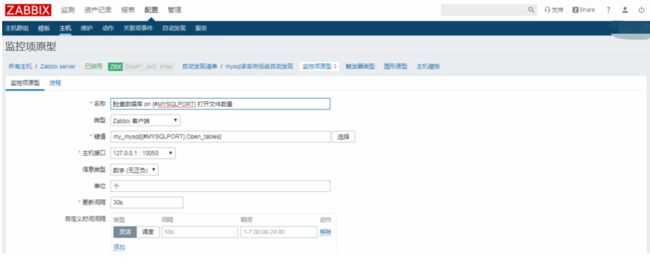
配置自动发现的监控原型
zabbix性能优化
1)针对mysql,zabbix应用写多读少,可将mariadb5.5(innodb引擎)升级mysql5.7 (tokuda引擎)
2)去掉无用监控项,増加监控项的取值间隔,减少历史数据保存周期
3)把被动模式修改为主动模式,增加 zabbix- proxy
4)针对于 zabbix- server进程调优,谁忙,就加大它的进程数量
查看[监控]–[最新数据]–[Zabbix-Server主机的zabbix-server应用集]–[Utilization of discoverer data collector processes, in %]查看使用率;若过大则调整zabbix-server配置文件启动的进程(默认为1)
# StartDiscoverers=1
查看数据采集进程繁忙度图形,修改相应的监控项
# StartPollers=5
# StartIPMIPollers=0
# StartPollersUnreachable=1
StartJavaPollers=5
查看数据内部进程繁忙度图形,修改相应的监控项
以上,都可以修改zabbix-server配置文件
5)针对于 zabbix- server缓存调优,谁的剩余内存少,就加大它的缓存值
查看数据缓存进程繁忙度图形,修改相应的监控项
VMwareCacheSize=8M—修改zabbix-server配置文件
判断zabbix遇到性能瓶颈
[管理]–[队列]
队列中的数据为未写入zabbix数据库的或未采集到的监控数据,大量堆积会影响查看效果
6)针对 zabbix历史数据和趋勢图的表,进行周期性分表
zabbix api(application interface)
zabbix api(application interface)
针对zabbix进行二次开发,公司 运维管理平台(把zabbix集成到自己的运维平台)
获取token:
curl -X POST -H 'Content-Type:application/json-rpc' -d '
{
    "jsonrpc": "2.0",
    "method": "user.login",
    "params": {
        "user": "Admin",
        "password": "zabbix"
    },
    "id": 1,
    "auth": null
}'  http://10.0.0.71/zabbix/api_jsonrpc.php


token='a75358fc2120badb9faa104acb3e5cf0'

for IP in `echo 10.0.0.{1..200}`;do curl -X POST -H 'Content-Type:application/json-rpc' -d '
{
    "jsonrpc": "2.0",
    "method": "host.create",
    "params": {
        "host": "'$IP'",
        "interfaces": [
            {
                "type": 1,
                "main": 1,
                "useip": 1,
                "ip": "'$IP'",
                "dns": "",
                "port": "10050"
            }
        ],
        "groups": [
            {
                "groupid": "19"
            }
        ],
        "templates": [
            {
                "templateid": "10001"
            },
            {
                "templateid": "10264"
            }
        ]
    },
    "auth": "'$token'",
    "id": 1
}'  http://10.0.0.71/zabbix/api_jsonrpc.php;done
添加一台监控主机,手动添加,自动发现,自动注册,调用添加主机api
zabbix-agent(取值)主动和被动的区别
主动:主动向zabbix-server汇报,53个监控,请求1次
被动:等待zabbix-server索要,53个监控,请求53次
采集时执行脚本,等待脚本执行完成,拿到结果,发送结果
增加主动模式模板,基于被动模式模板全克隆,批量更新监控项的类型,为主机链接新模板
无zabbix-agent客户端的监控(zabbix-sender)
zabbix-sender,10
先执行脚本拿到结果,采集时直接发送结果。
效率高,麻烦(每一个监控项都需要手动写脚本取值)!
zabbix性能优化
db性能调优 写多读少(存储过程,分表)
zabbix-server参数调休
Cache 优化
进程数 优化
zabbix 高可用
zabbix监控范围:
硬件监控:温度,电压,功率,风扇(ipmi-tool仅对物理机有效)
系统监控:cpu,内存,硬盘,网络,进程,安全(自带的linux模板)
应用的监控:nginx,php-fpm,mysql,nfs,redis(应用本身开启监控页)
业务的监控:业务是否能访问,每日成单量,流水(DBA)
piwik-Web统计软件
软件版本要求
PHP 7.x版本,因为它比以前的PHP版本更高效,速度更快
.MySQL 5.7+或MariaDB作为数据库
.Web服务器,如Apache,Nginx,IIS等。
安装piwik
安装nginx的
[root@web ~]# yum install -y nginx
[root@web ~]# vim /etc/nginx/conf.d/www.conf
server {
    listen       80;
    server_name  localhost;
    root   /app/www;
    location / {
    index  index.php index.html index.htm;
    }

     location ~* \.(php|php5)$ {
      fastcgi_pass   127.0.0.1:9000;
       fastcgi_index  index.php;
       fastcgi_param  SCRIPT_FILENAME  $document_root$fastcgi_script_name;
       include        fastcgi_params;
   }

}
[root@web ~]# gzip /etc/nginx/conf.d/default.conf
安装PHP
[root@web ~]# ls
anaconda-ks.cfg                         php71w-gd-7.1.23-1.w7.x86_64.rpm            php71w-pecl-memcached-3.0.4-1.w7.x86_64.rpm
cookil                                  php71w-mbstring-7.1.23-1.w7.x86_64.rpm      php71w-pecl-mongodb-1.4.1-1.w7.x86_64.rpm
de.html                                 php71w-mcrypt-7.1.23-1.w7.x86_64.rpm        php71w-pecl-redis-3.1.6-1.w7.x86_64.rpm
php71w-cli-7.1.23-1.w7.x86_64.rpm       php71w-mysqlnd-7.1.23-1.w7.x86_64.rpm       php71w-process-7.1.23-1.w7.x86_64.rpm
php71w-common-7.1.23-1.w7.x86_64.rpm    php71w-opcache-7.1.23-1.w7.x86_64.rpm       php71w-xml-7.1.23-1.w7.x86_64.rpm
php71w-devel-7.1.23-1.w7.x86_64.rpm     php71w-pdo-7.1.23-1.w7.x86_64.rpm           PHP7.1.zip
php71w-embedded-7.1.23-1.w7.x86_64.rpm  php71w-pear-1.10.4-1.w7.noarch.rpm
php71w-fpm-7.1.23-1.w7.x86_64.rpm       php71w-pecl-igbinary-2.0.5-1.w7.x86_64.rpm
[root@web ~]# yum localinstall *.rpm
[root@web ~]# egrep  '^user|^group' /etc/php-fpm.d/www.conf
user = nginx
group = nginx
安装数据库
shell>yum install -y mariadb-server
shell>systemctl start mariadb
shell>systemctl enable mariadb
MariaDB [(none)]> create database piwik;
MariaDB [(none)]> grant all      on piwik.*       to 'piwik'@'localhost'  identified by '123456';
上传代码
[root@web /app/www]# ls
How to install Matomo.html  matomo  matomo.zip
[root@web /app/www]# mv matomo/* .
[root@web /app/www]# ls
bower.json     config           How to install Matomo.html  LEGALNOTICE  matomo.js   piwik.js    README.md    vendor
CHANGELOG.md   console          index.php                   libs         matomo.php  piwik.php   SECURITY.md
composer.json  CONTRIBUTING.md  js                          LICENSE      matomo.zip  plugins     tests
composer.lock  core             lang                        matomo       misc        PRIVACY.md  tmp
[root@web /app/www]# rm "/app/www/How to install Matomo.html" "/app/www/matomo.zip"
[root@web /app/www]# chown -R nginx. .
[root@web /app/www]# systemctl restart nginx php-fpm
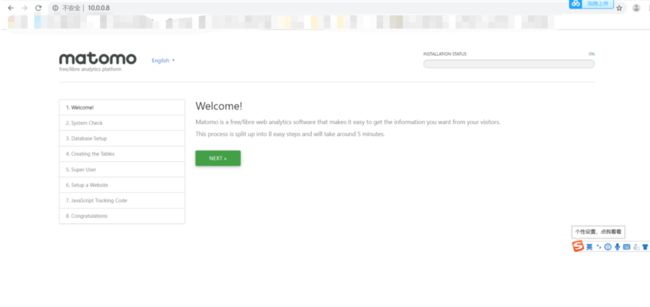
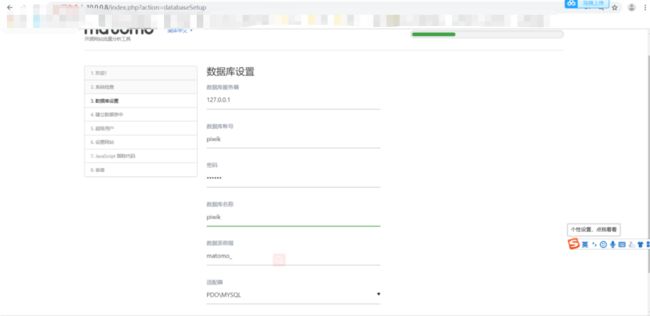
网站页面安装
zabbix 监控总结
a: 物理硬件监控(cpu温度,风扇转速,主板温度,电压,功率 ipmi工具监控 机房巡检)ipmitool命令行
b:操作系统监控(cpu负载,内存,磁盘容量io,网卡io,进程数,安全监控/etc/password)linux模板
c: 应用软件监控(nginx,php-fpm,mysql,redis,分布式文件系统glusterFS,ceph) 修改开源的模板
d:业务监控(业务状态,网页速度,pv,uv,ip监控,会员活跃数量,每天的成单量)
e: 网络设备监控 snmp
f:ELK监控日志
zabbix 模板社区
