Python计算机视觉——图像拼接
文章目录
- 1. 原理
- 1.1 RANSAC算法
- 1.2 RANSAC的一个标准化体现:直线的拟合
- 1.3 全景拼接
- 1.3.1 图像融合blending
- 2. 实验过程
- 2.1 针对固定点位拍摄多张图片,以中间图片为中心,实现图像的拼接融合
- 2.2 针对同一场景(需选取视差变化大的场景,也就是有近景目标),更换拍摄位置,分析拼接结果
1. 原理
1.1 RANSAC算法
SIFT算法的描述子稳健性很强,比Harris角点要来得精确,但是它的匹配正确率也并不是百分百的,会受到一些噪声点的干扰,有时就会因为不同地方有类似的图案导致匹配错误。那么RANSAC算法便是用来找到正确模型来拟合带有噪声数据的迭代方法。RANSAC通过反复取样,也就是从整个观测数据中随机抽一些数据估算模型参数之后看和所有数据误差有多大,然后取误差最小视为最好以及分离内群与离群数据。基本的思想是,数据中包含正确的点和噪声点,合理的模型应该能够在描述正确数据点的同时摒弃噪声点。
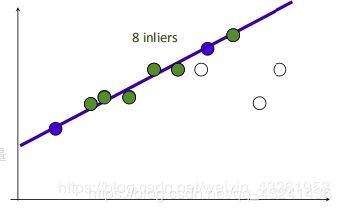
1.2 RANSAC的一个标准化体现:直线的拟合
- 在所有的点中随机选择两个点。
- 根据这两个点作一条直线。
- 设定一个阈值,计算在这条线上的点的数量,记为inliners。
- 根据最大的inliners那条线进行后续计算。
同理,RANSAC算法可以应用到其它模块中,例如用于图像变换的单应性矩阵的计算。
在拼接的过程中,通过将响速和单应矩阵H相乘,然后对齐次坐标进行归一化来实现像素间的映射。通过查看H中的平移量,我们可以决定应该将该图像填补到左边还是右边。当该图像填补到左边时,由于目标图像中点的坐标也变化了,所以在“左边”情况中,需要在单应矩阵中加入平移。
1.3 全景拼接
在之前的一篇博客介绍过SIFT匹配的方法,这里就不多写了,这次将其应用到图像拼接上。根据特征点匹配的方式,则利用这些匹配的点来估算单应矩阵(使用上面的RANSAC算法,也就是把其中一张通过个关联性和另一张匹配的方法。通过单应矩阵H,可以将原图像中任意像素点坐标转换为新坐标点,转换后的图像即为适合拼接的结果图像。可以简单分为以下几步:
- 根据给定图像/集,实现特征匹配。
- 通过匹配特征计算图像之间的变换结构。
- 利用图像变换结构,实现图像映射。
- 针对叠加后的图像,采用APAP之类的算法,对齐特征点。(图像配准)
- 通过图割方法,自动选取拼接缝。
- 根据multi-band blending策略实现融合。
1.3.1 图像融合blending
其实图像拼接完会发现在拼接的交界处有明显的衔接痕迹,存在边缘效应,因为光照色泽的原因使得图片交界处的过渡很糟糕,所以需要特定的处理解决这种不自然。那么这时候可以采用blending方法。multi-band blending是目前图像融和方面比较好的方法。具体可以参考论文:论文
原始论文中采用的方法是直接对待拼接的两个图片进行拉普拉斯金字塔分解,而后一半对一半进行融合。在opencv内部已经实现了multi-band blending,但是本篇中没有做相关尝试。
相关参考
相关参考
转载自:https://blog.csdn.net/weixin_43361953/article/details/88833398
2. 实验过程
2.1 针对固定点位拍摄多张图片,以中间图片为中心,实现图像的拼接融合
-
实验原理及结果分析
图片的拼接成功率达到了80%,图片虽然看上去像是拼接成功了,但交界处过于明显,还有一定的色差,看上去像是被横空切断。另外如果图片旁出现了黑色部分,是因为图片无法填充满,可以试试拍摄时角度变化大一些。可以尝试通过blending进行融合来达到更好的效果。 -
代码:
from pylab import *
from numpy import *
from PIL import Image


#If you have PCV installed, these imports should work
from PCV.geometry import homography, warp
import sift
from PCV.tools.imtools import get_imlist
"""
This is the panorama example from section 3.3.
"""

#set paths to data folder

#featname = ['C://Users//Garfield//Desktop//towelmatch//' + str(i + 1) + 'out_sift_1.txt' for i in range(5)]
#imname = ['C://Users//Garfield//Desktop//towelmatch//' + str(i + 1) + '.jpg' for i in range(5)]
imname = ['C://Users//Garfield//Desktop//towelmatch//pinjie//' + str(i + 1) + '.jpg' for i in range(5)]

download_path = "C://Users//Garfield//Desktop//towelmatch//pinjie//"  # set this to the path where you downloaded the panoramio images

imlist = get_imlist(download_path)

l = {}
d = {}
featname = ['out_sift_1.txt' for imna in imlist]
for i, imna in enumerate(imlist):
   sift.process_image(imna, featname[i])
   l[i], d[i] = sift.read_features_from_file(featname[i])


#extract features and match
#l = {}
#d = {}
#for i in range(5):
#sift.process_image(imname[i], featname[i])
#l[i], d[i] = sift.read_features_from_file(featname[i])

matches = {}
for i in range(4):
   matches[i] = sift.match(d[i + 1], d[i])

#visualize the matches (Figure 3-11 in the book)
#sift匹配可视化
for i in range(4):
   im1 = array(Image.open(imname[i]))
   im2 = array(Image.open(imname[i + 1]))
   figure()
   sift.plot_matches(im2, im1, l[i + 1], l[i], matches[i], show_below=True)


#function to convert the matches to hom. points
#将匹配转换成齐次坐标点的函数
def convert_points(j):
   ndx = matches[j].nonzero()[0]
   fp = homography.make_homog(l[j + 1][ndx, :2].T)
   ndx2 = [int(matches[j][i]) for i in ndx]
   tp = homography.make_homog(l[j][ndx2, :2].T)

   # switch x and y - TODO this should move elsewhere
   fp = vstack([fp[1], fp[0], fp[2]])
   tp = vstack([tp[1], tp[0], tp[2]])
   return fp, tp


#estimate the homographies
#估计单应性矩阵
model = homography.RansacModel()

fp, tp = convert_points(1)
H_12 = homography.H_from_ransac(fp, tp, model)[0]  # im 1 to 2  # im1 到 im2 的单应性矩阵


fp, tp = convert_points(0)
H_01 = homography.H_from_ransac(fp, tp, model)[0]  # im 0 to 1

tp, fp = convert_points(2)  # NB: reverse order
H_32 = homography.H_from_ransac(fp, tp, model)[0]  # im 3 to 2

tp, fp = convert_points(3)  # NB: reverse order
H_43 = homography.H_from_ransac(fp, tp, model)[0]  # im 4 to 3

#warp the images
#扭曲图像

delta = 2000  # for padding and translation 用于填充和平移

im1 = array(Image.open(imname[1]), "uint8")
im2 = array(Image.open(imname[2]), "uint8")
im_12 = warp.panorama(H_12, im1, im2, delta, delta)

im1 = array(Image.open(imname[0]), "f")
im_02 = warp.panorama(dot(H_12, H_01), im1, im_12, delta, delta)

im1 = array(Image.open(imname[3]), "f")
im_32 = warp.panorama(H_32, im1, im_02, delta, delta)

im1 = array(Image.open(imname[4]), "f")
im_42 = warp.panorama(dot(H_32, H_43), im1, im_32, delta, 2 * delta)
imsave('C://Users//Garfield//Desktop//towelmatch//result.jpg', array(im_42, "uint8"))
figure()
imshow(array(im_42, "uint8"))
axis('off')
show()
2.2 针对同一场景(需选取视差变化大的场景,也就是有近景目标),更换拍摄位置,分析拼接结果
实现步骤:
- 提取图片的特征点、描述符,可以使用opencv创建一个SIFT对象,SIFT对象使用DoG方法检测关键点,并对每个关键点周围的区域计算特征向量。在实现时,可以使用比SIFT快的SURF方法,使用Hessian算法检测关键点。因为只是进行全景图拼接,在使用SURF时,还可以调节它的参数,减少一些关键点,只获取64维而不是128维的向量等,加快速度。
- 在分别提取好了两张图片的关键点和特征向量以后,可以利用它们进行两张图片的匹配。在拼接图片中,可以使用Knn进行匹配,但是使用FLANN快速匹配库更快,图片拼接,需要用到FLANN的单应性匹配。
- 单应性匹配完之后可以获得透视变换H矩阵,用这个的逆矩阵来对第二幅图片进行透视变换,将其转到和第一张图一样的视角,为下一步拼接做准备。
- 透视变换完的图片,其大小就是最后全景图的大小,它的右边是透视变换以后的图片,左边是黑色没有信息。拼接时可以比较简单地处理,通过numpy数组选择直接把第一张图加到它的左边,覆盖掉重叠部分,得到拼接图片,这样做非常快,但是最后效果不是很好,中间有一条分割痕迹非常明显。使用opencv指南中图像金字塔的代码对拼接好的图片进行处理,整个图片平滑了,中间的缝还是特别突兀。
- 直接拼效果不是很好,可以把第一张图叠在左边,但是对第一张图和它的重叠区做一些加权处理,重叠部分,离左边图近的,左边图的权重就高一些,离右边近的,右边旋转图的权重就高一些,然后两者相加,使得过渡是平滑地,这样看上去效果好一些,速度就比较慢。如果是用SURF来做,时间主要画在平滑处理上而不是特征点提取和匹配。
从实验结果可以看到,作为近景参照的中心植物已经不见踪影,仅有一些模糊的影子。从匹配的连线密度来看,是建筑与建筑之间的匹配特征数比较多,于是远景匹配权重占比会更大一些,在透视变换时,也更多会根据远景的重叠性更好来判别拼接图片。这样拼接后的图片远景和近景看起来更像是割裂开的,从而整张拼接后的图片前景模糊且拼接痕迹明显。远景与近景匹配的冲突缺陷完全暴露。
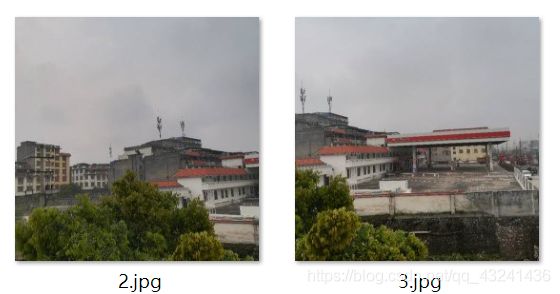
相反,如果选用全远景的图片进行拼接,效果会明显变好很多:

平滑前:
平滑后:
如果将上面的缝隙截掉,可以说是毫无拼接痕迹。
- 代码:
import cv2
import numpy as np
from matplotlib import pyplot as plt
import time

MIN = 10
starttime = time.time()
img1 = cv2.imread('C://Users//Garfield//Desktop//towelmatch//pinjie//2.jpg')  # query
img2 = cv2.imread('C://Users//Garfield//Desktop//towelmatch//pinjie//3.jpg')  # train

# img1gray=cv2.cvtColor(img1,cv2.COLOR_BGR2GRAY)
# img2gray=cv2.cvtColor(img2,cv2.COLOR_BGR2GRAY)
surf = cv2.xfeatures2d.SURF_create(10000, nOctaves=4, extended=False, upright=True)
# surf=cv2.xfeatures2d.SIFT_create()#可以改为SIFT
kp1, descrip1 = surf.detectAndCompute(img1, None)
kp2, descrip2 = surf.detectAndCompute(img2, None)

FLANN_INDEX_KDTREE = 0
indexParams = dict(algorithm=FLANN_INDEX_KDTREE, trees=5)
searchParams = dict(checks=50)

flann = cv2.FlannBasedMatcher(indexParams, searchParams)
match = flann.knnMatch(descrip1, descrip2, k=2)

good = []
for i, (m, n) in enumerate(match):
   if (m.distance < 0.75 * n.distance):
       good.append(m)

if len(good) > MIN:
   src_pts = np.float32([kp1[m.queryIdx].pt for m in good]).reshape(-1, 1, 2)
   ano_pts = np.float32([kp2[m.trainIdx].pt for m in good]).reshape(-1, 1, 2)
   M, mask = cv2.findHomography(src_pts, ano_pts, cv2.RANSAC, 5.0)
   warpImg = cv2.warpPerspective(img2, np.linalg.inv(M), (img1.shape[1] + img2.shape[1], img2.shape[0]))
   direct = warpImg.copy()
   direct[0:img1.shape[0], 0:img1.shape[1]] = img1
   simple = time.time()

   # cv2.namedWindow("Result", cv2.WINDOW_NORMAL)
   # cv2.imshow("Result",warpImg)
   rows, cols = img1.shape[:2]

   for col in range(0, cols):
       if img1[:, col].any() and warpImg[:, col].any():  # 开始重叠的最左端
           left = col
           break
   for col in range(cols - 1, 0, -1):
       if img1[:, col].any() and warpImg[:, col].any():  # 重叠的最右一列
           right = col
           break

   res = np.zeros([rows, cols, 3], np.uint8)
   for row in range(0, rows):
       for col in range(0, cols):
           if not img1[row, col].any():  # 如果没有原图,用旋转的填充
               res[row, col] = warpImg[row, col]
           elif not warpImg[row, col].any():
               res[row, col] = img1[row, col]
           else:
               srcImgLen = float(abs(col - left))
               testImgLen = float(abs(col - right))
               alpha = srcImgLen / (srcImgLen + testImgLen)
               res[row, col] = np.clip(img1[row, col] * (1 - alpha) + warpImg[row, col] * alpha, 0, 255)

   warpImg[0:img1.shape[0], 0:img1.shape[1]] = res
   final = time.time()
   img3 = cv2.cvtColor(direct, cv2.COLOR_BGR2RGB)
   plt.imshow(img3, ), plt.show()
   img4 = cv2.cvtColor(warpImg, cv2.COLOR_BGR2RGB)
   plt.imshow(img4, ), plt.show()
   print("simple stich cost %f" % (simple - starttime))
   print("\ntotal cost %f" % (final - starttime))
   cv2.imwrite("C://Users//Garfield//Desktop//towelmatch//simplepanorma.png", direct)
   cv2.imwrite("C://Users//Garfield//Desktop//towelmatch//bestpanorma.png", warpImg)

else:
   print("not enough matches!")
参考博客:https://blog.csdn.net/qq_37734256/article/details/86745451
参考学习:图像分割之最小割与最大流算法


