Android Material Design设计基础
文章简介
本文主要记录一些用于MD设计的小控件或新概念等,辅助MD设计。
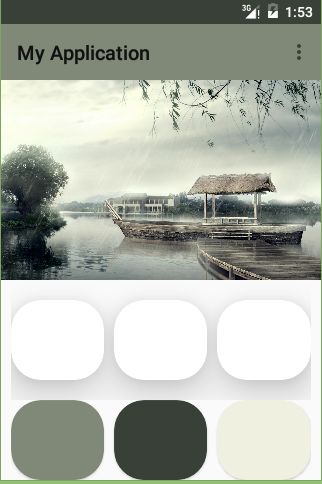
Palette
调色板,可以根据Bitmap获取多种色调用于调整ActionBar和StatusBar等,使界面更加和谐。
使用前请自行引入依赖:
compile 'com.android.support:palette-v7:23.3.0'获取色调的方式:
同步方式:
// Synchronous
 Palette p = Palette.from(bitmap).generate();
异步方式:
// Asynchronous
 Palette.from(bitmap).generate(new PaletteAsyncListener() {
     public void onGenerated(Palette p) {
         // Use generated instance
     }
 });
色调类型:
- Vibrant:充满活力的
- Vibrant Dark:充满活力的黑
- VibrantLight:充满活力的亮
- Muted:柔和的
- Muted dark:柔和的黑
Muted light:柔和的亮
上述色调的获取都对应有get方法
CardView
卡片式布局,简洁美观,在5.0后中官方直接提供了自己的卡片式控件。
使用前请自行引入依赖:
compile 'com.android.support:cardview-v7:23.3.0'在布局文件中,记得添加自定义命名空间:
xmlns:card_view="http://schemas.android.com/apk/res-auto"两个主要属性:
- card_view:cardBackgroundColor=”@color/colorAccent”
- card_view:cardCornerRadius=”30dp”
视图高度
View的大小位置都是通过x,y确定的,而现在有了z轴的概念,这个z值就是View的高度(elevation),高度决定了阴影(shadow)的大小。
View的z值由两部分组成,elevation和translationZ(它们都是Android L新引入的属性)。
eleavation是静态的成员,translationZ是用来做动画。
Z = elevation+translationZ
前面概念和控件的使用Demo:


限于篇幅,直接提供源码链接,有爱自取:CardViewDemo
Tinting
着色:
Tint通过修改图像的Alpha遮罩来达到重新着色的目的。通过tint和tintMode可以很方便的对图像进行一些处理。
Demo:
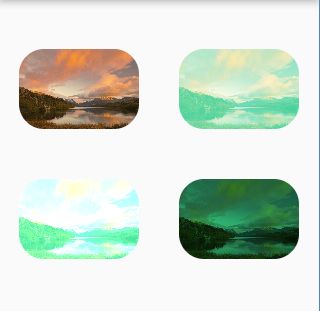
so,很 easy的实现了色调的变换。
xml:
<LinearLayout xmlns:android="http://schemas.android.com/apk/res/android"
    xmlns:tools="http://schemas.android.com/tools"
    android:layout_width="match_parent"
    android:layout_height="match_parent"
    android:orientation="horizontal"
    tools:context="com.example.horizon.myapplication.MainActivity">


    <LinearLayout
        android:layout_width="0dp"
        android:layout_weight="1"
        android:orientation="vertical"
        android:gravity="center_horizontal"
        android:layout_height="match_parent">

        <ImageView
            android:id="@+id/image1"
            android:layout_marginTop="50dp"
            android:layout_width="120dp"
            android:layout_height="80dp"
            android:src="@drawable/horizon"
            android:adjustViewBounds="true"
            android:scaleType="centerCrop"/>
        <ImageView
            android:id="@+id/image2"
            android:layout_marginTop="50dp"
            android:layout_width="120dp"
            android:layout_height="80dp"
            android:src="@drawable/horizon"
            android:adjustViewBounds="true"
            android:scaleType="centerCrop"
            android:tint="@color/colorSeaBlue"
            android:tintMode="add" />
    LinearLayout>

    <LinearLayout
        android:layout_width="0dp"
        android:layout_weight="1"
        android:orientation="vertical"
        android:gravity="center_horizontal"
        android:layout_height="match_parent">

        <ImageView
            android:id="@+id/image3"
            android:layout_marginTop="50dp"
            android:layout_width="120dp"
            android:layout_height="80dp"
            android:src="@drawable/horizon"
            android:adjustViewBounds="true"
            android:scaleType="centerCrop"
            android:tint="@color/colorSeaBlue"
            android:tintMode="screen"/>
        <ImageView
            android:id="@+id/image4"
            android:layout_marginTop="50dp"
            android:layout_width="120dp"
            android:layout_height="80dp"
            android:src="@drawable/horizon"
            android:adjustViewBounds="true"
            android:scaleType="centerCrop"
            android:tint="@color/colorSeaBlue"
            android:tintMode="multiply"/>

    LinearLayout>

LinearLayout>
java
public class MainActivity extends AppCompatActivity {

    @TargetApi(Build.VERSION_CODES.LOLLIPOP)
    @Override
    protected void onCreate(Bundle savedInstanceState) {
        super.onCreate(savedInstanceState);
        setContentView(R.layout.activity_main);

        ImageView imageView1 = (ImageView) findViewById(R.id.image1);
        ImageView imageView2 = (ImageView) findViewById(R.id.image2);
        ImageView imageView3 = (ImageView) findViewById(R.id.image3);
        ImageView imageView4 = (ImageView) findViewById(R.id.image4);


        ViewOutlineProvider imageProvider;
        imageProvider = new ViewOutlineProvider() {
            @Override
            public void getOutline(View view, Outline outline) {
                view.setClipToOutline(true);
                outline.setRoundRect(0, 0, view.getWidth(), view.getHeight(), 25);
            }
        };

        if (imageView1 != null) {
            imageView1.setOutlineProvider(imageProvider);
        }
        if (imageView2 != null) {
            imageView2.setOutlineProvider(imageProvider);
        }
        if (imageView3 != null) {
            imageView3.setOutlineProvider(imageProvider);
        }
        if (imageView4 != null) {
            imageView4.setOutlineProvider(imageProvider);
        }

    }
}
Clipping
为了裁剪一个可绘制的视图形状,需要实例OutlineProvider,并在getOutline()调用view.setClipToOutline(true)以及设定裁剪的图形。
Demo:

XML:
<LinearLayout xmlns:android="http://schemas.android.com/apk/res/android"
    xmlns:tools="http://schemas.android.com/tools"
    android:layout_width="match_parent"
    android:layout_height="match_parent"
    android:orientation="vertical"
    android:gravity="center"
    tools:context="com.example.horizon.myapplication.MainActivity">

    <TextView
        android:id="@+id/textView"
        android:gravity="center"
        android:background="@color/colorPrimary"
        android:layout_width="120dp"
        android:layout_height="120dp"
        android:text="Hello World!"
        android:elevation="20dp"/>

    <ImageView
        android:id="@+id/image"
        android:layout_marginTop="50dp"
        android:layout_width="120dp"
        android:layout_height="80dp"
        android:src="@drawable/horizon"
        android:adjustViewBounds="true"
        android:scaleType="centerCrop"/>
LinearLayout>
java:
public class MainActivity extends AppCompatActivity {

    @TargetApi(Build.VERSION_CODES.LOLLIPOP)
    @Override
    protected void onCreate(Bundle savedInstanceState) {
        super.onCreate(savedInstanceState);
        setContentView(R.layout.activity_main);

        TextView textView = (TextView) findViewById(R.id.textView);
        ImageView imageView = (ImageView) findViewById(R.id.image);


        final ViewOutlineProvider textProvider;

        //实例化ViewOutlineProvider
        textProvider = new ViewOutlineProvider() {
            @Override
            public void getOutline(View view, Outline outline) {
                //设置View可裁减和形状
                view.setClipToOutline(true);
                outline.setOval(0, 0, view.getWidth(), view.getHeight());
            }
        };

        if (textView != null) {
            //为view设置provider
            textView.setOutlineProvider(textProvider);
        }

        ViewOutlineProvider imageProvider;
        imageProvider = new ViewOutlineProvider() {
            @Override
            public void getOutline(View view, Outline outline) {
                view.setClipToOutline(true);
                outline.setRoundRect(0, 0, view.getWidth(), view.getHeight(), 25);
            }
        };

        if (imageView != null) {
            imageView.setOutlineProvider(imageProvider);
        }


    }
}
OK,先到这里吧。如果本文对你有帮助,欢迎star或点赞支持,不胜感激。