快应用开发基本知识(一)
路由的概念,页面跳转
摒弃一切装X的术语,通过一个小例子秒懂。
【例一】,简单的一个页面跳转
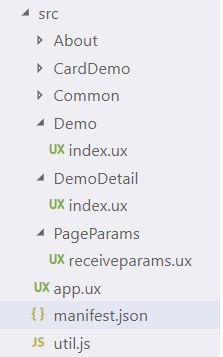
文件目录结构:

首页进去是/Demo/index.ux
我们现在要能从首页跳转到/DemoDetail下的index或者跳到/PageParams下的receiveparams.ux
怎么跳转呢?
代码:
<template>
  <div class="tutorial-page">

    <a href="/PageParams">跳转到接收参数页面1a>
    <a href="/PageParams">跳转到接收参数页面2a>
    <a href="/DemoDetail">跳转到详情页a>
    <image src="/Common/logo.png">image>
  div>
template>
然后在manifest.json配置文件中的router(路由配置下),写入代码:
 "router": {
   "entry": "Demo",
   "pages": {
     "Demo": {
       "component": "index"
     },
     "DemoDetail": {
       "component": "index"
     },
     "About": {
       "component": "index"
     },
     //这是我们加入的路由配置。我们定义前端在看到/PageParams路径后
     //就会找PageParams目录下的receiveparams.ux文件。然后就完成页面的跳转
     "PageParams": {
       "component": "receiveparams"
     }
   },
用命令行npm run build和npm run server来编译和运行项目

拿到测试网址http://169.254.238.116:8000 去访问即可完成测试。
因此,在快应用中,所有页面的路由都是要在manifest.json文件中配置的。否则它无法知道你要跳转到哪里去。
常见指令
- for
- if、show
- 组件block
指令for
for指令用于循环输出一个数组类型的数据
【例2】
<template>
  <div class="tutorial-page">


    <div class="tutorial-row" for="{{list}}">
      <text>{{$idx}}.{{$item.name}}text>
    div>


    <div class="tutorial-row" for="value in list">
      <text>{{$idx}}.{{value.name}}text>
    div>


    <div class="tutorial-row" for="(personIndex, personItem) in list">
      <text>{{personIndex}}.{{personItem.name}}text>
    div>
  div>
template>

<style lang="less">
  .tutorial-page {
    flex-direction: column;

    .tutorial-row {
      width: 85%;
      margin-top: 10px;
      margin-bottom: 10px;
    }
  }
style>

<script>
export default {
  onInit () {
    this.$page.setTitleBar({ text: '指令for' })
  },
  data: {
    list: [{name: 'aa'}, { name: 'bb' }]
  }
}
script>
最终结果:
0.aa
1.bb
0.aa
1.bb
0.aa
1.bb
指令if与指令show
都是属于判断型指令。如果结果为false,那么标签内的内容将不会显示
【例三】:
<template>
  <div class="tutorial-page">
    <text onclick="onClickShow">显示隐藏:text>

    <text show="{{showVar}}">show: 渲染但控制是否显示text>


    <text onclick="onClickCondition">条件指令:text>
    <text if="{{conditionVar === 1}}">if: if条件text>
    <text elif="{{conditionVar === 2}}">elif: elif条件text>
    <text else>else: 其余text>
  div>
template>

<style lang="less">
  .tutorial-page {
    flex-direction: column;
  }
style>

<script>
export default {
  onInit () {
    this.$page.setTitleBar({ text: '指令if与指令show' })
  },
  data: {
    showVar: true,
    conditionVar: 1
  },
  onClickShow () {
    this.showVar = !this.showVar
  },
  onClickCondition () {
    this.conditionVar = ++this.conditionVar % 3
  }
}
script>
可以利用这个指令,做一些简单的动态显示及隐藏。
组件block
block主要是用来分块,在block上可以混合使用for指令、if指令和show指令
<template>
  <div class="tutorial-page">
    <text onclick="toggleCityList">点击:控制是否显示城市text>
    <list>
      <block for="city in cityList" if="{{showCityList === 1}}">
        <list-item type="city">
          <text>城市:{{city.name}}text>
          <block for="{{city.spots}}">
            <div show="{{city.showSpots}}">
              <text>景点:{{$item.name}}text>
            div>
          block>
        list-item>
      block>
    list>
  div>
template>

<style lang="less">
  .tutorial-page {
    flex-direction: column;
  }

  list, list-item {
    flex-direction: column;
  }
style>

<script>
export default {
  onInit () {
    this.$page.setTitleBar({ text: '组件block' })
  },
  data: {
    'showCityList': 1,
    'cityList': [
      {
        'name': '北京',
        'showSpots': true,
        'spots': [
          { 'name': '天安门' },
          { 'name': '八达岭' }
        ]
      },
      {
        'name': '上海',
        'showSpots': false,
        'spots': [
          { 'name': '东方明珠' }
        ]
      }
    ]
  },
  toggleCityList () {
    this.showCityList = this.showCityList === 1 ? 0 : 1
  }
}
script>
这个例子综合了前面的知识点,还是比较好懂的。