Apache详解(三)Httpd常见配置
成功不易,加倍努力!
- Apache详解总目录
- 3 httpd 常见配置
- 3.1 指定服务器名
- 3.2 显示服务器版本信息
- 3.2 包含其它配置文件
- 3.3 监听的IP和Port
- 3.4 持久连接
- 3.5 DSO (Dynamic Shared Object)
- 3.6 MPM (Multi-Processing Module) 多路处理模块
- 3.7 prefork 模式相关的配置:
- 3.8 worker和event 模式相关的配置
- 3.9 定义Main server的文档页面路径
- 3.10 定义站点主页面
- 3.11 可实现访问控制的资源
- 3.12 针对目录和URL实现访问控制
- 3.13 基于客户端 IP 地址实现访问控制
- 3.14 日志设定
- 3.14.1 错误日志
- 3.14.2 访问日志
- 3.15 设定默认字符集
- 3.16 定义路径别名
- 3.17 基于用户的访问控制
- 3.18 远程客户端和用户验证的控制
- 3.19 实现用户家目录的http共享
- 3.20 隐藏服务器版本信息
- 3.21 禁止trace方法
- 3.22 status 状态页
- 3.23 多虚拟主机
- 3.24 压缩
- 3.25 实现 https
- 3.25.1 HTTPS 会话的简化过程
- 3.25.2 apache实现https过程
- 3.25.3 实现https 实战案例
- 3.26 URL重定向
- 3.27 实现HSTS
- 3.28 正向代理和反向代理
- 3.29 Sendfile 机制
- 3.30 指定文件类型 content type
Apache详解总目录
- Internet 和 http协议
- Httpd介绍和安装
- Httpd配置
- http报文格式
- WEB相关工具
3 httpd 常见配置
3.1 指定服务器名
[root@centos8 ~]#httpd -t
AH00558: httpd: Could not reliably determine the server's fully qualified domain name, using centos8.localdomain. Set the 'ServerName' directive globally to suppress this message
Syntax OK
[root@centos8 ~]#vim /etc/httpd/conf/httpd.conf
#ServerName www.example.com:80
servername www.magedu.org
[root@centos8 ~]#httpd -t
Syntax OK
3.2 显示服务器版本信息
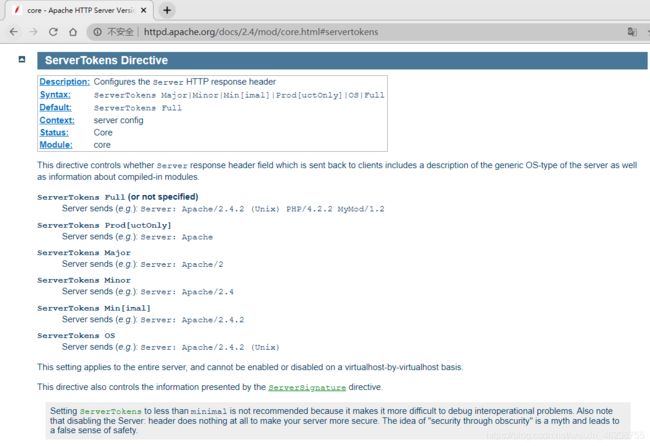
ServerTokens Major|Minor|Min[imal]|Prod[uctOnly]|OS|Full
范例:
ServerTokens Prod[uctOnly] :Server: Apache
ServerTokens Major: Server: Apache/2
ServerTokens Minor: Server: Apache/2.0
ServerTokens Min[imal]: Server: Apache/2.0.41
ServerTokens OS: Server: Apache/2.0.41 (Unix)
ServerTokens Full (or not specified): Server: Apache/2.0.41 (Unix) PHP/4.2.2
MyMod/1.2
建议使用:ServerTokens Prod
#默认效果
[root@Centos7 htdocs]#curl -I http://10.0.0.17
HTTP/1.1 200 OK
Date: Tue, 23 Jun 2020 12:08:06 GMT
Server: Apache/2.4.43 (Unix)
Last-Modified: Tue, 23 Jun 2020 09:45:00 GMT
ETag: "b-5a8bd367e085a"
Accept-Ranges: bytes
Content-Length: 11
Content-Type: text/html

[root@Centos7 ~]#cd /app/httpd24/conf/
[root@Centos7 conf]#ls
extra  httpd.conf  magic  mime.types  original
[root@Centos7 conf]#vim httpd.conf    #尽可能不改主配置文件
Include conf.d/*.conf
[root@Centos7 conf]#cd ..
[root@Centos7 httpd24]#ls
bin    cgi-bin  error   icons    lib   man     modules
build  conf     htdocs  include  logs  manual
[root@Centos7 httpd24]#mkdir conf.d
[root@Centos7 httpd24]#vim conf.d/test.conf
[root@Centos7 httpd24]#httpd -t
Syntax OK
[root@Centos7 httpd24]#systemctl reload httpd
[root@Centos7 httpd24]#curl -I http://10.0.0.17
HTTP/1.1 200 OK
Date: Tue, 23 Jun 2020 12:15:17 GMT
Server: Apache
Last-Modified: Tue, 23 Jun 2020 09:45:00 GMT
ETag: "b-5a8bd367e085a"
Accept-Ranges: bytes
Content-Length: 11
Content-Type: text/html
3.2 包含其它配置文件
指令:
Include file-path|directory-path|wildcard
IncludeOptional file-path|directory-path|wildcard
说明:
- Include和IncludeOptional功能相同,都可以包括其它配置文件
- 但是当无匹配文件时,include会报错,IncludeOptional会忽略错误
范例:
#Wildcards may be included in the directory or file portion of the path. This example will fail if there is no subdirectory in conf/vhosts that contains at least one *.conf file:
Include conf/vhosts/*/*.conf
#Alternatively, the following command will just be ignored in case of missing files or directories:

IncludeOptional conf/vhosts/*/*.conf
3.3 监听的IP和Port
Listen [IP:]PORT
说明:
(1) 省略IP表示为本机所有IP
(2) Listen指令至少一个,可重复出现多次
范例:
vim /app/httpd24/httpd.conf
Listen 192.168.1.100:8080    #此ip只能通过8080端口访问
Lsten 80
3.4 持久连接
Persistent Connection:连接建立,每个资源获取完成后不会断开连接,而是继续等待其它的请求完成,默认开启持久连接
断开条件:
时间限制:以秒为单位, 默认5s,httpd-2.4 支持毫秒级
请求数量: 请求数达到指定值,也会断开
副作用:对并发访问量大的服务器,持久连接会使有些请求得不到响应
折衷:使用较短的持久连接时间
持久连接相关指令:
KeepAlive On|Off
KeepAliveTimeout 15 	 #连接持续15s,可以以ms为单位,默认值为5s
MaxKeepAliveRequests 500 #持久连接最大接收的请求数,默认值100
测试方法:
telnet WEB_SERVER_IP PORT
GET /URL HTTP/1.1
Host: WEB_SERVER_IP
3.5 DSO (Dynamic Shared Object)
Dynamic Shared Object,加载动态模块配置,不需重启即生效
动态模块所在路径: /usr/lib64/httpd/modules/
主配置 /etc/httpd/conf/httpd.conf 文件中指定加载模块配置文件
ServerRoot "/etc/httpd"
Include conf.modules.d/*.conf
配置指定实现模块加载格式:
LoadModule <mod_name> <mod_path>
模块文件路径可使用相对路径:相对于ServerRoot(默认/etc/httpd)
范例:查看模块加载的配置文件
[root@centos8 ~]#ls /etc/httpd/conf.modules.d/
00-base.conf 00-lua.conf 00-optional.conf 00-systemd.conf 10-h2.conf
README
00-dav.conf 00-mpm.conf 00-proxy.conf 01-cgi.conf 10-proxy_h2.conf

[root@centos8 ~]#cat /etc/httpd/conf.modules.d/00-base.conf
#
# This file loads most of the modules included with the Apache HTTP
# Server itself.
#
LoadModule access_compat_module modules/mod_access_compat.so
LoadModule actions_module modules/mod_actions.so
LoadModule alias_module modules/mod_alias.so
LoadModule allowmethods_module modules/mod_allowmethods.so
LoadModule auth_basic_module modules/mod_auth_basic.so
...省略...
查看静态编译的模块:httpd -l
查看静态编译及动态装载的模块:httpd –M
范例:
#列出静态编译模块
[root@centos8 ~]#httpd -l
Compiled in modules:
core.c
mod_so.c
http_core.c

#列出静态和动态编译的模块
[root@centos8 ~]#httpd -M
AH00558: httpd: Could not reliably determine the server's fully qualified domain name, using centos8.localdomain. Set the 'ServerName' directive globally to suppress this message
Loaded Modules:
core_module (static)
so_module (static)
http_module (static)
access_compat_module (shared)
actions_module (shared)
alias_module (shared)
allowmethods_module (shared)
auth_basic_module (shared)
...省略...
3.6 MPM (Multi-Processing Module) 多路处理模块
httpd 支持三种MPM工作模式:prefork, worker, event
切换使用的MPM:
#启用要启用的MPM相关的LoadModule指令即可,其它未启用的两项需要在行首加#注释
vim /etc/httpd/conf.modules.d/00-mpm.conf
#LoadModule mpm_prefork_module modules/mod_mpm_prefork.so
#LoadModule mpm_worker_module modules/mod_mpm_worker.so
LoadModule mpm_event_module modules/mod_mpm_event.so
注意:不要同时启用多个MPM模块,否则会出现以下错误
AH00534: httpd: Configuration error: More than one MPM loaded.
范例:查看CentOS 8 和 CentOS 7 默认的MPM工作模式
#查看CentOS 8 默认的MPM工作模式
[root@centos8 ~]#httpd -M |grep mpm
AH00558: httpd: Could not reliably determine the server's fully qualified domain name, using centos8.localdomain. Set the 'ServerName' directive globally to suppress this message
mpm_event_module (shared)

#查看CentOS 7 默认的MPM工作模式
[root@centos7 ~]#httpd -M |grep mpm
AH00558: httpd: Could not reliably determine the server's fully qualified domain name, using centos7.localdomain. Set the 'ServerName' directive globally to suppress this message
mpm_prefork_module (shared)
范例:修改CentOS 8使用 prefork 模型
[root@centos8 ~]#vim /etc/httpd/conf.modules.d/00-mpm.conf
[root@centos8 ~]#grep Load /etc/httpd/conf.modules.d/00-mpm.conf
# one of the following LoadModule lines. See the httpd.conf(5) man
LoadModule mpm_prefork_module modules/mod_mpm_prefork.so
#LoadModule mpm_worker_module modules/mod_mpm_worker.so
#LoadModule mpm_event_module modules/mod_mpm_event.so
[root@centos8 ~]#httpd -M | grep mpm
AH00558: httpd: Could not reliably determine the server's fully qualified domain name, using centos8.localdomain. Set the 'ServerName' directive globally to suppress this message
mpm_prefork_module (shared)
3.7 prefork 模式相关的配置:
StartServers 			2000
MinSpareServers 		1000 #最少空闲进程数
MaxSpareServers 		3000 #最多空闲进程数
ServerLimit 			2560 #最多进程数,最大值 20000
MaxRequestWorkers 		2560 #最大的并发连接数,默认256
MaxConnectionsPerChild  4000 #子进程最多能处理的请求数量。在处理MaxRequestsPerChild 个请求之后,子进程将会被父进程终止,这时候子进程占用的内存就会释放(为0时永远不释放)
MaxRequestsPerChild  	4000 #从 httpd.2.3.9开始被MaxConnectionsPerChild代替
实验:
[root@Centos7 httpd24]#cat  conf.d/test.conf
ServerTokens Prod
StartServers            100
MinSpareServers         80
MaxSpareServers         90
ServerLimit             2560
MaxRequestWorkers       2560

[root@Centos7 httpd24]#ps aux | grep httpd |wc -l
92     #其中有两个root
3.8 worker和event 模式相关的配置
ServerLimit		  16 #最多开启worker进程的数量Upper limit on configurable number of processes
StartServers 	  10 #开启的进程数  Number of child server processes created at startup
MaxRequestWorkers 150 # 最大处理连接数量 Maximum number of connections that will be processed simultaneously
MinSpareThreads   25 #最少空闲线程
MaxSpareThreads   75 #最多空闲线程
ThreadsPerChild   25 #每个进程里的线程数 Number of threads created by each child process
3.9 定义Main server的文档页面路径
DocumentRoot "/path"
<directory /path>
	Require all granted    #必须授权
</directory>
说明:
- DocumentRoot指向的路径为URL路径的起始位置
- /path 必须显式授权后才可以访问
范例:
DocumentRoot "/data/html"
<directory /data/html>
	Require all granted
</directory>
http://HOST:PORT/test/index.html --> /data/html/test/index.html
3.10 定义站点主页面
DirectoryIndex index.php index.html
3.11 可实现访问控制的资源
可以针对文件系统和URI的资源进行访问控制
说明: 所谓文件系统是指一个目录能不能访问 ,URI是统一资源标识,分为URN和URL,通常我们指的是URL(统一资源定位服务)
文件系统路径:
#基于目录
<Directory “/path">
...
</Directory>

#基于文件
<File “/path/file”>
...
</File>

#基于文件通配符
<File “/path/*file*”>
...
</File>

#基于扩展正则表达式
<FileMatch “regex”>
...
</FileMatch>
范例:
#.+表示一个字符以上    \.表示对.转义   |表示或    e?表示e可有可无     匹配文件名事宜图片为后缀
<FilesMatch ".+\.(gif|jpe?g|png)$">
	# ...         #此处可以填是否允许访问
</FilesMatch>

<Files ".ht*">  #通配符,表示.ht开头
	Require all denied
</Files>
URL路径:
<Location "URL">
...
</Location>

<LocationMatch "regex">    #location的正则表达式
...
</LocationMatch>
范例:
#/private1, /private1/,/private1/file.txt 匹配
#/private1other 不匹配
<Location "/private1">
	# ...
</Location>

#/private2/,/private2/file.txt 匹配
#/private2,/private2other 不匹配
<Location "/private2/">
	# ...
</Location>
范例:
<Location /status>
<LocationMatch "/(extra|special)/data">
3.12 针对目录和URL实现访问控制
(1) Options指令:
后跟1个或多个以空白字符分隔的选项列表, 在选项前的+,- 表示增加或删除指定选项
常见选项:
- Indexes:指明的URL路径下不存在与定义的主页面资源相符的资源文件时,返回索引列表给用户
- FollowSymLinks:允许访问符号链接文件所指向的源文件
- None:全部禁用
- All: 全部允许
范例:
<Directory /web/docs>
	Options -Indexes -FollowSymLinks
</Directory>

<Directory /web/docs/spec>
	Options -FollowSymLinks
</Directory>
范例:
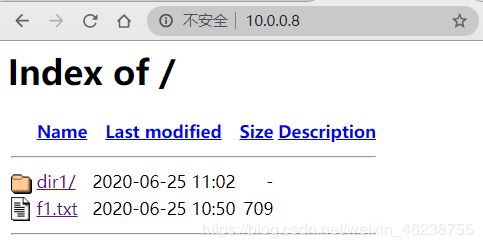
[root@centos8 ~]#cd /etc/httpd/conf.d/
[root@centos8 conf.d]#mv welcome.conf{,.bak}   #欢迎页面挪走后,将显示默认的文件列表
[root@centos8 conf.d]#cd /var/www/html/
[root@centos8 html]#cp /etc/fstab f1.txt
[root@centos8 html]#mkdir dir1
[root@centos8 html]#ln -s /etc/ etclink
[root@centos8 html]#ll
total 4
drwxr-xr-x 2 root root   6 Jun 25 10:50 dir1
lrwxrwxrwx 1 root root   5 Jun 25 10:51 etclink -> /etc/
-rw-r--r-- 1 root root 709 Jun 25 10:50 f1.txt

[root@centos8 ~]#systemctl restart httpd
打开浏览器,访问 http://httpd主机IP/ 可看到下面所示
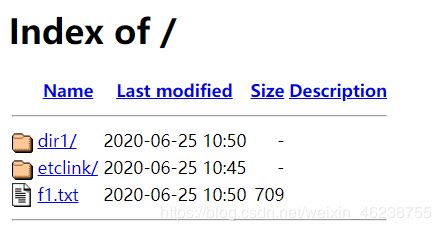
[root@centos8 ~]#vim /etc/httpd/conf/httpd.conf
#Options Indexes FollowSymLinks
Options Indexes #将上面行加注释,修改为此行
[root@centos8 ~]#systemctl restart httpd
打开浏览器,访问 http://httpd主机IP/ 可看到下面所示,无法看软链接目录datalink

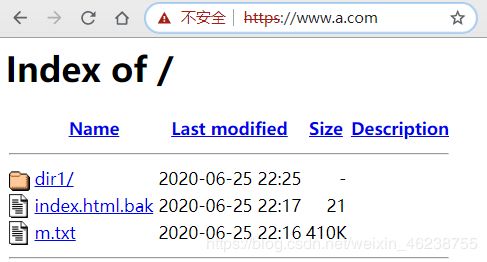
把Options Indexes这一行删除,则会有下面提示
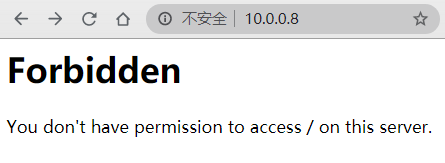
(2) AllowOverride指令
与访问控制相关的哪些指令可以放在指定目录下的.htaccess(由AccessFileName 指令指
定,AccessFileName .htaccess 为默认值)文件中,覆盖之前的配置指令,只对语句有效
常见用法:
- AllowOverride All: .htaccess中所有指令都有效
- AllowOverride None: .htaccess 文件无效,此为httpd 2.3.9以后版的默认值
- AllowOverride AuthConfig .htaccess 文件中,除了AuthConfig 其它指令都无法生效
范例:
vim /etc/httpd/conf/httpd.conf
#Options Indexes FollowSymLinks
Options Indexes

#AllowOverride None
AllowOverride options=FollowSymLinks,indexes #注释上一行,修改为此行

[root@centos8 ~]#vim /var/www/html/dir1/.htaccess
Options FollowSymLinks indexes #加此行

[root@centos8 ~]#cd /var/www/html/dir1/
[root@centos8 dir1]#cp /etc/fstab f2.txt
[root@centos8 dir1]#mkdir dir2
[root@centos8 dir1]#ln -s /tmp tmplink
[root@centos8 dir1]#ll
total 4
drwxr-xr-x 2 root root   6 Jun 25 11:00 dir2
-rw-r--r-- 1 root root 709 Jun 25 11:00 f2.txt
lrwxrwxrwx 1 root root   4 Jun 25 11:00 tmplink -> /tmp
[root@centos8 dir1]#pwd
/var/www/html/dir1

[root@centos8 ~]#systemctl restart httpd
打开浏览器,访问 http://httpd主机IP/dir1 ,可以看到tmplink的软链接

打开浏览器,访问 http://httpd主机IP/ 可看到下面所示,无法看软链接目录datalink
范例:.htaccess文件默认被禁止访问
[root@centos7 test2]#grep -Ev '^ *#|^$' /app/httpd24/conf/httpd.conf |grep -A 2 'ht\*'
<Files ".ht*">
	Require all denied
</Files>
3.13 基于客户端 IP 地址实现访问控制
针对各种资源,可以基于以下两种方式的访问控制:
- 客户端来源地址
- 用户账号
基于客户端的IP地址的访问控制:
- 无明确授权的目录,默认拒绝
- 允许所有主机访问:Require all granted
- 拒绝所有主机访问:Require all denied
- 控制特定的IP访问:
Require ip IPADDR:授权指定来源的IP访问
Require not ip IPADDR:拒绝特定的IP访问 - 控制特定的主机访问:
Require host HOSTNAME:授权特定主机访问
Require not host HOSTNAME:拒绝- HOSTNAME:
- FQDN:特定主机
- domin.tld:指定域名下的所有主机
- HOSTNAME:
不能有失败,至少有一个成功匹配才成功,即失败优先
<RequireAll>
	Require all granted
	Require not ip 172.16.1.1 #拒绝特定IP
</RequireAll>
多个语句有一个成功,则成功,即成功优先
<RequireAny>
	Require all denied
	require ip 172.16.1.1 #允许特定IP
</RequireAny>
提示:早期版本使用 mod_access_compat 模块提供的 Allow,Deny,Order指令,将被废弃,不推荐使用
http://httpd.apache.org/docs/2.4/mod/mod_access_compat.html
Available in Apache HTTP Server 2.3 as a compatibility module with previous versions of Apache httpd 2.x. The directives provided by this module have been deprecated by the new authz refactoring. Please see mod_authz_host
The Allow , Deny , and Order directives, provided by mod_access_compat , are deprecated and will go away in a future version. You should avoid using them, and avoid outdated tutorials recommending their use.
范例:
<directory /var/www/html/dir>
<requireany>
	require all denied
	Require ip 10.0.0.0/24
</requireany>
</directory>
3.14 日志设定
httpd有两种日志类型
- 访问日志
- 错误日志
3.14.1 错误日志
LogLevel warn #LogLevel 可选值: debug, info, notice, warn,error, crit, alert,emerg
ErrorLog logs/error_log #相对路径,相对于/etc/httpd,配置文件里有一行ServerRoot
3.14.2 访问日志
-
定义日志格式:
LogFormat format nickname -
使用日志格式:
CustomLog file nickname
范例:
LogFormat "%h %l %u %{%F %T}t "%r" %>s %b "%{Referer}i"\"%{User-Agent}i\"" testlog
参考帮助:http://httpd.apache.org/docs/2.4/mod/mod_log_config.html#formats
%h #客户端IP地址
%l #远程用户,启用mod_ident才有效,通常为减号"-”
%u #验证(basic,digest)远程用户,非登录访问时,为一个减号"-”
%t #服务器收到请求时的时间
%r #First line of request,即表示请求报文的首行;记录了此次请求的"方法”,"URL”以及协议版本
%>s #响应状态码
%b #响应报文的大小,单位是字节;不包括响应报文http首部
%{Referer}i #请求报文中首部"referer”的值;即从哪个页面中的超链接跳转至当前页面的
%{User-Agent}i #请求报文中首部"User-Agent”的值;即发出请求的应用程序

%{VARNAME}i #The contents of VARNAME: header line(s) in the request sent to the server
范例: 通过自定义访问日志格式,实现自定义时间格式
[root@centos8 ~]#vim /etc/httpd/conf/httpd.conf

logFormat "%h \"%{%F %T}t\" %>s %{User-Agent}i" testlog
CustomLog "logs/access_log" testlog

[root@centos8 ~]#tail -f /var/log/httpd/access_log
10.0.0.7 "2020-06-24 10:26:51" 200 curl/7.29.0
实验:查看报文头部
#模仿chrome浏览器对163进行访问,查看报文头部
[root@Centos7 ~]#curl -A chrome -I http://www.163.com
HTTP/1.1 200 OK
Date: Thu, 25 Jun 2020 06:12:01 GMT
Content-Type: text/html; charset=GBK
Connection: keep-alive
Expires: Thu, 25 Jun 2020 06:13:15 GMT
Server: nginx
Vary: Accept-Encoding
Cache-Control: no-cache,no-store,private
X-Cache-Spec: Yes
X-Via: 1.1 PS-CZX-0165159:5 (Cdn Cache Server V2.0), 1.1 PSsdzbwt5he22:2 (Cdn Cache Server V2.0), 1.1 tjtg129:2 (Cdn Cache Server V2.0)
X-Ws-Request-Id: 5ef44030_tjtg129_31362-51585
3.15 设定默认字符集
设定字符集指令
AddDefaultCharset UTF-8 #此为默认值
中文字符集:GBK, GB2312, GB18030
3.16 定义路径别名
格式:
Alias /URL/ "/PATH/"
范例:
DocumentRoot "/www/htdocs"
#http://www.magedu.com/download/bash.rpm ==>/www/htdocs/download/bash.rpm
Alias /download/  "/rpms/pub/"
#http://www.magedu.com/download/bash.rpm ==>/rpms/pub/bash.rpm
#http://www.magedu.com/images/logo.png ==>/www/htdocs/images/logo.png
范例:
[root@centos8 html]#mkdir /data/newsdir
[root@centos8 html]#echo /data/newsdir/index.html > /data/newsdir/index.html
[root@centos8 ~]#cat /etc/httpd/conf.d/test.conf
alias /news /data/html/newsdir/
<directory /data/html/newsdir>
require all granted
</directory>
3.17 基于用户的访问控制
认证质询:WWW-Authenticate,响应码为401,拒绝客户端请求,并说明要求客户端需要提供账号和密码
认证:Authorization,客户端用户填入账号和密码后再次发送请求报文;认证通过时,则服务器发送响应的资源
认证方式两种:
- basic:明文
- digest:消息摘要认证,兼容性差
安全域:需要用户认证后方能访问的路径;应该通过名称对其进行标识,以便于告知用户认证的原因
用户的账号和密码
虚拟账号:仅用于访问某服务时用到的认证标识
存储:文本文件,SQL数据库,ldap目录存储,nis等
basic认证配置示例:
(1) 定义安全域
<Directory "/path">
Options None
AllowOverride None
AuthType Basic
AuthName "String"
AuthUserFile  "/PATH/HTTPD_USER_PASSWD_FILE"
Require user username1 username2 ...
</Directory>
允许账号文件中的所有用户登录访问:
Require valid-user
(2) 提供账号和密码存储(文本文件)
使用专用命令完成此类文件的创建及用户管理
htpasswd [options] /PATH/HTTPD_PASSWD_FILE username

#apache用户需要有read权限
setfacl -m u:apache:r /PATH/HTTPD_PASSWD_FILE
选项:
-c 自动创建文件,仅应该在文件不存在时使用
-p 明文密码
-d CRYPT格式加密,默认
-m md5格式加密
-s sha格式加密
-D 删除指定用户
基于组账号进行认证
(1) 定义安全域
<Directory "/path">
AuthType Basic
AuthName "String"
AuthUserFile  "/PATH/HTTPD_USER_PASSWD_FILE"
AuthGroupFile "/PATH/HTTPD_GROUP_FILE"
Require group grpname1 grpname2 ...
</Directory>
范例:方法1
[root@centos8 html]#mkdir admin
[root@centos8 html]#echo /var/www/html/admin/index.html > admin/index.html

[root@centos8 ~]#cat /etc/httpd/conf.d/test.conf
<directory /var/www/html/admin>
AuthType Basic
AuthName "Please input valid user and password"
AuthUserFile  "/etc/httpd/conf.d/.httpuser"
#Require user xiaoming xiaohong    #指定用户才可以访问
require valid-user
</directory>

[root@centos8 ~]#htpasswd -c /etc/httpd/conf.d/.httpuser xiaoming
[root@centos8 ~]#htpasswd -c /etc/httpd/conf.d/.httpuser xiaohong
[root@centos8 ~]#cd /etc/httpd/conf.d
[root@centos8 conf.d]#cat .httpduser
xiaoming:$apr1$4m8msymf$Fa.r4sSRz/nIhpZzxRx3J.
xiaohong:$apr1$pPruVR2y$yKuN.TkgMy2.tTAoc2YBA1

[root@centos8 conf.d]#pwd
/etc/httpd/conf.d
[root@centos8 conf.d]#ll -a
total 24
drwxr-xr-x 2 root root  121 Jun 25 14:57 .
drwxr-xr-x 5 root root  105 Jun 25 10:45 ..
-rw-r--r-- 1 root root 2926 Dec 24  2019 autoindex.conf
-rw-r--r-- 1 root root  236 Jun 25 14:59 .httpduser
-rw-r--r-- 1 root root  400 Dec 24  2019 README
-rw-r--r-- 1 root root  198 Jun 25 14:34 test.conf
-rw-r--r-- 1 root root 1252 Dec 24  2019 userdir.conf
-rw-r--r-- 1 root root  738 Dec 24  2019 welcome.conf.bak
[root@centos8 conf.d]#chmod 600 .httpduser
[root@centos8 conf.d]#ll .httpduser
-rw------- 1 root root 236 Jun 25 14:59 .httpduser
[root@centos8 ~]#systemctl reload httpd
浏览器访问 http://httpd服务器/admin 可以看到以下显示


#apache用户需要有读权限
setfacl -m u:apache:r /etc/httpd/conf.d/.httpduser


使用wireshark 抓包软件,可以看到明文密码

查看访问日志文件/var/logs/httpd/access_log,可以观察到以下内容
[root@centos8 html]#tail -f /var/log/httpd/access_log
10.0.0.1 xiaoming "2020-06-25 15:36:18" 301 Mozilla/5.0 (Windows NT 10.0; Win64; x64) AppleWebKit/537.36 (KHTML, like Gecko) Chrome/83.0.4103.106 Safari/537.36
10.0.0.1 xiaoming "2020-06-25 15:36:18" 200 Mozilla/5.0 (Windows NT 10.0; Win64; x64) AppleWebKit/537.36 (KHTML, like Gecko) Chrome/83.0.4103.106 Safari/537.36
范例:方法2
[root@centos8 ~]#mkdir /var/www/html/secret
[root@centos8 ~]#echo /var/www/html/secret/index.html >
/var/www/html/secret/index.html
[root@centos8 ~]#cd /var/www/html/secret/
[root@centos8 secret]#ls
index.html
[root@centos8 secret]#vim .htaccess
[root@centos8 ~]#cat /var/www/html/secret/.htaccess
AuthType Basic
AuthName "FBI warning"
AuthUserFile  "/etc/httpd/conf.d/.httpuser"
Require user xiaoming
[root@centos8 ~]#vim /etc/httpd/conf.d/test.conf
[root@centos8 ~]#cat /etc/httpd/conf.d/test.conf
<directory /var/www/html/admin>
AuthType Basic
AuthName "FBI warning"
AuthUserFile  "/etc/httpd/conf.d/.httpuser"
#Require user xiaoming xiaohong
require valid-user
</directory>

<directory /var/www/html/secret>
allowoverride authconfig
</directory>

[root@centos8 ~]#systemctl reload httpd
(2) 创建用户账号和组账号文件
组文件:每一行定义一个组
GRP_NAME: username1 username2 ...
范例:
<Directory "/www/htdocs/admin">
Options None
AllowOverride None
AuthType Basic
AuthName "Administator private"
AuthUserFile "/etc/httpd/conf.d/.htpasswd"
AuthGroupFile "/etc/httpd/conf.d/.htgroup"
Require group webadmins
</Directory>

vim /etc/httpd/conf.d/.htgroup
webadmins:wang mage
范例:
[root@centos8 ~]#cat /var/www/html/secret/.htaccess
AuthType Basic
AuthName "FBI warning"
AuthUserFile  "/etc/httpd/conf.d/.httpuser"
AuthGroupFile "/etc/httpd/conf.d/.httpgroup"
#Require user xiaoming
Require group webadmins

[root@centos8 ~]#cat /etc/httpd/conf.d/.httpgroup
webadmins: xiaoming xiaobai

[root@centos8 ~]#cat /etc/httpd/conf.d/test.conf
<directory /var/www/html/admin>
AuthType Basic
AuthName "FBI warning"
AuthUserFile  "/etc/httpd/conf.d/.httpuser"
#Require user xiaoming xiaohong
require valid-user
</directory>

<directory /var/www/html/secret>
allowoverride authconfig
</directory>
3.18 远程客户端和用户验证的控制
Satisfy ALL|Any
说明:
ALL 客户机IP和用户验证都需要通过才可以,此为默认值
Any 客户机IP和用户验证,有一个满足即可
范例:
#针对/var/www/html/test目录,来自192.168.1.0/24的客户可以访问,其它网络的用户需要经过用户验证才能访问
<Directory "/var/www/html/test">
Require valid-user
Allow from 192.168.1
Satisfy Any
</Directory>

#/var/www/private目录只有用户验证才能访问
<Directory "/var/www/private">
   Require valid-user
</Directory>

#/var/www/private/public 不需要用户验证,任何客户都可以访问
<Directory "/var/www/private/public">
   Allow from all
   Satisfy Any
</Directory>
3.19 实现用户家目录的http共享
基于模块 mod_userdir.so 实现
相关设置:
vim /etc/httpd/conf.d/userdir.conf
<IfModule mod_userdir.c>
   #UserDir disabled     #将此行注释
   UserDir public_html   #将此行注释取消,指定共享目录的名称
</IfModule>
#准备目录
su – wang;
mkdir ~/public_html
setfacl –m u:apache:x ~wang
#访问
http://localhost/~wang/index.html
范例:对家目录共享
[root@centos8 ~]#su - wang
[wang@centos8 ~]$mkdir html
[wang@centos8 ~]$echo /home/wang/html/index.html > html/index.html
[wang@centos8 ~]$setfacl -m u:apache:x /home/wang
[root@centos8 ~]#vim /etc/httpd/conf.d/userdir.conf
[root@centos8 ~]#grep -v '^ *#' /etc/httpd/conf.d/userdir.conf
<IfModule mod_userdir.c>
   UserDir html
</IfModule>
<directory /home/wang/html>
require all granted
</directory>

浏览器访问
http://localhost/~wang/
范例:对家目录共享并实现basic验证
Vi /etc/httpd/conf.d/userdir.conf centos7
<IfModule mod_userdir.c>
#UserDir disabled
UserDir public_html
</IfModule>
#注释下面几行
#3.20 隐藏服务器版本信息
ServerTokens Major|Minor|Min[imal]|Prod[uctOnly]|OS|Full
范例:
ServerTokens Prod[uctOnly] :Server: Apache
ServerTokens Major: Server: Apache/2
ServerTokens Minor: Server: Apache/2.0
ServerTokens Min[imal]: Server: Apache/2.0.41
ServerTokens OS: Server: Apache/2.0.41 (Unix)
ServerTokens Full (or not specified): Server: Apache/2.0.41 (Unix) PHP/4.2.2 MyMod/1.2
建议使用:ServerTokens Prod
禁止错误网页版本泄露
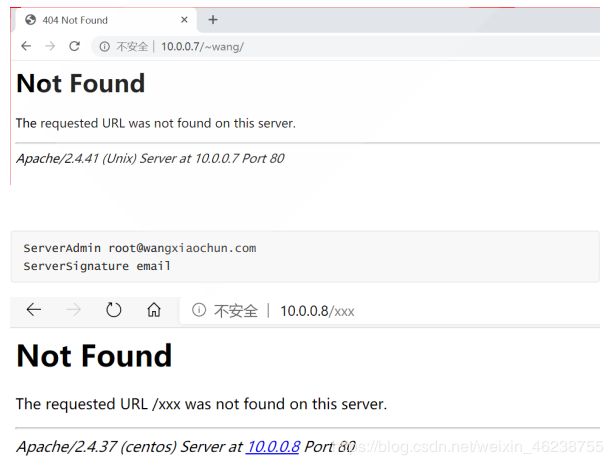
ServerSignature On | Off | EMail
默认值Off,如果ServerTokens 使用默认值,并且ServerSignature选项为on,当客户请求的网页并不存在时,服务器将产生错误文档,错误文档的最后一行将包含服务器名字、Apache版本等信息,如果不对外显示这些信息,就可将这个参数设置为Off, 如果设置为Email,将显示ServerAdmin 的Email提示
ServerSignature on
3.21 禁止trace方法
TraceEnable [on|off|extended]
默认on,基于安全风险,建议关闭
范例:关闭 trace方法
[root@centos8 ~]#curl -IX OPTIONS http://www.apache.org
HTTP/1.1 200 OK
Date: Wed, 24 Jun 2020 06:02:45 GMT
Server: Apache/2.4.18 (Ubuntu)
Allow: GET,HEAD,POST,OPTIONS
Cache-Control: max-age=3600
Expires: Wed, 24 Jun 2020 07:02:45 GMT
Content-Length: 0
Content-Type: text/html

[root@centos8 ~]#curl -IX OPTIONS http://127.0.0.1
HTTP/1.1 200 OK
Date: Wed, 24 Jun 2020 06:04:45 GMT
Server: Apache/2.4.37 (centos)
Allow: POST,OPTIONS,HEAD,GET,TRACE
Content-Length: 0
Content-Type: httpd/unix-directory

[root@centos8 ~]#vim /etc/httpd/conf.d/test.conf
TraceEnable off

[root@centos8 ~]#curl -IX OPTIONS http://127.0.0.1
HTTP/1.1 200 OK
Date: Tue, 10 Dec 2019 04:09:41 GMT
Server: Apache/2.4.37 (centos)
Allow: GET,POST,OPTIONS,HEAD
Content-Length: 0
Content-Type: text/html; charset=UTF-8
3.22 status 状态页
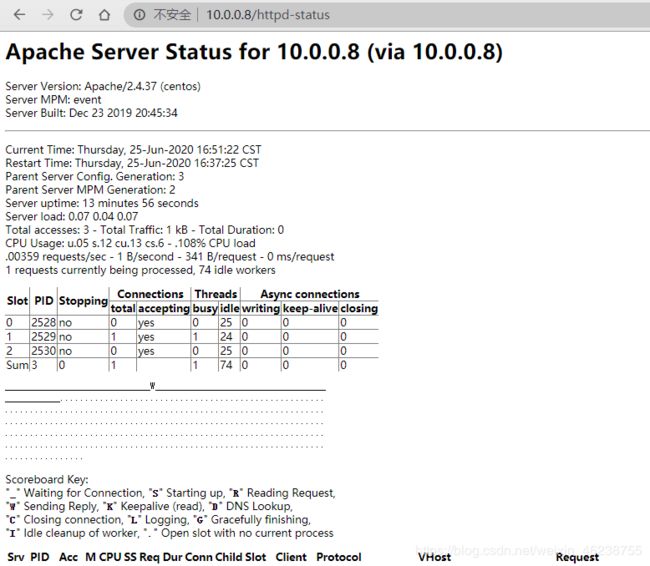
httpd 提供了状态页,可以用来观察httpd的运行情况。此功能需要加载mod_status.so模块才能实现
LoadModule status_module modules/mod_status.so
<Location "/status">
SetHandler server-status
</Location>
ExtendedStatus On   #显示扩展信息,httpd 2.3.6以后版默认为On
范例:启动状态页
#确认加载mod_status.so模块
[root@centos8 conf.d]#httpd -M |grep status
status_module (shared)
[root@centos8 ~]#vim /etc/httpd/conf.d/status.conf
<Location "/status">
   SetHandler server-status  #针对status目录开启状态页面
   <RequireAny>
   Require all denied
   require ip  172.16.1.1  #允许特定IP
   </RequireAny>
   #Order Deny,Allow   此方式也可以控制访问
   #Deny from all
   #Allow from 192.168.100
</Location>
ExtendedStatus Off  #是否详细的信息,默认值为on

[root@centos8 ~]#systemctl restart httpd
#打开浏览器访问http://httpd服务器IP/status可以参看到以下页面
3.23 多虚拟主机
httpd 支持在一台物理主机上实现多个网站,即多虚拟主机
网站的唯一标识:
- IP相同,但端口不同
- IP不同,但端口均为默认端口
- FQDN不同, IP和端口都相同
多虚拟主机有三种实现方案:
- 基于ip:为每个虚拟主机准备至少一个ip地址
- 基于port:为每个虚拟主机使用至少一个独立的port
- 基于FQDN:为每个虚拟主机使用至少一个FQDN,请求报文中首部 Host: www.magedu.com
注意:httpd 2.4版本中,基于FQDN的虚拟主机不再需要NameVirutalHost指令
虚拟主机的基本配置方法:
<VirtualHost IP:PORT>
ServerName FQDN
DocumentRoot  "/path"
</VirtualHost>
建议:上述配置存放在独立的配置文件中
其它常用可用指令:
ServerAlias:虚拟主机的别名;可多次使用
ErrorLog: 错误日志
CustomLog:访问日志
<Directory "/path"> </Directory>
范例:基于端口的虚拟主机
[root@centos8 ~]#echo /data/website1/index.html > /data/website1/index.html
[root@centos8 ~]#echo /data/website2/index.html > /data/website2/index.html
[root@centos8 ~]#echo /data/website3/index.html > /data/website3/index.html

[root@centos8 ~]#cat /etc/httpd/conf.d/test.conf
listen 81
listen 82
listen 83
<virtualhost *:81>
documentroot /data/website1/
CustomLog logs/website1_access.log combined
<directory /data/website1>
require all granted
</directory>
</virtualhost>

<virtualhost *:82>
documentroot /data/website2/
CustomLog logs/website2_access.log combined
<directory /data/website2>
require all granted
</directory>
</virtualhost>

<virtualhost *:83>
documentroot /data/website3/
CustomLog logs/website3_access.log combined
<directory /data/website3>
require all granted
</directory>
</virtualhost>

[root@centos8 ~]#ll /var/log/httpd/
total 44
-rw-r--r-- 1 root root 10679 Dec 10 12:00 access_log
-rw-r--r-- 1 root root 18883 Dec 10 11:59 error_log
-rw-r--r-- 1 root root  1969 Dec 10 12:00 website1_access.log
-rw-r--r-- 1 root root   482 Dec 10 12:00 website2_access.log
-rw-r--r-- 1 root root   482 Dec 10 12:00 website3_access.log

#浏览器访问不同端口,得到不同的页面
http://10.0.0.8:81/
http://10.0.0.8:82/
http://10.0.0.8:83/


范例:基于IP的虚拟主机
说明:这样做的话需要在互联网上申请三个公网ip
[root@centos8 ~]#ip a a 10.0.0.8/24 dev eth0 label eth0:1
[root@centos8 ~]#ip a a 10.0.0.18/24 dev eth0 label eth0:2
[root@centos8 ~]#ip a a 10.0.0.28/24 dev eth0 label eth0:3
[root@centos8 ~]#ip a
1: lo: <LOOPBACK,UP,LOWER_UP> mtu 65536 qdisc noqueue state UNKNOWN group default qlen 1000
   link/loopback 00:00:00:00:00:00 brd 00:00:00:00:00:00
   inet 127.0.0.1/8 scope host lo
       valid_lft forever preferred_lft forever
   inet6 ::1/128 scope host
       valid_lft forever preferred_lft forever
2: eth0: <BROADCAST,MULTICAST,UP,LOWER_UP> mtu 1500 qdisc mq state UP group default qlen 1000
   link/ether 00:0c:29:f9:8d:90 brd ff:ff:ff:ff:ff:ff
   inet 192.168.39.8/24 brd 192.168.39.255 scope global noprefixroute eth0
       valid_lft forever preferred_lft forever
   inet 10.0.0.8/24 scope global eth0
       valid_lft forever preferred_lft forever
   inet 10.0.0.18/24 scope global secondary eth0
       valid_lft forever preferred_lft forever
   inet 10.0.0.28/24 scope global secondary eth0
       valid_lft forever preferred_lft forever
   inet6 fe80::20c:29ff:fef9:8d90/64 scope link
       valid_lft forever preferred_lft forever

[root@centos8 ~]#vim /etc/httpd/conf.d/test.conf
[root@centos8 ~]#cat /etc/httpd/conf.d/test.conf
<virtualhost 10.0.0.8:80>
documentroot /data/website1/
CustomLog logs/website1_access.log combined
<directory /data/website1>
require all granted
</directory>
</virtualhost>

<virtualhost 10.0.0.18:80>
documentroot /data/website2/
CustomLog logs/website2_access.log combined
<directory /data/website2>
require all granted
</directory>
</virtualhost>

<virtualhost 10.0.0.28:80>
documentroot /data/website3/
CustomLog logs/website3_access.log combined
<directory /data/website3>
require all granted
</directory>
</virtualhost>
[root@centos8 ~]#httpd -t
Syntax OK
[root@centos8 ~]#systemctl reload httpd
[root@centos8 ~]#curl 10.0.0.8
/data/website1/index.html
[root@centos8 ~]#curl 10.0.0.18
/data/website2/index.html
[root@centos8 ~]#curl 10.0.0.28
/data/website3/index.html
范例:基于FQDN(主机头)虚拟主机
<VirtualHost *:80>
ServerName www.a.com
DocumentRoot "/www/a.com/htdocs"
<Directory "/www/a.com/htdocs">
ErrorLog "logs/a_error_log"
CustomLog "logs/a_access_log" combined
Options None
AllowOverride None
Require all granted
</Directory>
</VirtualHost>

<VirtualHost *:80>
ServerName www.b.net
DocumentRoot "/www/b.net/htdocs"
<Directory "/www/b.net/htdocs">
ErrorLog "logs/b_error_log"
CustomLog "logs/b_access_log" combined
Options None
AllowOverride None
Require all granted
</Directory>
</VirtualHost>

<VirtualHost *:80>
ServerName www.c.org
DocumentRoot "/www/c.org/htdocs"
<Directory "/www/c.org/htdocs">
errorLog "logs/c_error_log"
CustomLog "logs/c_access_log" combined
Options None
AllowOverride None
Require all granted
</Directory>
</VirtualHost>
注意:
- 任意目录下的页面只有显式授权才能被访问
- 三种方式的虚拟主机可以混和使用
3.24 压缩
使用mod_deflate模块压缩页面优化传输速度
LoadModule deflate_module modules/mod_deflate.so SetOutputFilter
适用场景:
(1) 节约带宽,额外消耗CPU;同时,可能有些较老浏览器不支持
(2) 压缩适于压缩的资源,例如文本文件
压缩指令
#可选项
SetOutputFilter DEFLATE

# 指定对哪种MIME类型进行压缩,必须指定项
AddOutputFilterByType DEFLATE text/plain
AddOutputFilterByType DEFLATE text/html
AddOutputFilterByType DEFLATE application/xhtml+xml
AddOutputFilterByType DEFLATE text/xml
AddOutputFilterByType DEFLATE application/xml
AddOutputFilterByType DEFLATE application/x-javascript
AddOutputFilterByType DEFLATE text/javascript
AddOutputFilterByType DEFLATE text/css

#压缩级别 (Highest 9 - Lowest 1)
DeflateCompressionLevel 9
#排除特定旧版本的浏览器,不支持压缩
#Netscape 4.x 只压缩text/html
BrowserMatch ^Mozilla/4 gzip-only-text/html
#Netscape 4.06-08 三个版本 不压缩
BrowserMatch ^Mozilla/4\.0[678] no-gzip
#Internet Explorer标识本身为"Mozilla / 4”,但实际上是能够处理请求的压缩。如果用户代理首部匹配字符串"MSIE”("B”为单词边界”),就关闭之前定义的限制
BrowserMatch \bMSI[E] !no-gzip !gzip-only-text/html
3.25 实现 https
https:http over ssl ,实现验证和加密功能
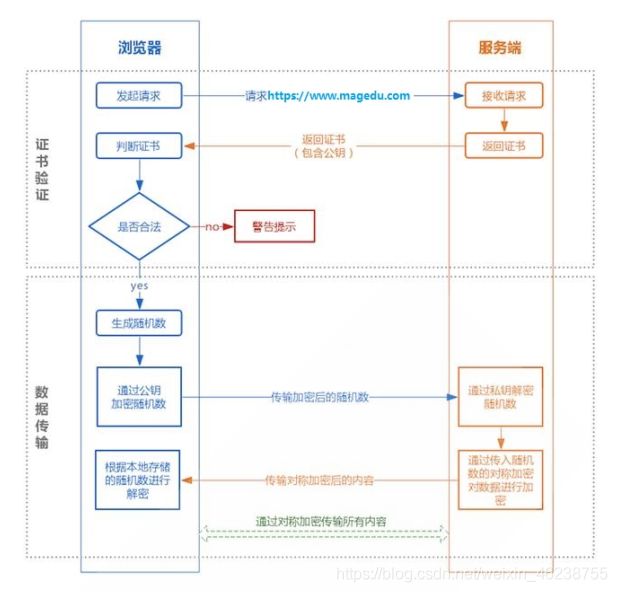
3.25.1 HTTPS 会话的简化过程
-
客户端发送可供选择的加密方式,并向服务器请求证书
-
服务器端发送证书以及选定的加密方式给客户端
-
客户端取得证书并进行证书验证,如果信任给其发证书的CA
(a) 验证证书来源的合法性;用CA的公钥解密证书上数字签名
(b) 验证证书的内容的合法性:完整性验证
(c) 检查证书的有效期限
(d) 检查证书是否被吊销
(e) 证书中拥有者的名字,与访问的目标主机要一致 -
客户端生成临时会话密钥(对称密钥),并使用服务器端的公钥加密此数据发送给服务器,完成密钥交换
-
服务用此密钥加密用户请求的资源,响应给客户端
注意:SSL是基于IP地址实现,单IP的httpd主机,仅可以使用一个https虚拟主机
3.25.2 apache实现https过程
-
为服务器申请数字证书
可以通过私建CA颁发证书实现
(a) 创建私有CA
(b) 在服务器创建证书签署请求
(c) CA签证 -
配置httpd支持使用ssl,及使用的证书
#安装mod_ssl包 yum -y install mod_ssl #修改对应的配置文件:/etc/httpd/conf.d/ssl.conf DocumentRoot ServerName SSLCertificateFile /path/file SSLCertificateKeyFile /path/file SSLCACertificateFile /path/file -
测试基于https访问相应的主机
openssl s_client [-connect host:port] [-cert filename] [-CApath directory] [-CAfile filename]
范例:
[root@centos8 ssl]#openssl s_client -connect www.wangxiaochun.com:443 -CAfile 3395645_wangxiaochun.com_chain.crt
3.25.3 实现https 实战案例
3.25.3.1 范例1:生成自签名证书
[root@centos8 ~]#yum -y install   mod_ssl
[root@centos7 ~]#cd /etc/pki/tls/certs
[root@centos7 certs]#pwd
/etc/pki/tls/certs
[root@centos7 certs]#ls
ca-bundle.crt ca-bundle.trust.crt make-dummy-cert Makefile renew-dummy-cert

[root@centos7 certs]#vim Makefile
#/usr/bin/openssl genrsa -aes128 $(KEYLEN) > $@
/usr/bin/openssl genrsa  $(KEYLEN) > $@
[root@centos7 certs]#make magedu.org
make: *** No rule to make target 'magedu.org'. Stop.
[root@centos7 certs]#make magedu.org.crt
umask 77 ; \
#/usr/bin/openssl genrsa -aes128 2048 > magedu.org.key
/usr/bin/openssl genrsa  2048 > magedu.org.key
Generating RSA private key, 2048 bit long modulus
......................+++
...+++
e is 65537 (0x10001)
umask 77 ; \
/usr/bin/openssl req -utf8 -new -key magedu.org.key -x509 -days 365 -out
magedu.org.crt
You are about to be asked to enter information that will be incorporated
into your certificate request.
What you are about to enter is what is called a Distinguished Name or a DN.
There are quite a few fields but you can leave some blank
For some fields there will be a default value,
If you enter '.', the field will be left blank.
-----
Country Name (2 letter code) [XX]:CN
State or Province Name (full name) []:beijing
Locality Name (eg, city) [Default City]:beijing
Organization Name (eg, company) [Default Company Ltd]:magedu
Organizational Unit Name (eg, section) []:devops
Common Name (eg, your name or your server's hostname) []:www.magedu.org
Email Address []:
[root@centos7 certs]#ls
ca-bundle.crt ca-bundle.trust.crt magedu.org.crt magedu.org.key make-dummycert Makefile renew-dummy-cert

[root@Centos7 ~]#mkdir /etc/httpd/conf.d/ssl
[root@Centos7 ~]#ll /etc/httpd/conf.d/ssl
total 16
-rw-r--r-- 1 root root 1143 Jun 25 23:40 cacert.pem
-rw-r--r-- 1 root root 1078 Jun 25 23:40 www.b.com.crt
-rw-r--r-- 1 root root  976 Jun 25 23:40 www.b.com.csr
-rw------- 1 root root 1708 Jun 25 23:40 www.b.com.key
[root@Centos7 ~]#vim /etc/httpd/conf.d/ssl.conf
[root@Centos7 ~]#systemctl restart httpd
[root@Centos7 ~]#echo centos7 > /var/www/html/index.html
[root@centos8 ~]#dnf -y install   mod_ssl
[root@centos8 ~]#ll /etc/httpd/conf.d/ssl/
total 24
-rw-r--r-- 1 root root 1679 Dec 10  2019 www.wangxiaochun.com_chain.crt
-rw-r--r-- 1 root root 1675 Dec 10  2019 www.wangxiaochun.com.key
-rw-r--r-- 1 root root 2021 Dec 10  2019 www.wangxiaochun.com_public.crt

[root@centos8 ~]#cd /etc/httpd/conf.d/ssl/
[root@centos8 ssl]#openssl x509 -in www.wangxiaochun.com_public.crt -noout -text


[root@centos8 ~]#grep -Ev "^ *#|^$" /etc/httpd/conf.d/ssl.conf
3.26 URL重定向
URL重定向,即将httpd 请求的URL转发至另一个的URL
重定向指令
Redirect [status] URL-path URL
status状态:
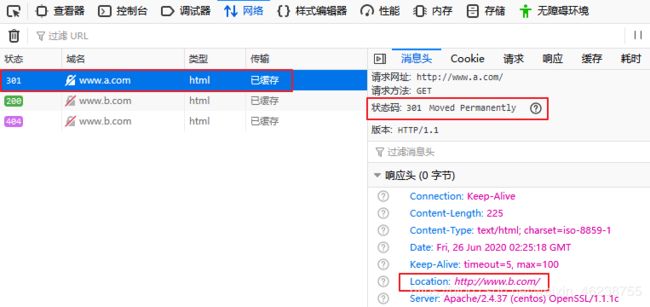
- permanent: 返回永久重定向状态码 301,浏览器会将 此重定向信息进行缓存
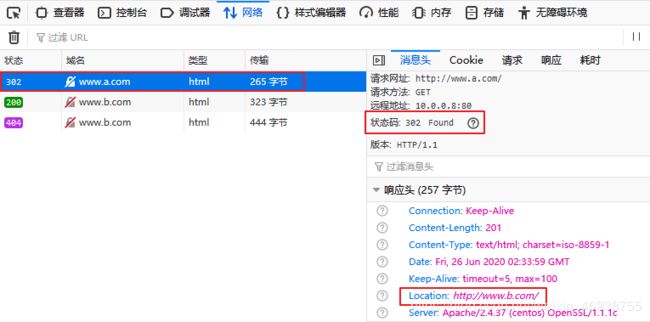
- temp:返回临时重定向状态码302. 此为默认值
说明:
服务器返回301或者302的值是公司的一种策略,并不是强制约定
范例:
[root@centos8 ~]#vim /etc/httpd/conf.d/test.conf
Redirect permanent / https://www.magedu.com/
范例:
[root@centos8 ~]#vim /etc/httpd/conf.d/test.conf
Redirect permanent / http://www.b.com/
[root@centos8 ~]#vim /etc/httpd/conf.d/test.conf
Redirect temp / http://www.b.com/
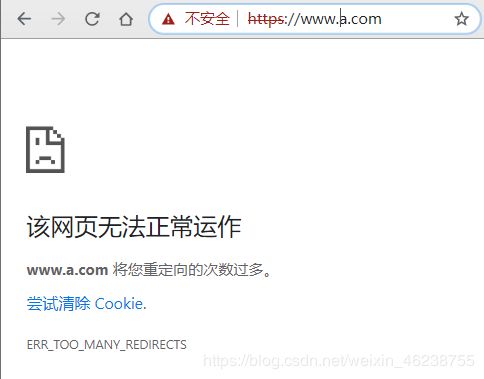
Redirect permanent / https://www.a.com/
RewriteEngine on
RewriteRule ^(/.*)$ https://%{HTTP_HOST}$1 [redirect=302]
[root@Centos7 ~]#curl -I http://www.jd.com/
HTTP/1.1 302 Moved Temporarily
Server: nginx
Date: Fri, 26 Jun 2020 02:10:04 GMT
Content-Type: text/html
Content-Length: 138
Connection: keep-alive
Location: https://www.jd.com/
Access-Control-Allow-Origin: *
Timing-Allow-Origin: *
X-Trace: 302-1593137404905-0-0-0-0-0
Strict-Transport-Security: max-age=360

[root@Centos7 ~]#curl -I http://www.taobao.com/
HTTP/1.1 301 Moved Permanently
Server: Tengine
Date: Fri, 26 Jun 2020 02:10:18 GMT
Content-Type: text/html
Content-Length: 278
Connection: keep-alive
Location: https://www.taobao.com/
Via: cache19.cn2588[,0]
Timing-Allow-Origin: *
EagleId: 6fa02c9515931374188153124e
3.27 实现HSTS
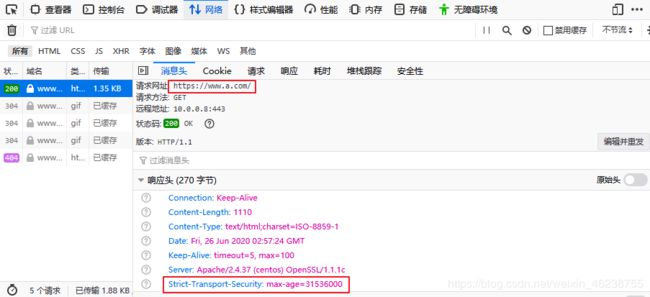
HSTS:HTTP Strict Transport Security , 服务器端配置支持HSTS后,会在给浏览器返回的HTTP首部中携带HSTS字段。浏览器获取到该信息后,会将所有HTTP访问请求在内部做307跳转到HTTPS。而无需任何网络过程,实现更高的安全性
HSTS preload list: 是Chrome浏览器中的HSTS预载入列表,在该列表中的网站,使用Chrome浏览器访问时,会自动转换成HTTPS。Firefox、Safari、Edge浏览器也会采用这个列表

范例:
[root@Centos7 ~]#curl -Ik http://www.tmall.com/
HTTP/1.1 302 Found
Server: Tengine
Date: Fri, 26 Jun 2020 07:15:31 GMT
Content-Type: text/html
Content-Length: 258
Connection: keep-alive
Location: https://www.tmall.com/
Via: cache8.cn791[,0]
Timing-Allow-Origin: *
EagleId: 77f9309c15931557314598911e
Strict-Transport-Security: max-age=31536000

[root@centos7 ~]#curl -Ik http://www.jd.com/
HTTP/1.1 302 Moved Temporarily
Server: nginx
Date: Fri, 26 Jun 2020 07:15:38 GMT
Content-Type: text/html
Content-Length: 138
Connection: keep-alive
Location: https://www.jd.com/
Access-Control-Allow-Origin: *
Timing-Allow-Origin: *
X-Trace: 302-1593155738017-0-0-0-0-0
Strict-Transport-Security: max-age=360
范例:实现HSTS
#严格的传输安全,一年有效期
[root@centos8 ~]#vim /etc/httpd/conf.d/test.conf
Header always set Strict-Transport-Security "max-age=31536000"
RewriteEngine on
RewriteRule ^(/.*)$ https://%{HTTP_HOST}$1 [redirect=302]

[root@Centos7 ~]#curl -I http://www.a.com/
HTTP/1.1 302 Found
Date: Fri, 26 Jun 2020 03:45:27 GMT
Server: Apache/2.4.37 (centos) OpenSSL/1.1.1c
Strict-Transport-Security: max-age=31536000
Location: https://www.a.com/
Content-Type: text/html; charset=iso-8859-1

#只能看到302的跳转信息,看不到希望看到的最终页面
[root@Centos7 ~]#curl http://www.a.com/
<!DOCTYPE HTML PUBLIC "-//IETF//DTD HTML 2.0//EN">
<html><head>
<title>302 Found</title>
</head><body>
<h1>Found</h1>
<p>The document has moved <a href="https://www.a.com/">here</a>.</p>
</body></html>

#按照跳转的结果去访问页面,最终访问到加密的页面
[root@Centos7 ~]#curl -L http://www.a.com/
curl: (60) Peer's certificate issuer has been marked as not trusted by the user.
More details here: http://curl.haxx.se/docs/sslcerts.html

curl performs SSL certificate verification by default, using a "bundle"
 of Certificate Authority (CA) public keys (CA certs). If the default
 bundle file isn't adequate, you can specify an alternate file
 using the --cacert option.
If this HTTPS server uses a certificate signed by a CA represented in
 the bundle, the certificate verification probably failed due to a
 problem with the certificate (it might be expired, or the name might
 not match the domain name in the URL).
If you'd like to turn off curl's verification of the certificate, use
 the -k (or --insecure) option.

 #加k选项,忽略证书检查,看到最终的页面
[root@Centos7 ~]#curl -Lk http://www.a.com/
<h1>/var/www/html/index.html</h1>
3.28 正向代理和反向代理
正向代理说明: 服务于客户端,隐藏了客户端的IP地址
假设某小区里的几个用户想要去网上看一个500M的视频 , 500M的视频会反复地下载,这样小区的带宽就被重复da的公司的浪费掉了, 搭建了正向代理服务器后,每个用户就通过代理服务器进行上网,这时用户再去看视频时,代理服务器就会替用户把视频下载缓存下来,其他用户再浏览同一个视频时,就不需要再从服务器上下载,于是网络带宽的消耗大幅减少 ; 另外,在代理服务器上还可以设置访问控制,实现安全策略
反向代理说明: 服务于服务端,隐藏了服务端的IP地址
大的公司可能会有多个服务器 ,用户访问时就不知道访问哪个,反向代理服务器就像一个接待者,首先用户向DNS发请求,DNS给用户一个反向代理服务器的地址,反向代理服务器收到请求后,转发给它觉得合理的服务器上去
启用反向代理
ProxyPass "/" "http://www.example.com/"
ProxyPassReverse "/" "http://www.example.com/"
特定URL反向代理
ProxyPass "/images" "http://www.example.com/"
ProxyPassReverse "/images" http://www.example.com/
范例:
<VirtualHost *>
ServerName www.magedu.com
ProxyPass / http://localhost:8080/
ProxyPassReverse / http://localhost:8080/
</VirtualHost>
3.29 Sendfile 机制
设置Sendfile 功能
EnableSendfile On|Off
属于"零复制"技术
不用 sendfile 的传统网络传输过程:
read(file, tmp_buf, len)
write(socket, tmp_buf, len)
硬盘 >> kernel buffer >> user buffer >> kernel socket buffer >> 协议栈
一般网络应用通过读硬盘数据,写数据到 socket 来完成网络传输,底层执行过程:
-
系统调用 read() 产生一个上下文切换:从 user mode 切换到 kernel mode,然后 DMA 执行拷贝,把文件数据从硬盘读到一个 kernel buffer 里
-
数据从 kernel buffer 拷贝到 user buffer,然后系统调用 read() 返回,这时又产生一个上下文切换:从kernel mode 切换到 user mode
-
系统调用 write() 产生一个上下文切换:从 user mode 切换到 kernel mode,然后把步骤2读到 user buffer 的数据拷贝到 kernel buffer(数据第2次拷贝到 kernel buffer),不过这次是个不同的 kernel buffer,这个 buffer和 socket 相关联
-
系统调用 write() 返回,产生一个上下文切换:从 kernel mode 切换到 user mode(第4次切换),然后DMA从 kernel buffer 拷贝数据到协议栈(第4次拷贝)
上面4个步骤有4次上下文切换,有4次拷贝,如果能减少切换次数和拷贝次数将会有效提升性能
Sendfile机制
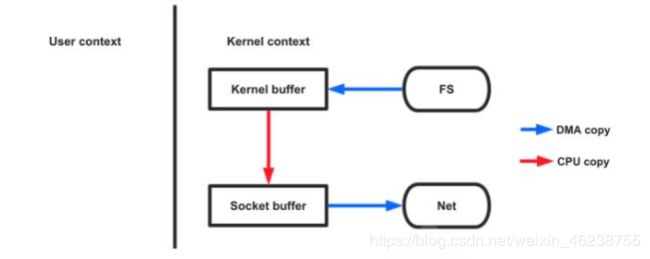
在kernel 2.0+ 版本中,系统调用 sendfile() 就是用来简化上面步骤提升性能的。sendfile() 不但能减少切换次数而且还能减少拷贝次数用 sendfile() 来进行网络传输的过程:
sendfile(socket, file, len);
硬盘 >> kernel buffer (快速拷贝到kernel socket buffer) >> 协议栈
-
系统调用 sendfile() 通过 DMA 把硬盘数据拷贝到 kernel buffer,然后数据被 kernel 直接拷贝到另外一个与 socket 相关的 kernel buffer。这里没有 user mode 和 kernel mode 之间的切换,在 kernel 中直接完成了从一个 buffer 到另一个 buffer 的拷贝
-
DMA 把数据从 kernel buffer 直接拷贝给协议栈,没有切换,也不需要数据从 user mode 拷贝到 kernel mode,因为数据就在 kernel 里
3.30 指定文件类型 content type
相关指令
#指定文件和content type 的对应文件
TypesConfig file-path
#在给定的文件扩展名与特定的content type内容类型之间建立映射关系。MIME-type指明了包含extension扩展名的文件的媒体类型。这个映射关系会添加在所有有效的映射关系上,并覆盖所有相同的extension扩展名映射,extension参数是不区分大小的,并且可以带或不带前导点
AddType MIME-type extension [extension] ...
范例:
TypesConfig /etc/mime.types #默认指向配置文件
AddType image/jpeg jpeg jpg jpe
AddType application/x-httpd-php .php
