Vue 3.0 初体验
Vue3.0 beta也出来一段时间了,最近一直在看react,对于vue3.0倒是没怎么关注,想着等正式版出来再说,不过最近事情不多,还是抽出了一点时间,试了一下新版的Vue3.0,不得不说,改动还是有的,对于初上手的人可能没有之前友好

尤大官方的直播也有一些介绍
但是毕竟还是beta版,配套的支持还不多,生产环境暂时还是不要使用为好
安装
使用vue-cli创建项目,我用的是4.4.6版本,不是最新版的建议更新一下
vue create vue-next-test
这是我个人创建项目启用的一些配置,这个随个人喜好变更,把vuex和router启用了就行
![]()
创建完成后这时项目还是2.x版本的,需要通过插件升级的方式来升级至3.0
cd vue-next-test
vue add vue-next
该插件会完成以下操作
安装 Vue 3.0 依赖
更新 Vue 3.0 webpack loader 配置,使其能够支持 .vue 文件构建
创建 Vue 3.0 的模板代码
自动将代码中的 Vue Router 和 Vuex 升级到 4.0 版本,如果未安装则不会升级
自动生成 Vue Router 和 Vuex 模板代码
安装完成之后,项目就升级至3.0 beta版本了
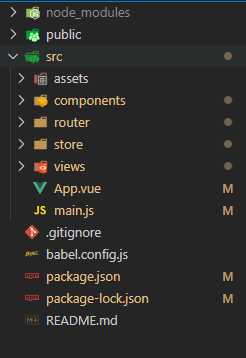
项目整体的结构并没有太大的变化

路由
路由的声明方式发生了一些改变,但是基本的使用和配置是没有变的
import { createRouter, createWebHashHistory } from 'vue-router';
import Home from "../views/Home.vue";

const routes = {
      {
    path: "/",
    name: "Home",
    component: Home,
  },
  {
    path: "/about",
    name: "About",
    // route level code-splitting
    // this generates a separate chunk (about.[hash].js) for this route
    // which is lazy-loaded when the route is visited.
    component: () =>
      import(/* webpackChunkName: "about" */ "../views/About.vue"),
  }
}
const router = createRouter({
  history: createWebHashHistory(),
  routes
})

export default router
vuex
vuex和路由类似,也是声明的方式发生了一些变化,但是使用的方式基本是没有变的
  import Vuex from 'vuex'

  export default Vuex.createStore({
    state: {
    },
    mutations: {
    },
    actions: {
    },
    modules: {
    }
  });
ref和reative
在页面的script内部的变化就比较大了,熟悉的data和methods都没有了,取而代之的是ref和reactive
// script标签内部基本结构
import { ref, reactive } from "vue";
export default {
  setup() {
	...
    return {
		...
    };
  }
};
所有的数据和方法写在setup内部,通过ref和reactive创建响应式的属性
要注意vue3.0不再使用this,直接使用声明时候的变量名来访问
ref
通过ref方法传入数据的初始值,然后通过value属性来获取或改变数据的值
方法也直接写在setup内
要记得将生命的数据和方法return
<template>
  <div>{{helloWorld}}</div>
</template>
<script>
import { ref } from "vue";
export default {
  setup() {
	const helloWorld = ref('Hello World')
    const sayHello = ()=>{
    	console.log(helloWorld.value)
    	// 'Hello World'
    }
    return {
		helloWorld,
        sayHello
    };
  }
};
</script>
reactive
<template>
  <div>{{data.helloWorld}}</div>
</template>
<script>
import { reactive } from "vue";
export default {
  setup() {
	const data = reactive({
      	helloWorld: "Hello World",
   	});
    const sayHello = ()=>{
    	console.log(data.helloWorld)
    	// 'Hello World'
    }
    return {
		data,
        sayHello
    };
  }
};
</script>
两种方法达到的效果是一样的,如果习惯使用多个变量,就用ref,如果习惯将多个变量封装至一个对象的属性中,就使用reactive,不过一定要记得把声明所有变量和方法return
不过这个地方如果把data换成state,就有了那么点react的味道了不是么…
计算属性computed
计算属性现在通过computed方法来实现,使用和之前的区别不大
import { ref,computed } from "vue";
export default {
  setup() {
	const person = ref({
        name:'xz',
        gender:'man'
    })
    const sayHello = computed(()=>{
      if (person.value.gender == "man") {
        return `你好${person.value.name}先生`
      }
      else{
        return `你好${person.value.name}女士`
      }
    })
    return {
		state,
        sayHello
    };
  }
};
watch侦听器
侦听器和计算属性类似,通过watch方法来实现
watch方法提供两个方法作为参数,第一个返回要监听的数据,第二个是回调
import { ref,watch } from "vue";
export default {
  setup() {
	const num = ref(1)
	const add = ()=>{
        num.value++
    }
    watch(()=>num.value,val=>{if(val>10){
      alert('太大了')
      num.value = 1
    }})
    return {
		num,
        add
    };
  }
};
filters过滤器
根据官方的报错提示,似乎可以确定,filters应该是凉了

只能用computed了
上下文ctx
vue3.0中不再使用this,所以获取路由和store需要通过getCurrentInstance获取上下文来获取
import { ref,getCurrentInstance  } from "vue";
export default {
  setup() {
	const { ctx } = getCurrentInstance()
    return {
		ctx
    };
  }
};
这个ctx可以用来获取当前页面的router和store
vuex
// store
import Vuex from 'vuex'

export default Vuex.createStore({
  state: {
    data:'data in store'
  },
  mutations: {
    changeData(state,newData){
      state.data=newData
    }
  },
  actions: {
  },
  modules: {
  }
});
// 页面script
import { ref,getCurrentInstance  } from "vue";
export default {
  setup() {
	const { ctx } = getCurrentInstance()
    console.log(ctx.$store.state.data)
    // 'data in store'
 	ctx.$store.commit('changeData','data commit to store')
    return {
		ctx
    };
  }
};
获取还是$store.state,操作还是commit,不过不能直接用this,需要使用ctx
路由
// router
import { createRouter, createWebHashHistory } from 'vue-router';
import Home from '../views/Home.vue'

const routes = [
{
  path: '/',
  name: 'Home',
  component: Home
},
{
  path: '/about/:id',
  name: 'About',
  // route level code-splitting
  // this generates a separate chunk (about.[hash].js) for this route
  // which is lazy-loaded when the route is visited.
  component: () => import(/* webpackChunkName: "about" */ '../views/About.vue')
}
]

const router = createRouter({
  history: createWebHashHistory(),
  routes
})

export default router
// 页面 /about/000001
<template>
  <div>
    <h1 @click="ctx.$router.push('/')">This is an about page</h1>
  </div>
</template>

<script>
import { ref, getCurrentInstance } from "vue";
export default {
  setup() {
    const { ctx } = getCurrentInstance();
    console.log(ctx.$router.currentRoute.value.params.id);
    // '000001'
    return {
      ctx
    };
  }
};
</script>
还是通过$router来获取和操作路由,不过也是需要通过ctx来获取
生命周期
生命周期不再像之前可以直接写,需要引入,有点类似自助餐,要哪个拿哪个
<template>
  <div>
    <p>{{data}}</p>
    <input type="text" v-model="data" />
  </div>
</template>

<script>
import {
  ref,
  onBeforeMount,
  onMounted,
  onBeforeUpdate,
  onUpdated,
  onBeforeUnmount,
  onUnmounted,
  onErrorCaptured
} from "vue";
export default {
  setup() {
    const data = ref("");
    // beforeCreate和created没有了,如果需要的话内部的方法可以直接放在setup内
    console.log('------setup------')
    onBeforeMount(() => {
      console.log("------onBeforeMount------");
    });
    onMounted(() => {
      console.log("------onMounted------");
    });
    onBeforeUpdate(() => {
      console.log("------onBeforeUpdate------");
    });
    onUpdated(() => {
      console.log("------onUpdated------");
    });
    onBeforeUnmount(() => {
      console.log("------onBeforeUnmount------");
    });
    onUnmounted(() => {
      console.log("------onUnmounted------");
    });
    onErrorCaptured(() => {
      console.log("------onErrorCaptured------");
    });
    return {
      data
    };
  }
};
</script>
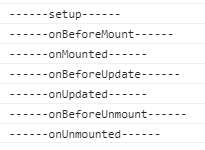
进入该页面,在输入框输入一些文字,然后退出该页面,生命周期执行如下

未发生改变的部分
vue3.0对于vue的一些指令,如v-model,v-if,v-for这些并没有做出改变,依旧可以很方便的进行数据绑定,列表渲染,条件渲染,样式部分也没有变化,依旧可以用lang属性来指定使用的预编译语言,scoped属性来使样式文件局部有效
总结
从data和methods到setup,对习惯2.x版本的人来说确实是有一些不习惯,不过存在即合理嘛,目前还是测试版,不确定后续的正式版会不会有改变,还是要保持关注,等一手官方的正式文档吧