Nginx的源码编译安装与基础配置
简述nginx:
Nginx是一款轻量级的Web 服务器/反向代理服务器及电子邮件(IMAP/POP3)代理服务器,并在一个BSD-like 协议下发行。
其特点是占有内存少,并发能力强,
Nginx作为负载均衡服务:既可以在内部直接支持 Rails 和 PHP 程序对外进行服务,也可以支持作为 HTTP代理服务对外进行服务。
Nginx采用C进行编写,不论是系统资源开销还是CPU使用效率都比 Perlbal 要好很多。
处理静态文件,索引文件以及自动索引;打开文件描述符缓冲。无缓存的反向代理加速,简单的负载均衡和容错。
1.nginx的基础配置
1.下载nginx并解压
安装包:
nginx-1.15.7.tar.gz
#1.在官网上下载nginx
[root@server1 ~]# ls
nginx-1.15.7.tar.gz
#2.解压
[root@server1 ~]# tar zxf nginx-1.15.7.tar.gz
[root@server1 ~]# ls
nginx-1.15.7  nginx-1.15.7.tar.gz
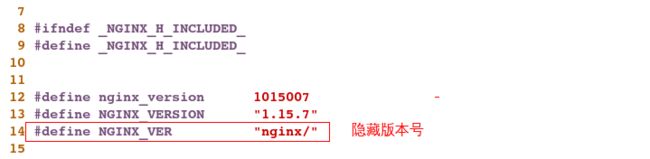
2.隐藏版本号
隐藏版本号:是为了防止被黑客攻击
[root@server1 ~]# cd nginx-1.15.7
[root@server1 nginx-1.15.7]# vim src/core/nginx.h
3.关闭debug日志
关闭debug日志:因为日志量太多了,过于繁琐
[root@server1 nginx-1.15.7]# vim auto/cc/gcc

4.源码编译
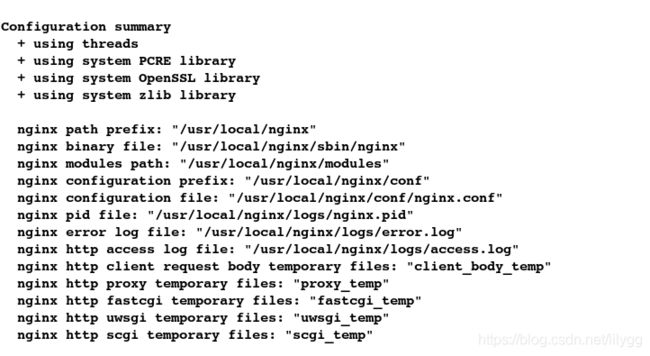
(1)configure编译
#没有eorror即可;  --prefix:安装目录  threads:激活线程池   file-aio:文件io    http_ssl_module:ssl模块   http_stub_status_module:状态监控模块
[root@server1 nginx-1.15.7]# ./configure --prefix=/usr/local/nginx --with-threads --with-file-aio --with-http_ssl_module --with-http_stub_status_module
(2)编译与安装
[root@server1 nginx-1.15.7]# make && make install

5.开启nginx
[root@server1 nginx-1.15.7]# cd /usr/local/nginx/
[root@server1 nginx]# ls
conf  html  logs  sbin     #  配置文件 默认发布目录 日志 启动脚本
[root@server1 nginx]# cd sbin/
[root@server1 sbin]# pwd
/usr/local/nginx/sbin
[root@server1 sbin]# ./nginx
[root@server1 sbin]# netstat -tnlp

6.网页测试
在网页上输入:172.25.66.1 即可访问到nginx的默认发布页面

2.nginx的配置文件部分参数详解
若想要了解更多nginx详细配置,点击此处,查看nginx官方文档
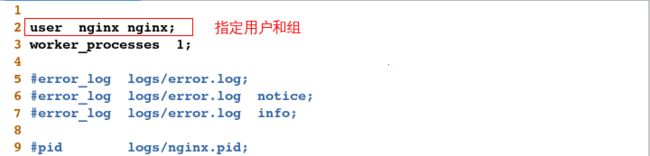
1.添加nginx用户组
#1.更改配置文件:添加nginx用户和组
[root@server1 ~]# cd /usr/local/nginx/conf/
[root@server1 conf]# vim nginx.conf
####################
user  nginx nginx;   #指定用户和组
#2.创建nginx用户
[root@server1 conf]# id nginx
id: nginx: No such user
# -s指定shell,-M不创建加目录,-d指定
[root@server1 conf]# useradd -s /sbin/nologin -M -d /usr/local/nginx nginx
[root@server1 conf]# id nginx
uid=500(nginx) gid=500(nginx) groups=500(nginx)
#3.重新加载
[root@server1 conf]# cd ..
[root@server1 nginx]# cd sbin/
[root@server1 sbin]# ./nginx -s reload
[root@server1 sbin]# pwd
/usr/local/nginx/sbin
测试:
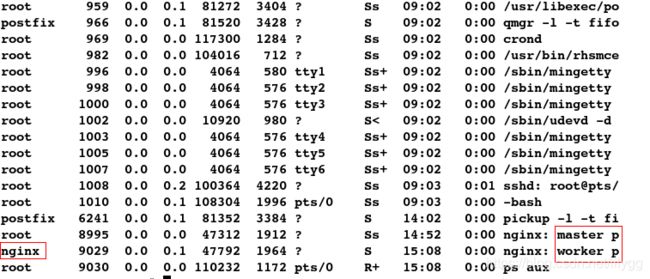
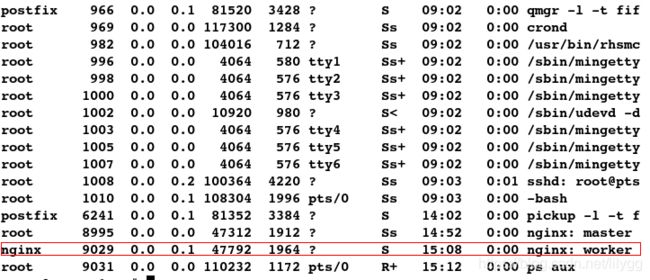
#查看进程:发现nginx进程的用户身份为nginx
[root@server1 sbin]# ps aux
2.指定工作进程数
#1.查看cpu内核个数;只有一个cpu
[root@server1 ~]# lscpu

#2.查看进程:发现有一个nginx主进程(master),和一个nginx子进程(worker)
[root@server1 ~]# ps aux
#3.更改配置文件:
[root@server1 ~]# cd /usr/local/nginx/conf
[root@server1 conf]# vim nginx.conf
####################
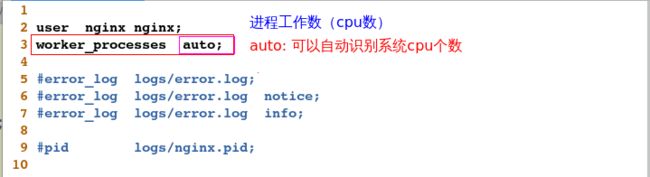
worker_processes auto; #工作进程数(cpu个数);auto会自动识别cpu核心
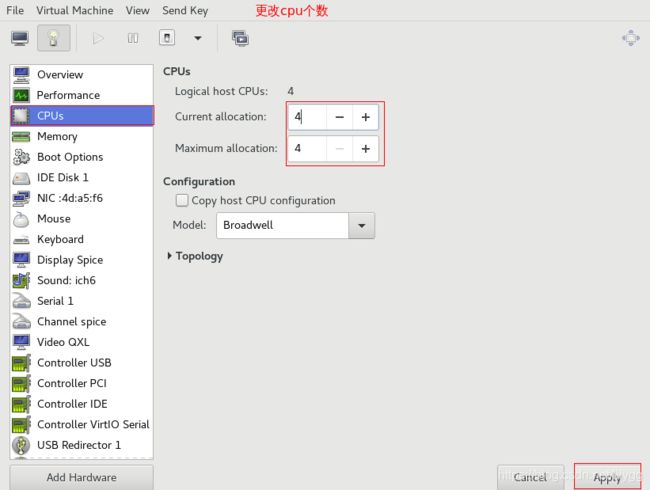
在图形界面上更改cpu数目:(注意:必须先关机才能生效喔)
#4.重新连接
[root@foundation66 ~]# ssh [email protected]
[email protected]'s password:
Last login: Tue Feb 19 09:03:13 2019 from 172.25.66.254
#5.启动nginx
[root@server1 ~]# cd /usr/local/nginx/sbin
[root@server1 sbin]# ./nginx
测试:
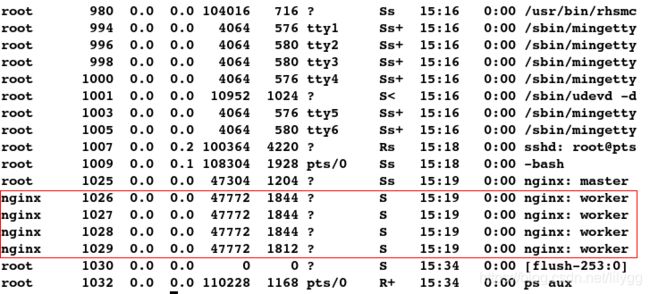
#查看进程:发现有4个子进程
[root@server1 sbin]# ps aux
改进:
[root@server1 sbin]# cd /usr/local/nginx/conf
#更改配置文件
[root@server1 conf]# vim nginx.conf
####################
worker_processes  4;    #由于auto会导致访问量不均衡,所以一般不用

#重新加载
[root@server1 sbin]# cd /usr/local/nginx/sbin
[root@server1 sbin]# ./nginx -s reload
3.nginx反向代理实现负载均衡
(1)配置nginx服务端
#1.更改配置文件
[root@server1 sbin]# cd /usr/local/nginx/conf
[root@server1 conf]# vim nginx.conf
####################
events {
    worker_connections  65535;     #最大工作连接数
}

http {
        upstream westos{           #反向代理模块
            server 172.25.66.2:80;        #后端1
            server 172.25.66.3:80;        #后端2
        }

    include       mime.types;
    default_type  application/octet-stream;


server{                                  #配置虚拟主机
         listen 80;
         server_name www.westos.org;   #域名

         location / {                  #反向代理
             proxy_pass http://westos;
         }
     }


[root@server1 conf]# cd /usr/local/nginx/sbin
#2.检测语法
[root@server1 sbin]# ./nginx -t
nginx: the configuration file /usr/local/nginx/conf/nginx.conf syntax is ok
nginx: configuration file /usr/local/nginx/conf/nginx.conf test is successful
#3.重新加载
[root@server1 sbin]# ./nginx -s reload
(2)配置后端服务器
在sever2上:
[root@server2 ~]# rpm -q httpd
httpd-2.2.15-29.el6_4.x86_64
[root@server2 ~]# cd /var/www/html/
[root@server2 html]# vim index.html
[root@server2 html]# cat index.html
server2
[root@server2 html]# /etc/init.d/httpd start
Starting httpd: httpd: Could not reliably determine the server's fully qualified domain name, using 172.25.66.2 for ServerName
                                                           [  OK  ]
在server3上:
[root@server3 ~]# rpm -q httpd
httpd-2.2.15-29.el6_4.x86_64
[root@server3 ~]# cd /var/www/html/
[root@server3 html]# vim index.html
[root@server3 html]# cat index.html
server3
[root@server3 html]# /etc/init.d/httpd start
Starting httpd: httpd: Could not reliably determine the server's fully qualified domain name, using 172.25.66.3 for ServerName
                                                           [  OK  ]
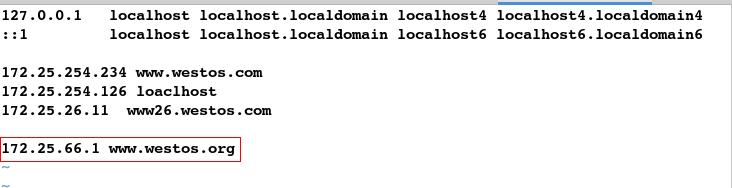
(3).本地解析
[root@foundation66 ~]# vim /etc/hosts
(4)测试
在网页上输入:www.westos.org ,发现server2和server3交替出现,即实现了负载均衡


也可以用curl命令测试:
[root@foundation66 ~]# curl www.westos.org
server3
[root@foundation66 ~]# curl www.westos.org
server2
4.nginx自带健康检查
模拟某个后端服务器出现故障:
[root@server2 ~]# /etc/init.d/httpd stop
Stopping httpd:                                            [  OK  ]
发现此时便只能访问server3
[root@foundation66 ~]# curl www.westos.org
server3
[root@foundation66 ~]# curl www.westos.org
server3
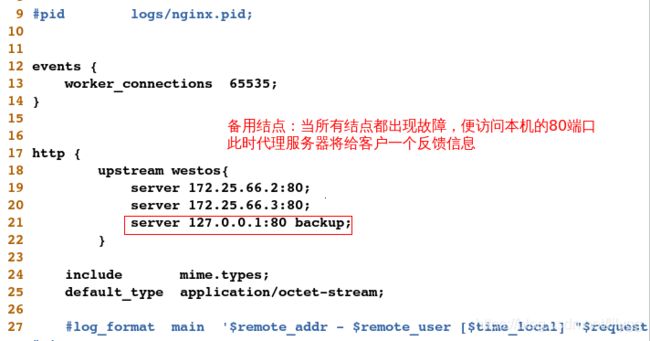
5.添加备用服务器
当所有后端服务器都出故障时,代理服务器给客户一个反馈信息
(1).更改配置文件
#1.更改配置文件
[root@server1 conf]# pwd
/usr/local/nginx/conf
[root@server1 conf]# vim nginx.conf
###################
server 127.0.0.1:80 backup;   #添加备用结点
[root@server1 conf]# cd ..
[root@server1 nginx]# cd sbin/
[root@server1 conf]# pwd
/usr/local/nginx/sbin
#2.检测语法
[root@server1 sbin]# ./nginx -t
nginx: the configuration file /usr/local/nginx/conf/nginx.conf syntax is ok
nginx: configuration file /usr/local/nginx/conf/nginx.conf test is successful
#3.重新加载
[root@server1 sbin]# ./nginx -s reload
(2)编写发布页面
[root@server1 sbin]# cd /usr/local/nginx/html
#1.备份
[root@server1 html]# mv index.html index.html_back
#2.重新编写发布文件
[root@server1 html]# vim index.html
[root@server1 html]# cat index.html
网站正在维护.....
(3).测试
模拟所有后端服务器出现故障(关闭所有服务器的apache):
[root@server3 html]# /etc/init.d/httpd stop
Stopping httpd:                                            [  OK  ]
[root@server3 html]# /etc/init.d/httpd status
httpd is stopped
[root@server2 ~]# /etc/init.d/httpd status
httpd is stopped
客户端访问:
[root@foundation66 ~]# curl www.westos.org
网站正在维护.....
[root@foundation66 ~]# curl www.westos.org
网站正在维护.....