Service Mesh - Istio快速入门
文章目录
- 1 Istio介绍
- 1.1 Istio架构与组件
- 1.2 Istio基本概念
- 2 部署Istio
- 2.1 在K8s中部署Istio
- 2.2 sidecar注入
1 Istio介绍
Istio官网:istio.io
Istio是Service Mesh落地化产品之一,也是最受欢迎的服务网格之一。

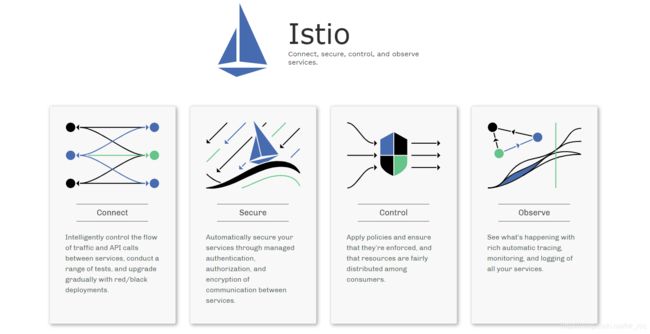
从官网首页可以看到,Istio主要的四大作用就是连接、安全、控制和观察:
- 连接(Connect)
流量管理、负载均衡、灰度发布 - 安全(Secure)
认证、鉴权 - 控制(Control)
限流、ACL - 观察(Observe)
监控、调用链
1.1 Istio架构与组件

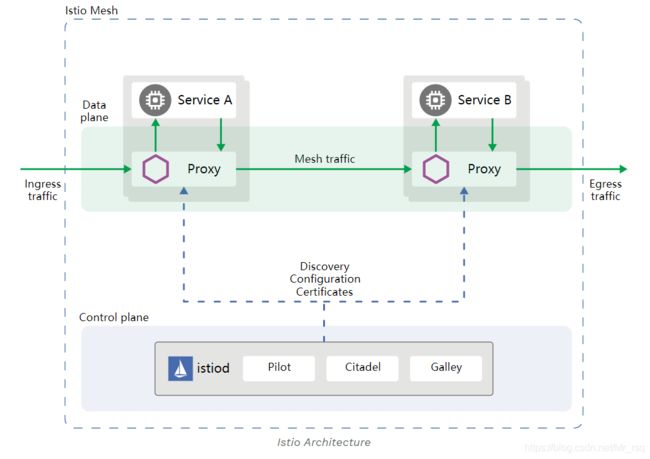
在Istio架构中,分为两大块,一块是数据平面,另一块是控制平面。
- 数据平面:由一组代理组成,这些代理微服务的所有网络通信,在1.5以前的版本中是接收和实施来自
Mixer的策略,1.5之后的版本中是接收来自istiod的策略数据,Proxy负责高效转发与策略实现(基于Envoy) - 控制平面:管理和配置代理来路由流量。在1.5以前的版本中是先通过mixer实施策略与收集来自边车代理的数据,然后再往后端其它组件发送数据;但是1.5之后的版本中废弃了
Mixer,并把Pilot、Citadel和Galley整合成istiod,这个组件是控制平面的核心,负责处理配置、证书分发、sidecar 注入等各种功能,以一个单体组件替代了原有的架构,在降低复杂度和维护难度的同时,也让易用性得到提升Piolt:策略配置组件,为Proxy提供服务发现、智能路由、错误处理等。Citadel:安全组件,提供证书生成下发,加密通信、访问控制等Galley:配置管理、验证、分发
1.2 Istio基本概念
Istio有4个配置资源,落地所有流量管理需求
- VirtualService:实现服务请求路由规则的功能
- DestinationRule:实现目标服务的负载均衡、服务发现、故障处理和故障注入等功能
- Gateway:让服务网格内的服务可以被全世界看到
- ServiceEntry:让服务网格内的服务可以看到外边的世界
2 部署Istio
2.1 在K8s中部署Istio
获取istio包
# 获取istio包
wget https://github.com/istio/istio/releases/download/1.6.7/istio-1.6.7-linux-amd64.tar.gz

# 解压缩
tar -xf istio-1.6.7-linux-amd64.tar.gz

# 拷贝istioctl命令至/usr/bin  或者配置环境变量也可
cd istio-1.6.7
cp bin/istioctl /usr/bin/
查看istio可选的几种部署模式
[root@master01 ~]# istioctl profile list
Istio configuration profiles:
    demo
    empty
    minimal
    preview
    remote
    default
profile开启的组件、插件的表格如下
| default | demo | minimal | remote | empty | preview | |
|---|---|---|---|---|---|---|
| Core components | ||||||
istio-egressgateway |
√ | |||||
istio-ingressgateway |
√ | √ | √ | √ | ||
istio-pilot |
√ | √ | √ | √ | √ | |
| Addons | ||||||
grafana |
√ | |||||
istio-tracing |
√ | |||||
kiali |
√ | |||||
prometheus |
√ | √ | √ | √ | ||
| Description | 是官方推荐的 istio 安装 profile的方式 | 仅供学习使用,并不合适作为生产环境 | 仅仅开启了 pilot 组件 | 提供共享控制面去操作多集群服务网格,不常用 | 不会开启任何组件或者插件 | 不太了解 |
查看具体的profile开启了哪些组件可用如下命令
istioctl profile dump [default|demo|minimal|remote|empty|preview]
这里测试环境用的profile是demo
# 第一次装失败了,看报错超时了,于是重新执行了下命令就成功了
[root@master01 ~]# istioctl manifest apply --set profile=demo
Detected that your cluster does not support third party JWT authentication. Falling back to less secure first party JWT. See https://istio.io/docs/ops/best-practices/security/#configure-third-party-service-account-tokens for details.
✔ Istio core installed
✔ Istiod installed
✔ Egress gateways installed
✔ Ingress gateways installed
✘ Addons encountered an error: failed to wait for resource: resources not ready after 5m0s: timed out waiting for the condition-system/prometheus
Deployment/istio-system/grafana
Deployment/istio-system/kiali
Deployment/istio-system/prometheus
- Pruning removed resources                                                                                                                                                                  Error: failed to apply manifests: errors occurred during operation

# 第二次装成功
[root@master01 ~]# istioctl manifest apply --set profile=demo
Detected that your cluster does not support third party JWT authentication. Falling back to less secure first party JWT. See https://istio.io/docs/ops/best-practices/security/#configure-third-party-service-account-tokens for details.
✔ Istio core installed
✔ Istiod installed
✔ Egress gateways installed
✔ Ingress gateways installed
✔ Addons installed
✔ Installation complete

# 查看istio的pod
[root@master01 ~]# kubectl get pods -n istio-system
NAME                                    READY   STATUS    RESTARTS   AGE
grafana-b54bb57b9-585jh                 1/1     Running   0          26m
istio-egressgateway-64bc874f5c-5nlfm    1/1     Running   0          26m
istio-ingressgateway-6b947b8c5d-2xqlx   1/1     Running   0          26m
istio-tracing-9dd6c4f7c-tknj5           1/1     Running   0          26m
istiod-654b4b468b-qjvp5                 1/1     Running   0          28m
kiali-d45468dc4-vnsvv                   1/1     Running   0          26m
prometheus-77566c9987-ftmqc             2/2     Running   0          26m
这里说一下,在之前1.5之后的版本,istio已经封装了pilot、citadel和Galley等组件为istiod,所以查看pod的时候会发现有一个istiod
2.2 sidecar注入
sidecar注入分为手动注入和自动注入,以如下httpbin实例为例
[root@master01 ~]# cd istio-1.6.7/samples/httpbin/
[root@master01 httpbin]# ls
httpbin-gateway.yaml  httpbin-nodeport.yaml  httpbin-vault.yaml  httpbin.yaml  policy  README.md  sample-client
1、手动注入
# 方法一
kubectl apply -f <(istioctl kube-inject -f httpbin-nodeport.yaml)

# 方法二
istioctl kube-inject -f httpbin-nodeport.yaml | kubectl apply -f -
2、自动注入
# 方法一:这种方法是指以后一旦在default名称空间中创建的pods会自动注入sidecar
kubectl label namesapce default istio-injection=enabled

# 方法二
kubectl apply -f httpbin-gateway.yaml
部署httpbin-nodeport
[root@master01 httpbin]# kubectl apply -f httpbin-nodeport.yaml
[root@master01 httpbin]# kubectl get pods -A -o wide
NAMESPACE       NAME                                        READY   STATUS            RESTARTS   AGE     IP            NODE               NOMINATED NODE   READINESS GATES
default         httpbin-77bfc6b755-wk8sx                    1/1     Running           0          29m     10.244.2.34   node01.rsq.com     <none>           <none>
浏览器测试访问
httpbin注入sidecar
# 手动注入
[root@master01 httpbin]# kubectl apply -f <(istioctl kube-inject -f httpbin-nodeport.yaml)
service/httpbin unchanged
deployment.apps/httpbin configured

# 稍等几分钟后会发现pod数量多了一个,sidecar已经注入成功
[root@master01 httpbin]# kubectl get pods -o wide | grep http
httpbin-5c7cdc4b76-s4c92        2/2     Running   0          7m14s   10.244.1.72   node02.rsq.com   <none>           <none>
istio有自带的ingressgateway,所以我们可以使用istio的ingress来访问有sidecar的应用,默认情况下的一个流程如下:

有关服务网关的流量去向图

根据上图可以看出,IngressGateway可以接收外部访问,并将流量转发到网格内的服务;EgressGateway可以将网格内服务访问外部应用,二者分别实现服务网格中流量的进出。
Gateway为网格内服务提供负载均衡器(Envoy),可以实现四层~七层的负载均衡,且支持双向TLS认证,而我们K8s集群上普通的Ingress网关只能单独实现4层或者七层的负载均衡,相比之下优势就显露出来。
在Istio中部署的应用若想通过istio Gateway暴露出去,必须定义Gateway和VirtualService,以httpbin-gateway.yaml为例:
apiVersion: networking.istio.io/v1alpha3
kind: Gateway
metadata:
  name: httpbin-gateway
spec:
  selector:
    istio: ingressgateway
  servers:
  - port:
      number: 80
      name: http
      protocol: HTTP
    hosts:
    - "*"
---
apiVersion: networking.istio.io/v1alpha3
kind: VirtualService
metadata:
  name: httpbin
spec:
  hosts:
  - "*"
  gateways:
  - httpbin-gateway
  http:
  - route:
    - destination:
        host: httpbin
        port:
          number: 8000
参考文章
service mesh - istio profile 详述