Spring 基础学习 在IDEA上使用Maven构建一个简单的Spring 项目(xml配置形式)
在IDEA上使用Maven构建一个简单的Spring 项目
- 1. 创建maven项目
- 2. Pom文件中 引入Spring依赖
- 3. 编写xml配置文件
- 3.1 基础的xml配置文件
- 3.2 Spring xml 配置文件头部解析
- 3.3 编写一个 配置了 ioc 自动注入 和一个简单切面的 spring - xml配置文件。
- 4. 创建一个Spring - mvc - web项目
- 4.1 POM文件中引入spring-webmvc 包
- 4. 2 创建web目录 和 web.xml 文件
- 4.3 web.xml配置Spring 上下文容器和 请求转发器
- 4.4 配置spring mvc xml
- 4.5 编写 控制层代码及接口
- 4.6 配置tomcat启动
1. 创建maven项目
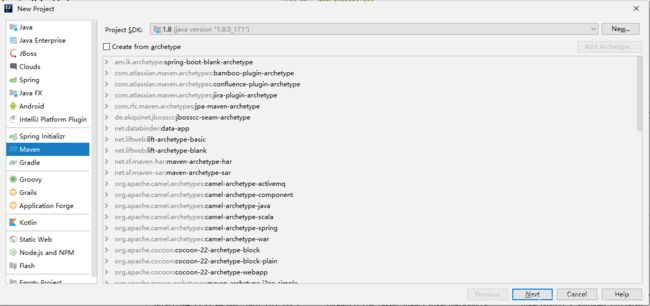
idea 上 new 一个 project 选择maven。当然,也可以使用命令行创建一个maven项目。然后导入到IDE中。这里 archetype(maven项目类型,相当于提供了一个模板,模板会自动帮助你创建一些必须的目录结构及文件,也可以不选择 ) 我选择 quickstart 。点击next
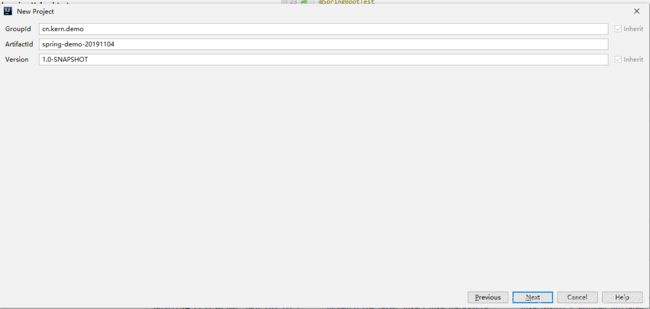
输入 maven 坐标系 groupid 和 artifactid 以及 version。next
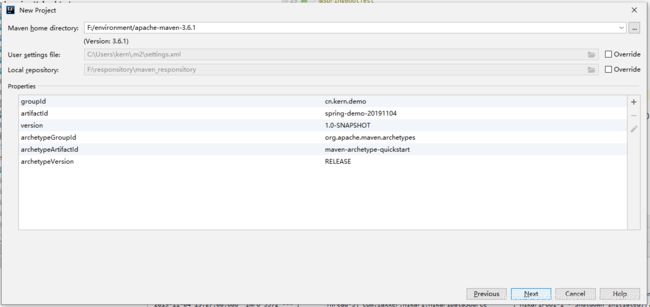
选择maven 所在目录及 配置文件路径 和仓库路径,确认项目信息, next
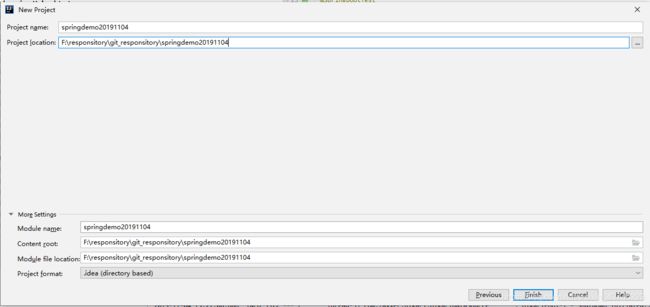
确认项目名和本地存储路径,以及maven 配置信息,finish
生成的maven项目目录结构如下,两个resources文件夹是我自己创建的,这是maven默认的目录结构,如果需要自定义,可以在pom文件中进行配置。
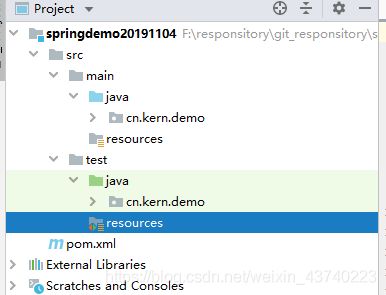
2. Pom文件中 引入Spring依赖
这里POM文件中配置了jdk版本和项目编码,同时引入了spring-context 上下文包,一个简单的spring项目引入这个就可以了,这个包中依赖了spring-core 核心包,spring-beans ioc包, spring-aop aop包等,此外由于测试需要,我们引入了spring集成的junit测试包 spring-test。
<project xmlns="http://maven.apache.org/POM/4.0.0" xmlns:xsi="http://www.w3.org/2001/XMLSchema-instance"
  xsi:schemaLocation="http://maven.apache.org/POM/4.0.0 http://maven.apache.org/xsd/maven-4.0.0.xsd">
  <modelVersion>4.0.0modelVersion>

  <groupId>cn.kern.demogroupId>
  <artifactId>spring-demo-20191104artifactId>
  <version>1.0-SNAPSHOTversion>

  <name>spring-demo-20191104name>

  <url>http://www.example.comurl>

  <properties>
    <project.build.sourceEncoding>UTF-8project.build.sourceEncoding>
    <maven.compiler.source>1.8maven.compiler.source>
    <maven.compiler.target>1.8maven.compiler.target>
  properties>

  <dependencies>
    <dependency>
      <groupId>org.springframeworkgroupId>
      <artifactId>spring-contextartifactId>
      <version>5.1.4.RELEASEversion>
    dependency>
	<dependency>
      <groupId>org.springframeworkgroupId>
      <artifactId>spring-testartifactId>
      <version>5.1.4.RELEASEversion>
    dependency>
  dependencies>
project>
3. 编写xml配置文件
Spring 1.X版本 是使用xml进行配置的,也就是原始的配置形式,进而在2.5版本引入了@Autowired 和 componentScan 组件扫描简化了xml配置, 3.X时期引入了 基于注解@Configuration 的java类配置,再到后来的Springboot一站式框架的提供。逐步进行了配置的简化。这里我们先使用xml配置。
首先我们需要在resources下创建一个xml文件,例如:
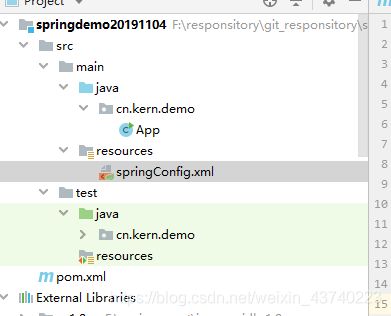
3.1 基础的xml配置文件
这个是Springxml配置文件的最简化版,下列元素都是必须的。
<beans xmlns="http://www.springframework.org/schema/beans"
       xmlns:xsi="http://www.w3.org/2001/XMLSchema-instance"
       xsi:schemaLocation="http://www.springframework.org/schema/beans
       http://www.springframework.org/schema/beans/spring-beans.xsd">
beans>
3.2 Spring xml 配置文件头部解析
此外,当你需要使用< context:>标签组时,需要引入context命名空间和xml模块定义文件,也就是xsd文件。或者你需要使用aop 内容,相应的,需要引入aop命令空间和 aop的 xsd文件。
如下演示:详见注释内容,注意换行是为了区别开来,简单分析下就明白其中的规则了。
<beans xmlns="http://www.springframework.org/schema/beans"
       xmlns:xsi="http://www.w3.org/2001/XMLSchema-instance"

       xmlns:context="http://www.springframework.org/schema/context"

       xmlns:aop="http://www.springframework.org/schema/aop"

       xsi:schemaLocation="http://www.springframework.org/schema/beans
       http://www.springframework.org/schema/beans/spring-beans.xsd

       http://www.springframework.org/schema/context
       http://www.springframework.org/schema/context/spring-context.xsd

       http://www.springframework.org/schema/aop
       http://www.springframework.org/schema/aop/spring-aop.xsd">


beans>
这部分关于xml头部配置的内容可能不是非常详细,有兴趣的可以去学习以下xml文件的有关内容。
3.3 编写一个 配置了 ioc 自动注入 和一个简单切面的 spring - xml配置文件。
首先简单写一个demo,创建一个 交易单的服务,提供接口 createBill , 该接口传入一个 Bill 对象 用于创建 交易单。
实体类
package cn.kern.demo.entity;
public class Bill {

    public Bill(Long id, String billNo) {
        this.id = id;
        BillNo = billNo;
    }

    private Long id;

    private String BillNo;

	//省略 get set 方法
}
服务提供对象,实现接口,遵循面向接口编程原则。
package cn.kern.demo.service;

import cn.kern.demo.entity.Bill;
import org.springframework.stereotype.Service;

@Service
public class BillServiceImpl implements IBillService {

    @Override
    public boolean createBill(Bill bill) {
        System.out.println("成功创建交易单:" + bill.getBillNo());
        return true;
    }
}
xml配置
<beans xmlns="http://www.springframework.org/schema/beans"
       xmlns:xsi="http://www.w3.org/2001/XMLSchema-instance"
       xmlns:context="http://www.springframework.org/schema/context"
       xmlns:aop="http://www.springframework.org/schema/aop"
       xsi:schemaLocation="http://www.springframework.org/schema/beans
       http://www.springframework.org/schema/beans/spring-beans.xsd
       http://www.springframework.org/schema/context
       http://www.springframework.org/schema/context/spring-context.xsd
       http://www.springframework.org/schema/aop
       http://www.springframework.org/schema/aop/spring-aop.xsd">


    <context:component-scan base-package="cn.kern.demo" />


beans>
测试类
package cn.kern.demo;

import static org.junit.Assert.assertTrue;

import cn.kern.demo.entity.Bill;
import cn.kern.demo.service.IBillService;
import org.junit.Test;
import org.junit.runner.RunWith;
import org.springframework.beans.factory.annotation.Autowired;
import org.springframework.test.context.ContextConfiguration;
import org.springframework.test.context.junit.jupiter.SpringJUnitConfig;
import org.springframework.test.context.junit4.SpringJUnit4ClassRunner;
import org.springframework.test.context.junit4.SpringRunner;

/**
 * Unit test for simple App.
 */
//@RunWith(SpringJUnit4ClassRunner.class) 可以直接使用这个, SpringRunner 是 5.X 后的类, 其中并没有与SpringJUnit4ClassRunner有区别,在类名上有简写
@RunWith(SpringRunner.class)
@ContextConfiguration(locations = "classpath:springConfig.xml")
public class AppTest
{
    @Autowired
    private IBillService billService;

    /**
     * Rigorous Test :-)
     */
    @Test
    public void shouldAnswerWithTrue()
    {
        billService.createBill(new Bill(1L, "BN56465423132"));
    }
}
运行结果

可以看到,我们成功配置了IOC容器的自动注入,并调用接口成功。
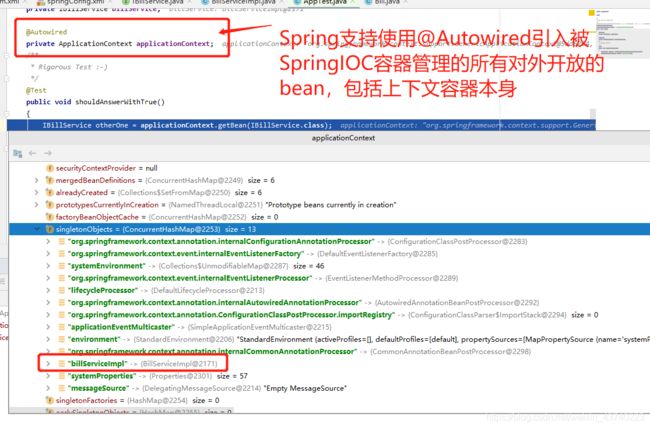
我们打个断点去查看上下文容器中的beanfactory,可以在单例对象中看到 billService的实现,也就是我们被 @Service (继承于@Component) 注解的类被加载。
下面我们简单的写一个记录接口访问次数和运行时间的切面。
首先在POM.xml文件中引入aspects 库
	<dependency>
      <groupId>org.springframeworkgroupId>
      <artifactId>spring-aspectsartifactId>
      <version>5.1.4.RELEASEversion>
    dependency>
然后创建与切面有关的切面逻辑处理类。
package cn.kern.demo.config.aspect;

import org.aspectj.lang.ProceedingJoinPoint;
import org.aspectj.lang.annotation.Aspect;
import org.aspectj.lang.annotation.Pointcut;
import org.aspectj.lang.reflect.MethodSignature;
import org.springframework.beans.factory.annotation.Autowired;
import org.springframework.stereotype.Component;

import java.lang.reflect.Method;
import java.util.Date;

@Aspect
@Component
public class VisitListening {

    @Autowired
    private IVisitService visitService;

    @Around("execution(* cn.kern.demo.service..*(..))")
    public Object aroundAop (ProceedingJoinPoint joinPoint) throws Throwable {
        Long startTime = System.currentTimeMillis();
        Object result = null;
        try {
            result = joinPoint.proceed();
            Long endTime = System.currentTimeMillis();
            String str = ((MethodSignature)joinPoint.getSignature()).getMethod().toString();
            Visit visit = new Visit(str, endTime - startTime);
            visitService.save(visit);
        } catch (Throwable throwable) {
            throw throwable;
        } finally {
            return result;
        }
    }
}
visit service
package cn.kern.demo.config.aspect;

import org.springframework.stereotype.Service;

@Service
public class VisitServiceImpl implements IVisitService {
    @Override
    public void save(Visit visit) {
        System.out.println("模拟入库操作: 增加一条visit 记录: " + visit.getInterfaceRefMethodName() + " 耗时:" + visit.getMsTime() + " (ms)");
    }
}
visit 对象类
package cn.kern.demo.config.aspect;

public class Visit {

    public Visit(String interfaceRefMethodName, Long msTime) {
        this.interfaceRefMethodName = interfaceRefMethodName;
        this.msTime = msTime;
    }

    private String interfaceRefMethodName;

    private Long msTime;

    public String getInterfaceRefMethodName() {
        return interfaceRefMethodName;
    }

    public void setInterfaceRefMethodName(String interfaceRefMethodName) {
        this.interfaceRefMethodName = interfaceRefMethodName;
    }

    public Long getMsTime() {
        return msTime;
    }

    public void setMsTime(Long msTime) {
        this.msTime = msTime;
    }
}
最后,我们需要在xml中开启切面代理的自动创建和织入
<beans xmlns="http://www.springframework.org/schema/beans"
       xmlns:xsi="http://www.w3.org/2001/XMLSchema-instance"
       xmlns:context="http://www.springframework.org/schema/context"
       xmlns:aop="http://www.springframework.org/schema/aop"
       xsi:schemaLocation="http://www.springframework.org/schema/beans
       http://www.springframework.org/schema/beans/spring-beans.xsd
       http://www.springframework.org/schema/context
       http://www.springframework.org/schema/context/spring-context.xsd
       http://www.springframework.org/schema/aop
       http://www.springframework.org/schema/aop/spring-aop.xsd">


    <context:component-scan base-package="cn.kern.demo" />

    <aop:aspectj-autoproxy/>
beans>
整体结构如下
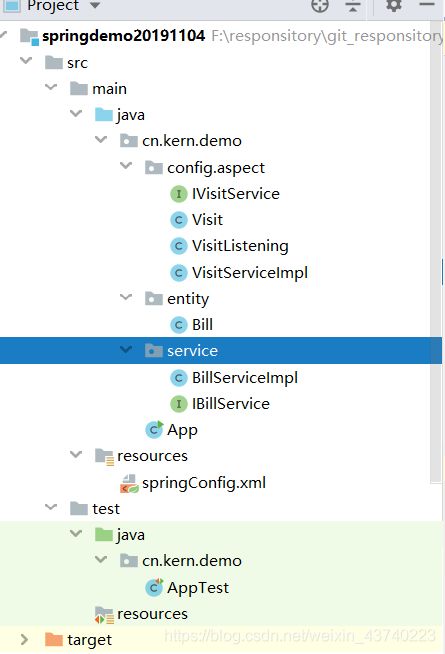
然后我们再次运行之前在测试类完成的那个方法
运行结果如下
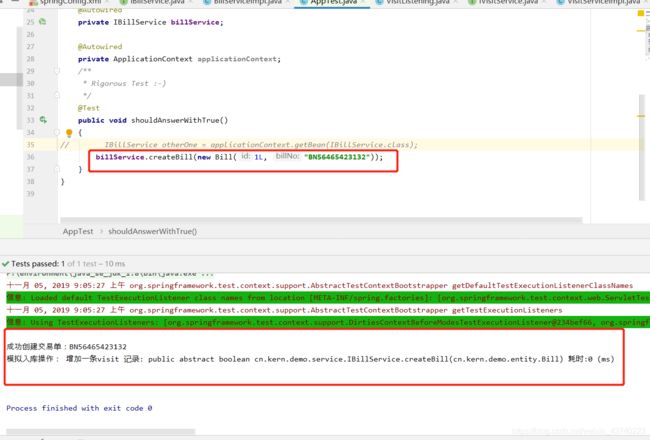
可以看到,切面方法成功的执行了。
至此,我们仅在Pom文件中引入了Spring相关的一些依赖,并在xml文件中配置了
    <context:component-scan base-package="cn.kern.demo" />

    <aop:aspectj-autoproxy/>
两项内容,配合我们的@Autowired @Aspect 等注解,便可以使用Spring IOC 和 AOP 两大功能了。这种便捷性是积累了前人的努力和汗水,一步步达到的。到现在的Springboot,我们得到了更加便捷的搭建项目的机会,非常不容易。
4. 创建一个Spring - mvc - web项目
在前文基础上,我们仅做少许变更,即可创建一个Spring 的web 项目
操作步骤大致如下:
- 在项目POM中引入依赖spring-webmvc
- 创建web目录 和 web.xml 文件
- web.xml中配置上下文参数和监听器以及请求转发servlet
- 创建spring配置xml文件中添加web服务相关的一些配置
- 创建controller 访问接口
- 配置tomcat启动,运行项目
4.1 POM文件中引入spring-webmvc 包
两个注意点:
1.把项目打包形式改为war,因为我们要使用tomcat启动,需要指定artifact
2.引入spring-webmvc依赖包,其中包含了context 和 aop 等,所以可以把context依赖删除
<project xmlns="http://maven.apache.org/POM/4.0.0" xmlns:xsi="http://www.w3.org/2001/XMLSchema-instance"
  xsi:schemaLocation="http://maven.apache.org/POM/4.0.0 http://maven.apache.org/xsd/maven-4.0.0.xsd">
  <modelVersion>4.0.0modelVersion>

  <groupId>cn.kern.demogroupId>
  <artifactId>spring-demo-20191104artifactId>
  <version>1.0-SNAPSHOTversion>
  <packaging>warpackaging>

  <name>spring-demo-20191104name>

  <url>http://www.example.comurl>

  <properties>
    <project.build.sourceEncoding>UTF-8project.build.sourceEncoding>
    <maven.compiler.source>1.8maven.compiler.source>
    <maven.compiler.target>1.8maven.compiler.target>
  properties>

  <dependencies>
    <dependency>
      <groupId>org.springframeworkgroupId>
      <artifactId>spring-testartifactId>
      <version>5.1.4.RELEASEversion>
    dependency>

    <dependency>
      <groupId>org.springframeworkgroupId>
      <artifactId>spring-aspectsartifactId>
      <version>5.1.4.RELEASEversion>
    dependency>

    <dependency>
      <groupId>junitgroupId>
      <artifactId>junitartifactId>
      <version>4.12version>
      <scope>testscope>
    dependency>

    <dependency>
      <groupId>org.springframeworkgroupId>
      <artifactId>spring-webmvcartifactId>
      <version>5.1.4.RELEASEversion>
    dependency>

  dependencies>

project>
4. 2 创建web目录 和 web.xml 文件
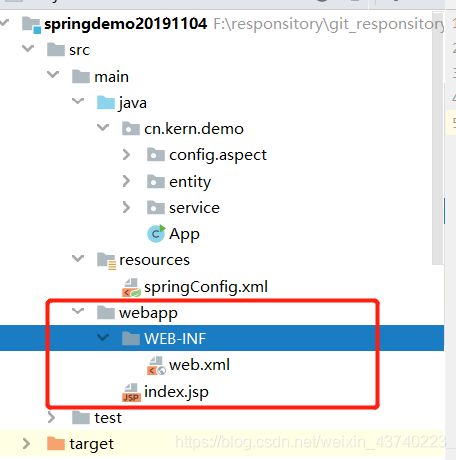
图中红色方框内即一个普通的web项目所包含的基本元素。
主要文件包括一个首页文件index.jsp(非必须) 和一个 web.xml(必须) 配置文件 。
一个简单的web.xml文件如下:
<web-app>

    <display-name>it's spring mvc web projectdisplay-name>


web-app>
4.3 web.xml配置Spring 上下文容器和 请求转发器
配置如下:这spring-web 项目最基础的配置
<web-app>
    <display-name>it's spring mvc web projectdisplay-name>

    <context-param>
        <param-name>contextConfigLocationparam-name>
        <param-value>classpath*:springConfig.xmlparam-value>
        <description>声明上下文文件的路径description>
    context-param>


    <listener>
        <listener-class>org.springframework.web.context.ContextLoaderListenerlistener-class>
    listener>


    <servlet>
        <servlet-name>dispatcherServletservlet-name>
        <servlet-class>org.springframework.web.servlet.DispatcherServletservlet-class>
        <init-param>
            <param-name>contextConfigLocationparam-name>
            <param-value>classpath*:springConfig.xmlparam-value>
        init-param>
    servlet>

    <servlet-mapping>
        <servlet-name>dispatcherServletservlet-name>
        <url-pattern>/url-pattern>
    servlet-mapping>

web-app>
4.4 配置spring mvc xml
可以看到,主要是添加了 < mvc:annotation-driven/>
注意:
在不手动在beans头部添加 xmlns:mvc=“http://www.springframework.org/schema/mvc” 时,idea 会自动添加 xmlns:mvc=“http://www.springframework.org/schema/cache” 以及xis:xsi:schemaLocation 中的内容,将其全部替换成mvc即可。否则将出现异常。NoCashException,报没有找到cache开头的一个类。
<beans xmlns="http://www.springframework.org/schema/beans"
       xmlns:xsi="http://www.w3.org/2001/XMLSchema-instance"
       xmlns:context="http://www.springframework.org/schema/context"
       xmlns:aop="http://www.springframework.org/schema/aop"
       xmlns:mvc="http://www.springframework.org/schema/mvc"
       xsi:schemaLocation="http://www.springframework.org/schema/beans
       http://www.springframework.org/schema/beans/spring-beans.xsd
       http://www.springframework.org/schema/context
       http://www.springframework.org/schema/context/spring-context.xsd
       http://www.springframework.org/schema/aop
       http://www.springframework.org/schema/aop/spring-aop.xsd
       http://www.springframework.org/schema/mvc
       http://www.springframework.org/schema/mvc/spring-mvc.xsd">


    <context:component-scan base-package="cn.kern.demo" />

    <aop:aspectj-autoproxy/>

    <mvc:annotation-driven/>
beans>
4.5 编写 控制层代码及接口
简单写了一个定义了一个控制层类,
package cn.kern.demo.controller;

import cn.kern.demo.entity.Bill;
import cn.kern.demo.service.IBillService;
import org.springframework.beans.factory.annotation.Autowired;
import org.springframework.stereotype.Controller;
import org.springframework.web.bind.annotation.*;

@Controller
@RequestMapping("bill")
public class BillController {

    @Autowired
    private IBillService billService;

    @ResponseBody
    @PostMapping("")
    public String createBill(@RequestParam("billNo") String billNO){
//        Id 这里写死,暂时模拟数据库自动生成id的机制
        Bill bill = new Bill(1L, billNO);
        billService.createBill(bill);
        return "succeed";
    }
}
这里我还在index.jsp简单写了一个form请求,模拟前端访问
<%@ page language="java" contentType="text/html; charset=gb2312"
             pageEncoding="utf-8"%>
<html>
<body>
<h1>Hello world!</h1>

请输入单号,以创建交易单 <br/>
<form method="post" action="/bill">
    单号 <input type="text" name="billNo" value="" >
    <input type="submit" value="创建">
</form>

</body>
</html>
4.6 配置tomcat启动

首次配置的话注意查看右下角的fix图标,点击如果没有出现提示的话,说明可能你的pom文件中没有把项目packing 形式改为war。
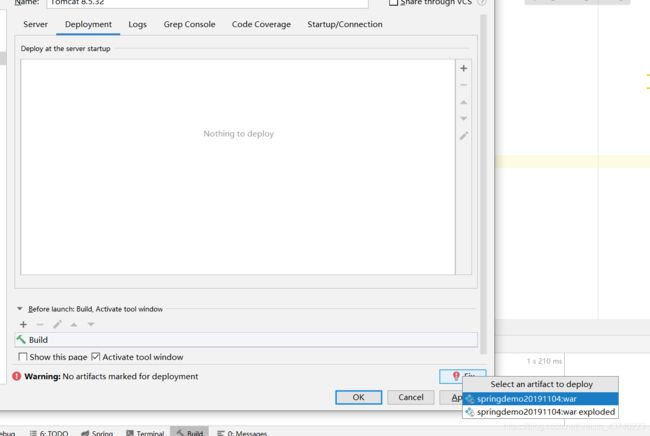
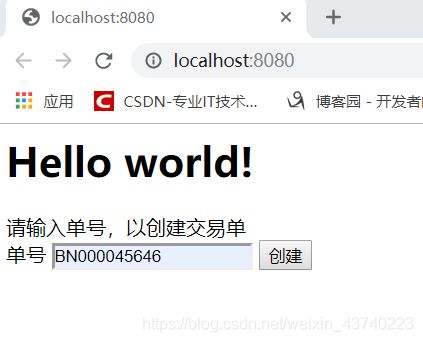
我们启动项目,tomcat自动打开index.jsp 首页 如下图
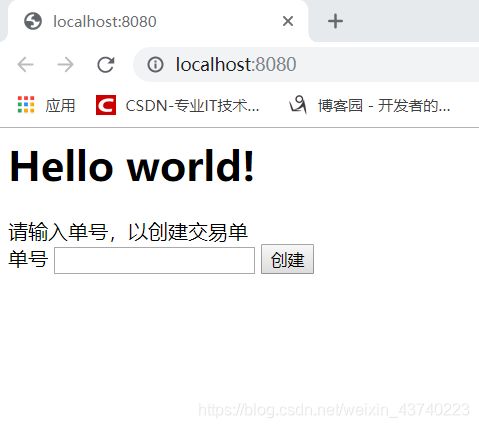
输入单号,点击创建
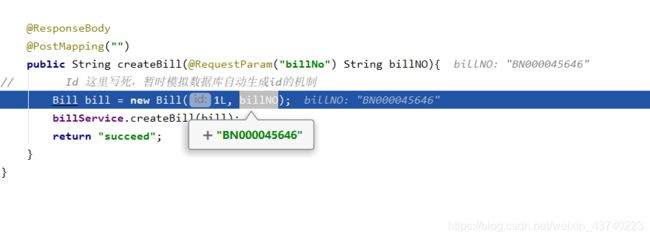
debug模式,我们看到正确拿到了单号
继续执行,结果如下
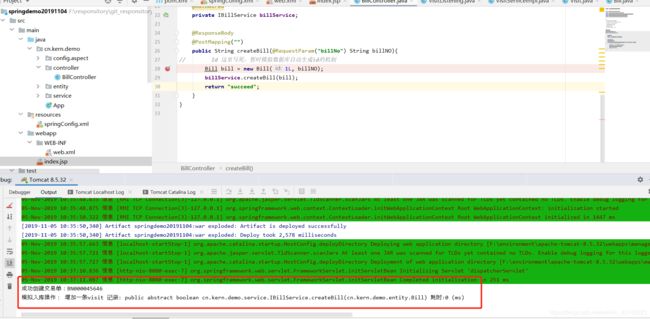

可以看到,我们模拟了一次较为常见的web http请求服务端的行为。这说明我们搭建的web项目已经可以正常运行,具备了基础的功能。至此,spring-webmvc项目创建完成。
这是一篇关于项目创建过程的blog,其中包含了很多细节和注意点,我将在我博客的其他章节中进行总结,有兴趣的小伙伴可以一起学习。