Alias、php编译安装、编译安装Nginx
Alias
当需要进行MySQL/MariDB连接的时候:
mysql连接命令:/usr/local/mysql/bin/mysql -uroot 太长了,不方便
解决方法1:
直接敲mysql命令:ln -s /usr/local/mysql/bin/mysql /usr/bin/mysql 做软链接
但是这个连接MySQL的时候还是需要:/usr/bin/mysql -uroot
还是不够方便
不采用这个方法可以删掉新作的软链接 rm -f /usr/bin/mysql
解决方法2:
修改系统环境变量PATH
echo $PATH 输出所有的PATH里面的路径
PATH的作用:可以直接用PATH这些路径里面的文件,不用敲绝对路径了。
PATH=$PATH:/usr/local/mysql/bin 临时加到path里面,重新登陆就没有了
echo "export PATH=$PATH:/usr/local/mysql/bin" >> /etc/profile (“>>”这个符号是追加的意思,输出这个PATH=$PATH:/usr/local/mysql/bin追加到/etc/profile这个文件里面去,export是把这个变量做一个申明不管是哪个shell都会生效)
退出终端重新进,或者 source /etc/profile 让修改即时生效
设定密码:mysqladmin -uroot password "aminglinux"
再次登录: mysql -uroot -paminglinux
mysql -uroot -paminglinux -S/tmp/mysql.sock 本地可以这样连接mysql
mysql -uroot -paminglinux -h192.168.222.128 -P3306 远程的可以用-h -P去连接MySQL
Alias别名:
一条命令的另外一个名字,你可以理解为外号。
举例:
网卡配置文件路径很长,每次敲这个命令都要花很长时间,可以做一个别名:
alias viens33='vi /etc/sysconfig/network-scripts/ifcfg-ens33'
vi ~/.bashrc //针对当前用户的,换一个用户就不好使了
vi /etc/bashrc //针对所有用户,不仅仅是当前用户。
在这个文件最后面增加:alias viens33='vi /etc/sysconfig/network-scripts/ifcfg-ens33'
补充:
解压 .tar.gz 结尾的压缩文件
tar zxvf xxxx.tar.gz    z 相对于针对gz压缩

.gz 结尾的文件另外一种压缩、解压方法

gzip 1.txt  (压缩)

gzip -d 1.txt.gz  (解压)
压缩并打包成.tar.gz 结尾的文件:
tar zcvf 123.tar.gz 123/
解压 .tar.bz2 结尾的压缩文件
tar jxvf xxxx.tar.bz2      j 相对于针对bz2压缩

.bz2 结尾的文件另外一种压缩、解压方法

 bzip2 1.txt   (压缩)
 bzip2 -d 1.txt.bz2   (解压)
压缩并打包成 .tar.bz2 结尾的文件:
tar jcvf 123.tar.bz2 123/
解压 .tar.xz 结尾的压缩文件
tar Jxvf xxxx.tar.xz  J 相对于针对xz压缩

.xz 结尾的文件另外一种压缩、解压方法

xz 1.txt    (压缩)
xz -d 1.txt.xz   (解压)
压缩并打包成 .tar.xz 结尾的文件:
tar Jcvf 123.tar.xz 123/
php编译安装
php编译安装分三步:
第一步:./configure 配置编译参数
第二步:make 编译,把源码的文件编译成二进制的文件 (计算机只能识别二进制文件)
第三步:make install 安装
PHP的INSTALL文件中说明文档:https://php.net/install
要安装nginx时的php编译安装说明文档:https://secure.php.net/manual/en/install.unix.nginx.php
下载PHP
1,cd /usr/local/src 进入到/usr/local/src目录
2,wget http://cn2.php.net/distributions/php-7.3.0.tar.bz2 下载PHP包
3,tar jxvf php-7.3.0.tar.bz2 解压这个包,如果报错就说明没有装解压工具
4,yum install -y bzip2 安装解压工具,然后再去解压
第一步:配置编译参数
5,cd php-7.3.0 进入php-7.3.0目录
编译参数:
6,./configure --prefix=/usr/local/php-fpm --with-config-file-path=/usr/local/php-fpm/etc --enable-fpm --with-fpm-user=php-fpm --with-fpm-group=php-fpm --with-mysql=/usr/local/mysql --with-mysqli=/usr/local/mysql/bin/mysql_config --with-pdo-mysql=/usr/local/mysql --with-mysql-sock=/tmp/mysql.sock --with-libxml-dir --with-gd --with-jpeg-dir --with-png-dir --with-freetype-dir --with-iconv-dir --with-zlib-dir --with-mcrypt --enable-soap --enable-gd-native-ttf --enable-ftp --enable-mbstring --enable-exif --with-pear --with-curl --with-openssl
详细解释:
./configure
--prefix=/usr/local/php-fpm    指定安装路径
--with-config-file-path=/usr/local/php-fpm/etc        config文件路径
--enable-fpm           开启fpm
--with-fpm-user=php-fpm    指定用户-所属主
--with-fpm-group=php-fpm    指定用户组-所属组
--with-mysql=/usr/local/mysql   关联MySQL(老版本的关联方式)
--with-mysqli=/usr/local/mysql/bin/mysql_config    关联MySQL(新版本的关联方式)
--with-pdo-mysql=/usr/local/mysql     MySQL连接方式
--with-mysql-sock=/tmp/mysql.sock    指定他的sock
--with-libxml-dir   从这个往后都是加php功能模块
错误1:
checking for cc... no
checking for gcc... no    这2个错误都是缺少gcc这个包

解决方案:
7,yum install -y gcc 安装完成gcc这个包之后再次编译参数./configure
错误2:
error: libxml2 not found 这个错误表示没有libxml2这个包
搜一下libxml2这个包 yum list |grep libxml2 |grep devel 过滤关键词libxml2和devel(一般都是安装带有devel的这种开发包)

解决方案:
8,yum install -y libxml2-devel 安装完成libxml2-devel这个包之后再次编译参数./configure
错误3:
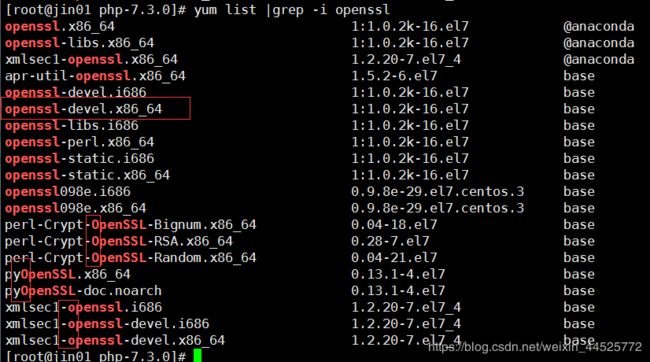
error: Cannot find OpenSSL's 这个错误表示没有OpenSSL这个包

搜一下openssl这个包 yum list |grep openssl (这里的openssl有大小写之分,结果可能出不来,所以用这个:yum list |grep -i openssl 在grep后面加一个-i忽略大小写)
解决方案:
9,yum install -y openssl-devel 安装完成openssl-devel这个包之后再次编译参数./configure
错误4:
error: cURL version 7.15.5 or later is required 这个错误表示没有curl这个包

yum list |grep curl |grep devel 查一下curl这个包名
解决方案:
10,yum install -y libcurl-devel 安装完成libcurl-devel这个包之后再次编译参数./configure
错误5:
configure: error: jpeglib.h not found 这个错误表示没有jpeg这个包

yum list |grep jpeg |grep devel 查一下jpeg这个包名
解决方案:
11,yum install -y libjpeg-turbo-devel 安装完成libjpeg-turbo-devel这个包之后再次编译参数./configure
错误6:
configure: error: png.h not found 这个错误表示没有png这个包
yum list |grep png |grep devel 搜一下这个包
解决方案:
12,yum install -y libpng-devel 安装完成这个包之后再次编译参数./configure
错误7:
configure: error: freetype-config not found. 这个错误表示没有freetype这个包
yum list |grep freetype |grep devel 搜一下这个包
解决方案:
13,yum install -y freetype-devel 安装完成这个包之后再次编译参数./configure
错误8:
configure: error: wrong mysql library version or lib not found 用的MySQL版本不对,用的mariadb版本比较新,但是php他用不了那么高的版本
解决方案:
下载一个低版本的MySQL/Mariadb
14,cd .. 进入上一级目录/usr/local/src中
15,wget https://mirrors.shu.edu.cn/mariadb//mariadb-5.5.62/bintar-linux-x86_64/mariadb-5.5.62-linux-x86_64.tar.gz 下载一个低版本的Mariadb
16,tar zxvf mariadb-5.5.62-linux-x86_64.tar.gz 解压
17,mv mariadb-5.5.62-linux-x86_64 /usr/local/mysql5.5 把mariadb-5.5.62-linux-x86_64这个目录移动并改名成/usr/local/mysql5.5目录
18,cd php-7.3.0 再进入到php-7.3.0这个php的目录里面
改编译参数
19,./configure --prefix=/usr/local/php-fpm --with-config-file-path=/usr/local/php-fpm/etc --enable-fpm --with-fpm-user=php-fpm --with-fpm-group=php-fpm --with-mysql=/usr/local/mysql5.5 --with-mysqli=/usr/local/mysql5.5/bin/mysql_config --with-pdo-mysql=/usr/local/mysql5.5 --with-mysql-sock=/tmp/mysql.sock --with-libxml-dir --with-gd --with-jpeg-dir --with-png-dir --with-freetype-dir --with-iconv-dir --with-zlib-dir --with-mcrypt --enable-soap --enable-gd-native-ttf --enable-ftp --enable-mbstring --enable-exif --with-pear --with-curl --with-openssl
第二步:
20,make 编译,把源码的文件编译成二进制的文件
如果在这步编译过程中出错了,处理好问题之后 先make clean 然后再 ./configure ......
我这次make编译过程中出现了虚拟内存不足的报错

将php安装配置文件中加了引号中的配置(不包括引号)“--disable-fileinfo”
改变之后的编译参数:
./configure --prefix=/usr/local/php-fpm --with-config-file-path=/usr/local/php-fpm/etc --enable-fpm --with-fpm-user=php-fpm --with-fpm-group=php-fpm --with-mysql=/usr/local/mysql5.5 --with-mysqli=/usr/local/mysql5.5/bin/mysql_config --with-pdo-mysql=/usr/local/mysql5.5 --with-mysql-sock=/tmp/mysql.sock --with-libxml-dir --with-gd --with-jpeg-dir --with-png-dir --with-freetype-dir --with-iconv-dir --with-zlib-dir --with-mcrypt --enable-soap --enable-gd-native-ttf --enable-ftp --enable-mbstring --enable-exif --with-pear --with-curl --with-openssl --disable-fileinfo
先执行:make clean,然后再把编译参数执行一遍
第三步:
21,make install 把编译过的文件拷贝到/usr/local/php-fpm/,安装PHP
如果要删除php,把php的几个目录删除掉就好了
22,cd /usr/local/php-fpm/etc/ 进入到/usr/local/php-fpm/etc/这个目录
23,cp php-fpm.conf.default php-fpm.conf 拷贝生成php服务的配置文件,没有配置文件没办法启动

24,cd /usr/local/src/php-7.3.0 进入到cd /usr/local/src/php-7.3.0目录
25,cp php.ini-development /usr/local/php-fpm/etc/php.ini 拷贝生成php的配置文件
配置启动脚本:
26,cp sapi/fpm/init.d.php-fpm /etc/init.d/php-fpm 拷贝生成启动脚本
然后vi看一下基本没有需要修改的
27,chkconfig --add php-fpm 添加到服务
chkconfig --list 查看服务列表

28,chkconfig php-fpm on 随机启动
29,service php-fpm start 启动php服务
权限不够,没有给他执行权限

解决方案:
30,chmod 755 /etc/init.d/php-fpm 然后再次启动php服务
然后再启动的时候就会报错了

这个报错是需要:定义配置文件,一个php的池子,必须要做的一步
31,cd /usr/local/php-fpm/etc/php-fpm.d/ 进入/usr/local/php-fpm/etc/php-fpm.d/目录
32,cp www.conf.default www.conf 拷贝生成www.conf
启动php服务
此时报错是因为没有创建php-fpm用户

错误9:
ERROR: [pool www] cannot get uid for user 'php-fpm' 没有php-fpm用户
解决方案:
33,useradd php-fpm 创建php-fpm用户
再次启动php服务,这次就完全启动了

检查有没有php-fpm服务:
ps aux |grep php-fpm
看看监听的端口: 9000是php的端口
netstat -lntp
补充:
grep -i 忽略大小写
比如:yum list |grep -i openssl 搜一下openssl这个包,忽略大小写
diff 查看两个文件的差异的,如 diff 1.txt 2.txt ,如果没有差异就不会有输出
vi 里面在一般模式下,按dd可以删除行(剪切),5dd(剪切5行),光标挪到要粘贴的位置,按p。
操作错误之后,想要撤销,可以按u,反着撤销按 ctrl r;
一般模式下按gg可以把光标定位到首行,按G可以定位到末行;
按yy复制,5yy复制5行;
显示行号,在一般模式里输入:set nu;
定位到指定的行:一般模式下直接按数字G,如10G
编译安装Nginx
官网:http://nginx.org/
官方文档:http://nginx.org/en/docs/install.html
下载:
cd /usr/local/src

wget http://nginx.org/download/nginx-1.14.2.tar.gz
解压:
tar zxvf nginx-1.14.2.tar.gz
cd nginx-1.14.2
编译:
./configure --prefix=/usr/local/nginx --with-http_ssl_module
编译完成
make && make install 第一个命令make运行成功了就继续运行第二个命令
ls /usr/local/nginx
可以看到此时Nginx已经编译安装好了

启动:
/usr/local/nginx/sbin/nginx 启动命令
ps aux |grep nginx 查看nginx服务是否启动
启动脚本
cd /usr/local/nginx/conf/
vi nginx.conf 配置文件


