Zookeeper——开源的分布式应用程序协调服务
Zookeeper
- 简介
- 功能:
- Zookeeper的基本功能和应用场景
- Zookeeper的整体运行机制
- Zookeeper的数据存储机制
- 集群安装、配置、部署、启动
- 自定义zkmanager脚本以启动zookeeper
- zookeeper客户端(zkCli.sh 2181)
- znode类型
- EX
- JAVA-ZOOKEEPER API
- 一次监听
- 一直监听
- zookeeper图形化客户端插件
- 写在最后
简介
功能:
- 可以为client管理少量数据(key-value)
- 可以为client监听指定数据节点的状态并在数据节点发生变化时通知客户端
Zookeeper的基本功能和应用场景
Zookeeper的整体运行机制
Zookeeper的数据存储机制
zookeeper中对用户的数据采用kv形式存储
只是zk有点特别:
key:是以路径的形式表示的,那就以为着,各key之间有父子关系,比如
/ 是顶层key
用户建的key只能在/ 下作为子节点,比如建一个key: /aa  这个key可以带value数据
 也可以建一个key:   /bb
 也可以建key: /aa/xx
zookeeper中,对每一个数据key,称作一个znode
集群安装、配置、部署、启动
注意:
初次启动需要奇数台节点(3、5台) 后台进程名:QuorumPeerMain
Leader工作端口:2888
Follower工作端口:3888
- 上传安装包,解压
- 修改配置文件conf/zoo.cfg(zoo.cfg.template–>zoo.cfg)
# The number of milliseconds of each tick
tickTime=2000
# The number of ticks that the initial
# synchronization phase can take
initLimit=10
# The number of ticks that can pass between
# sending a request and getting an acknowledgement
syncLimit=5
# the directory where the snapshot is stored.
# do not use /tmp for storage, /tmp here is just
# example sakes.
# 数据存储位置(修改位置1)
dataDir=/root/zkdata
# the port at which the clients will connect
clientPort=2181
# Set to "0" to disable auto purge feature
#autopurge.purgeInterval=1
# server.id = ip:port:port (修改位置2)
server.1=hdp-01:2888:3888
server.2=hdp-02:2888:3888
server.3=hdp-03:2888:3888
- 复制拷贝安装包到其它节点
配置文件修改完后,将安装包拷贝给其它节点(hdp-02、hdp-03...)
scp -r /path/to/from to to to ...
ex:scp -r /path/to/zookeeper hdp-02:/path/to/zookeeper hdp-02:/path/to/zookeeper
- 新建数据目录,并生成文件myid,内容为id(与配置文件中id对应)
接着,到hdp-01上,新建数据目录/root/zkdata,并在目录中生成一个文件myid,内容为1
接着,到hdp-02上,新建数据目录/root/zkdata,并在目录中生成一个文件myid,内容为2
接着,到hdp-03上,新建数据目录/root/zkdata,并在目录中生成一个文件myid,内容为3 - 启动zookeeper集群
lib/zkServer.sh start
- 查看zookeeper状态
lib/zkServer.sh start
自定义zkmanager脚本以启动zookeeper
#!/bin/bash
for host in hdp-01 hdp-02 hdp-03
do
ehco “${host}:${1}ing...”
ssh $host “source /etc/profile;/path/to/zookeeper/bin/zkServer.sh $1”
done
./zkmanager.sh start
---------------------------------- 通常到此即可 ----------------------------------
zookeeper客户端(zkCli.sh 2181)
# 1. 启动
bin/zkCli.sh -server hdp-02:2181
# 2.命令
ls /      ls /zookeeper
get /zookeeper    get /zookeeper/quta
create /test “hello”
set /test hellospark
help
rmr /test
get /test watch # 监听节点/test的数据(同步,只一次)
ls /test watch # 监听/test下的节点
znode类型
1.PERSISTENT 持久的:创建者就算跟集群断开联系,该节点也会持久存在于zk集群中
2.EPHEMERAL 短暂的:创建者一旦跟集群断开联系,zk就会将这个节点删除
3.SEQUENTIAL 带序号的:这类节点,zk会自动拼接上一个序号,而且序号是递增的
> ※组合类型
> PERSISTENT:持久不带序号
> EPHEMERAL:短暂不带序号
> PERSISTENT且SEQUENTIAL:持久且带序号
> EPHEMERAL且SEQUENTIAL:短暂且带序号
EX
> create -e /test 999    # -e 短暂
> create -s /test 66     # ???
JAVA-ZOOKEEPER API
// zookeeper地址,2s超时,null监听回调
Zookeeper zk = new Zookeeper(“hdp-01:2181,hdp-02:2181,hdp-03:2181”,2000,null);
// 1.增
// path,data(byte),acl权限,createNode类型   返回值:path(String)
zk.create(“/test”,”hello”.getBytes(),Ids.OPEN_ACL_UNSAFE,CreateNode.PERSISTENT);
// 2.改
// path,data,version -1代表任何版本
zk.setData(“/test”,”helloworld”.getBytes(“UTF-8”),-1);
// 3.查
// path,是否监听,stat数版本 null代表最新   返回值:data(byte[])
zk.getData(“/test”,false,null);
// 4.查子节点
// path,是否监听     返回值:List节点名称列表
Zk.getChildren(“/test”,false);
// 5.删
// path,version -1代表任何版本
zk.delete(“/test”,-1);
// 6.节点是否存在
Zk.exists(“/test”,fasle); //path.是否监听  返回值:stat 不存在时返回null
Zk.close();
一次监听
Zookeeper zk = new Zookeeper(“”,2000,null);
byte[] data = zk.getData(“/test”,new Watcher(){
  @Override
  public void process(WatchedEvent event){
  sout<<event.getPath(); //节点路径
  sout<<event.getType();//事件类型
  Zk.getData(“/test”,true,null);
}
},null);
一直监听
zk = new Zookeeper(“”,2000,new Watcher(){
  @Override
  Public void process(WatchedEvent event){
  ...
  try{
  Zk.getData(“/test”,true,null);
}catch(KeeperException|InterruptedException e){}
}
});
byte[] data = zk.getData(“/test”,true,null);
sleep(Long.MAX_VALUE); // 内部:thread.setDaemon(true); 设置了守护线程
ex:
event.getState()==keeperState.SyncConnected&&event.getType()==EventType.NodeDataChange
zookeeper图形化客户端插件
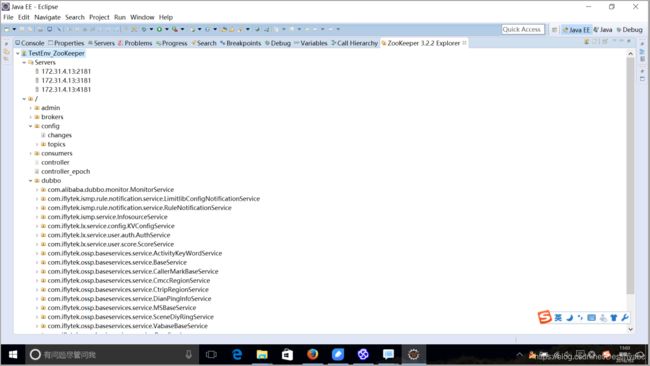
在Eclipse环境下安装ZooKeeper状态查看相关的插件步骤如下:
Step 1. 在 Eclipse 菜单打开Help -> Install New Software…
Step 2. 添加 url http://www.massedynamic.org/eclipse/updates/
Step 3. 选择插件并安装运行
Step 4. 在 Eclipse 菜单打开Window->Show View->Other…->ZooKeeper 3.2.2。
Step 5. 连接ZK 输入正在运行的ZK server 地址和端口
连接成功后就就可以在Eclipse里查看ZK Server里的节点信息。如下所示:

写在最后
欢迎留言私信讨论;
文章有知识性错误请立马联系博主,博主将非常感谢;
无需经过允许即可随意使用转载,知识本来就是被广泛用来学习的;
非常感谢您能看到此处,本文为博主学习笔记,如有不同见解,请不吝赐教。

