webpack3最新版本配置研究(三)多入口,html-webpack-plugin, extract-text-webpack-plugin
虽然现在有很多单页应用,不过还是多页面用的比较多一些,先研究了下多入口的配置
//随便生成一个js来测试,我在根目录新建了一个entry.js文件
console.log('123');
之前的webpack.config.js的配置是这样的
  entry: __dirname + "/index.js",
  output:{
    // 打包后存放地址
    path: __dirname,
    // 输出后的文件名
    filename: 'bundle.js'
  }
需要修改一下他的结构
entry: {
    index: __dirname + "/index.js",
    entry: __dirname + '/entry.js'
  },
  output: {
    filename: 'js/[name].js',
    path: __dirname + '/public'
  },

//顺便把他的img loader的地址就改下,删除name后面的build,因为output里面写了path,后面都会继承
{
 test: /\.(png|jpe?g|gif|svg)(\?.*)?$/,
 loader: "url-loader?limit=8192&name=img/[name].[hash:8].[ext]"
}
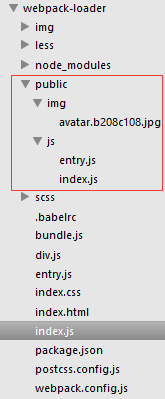
然后npm run build会出现下面的结构,生成了一个public的文件夹里面的生成了对应的文件,这样以后js在webpack里面注册一下之后就会生成到public里面,修改下index.html的script路径就能使用了
之前的话研究了下loader感觉还是挺方便的,跟印象中的gulp好像简单一些,这回研究下plugin的相关组件
plugin
html-webpack-plugin
首先还是安装下包,npm install html-webpack-plugin
//A:又是webpack.config.js
//B:这不是webpack配置研究么
//A:你赢了
//获取下plugin
const HtmlWebpackPlugin = require('html-webpack-plugin');
//module中新增一个plugin属性
plugins:[
    new HtmlWebpackPlugin({
      filename: 'index.html',   // 生成出来的文件和路径,前面会加上output的path
      template: 'index.html',   // 获取最初的html末班
      inject:  'body',          // 插入文件的位置
      hash: true,               // 在生成的文件后面增加一个hash,防止缓存
      chunks: ['index','entry'] //引入js的地址,里面的值就是entry里面的属性,在对应的页面里面引入想要的js即可,就可以多页面不同引用了
    })
  ]
这一个html-webpack-plugin的配置还是相对比较简单的
不过当分页面非常多的时候,每一个页面写一个这个就非常的麻烦了
webpack.config.js的配置还是相当灵活的可以这样修改下
//webpack.config.js

//删除plugins里面的htmlwebpack
// new HtmlWebpackPlugin({
//   filename: 'index.html',   // 生成出来的文件和路径,前面会加上output的path
//   template: 'index.html',   // 获取最初的html末班
//   inject:  'body',          // 插入文件的位置
//   hash: true,               // 在生成的文件后面增加一个hash,防止缓存
//   // "chunks": {               // 引入的js和css地址
//   //   "head": {
//   //     "entry": ["./js/index.js","./js/entry.js"]  // 所需插入的js,数量超过一个用数组
//   //   },
//   //   xhtml:false
//   // }
//   chunks: ['index','entry']
// }),

// 在文件的最下面加上一个数组遍历,将想生成HtmlWebpackPlugin的js写在数组里生成,一些特定的页面引入多js的也可以自己定制,注意层次结构,就可以随心所欲的修改了
const htmlArray = ['index'];
htmlArray.forEach((element) => {
  const chunksArray = [element];
  if (element === 'index') {
    chunksArray.push('entry');
  }
  const newPlugin = new HtmlWebpackPlugin({
    filename: element + '.html',
    template: element + '.html',   // 获取最初的html末班
    inject:  'body',          // 插入文件的位置
    hash: true,               // 在生成的文件后面增加一个hash,防止缓存
    chunks: chunksArray
  });
  module.exports.plugins.push(newPlugin);
});
index.html将里面的script标签删掉!!!
,不然会运行一次就会网上加一次,使用npm run webpack之后可以看到在public里面生成了一个index.html,并且在body处加上了两个script
还有下列属性可以使用
title: 设置title的名字
inject: 把模板注入到哪个标签后,
favicon: 给html添加一个favicon(就是浏览器标签上的小图片),
minify:是否压缩 如果要写的话用minify: { removeAttributeQuotes: true }不然会报错
hash:是否hash化 true false ,
cache:是否缓存,
showErrors:是否显示错误,
xhtml:是否自动毕业标签 默认false
extract-text-webpack-plugin
安装包 npm install extract-text-webpack-plugin –save-dev
//webpack.config.js
const ExtractTextPlugin = require("extract-text-webpack-plugin");
//修改module中的css的loader并调整下img的loader的name对应的位置
{
 test: /\.css$/,
   use: ExtractTextPlugin.extract({
     fallback: "style-loader",
     use: "css-loader"
   })
},
{
 test: /\.(png|jpe?g|gif|svg)(\?.*)?$/,
 loader: "url-loader?limit=8192&name=../img/[name].[hash:8].[ext]"
}

//plugins中增加
new ExtractTextPlugin({
  filename: 'css/[name].css'
}),


