SpringBoot整合Mybatis(高级)
SpringBoot整合Mybatis(高级)
文章目录
- SpringBoot整合Mybatis(高级)
- 前言
- 基础环境配置
- 增删改查
- ResultMap
- 复杂查询
- 多对一
- 一对多
- 动态SQL
- if
- choose
- trim
- SQL片段
- foreach
- 缓存
- 一级缓存
- 二级缓存
- 参考文章
前言
花了三天时间,看完了B站上的 IDEA 版 Mybatis 的视频教程,确实从 UP 主那里学到了很多东西。UP 讲课很有激情,而且以练促学这种方式很容易学到东西,真的要给 UP 点个大大的赞。
UP 是用 Maven 导入项目然后进行 Mybatis 的教学,这里我采用的是 SpringBoot 来集成 Mybatis,根据节奏一步步学习完了 Mybatis 的知识。
应该来说本质上的东西,像 SQL 之类都是一样的,但是配置方面因为环境不同,所以也不太一样。
这篇博客用来记录 SpringBoot 集成 Mybatis 的一整个学习过程,算是对自己学习的一个总结。
这里我用的是 IDEA 进行的 SpringBoot 项目的搭建,然后整合了 Mybatis在项目中。
- 搭建 SpringBoot+Mybatis 项目的流程请参考这篇文章 SpringBoot整合Mybatis超详细流程,
- 同时,我们在实践中使用了 Lombok 插件,也请参考这篇文章进行
Lombok的配置 Lombok插件的安装与使用。
基础环境配置
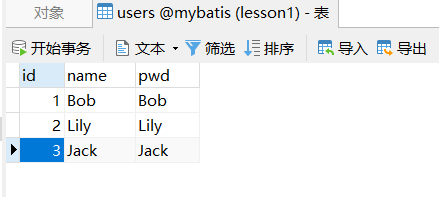
users数据表设计如下
在 application.yml 中进行配置
spring:
  datasource:
    driver-class-name: com.mysql.cj.jdbc.Driver
    url: jdbc:mysql://127.0.0.1:3306/mybatis?useUnicode=true & characterEncoding=utf-8 &
      useSSL=false & serverTimezone=Asia/Shanghai
    username: root
    password: 123456

mybatis:
  mapper-locations: classpath:mapper/*.xml
  type-aliases-package: com.example.entity

logging:
  level:
    com:
      example:
        dao:
          debug
在 mybatis 配置中,mapper-locations指定了 xml 文件的地址, type-aliases-package: com.example.entity,这样在 xml 中parameterType、resultType都能使用简写
如果我们要打印 mybatis 的日志,配置对应mapper所在包的日志级别即可。这里可以看到,“logging.level”是前缀,“com.example.dao”是Dao层接口所在的包路径。
这里我们没有用到 controller 和 service,目录结构我们只需要 entity、dao和mapper。我们定义好实体类和 dao 层接口、编写 mapper.xml 之后,用 JUnit 测试类进行查看。
增删改查
Entity层
package com.example.entity;

import lombok.AllArgsConstructor;
import lombok.Data;

@Data
@AllArgsConstructor
public class User {
    private int id;
    private String name;
    private String pwd;
}
Dao层
@Repository
public interface UserDao {
    //查询所有用户
    List<User> getAll();
    //根据id查用户
    User getUserById(int id);
    //删除用户
    void deleteUser(int id);
    //更新用户信息
    void updateUser(User user);
    //增加用户
    void insertUser(User user);
}
增删改查 insert、delete、update、select
<mapper namespace="com.example.dao.UserDao">

    <select id="getAll" resultType="User">
        select * from `users` ;
    select>

    <select id="getUserById" parameterType="int" resultType="User">
        select * from `users` where id=#{id};
    select>


    <insert id="insertUser" parameterType="User">
        insert into `users` (id, name, pwd) values (#{id}, #{name}, #{pwd});
    insert>


    <update id="updateUser" parameterType="User">
        update `users` set name=#{name},pwd=#{pwd} where id=#{id};
    update>


    <delete id="deleteUser" parameterType="int">
        delete from `users` where id=#{id};
    delete>

mapper>
测试类
@Autowired
private UserDao userDao;

@Test
void contextLoads() {
    userDao.insertUser(new User(4, "haha", "123"));
    userDao.updateUser(new User(3, "jackYYY", "zzz"));

    //userDao.deleteUser(4);

    User user = userDao.getUserById(3);
    System.out.println(user);

    List<User> list = userDao.getAll();
    System.out.println(list);

}
- 如果我们在 dao 中用
@Param指定参数名称,则在 xml 中不需要指定parameterType,sql 中使用指定名称 - 或者我们在 dao 中使用 hashMap 类型传值,
parameterType=map,sql中使用 map 指定的 key (多参数传递时推荐用 map )
一个经验:如果在任何一个 xml 里面写了任何的增删改查,一定要在 Dao 层接口中有对应的方法,否则项目运行一定报错。
ResultMap
结果集映射,用于解决数据库字段与 Java实体类的属性不一致的情况
id name pwd -> id name password
如果我们的Entity层定义为:
import lombok.Data;

@Data
public class User2 {
    private int id;
    private String name;
    private String password;
}
这样的话数据库字段和实体类属性不一致,查询出来的 password 一列为空,对于这种情况我们可以使用 resultMap 进行解决。
<resultMap id="UserMap" type="User2">

    <result column="id" property="id">result>
    <result column="name" property="name">result>
    <result column="pwd" property="password">result>
resultMap>

<select id="getAll" resultMap="UserMap">
    select * from `users`;
select>
复杂查询
resultMap 元素是 MyBatis 中最重要最强大的元素。ResultMap 的设计思想是,对简单的语句做到零配置,对于复杂一点的语句,只需要描述语句之间的关系就行了。
比如现在有两个表,一个学生表、一个老师表,多个学生对一个老师是关联【多对一】,一个老师有很多学生是集合【一对多】
我们先在 MySQL 数据库中建表,老师表有两个字段,id、name。学生表有三个字段,id、name、tid,其中 tid 是外键,对应老师的 id
CREATE TABLE teacher(
	id int(10) not null,
	name varchar(20) DEFAULT null,
	PRIMARY KEY(id)
)

INSERT INTO teacher(id, name) VALUES(1, '秦老师');

CREATE TABLE student(
	id int(10) not null,
	name VARCHAR(20) DEFAULT NULL,
	tid int(10) DEFAULT NULL,
	PRIMARY KEY(id),
	FOREIGN KEY(tid) REFERENCES teacher(id)
)

INSERT INTO student(id, name, tid) VALUES(1, '小红', 1);
INSERT INTO student(id, name, tid) VALUES(2, '小明', 1);
INSERT INTO student(id, name, tid) VALUES(3, '小蓝', 1);
INSERT INTO student(id, name, tid) VALUES(4, '小绿', 1);
INSERT INTO student(id, name, tid) VALUES(5, '小紫', 1);
多对一
我们使用 Lombok 建立老师、学生类
@Data
public class Teacher {
    private int id;
    private String name;
}

@Data
public class Student {
    private int id;
    private String name;

    //学生关联一个老师
    private Teacher teacher;
}
在 resultMap 中,查询对象使用 association,集合使用 collection。
JavaType:指定实体类中属性的类型
association 中的 select 即嵌套查询
方法一:按照查询嵌套处理
我们要查询外键中 teacher 的 tid,需要嵌套查询。建立学生实体类下的老师对象,即意味着适用 association
Dao层
@Repository
public interface StudentDao {
    //查询所有学生信息,以及对应的老师信息
    List<Student> getStudent();
    List<Student> getStudent2();
}
Mapper
<select id="getStudent" resultMap="StudentMap">
    select * from `student`;
select>

<resultMap id="StudentMap" type="Student">

    <result property="id" column="id"/>
    <result property="name" column="name"/>
    <association property="teacher" column="tid" javaType="Teacher" select="getTeacher"/>
resultMap>

<select id="getTeacher" resultType="Teacher">
    select * from `teacher` where id=#{tid};
select>
测试类
@Autowired
private StudentDao studentDao;

@Test
public void getStudent(){
    List<Student> list2 = studentDao.getStudent();
    for (Student x: list2){
        System.out.println(x);
    }
}
方法二:按照结果嵌套处理
直接根据实体类的属性进行结果查询,其中需要的对象直接用 association 构造查询
<select id="getStudent2" resultMap="StudentMap2">
    select s.id sid, s.name sname,t.name tname
    from `student` s, `teacher` t
    where s.tid = t.id;
select>

<resultMap id="StudentMap2" type="Student">
    <result property="id" column="sid"/>
    <result property="name" column="sname"/>
    <association property="teacher" javaType="Teacher">
        <result property="name" column="tname"/>
    association>
resultMap>
结果为:
一对多
我们同样使用刚才在数据库中建立的老师表和学生表
使用 Lombok 建立学生、老师类
@Data
public class Student {
    private int id;
    private String name;
    private int tid;
}

@Data
public class Teacher {
    private int id;
    private String name;

    //一个老师有多个学生
    private List<Student> students;
}
建立老师实体类下的List< Student >泛型,即意味着在 resultMap 中适用 collection
ofType:指定的这个 List 所存放的 JavaBean 的类型
方法一:按照结果嵌套处理
Dao层
@Repository
public interface TeacherDao {
    //获取指定老师下的所有学生及老师的信息
    Teacher getTeacher(@Param("tid") int id);
    Teacher getTeacher2(@Param("tid") int id);
}
Mapper
<select id="getTeacher" resultMap="TeacherMap">
    select s.id sid, s.name sname, t.name tname, t.id tid
    from `student` s, `teacher` t
    where s.tid = t.id and t.id=#{tid}
select>

<resultMap id="TeacherMap" type="Teacher">
    <result property="id" column="tid"/>
    <result property="name" column="tname"/>

    <collection property="students" ofType="Student">
        <result property="id" column="sid"/>
        <result property="name" column="sname"/>
        <result property="tid" column="tid"/>
    collection>
resultMap>
测试类
@Autowired
private TeacherDao teacherDao;

@Test
public void getTeacher(){
    Teacher teacher = teacherDao.getTeacher(1);
    System.out.println(teacher);
}
结果为:
方法二:使用查询嵌套处理
<select id="getTeacher2" resultMap="TeacherMap2">
    select * from `teacher` where id=#{tid};
select>

<resultMap id="TeacherMap2" type="Teacher">
    <collection property="students" javaType="ArrayList" ofType="Student"
                select="getStudent" column="id"/>
resultMap>

<select id="getStudent" resultType="Student">
    select * from `student` where tid=#{tid};
select>
动态SQL
动态SQL:指根据不同的条件生成不同的SQL语句,摆脱拼接SQL的痛苦
我们在数据库中建立一个博客表,字段有 id、title、author、create_time、views
CREATE TABLE blog(
	id VARCHAR(50) not null COMMENT '博客id',
	title VARCHAR(100) not null COMMENT '博客标题',
	author VARCHAR(30) not null COMMENT '博客作者',
	create_time datetime not null COMMENT '创建时间',
	views int(30) not null COMMENT '浏览量'
)
建立实体类
@Data
public class Blog {
    private String id;
    private String title;
    private String author;
    private Date createTime;
    private int views;
}
博客ID并不是使用数字自增,而是使用随机数来保证ID唯一,所以我们需要一个工具类来生成唯一ID
新建 utils 包,包下新建 IDutils 类
//因为随机生成的UUID中含有'-'字符,所以我们把字符去掉
public class IDutils {
    public static String getID(){
        return UUID.randomUUID().toString().replaceAll("-", "");
    }
}
我们可以去测试类进行查看
@Test
public void testID(){
    System.out.println(IDutils.getID());
}
然后我们插入数据
Dao层
@Repository
public interface BlogDao {
    //插入数据
    int addBlog(Blog blog);
    //IF查询博客
    List<Blog> queryBlogIF(Map map);
    //Choose查询博客
    List<Blog> queryBlogChoose(Map map);
    //Set更新博客
    int updateBlog(Map map);
}
Mapper
<insert id="addBlog" parameterType="Blog">
    insert into `blog` (id, title, author, create_time, views)
    values (#{id}, #{title}, #{author}, #{createTime}, #{views})
insert>
测试类
@Test
public void addBlog(){
    Blog blog = new Blog();
    blog.setId(IDutils.getID());
    blog.setTitle("Mybatis很好玩");
    blog.setAuthor("Kiros");
    blog.setCreateTime(new Date());
    blog.setViews(9999);
    blogDao.addBlog(blog);

    blog.setId(IDutils.getID());
    blog.setTitle("Java很好玩");
    blogDao.addBlog(blog);

    blog.setId(IDutils.getID());
    blog.setTitle("Spring很好玩");
    blogDao.addBlog(blog);

    blog.setId(IDutils.getID());
    blog.setTitle("微服务很好玩");
    blogDao.addBlog(blog);
}
结果:
if
使用动态 SQL 最常见情景是根据条件包含 where 子句的一部分。
如果我们不传入参数 title,那么所有的 Blog 都会返回;如果传入了 “title” 参数,那么就会对 “title” 进行查找并返回对应的 BLOG 结果,对于 “author” 参数同理。
<select id="queryBlogIF" parameterType="map"  resultType="Blog">
    select * from `blog` where 1=1
    <if test="title != null">
        and title=#{title}
    if>
    <if test="author != null">
        and author=#{author}
    if>
select>
在测试类中传入数据进行测试
@Test
public void queryBlogIF(){
    //不传入参数
    HashMap map = new HashMap();

    /*传入title和author
        map.put("title", "Mybatis很好玩");
        map.put("authpr", "Kiros");
         */

    List<Blog> blogs = blogDao.queryBlogIF(map);
    for(Blog blog: blogs){
        System.out.println(blog);
    }
}
不传入参数时查询出四条记录,传入参数后查询出一条记录
choose
有时候,我们不想使用所有的条件,而只是想从多个条件中选择一个使用。针对这种情况,MyBatis 提供了 choose 元素,它有点像 Java 中的 switch 语句。
Choose标签下结合 when、otherwies 标签来使用,只要满足第一个when,就不再往下查找。这个特性和 switch——case——default 是一致的。
传入了 “title” 就按 “title” 查找,传入了 “author” 就按 “author” 查找的情形。若两者都没有传入,就返回 views 为 9999 的 BLOG
<select id="queryBlogChoose" parameterType="map" resultType="Blog">
    select * from `blog` where
    <choose>
        <when test="title != null">
            title=#{title}
        when>
        <when test="author != null">
            and author=#{author}
        when>
        <otherwise>
            and views=9999
        otherwise>
    choose>
select>
但是以上SQL代码有个问题,如果 title 为空,而 author 不为空,SQL就会被拼接为 select * from blog where and author=#{author} ,这个查询明显会失败。为了解决这个问题,mybatis 中引入了 where 元素。
where 元素只会在子元素返回任何内容的情况下才插入 “WHERE” 子句。而且,若子句的开头为 “AND” 或 “OR”,where 元素也会将它们去除。这样就避免了SQL拼接时出现的问题。
<select id="queryBlogChoose" parameterType="map" resultType="Blog">
    select * from `blog`
    <where>
        <choose>
            <when test="title != null">
                title=#{title}
            when>
            <when test="author != null">
                and author=#{author}
            when>
            <otherwise>
                and views=9999
            otherwise>
        choose>
    where>
select>
在测试类中传入数据进行测试
@Test
public void queryBlogChoose(){
    //不传入参数
    HashMap map = new HashMap();

    //传入title和author
    //map.put("title", "Mybatis很好玩");
    map.put("authpr", "Kiros");

    List<Blog> blogs = blogDao.queryBlogChoose(map);
    for(Blog blog: blogs){
        System.out.println(blog);
    }
}
trim
用于动态更新语句的类似解决方案叫做 set。set 元素可以用于动态包含需要更新的列,忽略其它不更新的列。
同时,set 元素会动态地在行首插入 SET 关键字,并会删掉额外的逗号(这些逗号是在使用条件语句给列赋值时引入的)。
<update id="updateBlog" parameterType="map">
    update `blog`
    <set>
        <if test="title != null">
            title=#{title},
        if>
        <if test="author != null">
            author=#{author}
        if>
    set>
    where id=#{id}
update>
在测试类中传入数据进行测试
@Test
public void updateBlog(){
    HashMap map = new HashMap();

	//传入title和author
    map.put("title", "Mybatis很好玩aaaaaaa");
    //map.put("authpr", "Kiros");
	map.put("id", "ad0b3e7f08924eca98db184fbe4e8d9b");

    blogDao.queryBlogChoose(map);
    System.out.println("更新成功");
}
如果 where 元素与你期望的不太一样,你也可以通过自定义 trim 元素来定制 where 元素的功能。比如,和 where 元素等价的自定义 trim 元素为:
<trim prefix="WHERE" prefixOverrides="AND |OR ">
  ...
trim>
prefixOverrides 属性会忽略通过管道符分隔的文本序列(注意此例中的空格是必要的)。上述例子会移除所有 prefixOverrides 属性中指定的内容,并且插入 prefix 属性中指定的内容。
同理,我们也可以自定义 trim 来定制 set 元素,与 set 元素等价的自定义 trim 元素为:
<trim prefix="SET" suffixOverrides=",">
  ...
trim>
一般来说,默认的 where、set就可以解决我们大部分的问题,如果需要,再进行定制化开发。
SQL片段
有时候我们需要把一些公共的 SQL 片段抽取出来,方便复用
我们使用 sql 标签抽取公共部分,然后在需要的地方使用 include 标签引用
<sql id="if-title-author">
    <if test="title != null">
        and title=#{title}
    if>
    <if test="author != null">
        and author=#{author}
    if>
sql>

<select id="queryBlogIF" parameterType="map" resultType="Blog">
    select * from `blog`
    <where>
        <include refid="if-title-author">include>
    where>
select>


<select id="queryBlogIF" parameterType="map" resultType="Blog">
    select * from `blog`
    <where>
        <if test="title != null">
            and title=#{title}
        if>
        <if test="author != null">
            and author=#{author}
        if>
    where>
select>
注意,尽量基于单表来定义SQL片段,sql 标签内最好不要包含 where 标签。
foreach
动态 SQL 的另一个常见使用场景是对集合进行遍历(尤其是在构建 IN 条件语句的时候)。
foreach 元素的功能非常强大,它允许你指定一个集合,声明可以在元素体内使用的集合项(item)和索引(index)变量。它也允许你指定开头与结尾的字符串以及集合项迭代之间的分隔符。这个元素也不会错误地添加多余的分隔符。
你可以将任何可迭代对象(如 List、Set 等)、Map 对象或者数组对象作为集合参数传递给 foreach。当使用可迭代对象或者数组时,index 是当前迭代的序号,item 的值是本次迭代获取到的元素。当使用 Map 对象(或者 Map.Entry 对象的集合)时,index 是键,item 是值。
我们先去数据库中把博客的 id 都改为数字,这样方便我们使用 foreach 进行查询。
现在我们要使用 foreach 查询博客 id 为 1、2、3 的博客,sql为:
select * from blog where 1=1 and(id=1 or id=2 or id=3)
根据 sql 构建 foreach,我们之后会在测试类中传入一个集合,集合名字叫做 ids,集合中的元素是 id,指定的开头是 and(,结尾是),分隔符是 or。
<select id="queryBlogForeach" parameterType="map" resultType="Blog">
    select * from `blog`
    <where>
        <foreach collection="ids" item="id" open="and (" close=")" separator="or">
            id=#{id}
        foreach>
    where>
select>
测试类
@Test
public void queryBlogForeach(){
    HashMap map = new HashMap();
    ArrayList<Integer> ids = new ArrayList<Integer>();
    ids.add(1);
    ids.add(2);
    ids.add(3);

    map.put("ids", ids);
    List<Blog> blogs = blogDao.queryBlogForeach(map);
    for (Blog blog : blogs) {
        System.out.println(blog);
    }
}
建议:先在 MySQL 中写出完整的 SQL 语句,再对应地去修改成为需要的动态 SQL 即可。
缓存
平时我们查询数据库的时候都要损耗资源,因此我们想到可以把一些数据暂时存放在内存的一个地方,这就是缓存。当我们再次查询相同数据时,可以直接从缓存中取出数据,就不用再从数据库中查询了。
缓存是存放在内存中的临时数据,从缓存中查询数据可以减少和数据库的交互次数,降低系统开销,提高查询的效率,从而提升高并发系统的性能。经常查询并且不经常改变的数据 适合使用缓存,否则不适合使用缓存。
MyBatis 内置了一个强大的事务性查询缓存机制,它可以非常方便地配置和定制。
Mybatis 系统默认定义了两级缓存:一级缓存和二级缓存。
- 一级缓存,也称本地缓存,SqlSession级别,仅仅对一个会话中的数据进行缓存
- 二级缓存,namespace级别的缓存,会对全局的数据进行缓存,
- Mybatis 还定义了缓存接口
cache,我们可以通过缓存接口来自定义二级缓存
SpringBoot中默认一级缓存不需要在配置文件去配置,默认开启,一级缓存不能被关闭,只能配置缓存范围:Session或者Statement。二级缓存也是默认开启的,但是可以通过 application.yml 配置文件关闭或者开启,同时,如果要使用二级缓存则需要在 xml 文件中配置。
# 关闭/开启二级缓存
mybatis:
  configuration:
    cache-enabled: false/true
通常情况下,如果同时设置了一级缓存和二级缓存,会先使用二级缓存的数据,然后再使用一级缓存的数据,最后才会访问数据库。
一级缓存
这里我们使用数据库中的 users 表(一开始建立的那个表)进行查询,重新建立一个 User 类
@Data
public class User {
    private int id;
    private String name;
    private String pwd;
}
Dao层
@Repository
public interface UserDao {
    //查询用户
    User queryUserById(@Param("id") int id);
}
Mapper
<select id="queryUserById" resultType="User">
    select * from `users` where id=#{id};
select>
测试类
@Test
public void queryUserById(){
    User user = userDao.queryUserById(1);
    System.out.println(user);

    User user2 = userDao.queryUserById(1);
    System.out.println(user2);
}
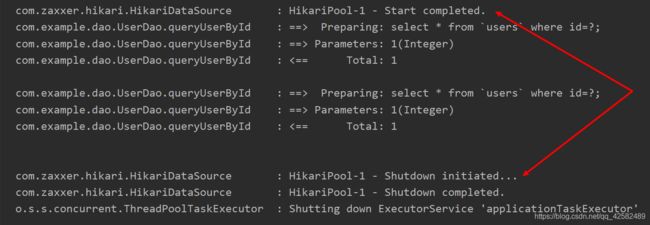
从日志反馈中可以看出,我们查询了两次数据库,似乎一级缓存没有生效啊。
这是因为 SpringBoot 集成 Mybatis 时默认每次查询完之后自动 commite 去提交事务,每次 userDao 调用queryUserById方法都会创建一个 session,并且在执行完毕后关闭 session。所以两次调用并不是同一个 SqlSession,一级缓存永远不会生效。
想要一级缓存生效的话,我们需要把方法放在一个事务当中,这样走的就是同一个 SqlSession,一级缓存就又生效了。
@Test
@Transactional
public void queryUserById(){
    User user = userDao.queryUserById(1);
    System.out.println(user);

    User user2 = userDao.queryUserById(1);
    System.out.println(user2);
}
我们可以看到,放在一个事务之中,只查询了一次数据库,一级缓存生效。
一级缓存默认是开启的,只在一次 SqlSession 中有效。相当于一个Map,缓存不失效的情况下每次去 Map 中取数据就行。
缓存失效的情况:
- 同一个Mapper.xml中查询不同的对象
- 增删改操作,可能会改变原理的数据,必定刷新缓存
- 查询不同的Mapper.xml
- 手动清理缓存
二级缓存
然而,一级缓存的作用域太小,我们一般都会采用二级缓存
工作机制:
- 一个会话查询一条数据,这个数据就会被放在当前会话的以及缓存中
- 如果当前会话关闭了,这个会话的一级缓存就没了;但我们想要的是,会话关闭了,一级缓存中的数据被保存到二级缓存中
- 新的会话查询信息,就可以从二级缓存中获取内容
- 不同的
mapper查出的数据会放在自己对应的缓存中
要启用全局的二级缓存,只需要在你的 SQL 映射文件(即 xml 文件)中添加一行
<cache/>
这个简单语句的基本效果:
-
映射语句文件中的所有 select 语句的结果将会被缓存。
-
映射语句文件中的所有 insert、update 和 delete 语句会刷新缓存。
-
缓存会使用最近最少使用算法(LRU算法)来清除不需要的缓存。
-
缓存不会定时进行刷新(也就是说,没有刷新间隔)。
-
缓存会保存列表或对象(无论查询方法返回哪种)的 1024 个引用。
-
缓存会被视为读/写缓存,这意味着获取到的对象并不是共享的,可以安全地被调用者修改,而不干扰其他调用者或线程所做的潜在修改。
当然,这些属性可以通过 cache 元素的属性来修改。比如:
<cache
  eviction="FIFO"
  flushInterval="60000"
  size="512"
  readOnly="true"/>
这个更高级的配置创建了一个 FIFO 缓存,每隔 60 秒刷新,最多可以存储结果对象或列表的 512 个引用,而且返回的对象被认为是只读的,因此对它们进行修改可能会在不同线程中的调用者产生冲突。
参数解读:
-
eviction(清除策略)属性指定的是清除缓存的方法,可用的策略有四种
LRU– 最近最少使用:移除最长时间不被使用的对象。(默认)FIFO– 先进先出:按对象进入缓存的顺序来移除它们。SOFT– 软引用:基于垃圾回收器状态和软引用规则移除对象。WEAK– 弱引用:更积极地基于垃圾收集器状态和弱引用规则移除对象。
-
flushInterval(刷新间隔)属性可以被设置为任意的正整数,设置的值应该是一个以毫秒为单位的合理时间量。默认情况是不设置,也就是没有刷新间隔,缓存仅仅会在调用语句时刷新。
-
size(引用数目)属性可以被设置为任意正整数,要注意欲缓存对象的大小和运行环境中可用的内存资源。默认值是 1024。
-
readOnly(只读)属性可以被设置为 true 或 false。只读的缓存会给所有调用者返回缓存对象的相同实例。因此这些对象不能被修改。这就提供了可观的性能提升。而可读写的缓存会(通过序列化)返回缓存对象的拷贝。速度上会慢一些,但是更安全,因此默认值是 false。
二级缓存需要查询结果映射的 POJO 对象实现 Java.io.Serializable 接口。如果存在父类、成员 POJO 都需要实现序列化接口。否则,执行的过程中会直接报错。
由于二级缓存数据存储介质多种多样,不一定在内存有可能是硬盘或者远程服务器。所以,POJO 类实现序列化接口是为了将缓存数据取出执行反序列化操作。
@Data
public class User implements Serializable {
    private int id;
    private String name;
    private String pwd;
}
由于 cache 是针对整个 Mapper 中的查询方法的,因此当某个 select 方法不需要缓存时,可在对应的 select 标签中添加 useCache 值为 false 来禁用二级缓存。
<select id="findById" resultType="User" useCache="false">
    ······
select>
下面,我们还是通过刚才一级缓存的实例来操作二级缓存
实体类
@Data
public class User implements Serializable {
    private int id;
    private String name;
    private String pwd;
}
Mapper
<cache/>
<select id="queryUserById" resultType="User">
    select * from `users` where id=#{id};
select>
测试类
@Test
public void queryUserById(){
    User user = userDao.queryUserById(1);
    System.out.println(user);

    User user2 = userDao.queryUserById(1);
    System.out.println(user2);
}
可以看到,我们只查询了一次数据库,第二次是从缓存中取出了数据,命中缓存的概率是 0.5。
小结:
-
只要开启了二级缓存,在同一个 Mapper 下都有效
-
所有数据都会先放在一级缓存中,当会话提交或者关闭的时候才提交到二级缓存中
-
使用二级缓存一定要记得给
POJO对象序列化 -
查询结果实时性要求不高的情况下可采用
Mybatis二级缓存降低数据库访问量,提高访问速度,同时配合设置缓存刷新间隔flushInterval来根据需要改变刷新缓存的频次。
参考文章
Mybatis3-官方文档
【狂神说Java】Mybatis最新完整教程IDEA版通俗易懂
Spring Boot集成Mybatis中如何显示日志
SpringBoot集成Mybatis的一级缓存和二级缓存
Mybatis中的collection标签中的javaType和ofType属性的区别


