分布式实战(一):
实战环境:
- nginx WEB服务器:192.168.2.10
- PHP服务器:192.168.2.20
- PHP服务器:192.168.2.30
- MYCAT服务器:192.168.2.40
- MYSQL主服务器:192.168.2.50
- MySQL从服务器:192.168.2.60
部署流程:
1. 部署nginx:
1.1. 安装nginx:
[root@localhost ~]
1.2. 下载门户网站文件:
[root@localhost ~]
[root@localhost ~]
1.3. 配置nginx
[root@localhost ~]
user nginx;
worker_processes auto;
pid /var/run/nginx.pid;
events {
worker_connections 1024;
}
http {
include /etc/nginx/mime.types;
default_type application/octet-stream;
log_format main '$remote_addr - $remote_user [$time_local] "$request" '
'$status $body_bytes_sent "$http_referer" '
'"$http_user_agent" "$http_x_forwarded_for"';
access_log /var/log/nginx/access.log main;
sendfile on;
tcp_nopush on;
tcp_nodelay on;
keepalive_timeout 65;
keepalive_requests 100;
gzip on;
gzip_min_length 1k;
gzip_types text/plain text/xml;
gzip_comp_level 3;
charset utf-8;
include /etc/nginx/conf.d/*.conf;
}
[root@localhost ~]
[root@localhost ~]
upstream cgiwordpress {
server 192.168.2.20:9000;
server 192.168.2.30:9000;
}
server {
listen 80;
server_name bog.wordpress.com;
access_log /var/log/nginx/wordpress.access.log main;
error_log /var/log/nginx/wordpress.error.log warn;
location / {
root /usr/share/nginx/html/wordpress;
index php.html index.html index.htm;
}
error_page 500 502 503 504 /50x.html;
location = /50x.html {
root /usr/share/nginx/html;
}
location ~ \.php$ {
root /data/nginx/html/wordpress;
fastcgi_pass cgiwordpress;
fastcgi_next_upstream error http_500;
fastcgi_index index.php;
fastcgi_param SCRIPT_FILENAME $document_root$fastcgi_script_name;
include fastcgi_params;
}
}
2. 部署PHP:
2.1. 安装PHP:
[root@localhost ~]
以上命令2.20和2.30服务器都需要执行
2.2. 配置php-fpm:
2.20服务器配置如下:
[root@localhost ~]
修改如下:
listen = 192.168.2.20:9000
listen.allowed_clients = 192.168.2.10
user = nginx
group = nginx
2.30服务器配置如下;
[root@localhost ~]
修改如下:
listen = 192.168.2.30:9000
listen.allowed_clients = 192.168.2.10
user = nginx
group = nginx
D、E
2.20和2.30服务器配置如下:
[root@localhost ~]
[root@localhost ~]
[root@localhost ~]
[root@localhost ~]
[root@localhost ~]
[root@localhost ~]
3. 配置MySQL主从:
3.1. 安装MySQL:
[root@localhost ~]
3.2. 修改配置文件:
2.20服务器配置:
[root@www ~]
在mysqld指令段添加以下内容:
server-id=1
log-bin=ys.bin
validate_password_policy=0
validate_password_length=4
2.30服务器配置:
[root@www ~]
在mysqld指令段添加以下内容:
server-id=2
validate_password_policy=0
validate_password_length=4
3.3. 授权从库:
[root@localhost ~]
[root@localhost ~]
2020-06-12T09:43:19.918327Z 1 [Note] A temporary password is generated for root@localhost: .2Lsr>r?)_CY
[root@localhost ~]
Enter password: .2Lsr>r?)_CY
mysql> alter user 'root'@'localhost' identified by '1234'; ---修改root密码
Query OK, 0 rows affected (0.01 sec)
mysql> show variables like "%log_bin"; -----查看log_bin和sql_log_bin是否均为on
+---------------+-------+
| Variable_name | Value |
+---------------+-------+
| log_bin | ON |
| sql_log_bin | ON |
+---------------+-------+
2 rows in set (0.00 sec)
授权从库
mysql> grant replication slave on *.* to "ys"@"192.168.2.60" identified by "1234";
mysql> flush privileges; ---刷新权限
Query OK, 0 rows affected (0.00 sec)
查看主库状态
mysql> show master status;
+-----------+----------+--------------+------------------+-------------------+
| File | Position | Binlog_Do_DB | Binlog_Ignore_DB | Executed_Gtid_Set |
+-----------+----------+--------------+------------------+-------------------+
| ys.000001 | 306 | | | |
+-----------+----------+--------------+------------------+-------------------+
1 row in set (0.00 sec)
3.4. slave端配置:
root@localhost ~]
[root@localhost ~]
2020-06-12T09:43:19.918327Z 1 [Note] A temporary password is generated for root@localhost: .2Lsr>r?)_CY
[root@localhost ~]
Enter password: .2Lsr>r?)_CY
mysql> alter user 'root'@'localhost' identified by '1234'; ---修改root密码
Query OK, 0 rows affected (0.01 sec)
mysql> change master to
-> master_host="192.168.2.50",
-> master_user="ys",
-> master_password="1234",
-> master_log_file=" ys.000001",
-> master_log_pos=306;
mysql> start slave;
查看slave状态:
mysql> show slave status\G;
*************************** 1. row ***************************
Slave_IO_State: Waiting for master to send event
Master_Host: 192.168.2.50
Master_User: sxy
Master_Port: 3306
Connect_Retry: 60
Master_Log_File: ys.000001
Read_Master_Log_Pos: 154
Relay_Log_File: www-relay-bin.000001
Relay_Log_Pos: 355
Relay_Master_Log_File: ys.000001
Slave_IO_Running: Yes
Slave_SQL_Running: Yes
Replicate_Do_DB:
Replicate_Ignore_DB:
Replicate_Do_Table:
Replicate_Ignore_Table:
Replicate_Wild_Do_Table:
Replicate_Wild_Ignore_Table:
Last_Errno: 0
Last_Error:
Skip_Counter: 0
Exec_Master_Log_Pos: 306
Relay_Log_Space: 761
Until_Condition: None
Until_Log_File:
Until_Log_Pos: 0
Master_SSL_Allowed: No
Master_SSL_CA_File:
Master_SSL_CA_Path:
Master_SSL_Cert:
Master_SSL_Cipher:
Master_SSL_Key:
Seconds_Behind_Master: 0
Master_SSL_Verify_Server_Cert: No
Last_IO_Errno: 0
Last_IO_Error:
Last_SQL_Errno: 0
Last_SQL_Error:
Replicate_Ignore_Server_Ids:
Master_Server_Id: 1
Master_UUID: 4f2cb611-a2ab-11ea-af22-000c29f12149
Master_Info_File: /var/lib/mysql/master.info
SQL_Delay: 0
SQL_Remaining_Delay: NULL
Slave_SQL_Running_State: Slave has read all relay log; waiting for more updates
Master_Retry_Count: 86400
Master_Bind:
Last_IO_Error_Timestamp:
Last_SQL_Error_Timestamp:
Master_SSL_Crl:
Master_SSL_Crlpath:
Retrieved_Gtid_Set:
Executed_Gtid_Set:
Auto_Position: 0
Replicate_Rewrite_DB:
Channel_Name:
Master_TLS_Version:
1 row in set (0.00 sec)
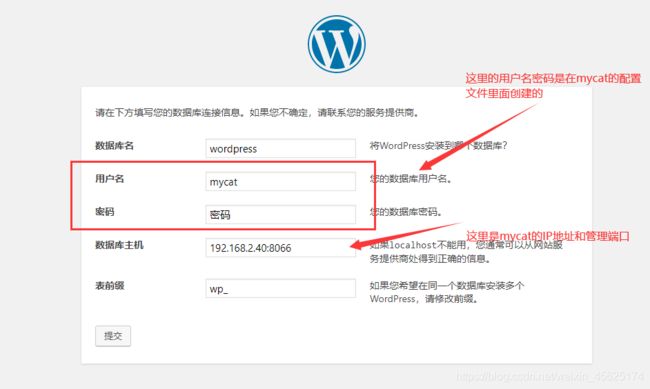
3.5. 授权mycat:
在主库执行授权信息,从库自动会同步:
mysql> grant all privileges on *.* to 'mycat-proxy'@'192.168.2.40' identified by '1234';
Query OK, 0 rows affected, 1 warning (0.01 sec)

mysql> flush privileges;
Query OK, 0 rows affected (0.01 sec)
mysql> create database wordpressdb default charset=utf8;
Query OK, 1 row affected (0.00 sec)
3.6. 配置mycat:
[root@localhost ~]
[root@localhost mycat]
[root@localhost mycat]
.....
<user name="mycat" defaultAccount="true">
<property name="password">1234</property>
<property name="schemas">wordpress</property>
</user>
<user name="user">
<property name="password">user</property>
<property name="schemas">wordpress</property>
<property name="readOnly">true</property>
</user>
....
[root@localhost mycat]
[root@localhost mycat]
......
<schema name="wordpress" checkSQLschema="false" sqlMaxLimit="100" dataNote="dn1">
</schema>
<dataNode name="dn1" dataHost="localhost1" database="wordpressdb" />
<dataHost name="localhost1" maxCon="1000" minCon="10" balance="1"
writeType="0" dbType="mysql" dbDriver="native" switchType="1" slaveThreshold="100">
负载均衡类型:
(1)balance="0", 不开启读写分离机制,所有读操作都发送到当前可用的writeHost 上。
(2)balance="1",全部的 readHost 与 stand by writeHost 参与 select 语句的负载均衡,简单的说,当双主双从模式(M1->S1,M2->S2,并且 M1 与 M2 互为主备),正常情况下,M2,S1,S2 都参与 select 语句的负载均衡。
(3)balance="2",所有读操作都随机的在 writeHost、 readhost 上分发。
(4)balance="3",所有读请求随机的分发到 wiriterHost 对应的 readhost 执行,writerHost 不负担读压力,注意 balance=3 只在 1.4 及其以后版本有,1.3 没有。
<heartbeat>select user()</heartbeat>
<!-- can have multi write hosts -->
<writeHost host="hostM1" url="192.168.2.50:3306" user="mycat-proxy"
password="1234">
<!-- can have multi read hosts -->
<readHost host="hostS1" url="192.168.2.60:3306"
</writeHost>
<writeHost host="hostM2" url="192.168.2.60:3306" user="mycat-proxy"
password="1234" />
</dataHost>
3.7. 启动服务:
[root@localhost ~]
[root@localhost ~]
Active Internet connections (only servers)
Proto Recv-Q Send-Q Local Address Foreign Address State PID/Program name
tcp 0 0 127.0.0.1:25 0.0.0.0:* LISTEN 3494/master
tcp 0 0 127.0.0.1:32000 0.0.0.0:* LISTEN 3666/java
tcp 0 0 0.0.0.0:22 0.0.0.0:* LISTEN 1196/sshd
tcp6 0 0 ::1:25 :::* LISTEN 3494/master
tcp6 0 0 :::1984 :::* LISTEN 3666/java
tcp6 0 0 :::8066 :::* LISTEN 3666/java
tcp6 0 0 :::9066 :::* LISTEN 3666/java
tcp6 0 0 :::45231 :::* LISTEN 3666/java
tcp6 0 0 :::34869 :::* LISTEN 3666/java
tcp6 0 0 :::22 :::* LISTEN 1196/sshd
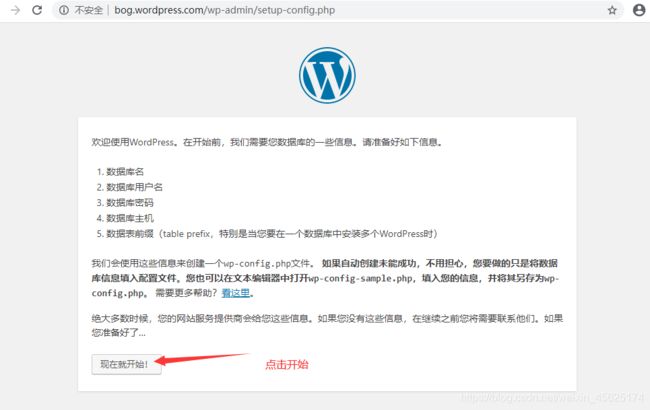
4.验证:
- 修改hosts的文件:C:\Windows\System32\drivers\etc\hosts
添加如下:
192.168.2.10 www.wordpress.com
- 打开浏览器验证: