ISCSI实现磁盘网络共享以及LVM方式共享拓展
ISCSI实现磁盘网络共享以及LVM方式共享拓展
这里通过ISCSI实现的磁盘分离,并且可以进行诸如LVM等方面的操作,同样需要两台主机模拟说明问题。一台作为服务器,一台作为客户端.
一、服务器建立一个普通共享磁盘,客户端使用
在服务器:
首先建立共享磁盘
[root@server ~]# fdisk /dev/vdb
Command (m for help): n ## n表示创建分区
Partition type:
p primary (0 primary, 0 extended, 4 free)
e extended
Select (default p): p ## p 表示选择默认
Partition number (1-4, default 1): 1 ##选择1
First sector (2048-20971519, default 2048): ##按回车键
Using default value 2048
Last sector, +sectors or +size{K,M,G} (2048-20971519, default 20971519): +5G ##先加上5G
Partition 1 of type Linux and of size 5 GiB is set
Command (m for help): wq ##退出保存
The partition table has been altered!
定义ISCSI共享的target文件名?
一般情况下,通过ISCSI共享出来的target文件名都是以iqn开头,意思是“iSCSI Qualified Name(iSCSI合格名称)”
格式如下:
iqn.yyyy-mm.
iqn.年年-月.单位网络名的反转写法 :这个共享的target 名称
例如之下用到的:iqn.2017-12.com.example:storage1
配置targetcli
[root@server ~]# yum install targetcli -y ##安装服务软件
[root@server ~]# systemctl start target ##开启服务
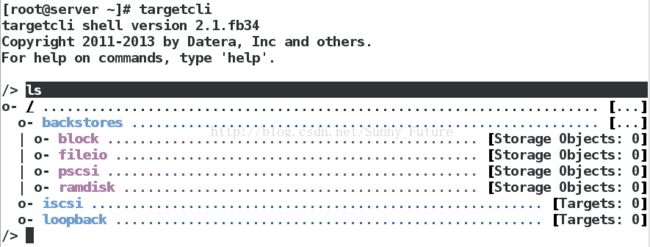
[root@server ~]# targetcli ##默认情况如下:
/> /backstores/block create redhat:storage1 /dev/vdb1 ##命名设备块
Created block storage object redhat:storage1 using /dev/vdb1.
/> /iscsi create iqn.2017-12.com.example:storage1 ##生成共享设备
Created target iqn.2017-12.com.example:storage1.
Created TPG 1.
/> /iscsi/iqn.2017-12.com.example:storage1/tpg1/acls create iqn.2017-12.com.example:redhatkey ##生成共享设备的钥匙
Created Node ACL for iqn.2017-12.com.example:redhatkey
/> /iscsi/iqn.2017-12.com.example:storage1/tpg1/luns create /backstores/block/redhat:storage1 ##创造共享设备指向本地设备的链接
Created LUN 0.
Created LUN 0->0 mapping in node ACL iqn.2017-12.com.example:redhatkey
/> /iscsi/iqn.2017-12.com.example:storage1/tpg1/portals create 172.25.254.120 ##添加共享设备的的端口
Using default IP port 3260
Created network portal 172.25.254.120:3260.
整体效果如下:
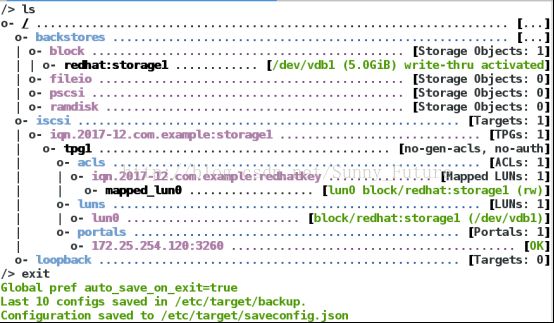
[root@server ~]# vim /etc/target/saveconfig.json ##此文件查看上述的配置
防火墙永久添加端口3260服务:
[root@server ~]# firewall-cmd --add-port=3260/tcp --permanent
[root@server ~]# firewall-cmd --reload
客户端:
[root@client ~]# yum install iscsi-initiator-utils.x86_64 -y ##安装服务
[root@client ~]# systemctl start iscsi
[root@client ~]# vim /etc/iscsi/initiatorname.iscsi
InitiatorName=iqn.2017-12.com.example:redhatkey
[root@client ~]# systemctl restart iscsi
[root@client ~]# iscsiadm -m discovery -t st -p 172.25.254.120
## -m discovery 表示:使用检测的方式进行iscsiadmin命令功能; -t st表示:st类型; -p 172.25.254.120 (-p IP:port)表示:从ip为172.25.254.120主机获取iscsi设备与端口,不写端口就是默认是3260
[root@client ~]# iscsiadm -m node -T iqn.2017-12.com.example:storage1 -p 172.25.254.120 -l
## -m node 表示:找到目前本机上面所有检测的target信息;-T iqn.2017-12.com.example:storage1 表示:仅使用后面接的这台target; -p 172.25.254.120 (-p IP:port)表示:从ip为172.25.254.120主机获取iscsi设备与端口,不写端口就是默认是3260;-l表示:login,就是进行登陆
[root@client ~]# fdisk -l ##可以看到,磁盘已经共享,能够正常使用。

[root@client ~]# fdisk /dev/sda
Command (m for help): n ##创建分区
Partition type:
p primary (0 primary, 0 extended, 4 free)
e extended
Select (default p): p
Partition number (1-4, default 1): 1
First sector (8192-10485759, default 8192):
Using default value 8192
Last sector, +sectors or +size{K,M,G} (8192-10485759, default 10485759):
Using default value 10485759
Partition 1 of type Linux and of size 5 GiB is set
[root@client ~]# partprobe ##同步分区表
[root@client ~]# mkfs.xfs /dev/sda1 ##格式化
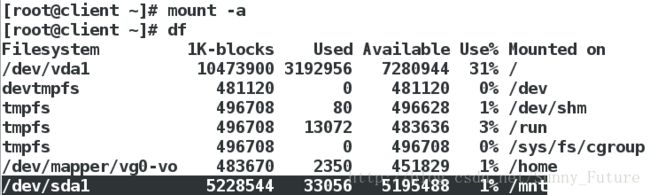
[root@client ~]# mount /dev/sda1 /mnt/ ##挂载使用
永久挂载:
[root@client ~]# vim /etc/fstab
UUID=5bfa217e-7687-443b-ba54-0cbeb39c77e4 /mnt xfs defaults,_netdev 0 0
_netdev 注明此为网络磁盘,应在网络启动后再挂载之
UUID 防止名称漂移,以此稳定挂载
[root@client ~]# blkid ##查看UUID

测试:
二、删除网络磁盘:
客户端:(取消挂载,退出,删除,重启服务)
取消挂载
[root@client ~]# vim /etc/fstab ##永久挂载的代码,取消永久挂载
[root@client ~]# umount /mnt/ ##取消当前挂载
退出登陆
[root@client ~]# iscsiadm -m node -T iqn.2017-12.com.example:storage1 -p 172.25.254.120 -u
[root@client ~]# systemctl restart iscsi
[root@client ~]# fdisk -l
重启服务后,但是网络硬盘还是存在。。。
解决方法如下:
先退出:
[root@client ~]# iscsiadm -m node -T iqn.2017-12.com.example:storage1 -p 172.25.254.120 -u
再删除之(-o delete)
[root@client ~]# iscsiadm -m node -T iqn.2017-12.com.example:storage1 -p 172.25.254.120 -o delete
[root@client ~]# systemctl restart iscsi
[root@client ~]# fdisk -l
此时重启服务网络硬盘已经不存在,则删除成功
对于服务器端:(清除共享)
[root@server ~]# targetcli
/>clearconfig confirm=true
/> exit
三、服务器新建LVM可拓展共享磁盘
(一)服务新建可拓展共享磁盘,客户端挂载
对于服务端:
[root@server ~]# fdisk /dev/vdb
Command (m for help): n ##增加一个分区
Partition type:
p primary (0 primary, 0 extended, 3 free)
e extended
Select (default p):
Using default response p
Partition number (1-4, default 2): 1
First sector (2099200-20971519, default 2099200):
Using default value 2099200
Last sector, +sectors or +size{K,M,G} (2099200-20971519, default 20971519): +1G
Partition 1 of type Linux and of size 1 GiB is set
Command (m for help): t ##修改分区标签为LVM
Hex code (type L to list all codes): 8e
Changed type of partition 'Linux' to 'Linux LVM'
Command (m for help): wq
The partition table has been altered!
[root@server ~]# partprobe ##同步分区表
[root@server ~]# targetcli ##重新配置
/> /backstores/block create westos:storage1 /dev/iscsi_vg/iscsi_lv0
/> /iscsi create iqn.2017-12.com.example:storage1
/> /iscsi/iqn.2017-12.com.example:storage1/tpg1/acls create iqn.2017-12.com.example:key1
/> /iscsi/iqn.2017-12.com.example:storage1/tpg1/luns create /backstores/block/westos:storage1
/> /iscsi/iqn.2017-12.com.example:storage1/tpg1/portals create 172.25.254.120
/> exit
[root@server ~]# systemctl restart iscsi
[root@server ~]# firewall-cmd --add-port=3260/tcp --permanent
[root@server ~]# firewall-cmd --reload
客户端由于数据残馀可能出现的错误:
[root@client ~]# vim /etc/iscsi/initiatorname.iscsi
InitiatorName=iqn.2017-12.com.example:key1
[root@client ~]# iscsiadm -m discovery -t st -p 172.25.254.120
[root@client ~]# iscsiadm -m node -T iqn.2017-12.com.example:storage1 -p 172.25.254.120 -l ##可能出现如下错误:

解决方法:
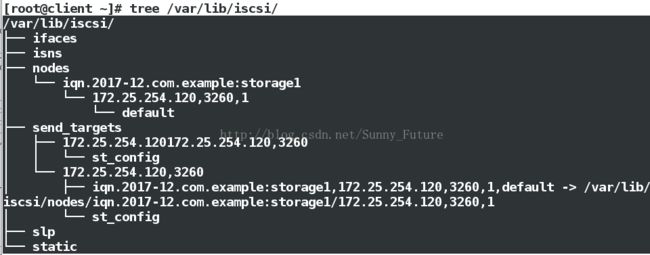
[root@client ~]# yum install tree
[root@client ~]# tree /var/lib/iscsi/
删除残馀数据
[root@client ~]# rm -fr /var/lib/iscsi/nodes/*
[root@client ~]# rm -fr /var/lib/iscsi/send_targets/*
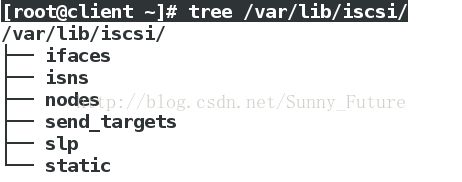
[root@client ~]# tree /var/lib/iscsi/ ##清空后如下图
[root@client ~]# systemctl restart iscsid
[root@client ~]# systemctl restart iscsi
[root@client ~]# iscsiadm -m discovery -t st -p 172.25.254.120
[root@client ~]# iscsiadm -m node -T iqn.2017-12.com.example:storage1 -p 172.25.254.120 -l ##如下,则成功登陆

[root@client ~]# fdisk -l

(二)服务器进行共享磁盘扩展后,客户端继续使用
在服务器:
[root@server ~]# fdisk /dev/vdb
Command (m for help): n
Partition type:
p primary (1 primary, 0 extended, 3 free)
e extended
Select (default p): p
Partition number (2-4, default 2): 2
First sector (2099200-20971519, default 2099200):
Using default value 2099200
Last sector, +sectors or +size{K,M,G} (2099200-20971519, default 20971519): +1G
Partition 2 of type Linux and of size 1 GiB is set
Command (m for help): t
Partition number (1,2, default 2): 2
Hex code (type L to list all codes): 8e
Changed type of partition 'Linux' to 'Linux LVM'
Command (m for help): p

[root@server ~]#partprobe
[root@server ~]#pvcreate /dev/vdb2
[root@server ~]#vgextend iscsi_vg /dev/vdb2
[root@server ~]#lvextend -L 1500M /dev/iscsi_vg/iscsi_lv0
[root@server ~]# lvs ##查看
![]()
在客户端:
[root@client ~]# iscsiadm -m node -T iqn.2017-12.com.example:storage1 -p 172.25.254.120 -u ##先退出
[root@client ~]# iscsiadm -m node -T iqn.2017-12.com.example:storage1 -p 172.25.254.120 -l ##再登陆
[root@client ~]# fdisk -l ##查看共享磁盘已经成功拓展
