自定义View简介
文章目录
- 概述
- onMeasure()
- 实操:ScrollView + ListView 会显示不全问题
- 场景
- 解决方式
- 源码分析
- onDraw()
- 基准线baseline的计算
- onTouch()
- 源码分析
- 自定义属性
- 思考
概述
啥是自定义View,就是在系统已经定义好的控件无法满足的情况下,我们自己去extends自我们的View或者ViewGroup去自己定义的View
onMeasure()
字面意思是测量,计算决定控件实际占用宽高,比如TextView传入宽高wrap_content的时候,我们应该测量传入文本具体的宽高。
测试模式的定义
MeasureSpec.AT_MOST : 在布局中指定了wrap_content
MeasureSpec.EXACTLY : 在布局中指定了确切的值  match_parent
MeasureSpec.UNSPECIFIED : 尽可能的大,很少能用到,ListView RecyclerView ScrollView 在测量子布局的时候会用UNSPECIFIED
 /**
     * @param widthMeasureSpec
     * @param heightMeasureSpec
     */
    @Override
    protected void onMeasure(int widthMeasureSpec, int heightMeasureSpec) {
        super.onMeasure(widthMeasureSpec, heightMeasureSpec);
        // 获取宽高的测量模式
        int widthMode = MeasureSpec.getMode(widthMeasureSpec);
        int heightMode = MeasureSpec.getMode(heightMeasureSpec);

        // 1.确定的值,这个时候不需要计算,给的多少就是多少
        int width = MeasureSpec.getSize(widthMeasureSpec);

        // 2.给的是wrap_content 需要计算
        if(widthMode == MeasureSpec.AT_MOST){
            // 计算的宽度 与 字体的长度有关  与字体的大小  用画笔来测量
            Rect bounds = new Rect();
            // 获取文本的Rect
            mPaint.getTextBounds(mText,0,mText.length(),bounds);
            width = bounds.width() + getPaddingLeft() +getPaddingRight();
        }

        int height = MeasureSpec.getSize(heightMeasureSpec);

        if(widthMode == MeasureSpec.AT_MOST){
            // 计算的宽度 与 字体的长度有关  与字体的大小  用画笔来测量
            Rect bounds = new Rect();
            // 获取文本的Rect
            mPaint.getTextBounds(mText,0,mText.length(),bounds);
            height = bounds.height() + getPaddingTop() + getPaddingBottom();
        }

        // 设置控件的宽高
        setMeasuredDimension(width,height);
    }
实操:ScrollView + ListView 会显示不全问题
场景
早期的时候常常会有ScrollView嵌套ListView的场景,往往不处理只会显示一个item高度的ListView.
解决方式
自定义ListView,重写我们的onMeasure()方法
  @Override
    /**
     * 重写该方法,达到使ListView适应ScrollView的效果
     */
    protected void onMeasure(int widthMeasureSpec, int heightMeasureSpec) {
        int expandSpec = MeasureSpec.makeMeasureSpec(Integer.MAX_VALUE >> 2,
                MeasureSpec.AT_MOST);
        super.onMeasure(widthMeasureSpec, expandSpec);
    }
源码分析
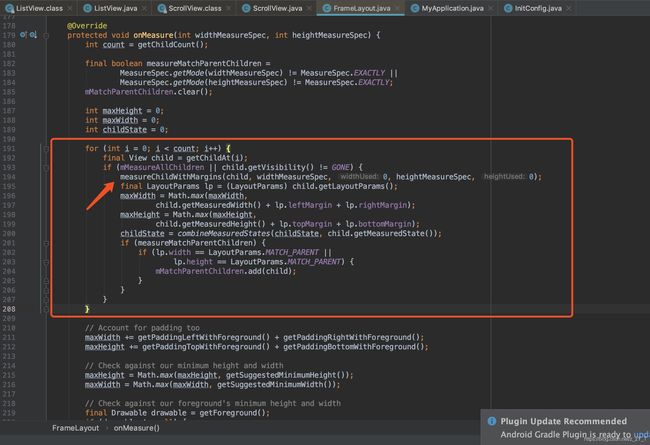
- 查看ScrollView的源代码,发现继承自我们的FrameLayout,主要是测量的高度有问题,那么我们看到onMeasure方法
public class ScrollView extends FrameLayout {
...
@Override
    protected void onMeasure(int widthMeasureSpec, int heightMeasureSpec) {
        ...
        缺省代码见下图
        ...
    }
...
}
- 自上而下,首先会执行super.onMeasure(widthMeasureSpec, heightMeasureSpec),那么我们看到FrameLayout的onMeasure方法
@RemoteView
public class FrameLayout extends ViewGroup {
...
 @Override
    protected void onMeasure(int widthMeasureSpec, int heightMeasureSpec) {
    ...
     缺省代码见下图
    ...
    }
...
}
- 代码的意思是循环查找自己的子View如果不是GONE的话就调用ViewGroup的measureChildWithMargins方法
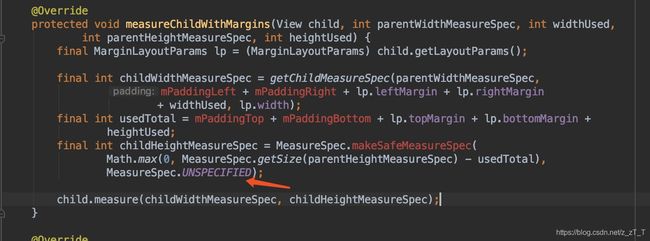
- 但是继续看下ScrollView,重写measureChildWithMargins方法,重新定义了测量模式为MeasureSpec.UNSPECIFIED,并且调用了child的测量方法,至此,super.onMeasure(widthMeasureSpec, heightMeasureSpec)方法结束
 public class ScrollView extends FrameLayout {
...
    @Override
    protected void onMeasure(int widthMeasureSpec, int heightMeasureSpec) {
        super.onMeasure(widthMeasureSpec, heightMeasureSpec);

        if (!mFillViewport) {
            return;
        }

        final int heightMode = MeasureSpec.getMode(heightMeasureSpec);
        if (heightMode == MeasureSpec.UNSPECIFIED) {
            return;
        }
        ...
    }
- 如果heightMode == MeasureSpec.UNSPECIFIED的话,直接return;紧接着也就是进入了ListView的onMeasure方法
@RemoteView
public class ListView extends AbsListView {
    static final String TAG = "ListView";
    ...
     @Override
    protected void onMeasure(int widthMeasureSpec, int heightMeasureSpec) {
        // Sets up mListPadding
        super.onMeasure(widthMeasureSpec, heightMeasureSpec);
         ...
         缺省代码见下图
         ...
        }
    ...
    }
- 这也是造成了我们的ListView为啥在ScrollView中只会显示一个item高度的原因,我们需要更改他的模式为MeasureSpec.AT_MOST让它累加返回
- 那么至此回到我们的解决方案,可能还有疑问,为啥是Integer.MAX_VALUE右移两位
 //???
 MeasureSpec.makeMeasureSpec(Integer.MAX_VALUE >> 2,
                MeasureSpec.AT_MOST);
@UiThread
public class View implements Drawable.Callback, KeyEvent.Callback,
        AccessibilityEventSource {
       ...
        /**
         * Measure specification mode: The child can be as large as it wants up
         * to the specified size.
         */
        public static final int AT_MOST     = 2 << MODE_SHIFT;
        ...
        ...
        public static class MeasureSpec {
        private static final int MODE_SHIFT = 30;
        private static final int MODE_MASK  = 0x3 << MODE_SHIFT;

        /** @hide */
        @IntDef({UNSPECIFIED, EXACTLY, AT_MOST})
        }
        ...

       ...
 public static int makeMeasureSpec(@IntRange(from = 0,
 to = (1 << MeasureSpec.MODE_SHIFT) - 1) int size,@MeasureSpecMode int mode) {
            if (sUseBrokenMakeMeasureSpec) {
                return size + mode;
            } else {
                //进入这里
                return (size & ~MODE_MASK) | (mode & MODE_MASK);
            }
        }
       ...
...
}
从上面代码可以发现AT_MOST等于我们的2左移动30位,高位2位是10,那么意思是传入的32位数值中,前2位代表我们的模式mod,后30位代表我们的size.所以Integer.Max_Value右移 2 位已经是测量尺寸的所能表示的最大值了,是一个临界值的概念,不再深究了。
onDraw()
字面意思是绘制,就是拿通过画笔画布去绘制我们的自定义view,比如draw我们定义的TextView的文本,采用了模版模式;
 /**
     * 用于绘制
     * @param canvas
     */
    @Override
    protected void onDraw(Canvas canvas) {
        super.dispatchDraw(canvas);
        /*// 画文本
        canvas.drawText();
        // 画弧
        canvas.drawArc();
        // 画圆
        canvas.drawCircle();*/
        //dy 代表的是:高度的一半到 baseLine的距离
        Paint.FontMetricsInt fontMetrics = mPaint.getFontMetricsInt();
        int dy = (fontMetrics.bottom - fontMetrics.top)/2 - fontMetrics.bottom;
        int baseLine = getHeight()/2 + dy;

        int x = getPaddingLeft();

        canvas.drawText(mText,x,baseLine,mPaint);
    }
基准线baseline的计算

这边搞个图方便理解下,首先我们这边定一个cy,dy,这边需注意这边的top,bootom是基于baseline的,我们的基准线
- cy = (fontMetrics.bottom - fontMetrics.top)/2
- dy=cy - fontMetrics.bottom;
- baseLine = getHeight()/2 + dy;
onTouch()
字面意思是触摸,就是用于处理与用户交互,我们手指按下,移动,抬起都是可以监听的
   /**
     * 处理跟用户交互的,手指触摸等等
     * @param event 事件分发事件拦截
     * @return
     */
    @Override
    public boolean onTouchEvent(MotionEvent event) {
        switch (event.getAction()){
            case MotionEvent.ACTION_DOWN:
                // 手指按下
                Log.e("TAG","手指按下");
                break;
            case MotionEvent.ACTION_MOVE:
                // 手指移动
                Log.e("TAG","手指移动");
                break;
            case MotionEvent.ACTION_UP:
                // 手指抬起
                Log.e("TAG","手指抬起");
                break;
        }
        return super.onTouchEvent(event);
    }
源码分析
- 使用了责任链设计模式,我们从ViewGroup中开始看下
public abstract class ViewGroup extends View implements ViewParent, ViewManager {
    private static final String TAG = "ViewGroup";
    ...
     @Override
    public boolean dispatchTouchEvent(MotionEvent ev) {
    ...
    省略代码如下图
    ...
    }
    ...
    }
- 启动while循环,不断往下分发事件
  /**
     * Transforms a motion event into the coordinate space of a particular child view,
     * filters out irrelevant pointer ids, and overrides its action if necessary.
     * If child is null, assumes the MotionEvent will be sent to this ViewGroup instead.
     */
  private boolean dispatchTransformedTouchEvent(MotionEvent event,
   boolean cancel,View child, int desiredPointerIdBits) {
        final boolean handled;
        // Canceling motions is a special case.  We don't need to perform any transformations
        // or filtering.  The important part is the action, not the contents.
        final int oldAction = event.getAction();
        if (cancel || oldAction == MotionEvent.ACTION_CANCEL) {
            event.setAction(MotionEvent.ACTION_CANCEL);
            if (child == null) {
                handled = super.dispatchTouchEvent(event);
            } else {
                handled = child.dispatchTouchEvent(event);
            }
            event.setAction(oldAction);
            return handled;
        }

        // Calculate the number of pointers to deliver.
        final int oldPointerIdBits = event.getPointerIdBits();
        final int newPointerIdBits = oldPointerIdBits & desiredPointerIdBits;

        // If for some reason we ended up in an inconsistent state where it looks like we
        // might produce a motion event with no pointers in it, then drop the event.
        if (newPointerIdBits == 0) {
            return false;
        }

        // If the number of pointers is the same and we don't need to perform any fancy
        // irreversible transformations, then we can reuse the motion event for this
        // dispatch as long as we are careful to revert any changes we make.
        // Otherwise we need to make a copy.
        final MotionEvent transformedEvent;
        if (newPointerIdBits == oldPointerIdBits) {
            if (child == null || child.hasIdentityMatrix()) {
                if (child == null) {
                    handled = super.dispatchTouchEvent(event);
                } else {
                    final float offsetX = mScrollX - child.mLeft;
                    final float offsetY = mScrollY - child.mTop;
                    event.offsetLocation(offsetX, offsetY);

                    handled = child.dispatchTouchEvent(event);

                    event.offsetLocation(-offsetX, -offsetY);
                }
                return handled;
            }
            transformedEvent = MotionEvent.obtain(event);
        } else {
            transformedEvent = event.split(newPointerIdBits);
        }

        // Perform any necessary transformations and dispatch.
        if (child == null) {
            handled = super.dispatchTouchEvent(transformedEvent);
        } else {
            final float offsetX = mScrollX - child.mLeft;
            final float offsetY = mScrollY - child.mTop;
            transformedEvent.offsetLocation(offsetX, offsetY);
            if (! child.hasIdentityMatrix()) {
                transformedEvent.transform(child.getInverseMatrix());
            }
            //走到我们的view.dispatchTouchEvent
            handled = child.dispatchTouchEvent(transformedEvent);
        }

        // Done.
        transformedEvent.recycle();
        return handled;
    }
- 直到我们的本次的事件结束,返回true,结束本次while循环
自定义属性
配置规范我们的自定义属性,在xml中就可以传入我们的自定义属性值,就能实时预览我们的效果啦
- 在res下的values下面新建attrs.xml
注意属性名称不能与系统已有的属性重复,所以我在前面统一加了Z的前缀。
<resources>
    <!--name 自定义View的名字 TextView-->
    <declare-styleable name="TextView">
        <attr name="ZText" format="string"/>
        <attr name="ZTextColor" format="color"/>
        <attr name="ZTextSize" format="dimension"/>
        <attr name="ZMaxLength" format="integer"/>
        <!-- 枚举 -->
        <attr name="ZInputType">
            <enum name="number" value="1"/>
            <enum name="text" value="2"/>
            <enum name="password" value="3"/>
        </attr>
    </declare-styleable>
</resources>
注意声明命名空间  xmlns:app="http://schemas.android.com/apk/res-auto"
<?xml version="1.0" encoding="utf-8"?>
<LinearLayout xmlns:android="http://schemas.android.com/apk/res/android"
    xmlns:tools="http://schemas.android.com/tools"
    xmlns:app="http://schemas.android.com/apk/res-auto"
    android:layout_width="match_parent"
    android:layout_height="match_parent"
    >

    <com.test.demo.TextView
        android:layout_width="wrap_content"
        android:layout_height="wrap_content"
        app:ZText="Zark"
        app:ZTextSize="20sp"
        android:padding="10dp"
        app:ZTextColor="#FF0000"
        android:text="Hello World!" />
</LinearLayout>
思考
那么我们自定义完我们的TextView后,如果改成extends ViewGroup能否显示出来?
答案:出不来,默认的ViewGroup 不会调用onDraw方法,为什么?
源码分析:
@UiThread
public class View implements Drawable.Callback, KeyEvent.Callback,
        AccessibilityEventSource {
        ...
  @CallSuper
    public void draw(Canvas canvas) {
        final int privateFlags = mPrivateFlags;
        mPrivateFlags = (privateFlags & ~PFLAG_DIRTY_MASK) | PFLAG_DRAWN;

        /*
         * Draw traversal performs several drawing steps which must be executed
         * in the appropriate order:
         *
         *      1. Draw the background
         *      2. If necessary, save the canvas' layers to prepare for fading
         *      3. Draw view's content
         *      4. Draw children
         *      5. If necessary, draw the fading edges and restore layers
         *      6. Draw decorations (scrollbars for instance)
         */

        // Step 1, draw the background, if needed
        int saveCount;

        drawBackground(canvas);

        // skip step 2 & 5 if possible (common case)
        final int viewFlags = mViewFlags;
        boolean horizontalEdges = (viewFlags & FADING_EDGE_HORIZONTAL) != 0;
        boolean verticalEdges = (viewFlags & FADING_EDGE_VERTICAL) != 0;
        if (!verticalEdges && !horizontalEdges) {
            // Step 3, draw the content
            onDraw(canvas);

            // Step 4, draw the children
            dispatchDraw(canvas);

            drawAutofilledHighlight(canvas);
            ...
            }
            ...
            }
- 猜测未调用我们View的onDraw()方法,由我们的mPrivateFlags = (privateFlags & ~PFLAG_DIRTY_MASK) | PFLAG_DRAWN;
- 那么为啥ViewGroup不会执行我们的onDraw()方法呢?答案是setFlags方法会重新给我们的mPrivateFlags赋值
private void initViewGroup() {
        // ViewGroup doesn't draw by default
        if (!debugDraw()) {
            setFlags(WILL_NOT_DRAW, DRAW_MASK);
        }
        mGroupFlags |= FLAG_CLIP_CHILDREN;
        mGroupFlags |= FLAG_CLIP_TO_PADDING;
        mGroupFlags |= FLAG_ANIMATION_DONE;
        mGroupFlags |= FLAG_ANIMATION_CACHE;
        mGroupFlags |= FLAG_ALWAYS_DRAWN_WITH_CACHE;

        if (mContext.getApplicationInfo().targetSdkVersion >= Build.VERSION_CODES.HONEYCOMB) {
            mGroupFlags |= FLAG_SPLIT_MOTION_EVENTS;
        }

        setDescendantFocusability(FOCUS_BEFORE_DESCENDANTS);

        mChildren = new View[ARRAY_INITIAL_CAPACITY];
        mChildrenCount = 0;

        mPersistentDrawingCache = PERSISTENT_SCROLLING_CACHE;
    }
- 解决方案:所以转变我们的思路,去改变mPrivateFlags就可以了


