从vue-cli 2.x 到 vue-cli 3.0 体验
文章目录
- 前言
- 项目建立
- 迁移细节
- webpack配置
- 坑: vue文件中scoped css的引用
- 骨架屏(skeleton)的迁移
- 开启PWA (service worker, manifest等)
前言
一次从vue-cli 2.x 到 vue-cli 3.0的迁移流水账
项目建立
重新全局安装@vue/cli后,即可获得vue-cli 3.0最新版
npm install -g @vue/cli
建立项目:
vue create my-project
# OR
vue ui
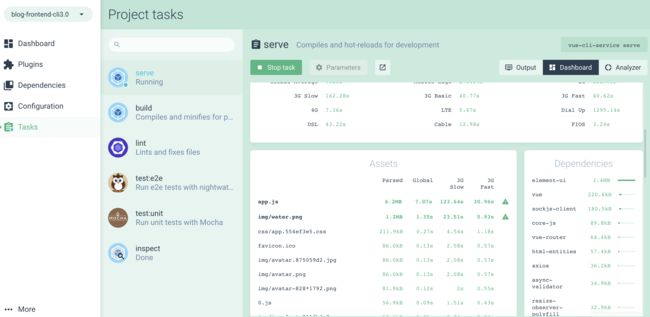
对vue-cli 3.0来说,最爽的就是可以通过vue ui用一套图形化界面管理你的所有项目。包括新建项目引导,管理依赖(dependency),启动dev-server或production build同时提供友好地打包数据分析,运行单元测试等。
迁移细节
webpack配置
调整 webpack 配置最简单的方式就是在 vue.config.js 中的 configureWebpack 选项提供一个对象,该对象将会被 webpack-merge 合并入最终的 webpack 配置。
// vue.config.js
module.exports = {
  devServer: {
    proxy: {
      '/api/*': {
        target: 'http://127.0.0.1:3000',
        ws: true,
        changeOrigin: true
      }
    }
  },

  configureWebpack: config => {
    config.plugins.push(
		// myWebpackPlugin()
    )
  }
}
坑: vue文件中scoped css的引用
在vue cli 2.x建立的项目中,.vue 文件中我通过@import引入组件css,在style标签上添加scoped属性,以表示样式只作用于当前组件,从而实现了样式私有化。
<template>
// .....
</template>

<style scoped>
 @import "./About.css";
</style>

<script src="./About.js"></script>
当项目迁移至vue cli 3.0后,上述这种style -> scoped -> @import的方式不起作用了,@import的css泄漏到了全局当中。
解决方法如下:
<style src="./About.css" scoped></style>
看了很多文章,尚未找到原因,主要问题是为什么在vue cli 2.x是可用,vue cli 3.0就不可用了。
试过如下方法,无解:
1. vue cli 3.0中vue版本从2.6.7降级到 vue cli 2.x中vue版本2.5.2
2. 不再抽取css,还以字符串形式和js写到一起
module.exports = {
  ...
  css: {
    extract: false
  }
 ...
}
有机会再深入研究根源,但是学到一条最佳实践,慎用@import来做style scoped.
骨架屏(skeleton)的迁移
骨架屏插件还是采用百度出的vue-skeleton-webpack-plugin
vue.config.js中配置参照这篇文章vue cli3 之 skeleton plugin
配置如下:
const path = require('path')
const SkeletonWebpackPlugin = require('vue-skeleton-webpack-plugin')

module.exports = {
  css: {
    // css拆分ExtractTextPlugin插件,默认true - 骨架屏需要为true
    extract: false
  },
  // ...
  configureWebpack: config => {
    // vue骨架屏插件配置
    config.plugins.push(
      new SkeletonWebpackPlugin({
        webpackConfig: {
          entry: {
            app: path.join(__dirname, './src/components/skeleton/skeleton.config.js')
          }
        },
        minimize: true,
        quiet: true
      })
    )
  }
}
开启PWA (service worker, manifest等)
创建项目时,在引导中可以选择启用 PWA 。
vue cli 3.0中pwa使用了第三方库workbox
workbox 是 GoogleChrome 团队推出的一套 Web App 静态资源和请求结果的本地存储的解决方案,该解决方案包含一些 Js 库和构建工具,在 Chrome Submit 2017 上首次隆重面世
此时项目中关于PWA的文件如下:
- package.json中引用了register-service-worker插件
- 根目录下有registerServiceWorker.js
- public文件夹下有manifest.json,可以根据需要修改其中的内容
打包时dist下会默认生成 service-worker.js 和 manifest.json 相关文件。

**默认情况 service-worker 采用的是 precache 。除ajax外,包括index.html在内的所有静态资源都会被缓存。
One feature of service workers is the ability to save a set of files to the cache when the service worker is installing. This is often referred to as “precaching”, since you are caching content ahead of the service worker being used.
The main reasons for doing this is that it gives developers control over the cache, meaning they can determine when and how long a file is cached as well as serve it to the browser without going to the network, meaning it can be used to create web apps that work offline.
但是我的网站要求ajax也可以缓存,以备断网的时候也可以拿到一个旧的list,具体细节可以参考我这篇博文:
步步提高网站体验系列之—PWA(Service Worker)
那么可以通过配置 pwa.workboxPluginMode 自定义缓存策略**
module.exports = {
  pwa: {
    // configure the workbox plugin
    workboxPluginMode: 'InjectManifest',
    workboxOptions: {
      // swSrc is required in InjectManifest mode.
      swSrc: 'src/pwa/service-worker.js'
    }
  }
}
注意点:
1)在registerServiceWorker.js中可以看出,网站是寻找根目录下名为service-worker.js的文件,所以自定义的sw文件名应为service-work.js,否则报404.
2)因为在建立项目时,cli 3.0已经为我们注册了service worker,所以不用像在cli 2.x中手动注册了。
import { register } from 'register-service-worker'

if (process.env.NODE_ENV === 'production') {
  register(`${process.env.BASE_URL}service-worker.js`, {
	// ...
  }
}
