springboot模板
文章目录
- 1、模板简单介绍
- 2、thymeleaf模板
- 3、Freemarker模板
1、模板简单介绍
Thymeleaf是一个流行的模板引擎,该模板引擎采用Java语言开发;
模板引擎是一个技术名词,是跨领域跨平台的概念,在Java语言体系下有模板引擎,在C#、PHP语言体系下也有模板引擎,在JavaScript中也会用到模板引擎技术;
Java生态下的模板引擎有 Thymeleaf 、Freemaker、Velocity、Beetl(国产) 等;
Thymeleaf 它是基于HTML的,Thymeleaf模板本身也是一个html页面,Thymeleaf 要寄托在HTML的标签下实现对数据的展示;
Spring boot 集成了thymeleaf模板技术,并且spring boot官方也推荐使用thymeleaf来替代JSP技术;
Thymeleaf是另外的一种模板技术,它本身并不属于SpringBoot,SpringBoot只是很好地集成这种模板技术,作为前端页面的数据展示;
Thymeleaf旨在提供⼀个优雅的、⾼度可维护的创建模板的⽅式,为了实现这⼀⽬标,Thymeleaf建⽴在⾃然模板的概念上,将其逻辑注⼊到模板⽂件中,不会影响模板设计原型。 这改善了设计的沟通,弥合了设计和开发团队之间的差距。
Thymeleaf与JSP的区别在于,不运行项目之前,Thymeleaf也是纯HTML(不需要服务端的支持)而JSP需要进行一定的转换,这样就方便前端人员进行独立的设计、调试。
2、thymeleaf模板
我们直接进入代码:
导入pom依赖
<dependency>
            <groupId>org.springframework.boot</groupId>
            <artifactId>spring-boot-starter-thymeleaf</artifactId>
        </dependency>
User.java
package com.zrh.springboot01.entity;

import lombok.Data;

/**
 * @author zrh
 * @site IDEA项目
 * @company
 * @create 2019-11-0811:48
 */
@Data
public class User {
    private String uid;
    private String uname;

    public User() {
    }

    public User(String uid, String uname) {
        this.uid = uid;
        this.uname = uname;
    }

}
application.yml
server:
  port: 80
  servlet:
    context-path: /

spring:
  thymeleaf:
    cache: false
ThymeleafControlle.java
package com.zrh.springboot01.controller;

import com.zrh.springboot01.entity.User;
import org.springframework.stereotype.Controller;
import org.springframework.web.bind.annotation.RequestMapping;
import org.springframework.web.servlet.ModelAndView;

import java.util.ArrayList;
import java.util.List;

/**
 * @author zrh
 * @site IDEA项目
 * @company
 * @create 2019-11-0811:25
 */
@Controller
@RequestMapping("/thymeleaf")
public class ThymeleafControlle {

    @RequestMapping("/list")
    public ModelAndView list(){
        ModelAndView mv = new ModelAndView();//返回视图
        List list = new ArrayList();
        list.add(new User("1","aa"));
        list.add(new User("2","ee"));
        list.add(new User("3","dd"));

        mv.addObject("userlist",list);
        mv.addObject("msg","双11光棍节");
        mv.addObject("name","zzs");//模型就是要传的值
        mv.setViewName("list");//视图就是要返回的页面
        return mv;
    }

}
head2.html
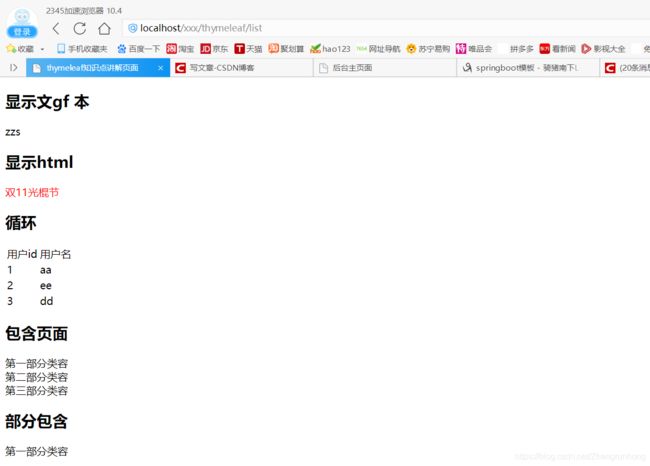
<div th:fragment="h1">
    第一部分类容
</div>
<div th:fragment="h2">
    第二部分类容
</div>
<div th:fragment="h3">
    第三部分类容
</div>
前台页面:
list.html
<!DOCTYPE html>
<html xmlns:th="http://www.thymeleaf.org">
<head>
    <meta charset="UTF-8">
    <title>thymeleaf知识点讲解页面</title>
</head>
<body>
<h2>显示文gf   本</h2>
<span th:text="${name}"></span>

<h2>显示html</h2>
<div th:utext="${msg}"></div>
<h2>循环</h2>
<table>
    <tr>
        <td>用户id</td>
        <td>用户名</td>
    </tr>
    <tr th:each="u : ${userlist}">
        <td th:text="${u.uid}"></td>
        <td th:text="${u.uname}"></td>
    </tr>
</table>

<h2>包含页面</h2>
<div th:include="role/common/head2"></div>

<h2>部分包含</h2>
<div th:include="role/common/head2 :: h1"></div>
</body>
</html>
注意:冒号冒号前后都有空格,我没注意这一点踩了大坑
3、Freemarker模板
学习网站:http://freemarker.foofun.cn/
首先导入依赖:
<dependency>
	<groupId>org.springframework.boot</groupId>
	<artifactId>spring-boot-starter-freemarker</artifactId>
   </dependency>
application.yml文件的默认配置
spring:
  thymeleaf:
    cache: false
  freemarker:
    # 设置模板后缀名
    suffix: .ftl
    # 设置文档类型
    content-type: text/html
      # 设置页面编码格式
    charset: UTF-8
      # 设置页面缓存
    cache: false
      # 设置ftl文件路径,默认是/templates,为演示效果添加role
    template-loader-path: classpath:/templates/role
  mvc:
    static-path-pattern: /static/**
Role.java
package com.zrh.springboot01.entity;

import lombok.Data;

/**
 * @author zrh
 * @site IDEA项目
 * @company
 * @create 2019-11-0818:33
 */
@Data
public class Role {
    private String rid;
    private String rname;

    public Role(String rid, String rname) {
        this.rid = rid;
        this.rname = rname;
    }

    public Role() {
    }
}
head.ftl
<!DOCTYPE html>
<html lang="en">
<head>
    <meta charset="UTF-8">
    <title>头部页面</title>
</head>
<body>
头部页面
</body>
</html>
FreemarkerControlle.java
package com.zrh.springboot01.controller;

import com.zrh.springboot01.entity.Role;
import org.springframework.stereotype.Controller;
import org.springframework.web.bind.annotation.RequestMapping;
import org.springframework.web.servlet.ModelAndView;

import java.util.ArrayList;
import java.util.List;

/**
 * @author zrh
 * @site IDEA项目
 * @company
 * @create 2019-11-0813:05
 */
@Controller
@RequestMapping("/freemarker")
public class FreemarkerControlle {

    @RequestMapping("/list")
    public ModelAndView list(){
        ModelAndView mv = new ModelAndView();
        mv.addObject("loginName","方法");
        List list = new ArrayList();
        list.add(new Role("1","普通用户"));
        list.add(new Role("2","会员用户"));
        list.add(new Role("3","超级用户"));
        mv.addObject("roleList",list);
        mv.setViewName("list");
        return mv;

    }

}
global.ftl
公用类:
<#global ctx>
    ${springMacroRequestContext.contextPath}
</#global>
list.ftl
前台界面:
<!DOCTYPE html>
<html lang="en">
<head>
<meta charset="UTF-8">
<title>讲解freemarker</title>
</head>
<body>
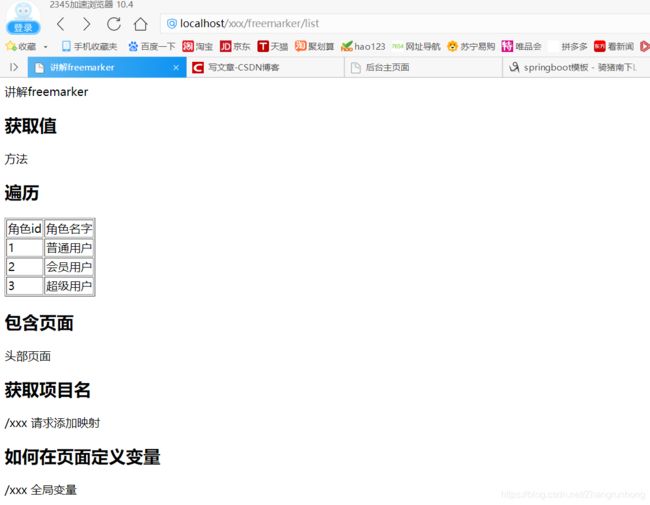
讲解freemarker
<h2>获取值</h2>
${loginName}
<h2>遍历</h2>
<table border="1" width=""60%>
<tr>
<td>角色id</td>
<td>角色名字</td>
</tr>
<#list roleList as role>
<tr>
<td>${role.rid}</td>
<td>${role.rname}</td>
</tr>
</#list>
</table>
<h2>包含页面</h2>
<#include 'common/head.ftl'>
<#include 'common/global.ftl'>
<h2>获取项目名</h2>
${ctx}
请求添加映射
<h2>如何在页面定义变量</h2>
<#assign ctx1>
${springMacroRequestContext.contextPath}局部变量
</#assign>
${ctx}全局变量
</body>
</html>