【干货】Mac上搭建以太坊私有网络
文章目录
- 一、环境搭建
- 1.安装go语言
- 2.安装Geth
- 3.使用geth的help命令可查看使用指南(可跳过)
- 4.Geth简介
- 二、搭建私有网络
- 1.创建创世区块配置文件
- 2.网络初始化
- 3.搭建节点运行的环境
- 4.设置账户
- 5.启动挖矿
- 6.停止挖矿
- 7.打开以太坊钱包
- 8.进行交易
- 三、常见报错总结
一、环境搭建
1.安装go语言
brew install go
2.安装Geth
方法一:官网下载最新版本
https://geth.ethereum.org/downloads/
注:网站可能出现加载问题
Retrieving packages from release server…
解决方案:F12开发这模式查看下载链接
附最新下载链接:
Linux:https://gethstore.blob.core.windows.net/builds/geth-linux-amd64-1.9.9-01744997.tar.gz
Windows:https://gethstore.blob.core.windows.net/builds/geth-windows-amd64-1.9.9-01744997.exe
MacOS:https://gethstore.blob.core.windows.net/builds/geth-darwin-amd64-1.9.9-01744997.tar.gz
tar -zxvf geth-darwin-amd64-1.9.9-01744997.tar.gz
cd geth-darwin-amd64-1.9.9-01744997.tar.gz
方法二:使用Homebrew安装
brew install ethereum
3.使用geth的help命令可查看使用指南(可跳过)
geth help
4.Geth简介
Geth是使用Go语言编写的命令行工具,可以使用它在私有网络上创建节点和矿工。可以作为客户端连接到公共的和测试的网络上,它也可以在私有网络上运行挖矿和EVM(交易节点)。
Geth是基于JASON RPC的协议。它定义了采用JSON格式的代码远程调用规范。Geth可以使用下面三种JSON RPC协议进行连接:
- 内部进程通信(IPC):内部通讯,通常用于一台电脑内。
- 远程程序调用(RCP):跨计算机的通讯。通常使用TCP和HTTP协议。
- WS(Web sockets):使用sockets连接Geth。
配置Geth的命令、开关参数和选项很多,诸如:
- 配置IPC、RPC和WS协议
- 配置网络连接的类型——私有网络、Rostper和Rinkeby
- 挖矿选项
- 控制台和API
- 网络
- 调试和日志
在不同的网络上,chain ID不同:
- chain ID:1 主网公链
- chain ID:2 Morden网络(仅对部分人开放)
- chain ID:3 Ropsten网络
- chain ID:4 Rinkeby网络
- chain ID 大于4的是私有网络
使用Geth --testnet连接到Ropsten网络,Geth --rinkeby连接到Rinkeby网络。
二、搭建私有网络
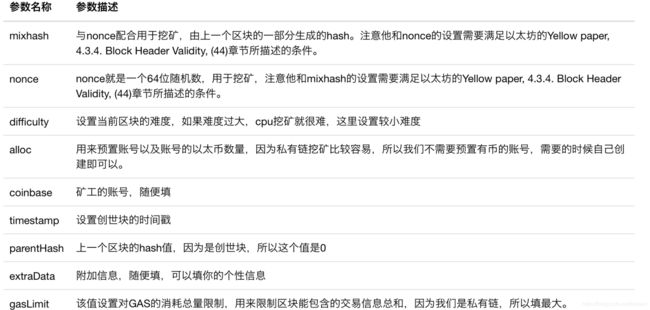
1.创建创世区块配置文件
Geth需要使用genesis.json文件生成创世区块,同时需要提供保存区块数据和账户私钥(keystore)的目录。
mkdir myeth
cd myeth
vim genesis.json
{
  "config": {
    "chainId": 15,
    "homesteadBlock": 0,
    "eip150Block": 0,
    "eip155Block": 0,
    "eip158Block": 0
  },
  "nonce": "0x0000000000000042",
  "maxhash":
  "0x0000000000000000000000000000000000000000000000000000000000000000",
  "difficulty": "0x200",
  "gasLimit": "0xffffffff",
  "coinbase": "0000000000000000000000000000000000000000",
  "stmestamp": "0x00",
  "parentHash":
  "0x0000000000000000000000000000000000000000000000000000000000000000",
  "alloc": {}
}
2.网络初始化
输入geth init命令、genesis.json文件、存储区块数据和keystore的文件夹,进行初始化。
geth init "/Users/andrewfeng/Documents/Ethereum/myeth/genesis.json" --datadir "/Users/andrewfeng/Documents/Ethereum/myeth/chaindata"
注:路径需要换成你自己的路径
创世区块已经产生了,Geth节点可以启动了。
Geth启动时默认使用IPC协议,为了确保Geth节点可以通过PRC协议访问,命令中需要带上RPC参数
3.搭建节点运行的环境
geth --datadir "/Users/andrewfeng/Documents/Ethereum/myeth/chaindata" --rpc --rpcapi "eth,web3,miner,admin,personal,net" --rpccorsdomain "*" --nodiscover --networkid 15
常用参数选项含义如下:
- –identity:指定节点 ID,方便在一大群节点中识别出自己的节点;
- –rpc:表示开启 HTTP-RPC 服务;
- –rpcport:指定 HTTP-RPC 服务监听端口号(默认为 8545);
- –rpcaddr:指定IP地址;
- –rpcapi “eth,web3,miner,admin,personal,net” :这个命令指示了允许通过RPC访问的命令。默认情况下,Geth允许web3。
- –datadir:指定区块链数据的存储位置;
- –port:指定和其他节点连接所用的端口号(默认为 30303);
- –nodiscover:关闭节点发现机制,防止加入有同样初始配置的陌生节点;
- –maxpeers 0 如果你不想有人连上你的测试链,就用maxpeers 0。或者,你可以调整参数,当你确切的知道有几个节点要连接上来的时候。
enode的信息是节点在网络上的身份标志。如果其他节点准备加入这个网络中,就需要提供自己的enode值。
RPC访问可以通过http://127.0.0.1:8545或http://localhost:8545,IPC访问可以通过**\.\pipe\geth.ipc**命令。
命令是以服务的形式持续运行的,需要再打开一个命令行窗口,输入
Geth attach rpc:http://localhost:8545
使用IPC协议连接到节点上,这样即可执行其他命令。
这是一个交互式的 JavaScript 执行环境,在这里面可以执行 JavaScript 代码,其中 > 是命令提示符。在这个环境里也内置了一些用来操作以太坊的 JavaScript 对象,可以直接使用这些对象。这些对象主要包括:
- eth:包含一些跟操作区块链相关的方法;
- net:包含一些查看p2p网络状态的方法;
- admin:包含一些与管理节点相关的方法;
- miner:包含启动和停止挖矿的一些方法;
- personal:主要包含一些管理账户的方法;
- txpool:包含一些查看交易内存池的方法;
- web3:包含了以上对象,还包含一些单位换算的方法。
进入以太坊 Javascript Console 后,就可以使用里面的内置对象做一些操作,这些内置对象提供的功能很丰富,比如查看区块和交易、创建账户、挖矿、发送交易、部署智能合约等。
常用命令:
- personal.newAccount():创建账户;
- personal.unlockAccount():解锁账户;
- eth.accounts:枚举系统中的账户;
- eth.getBalance():查看账户余额,返回值的单位是 Wei(Wei 是以太坊中最小货币面额单位,类似比特币中的聪,1 ether = 10^18 Wei);
- eth.blockNumber:列出区块总数;
- eth.getTransaction():获取交易;
- eth.getBlock():获取区块;
- miner.start():开始挖矿;
- miner.stop():停止挖矿;
- web3.fromWei():Wei 换算成以太币;
- web3.toWei():以太币换算成 Wei;
- txpool.status:交易池中的状态;
- admin.addPeer():连接到其他节点;
4.设置账户
连接到Geth节点后,接下来需要设置coinbase或etherbase账户。创建账户可以使用personal对象的newAccout方法,并设置密码(密码不可见)。
personal.newAccount()

如果需要更改原有的coinbase账户地址,可以通过address.miner对象的setEtherBase函数进行操作。这个操作将使用新的账户替换原有的coinbase账户。
miner.setEtherbase("0x19b4029dad20824db6dc201437f9cac2a7e1fc5c")
执行查询命令,可看到设置的地址已经生效了。此时挖矿可以启动了。由于只有一个矿工,将获得全部的挖矿奖励,coinbase账户的以太币会逐步增加。
eth.coinbase
eth.accounts
5.启动挖矿
miner.start(8)
start中的参数代表了用于挖矿的线程数量。
![]()
这时切换到之前创建私有链的命令行窗口中,可以看到挖矿过程的输出结果。
注:当使用输入日志的方式时,可以输入命令tail -f geth.log 来跟踪挖矿进度
可以看到正在挖矿的账户0已经获得的以太币和未挖矿的账户1的以太币余额。

挖到一个区块会奖励5个以太币,挖矿所得的奖励会进入矿工的账户,这个账户叫做coinbase,默认情况下coinbase是本地账户中的第一个账户。
getBalance()返回值的单位是wei,wei是以太币的最小单位,1个以太币=10的18次方个wei。要查看有多少个以太币,可以用web3.fromWei()将返回值换算成以太币:
web3.fromWei(eth.getBalance(eth.accounts[0]),'ether')
6.停止挖矿
miner.stop()
7.打开以太坊钱包
在线地址:以太坊钱包
下载地址:https://github.com/ethereum/mist/releases

可以看到,主账户有了6400个以太币。上方红色的字体“PRIVATE-NET”即表示你的区块链网络是正常的。
8.进行交易
我们要从账户0到账户1转账,需要先解锁账户才能转账,否则会报错。
personal.unlockAccount(eth.accounts[0])

发现报错Error: account unlock with HTTP access is forbidden
原来是出于安全考虑,默认禁止了HTTP通道解锁账户,相关issue参考:https://github.com/ethereum/go-ethereum/pull/17037
如果已经了解打开此功能的风险,可通启动命令中添加参数:–allow-insecure-unlock
![]()
又发现报错Fatal: Error starting protocol stack: datadir already used by another process
需要强制关闭正在运行的geth进程:
ps aux | grep "geth"
kill -9 54148

再次加上参数–allow-insecure-unlock,重新启动g私有链。
geth --datadir "/Users/andrewfeng/Documents/Ethereum/myeth/chaindata" --rpc --rpcapi "eth,web3,miner,admin,personal,net" --rpccorsdomain "*" --nodiscover --networkid 15 --allow-insecure-unlock
现在执行解锁账户命令即可成功了。

悲催的是,前面挖的以太币重启后被清零了。。。需要重新挖一会。查看当前两个账户的余额:

可以通过发送一笔交易,从账户0转移200个以太币到账户1。其中需要将账户0解锁。
personal.unlockAccount(eth.accounts[0])
amount = web3.toWei(200,'ether')
eth.sendTransaction({from:eth.accounts[0],to:eth.accounts[1],value:amount})
此时交易已经提交到区块链,返回了交易的hash,但还未被处理,本地交易池中有一个待确认的交易,可以使用 eth.getBlock(“pending”, true).transactions 查看当前待确认交易。
eth.getBlock("pending", true).transactions
要使交易被处理,必须要挖矿。这里我们启动挖矿,然后等待挖到一个区块之后就停止挖矿:
miner.start(1);admin.sleepBlocks(1);miner.stop();
web3.fromWei(eth.getBalance(eth.accounts[1]),'ether')
三、常见报错总结
1.Fatal: invalid genesis file: invalid character ‘"’ after object key:value pair
Json键值对行末丢了逗号
2.Fatal: invalid genesis file: json: cannot unmarshal hex string without 0x prefix into Go struct field Genesis.coinbase of type common.Address
json文件中,对于16进制数据,需要加上0x前缀
3.Fatal: Failed to write genesis block: unsupported fork ordering: eip150Block not enabled, but eip155Block enabled at 0
config部分中添加 “eip150Block”: 0,
4.Fatal: failed to write genesis block: genesis has no chain configuration
json文件中,缺少config部分
5.Error: invalid sender undefined
这个错误不会导致初始化失败,但是会在以后的转账(eth.sendTransaction),或者部署智能合约的时候产生。解决方法就是chainId 不能设置为0。
6.Error: account unlock with HTTP access is forbidden
出于安全考虑,默认禁止了HTTP通道解锁账户,相关issue参考https://github.com/ethereum/go-ethereum/pull/17037。如果已经了解打开此功能的风险,可通启动命令中添加参数:–allow-insecure-unlock
7.Fatal: Error starting protocol stack: datadir already used by another process
需要强制关闭正在运行的geth进程:
ps aux | grep "geth"
kill -9 [PID]


