vue-cli2构建多页面:改造原配置文件,实现自动构建多页面入口和模板文件
一、改造utils.js,添加getModules方法,方法中需要使用到node的glob模块
1、安装glob模块
npm i glob -D
2、创建getModules方法,获取文件名以及对应路径
const glob = require('glob');

// 构建多页面(获取文件名以及对应路径)
exports.getModules = function (globPath) {
  let modules = {}
  // 读取src目录,并进行路径裁剪
  glob.sync(globPath).forEach(function (url) {
    const ext = path.extname(url);  // 获取文件后缀
    const moduleName = path.basename(url, ext); // 获取文件名
    modules[moduleName] = url
  });
  return modules;
}
.
二、改造webpack.base.conf.js,修改入口文件配置
- 我们只需要有一个入口文件,这样就减少了维护的成本。那么,因为在入口文件里面需要引入对应的.vue文件,就需要import from后面接入一个变量,但是这是不被import from支持的;
- 所以,博主就使用了下面的方式来自动生成入口文件,以避免手动维护:
1、修改如下:
entry: Object.assign(getEntries(), {
    app: './src/main.js'
}),
const fs = require('fs')
// 处理入口文件
function getEntries(){
const entries = {};
// 生成入口文件
const pages = utils.getModules('./src/pages/**/*.vue');
for(let pageCode in pages) {
const entryFile = `./entry/${pageCode}.js`;
fs.exists(entryFile, function (exists) { // 这里没有对文件目录进行判断,所以需要先建一个'entry'文件夹,否则会报错
if (exists) return;
const appTpl = '.' + pages[pageCode];
const entryData = ` import Vue from 'vue';\n import App from '${appTpl}';\n Vue.config.productionTip = false;\n new Vue({ el: '#${pageCode}', components: { App }, template: '2、生成的入口文件(entry/index.js)
import Vue from 'vue';
import App from '../src/pages/index/index.vue';
Vue.config.productionTip = false;
new Vue({ el: '#index', components: { App }, template: '.
三、改造webpack.dev.conf.js和webpack.prod.conf.js
1、删除原有的页面配置new HtmlWebpackPlugin()
// webpack.dev.conf.js

// 构建多页面(删除之前的页面配置)
// new HtmlWebpackPlugin({
//   filename: 'index.html',
//   template: 'index.html',
//   inject: true
// }),
// copy custom static assets
// webpack.prod.conf.js

// 构建多页面(删除之前的页面配置)
// new HtmlWebpackPlugin({
//   filename: process.env.NODE_ENV === 'testing'
//     ? 'index.html'
//     : config.build.index,
//   template: 'index.html',
//   inject: true,
//   minify: {
//     removeComments: true,
//     collapseWhitespace: true,
//     removeAttributeQuotes: true
//     // more options:
//     // https://github.com/kangax/html-minifier#options-quick-reference
//   },
//   // necessary to consistently work with multiple chunks via CommonsChunkPlugin
//   chunksSortMode: 'dependency'
// }),
2、增加多页面配置
- 当然,你可以分别在这两个文件里面进行配置,以细分开发环境和生产环境的配置;
- 这里,我就直接在webpack.base.conf.js里面进行配置了。
.
四、继续改造webpack.base.conf.js,添加模板配置new HtmlWebpackPlugin()
1、webpack.base.conf.js增加代码如下:
const HtmlWebpackPlugin = require('html-webpack-plugin')

// 构建多页面
const pagesJson = require('../config/page.json');
const pages = utils.getModules('./src/pages/**/*.vue');

for(let pageCode in pages) {
  // 自定义页面数据
  const pageData = pagesJson[pageCode] || {};
  Object.assign(pageData, {
    url: pages[pageCode],
    code: pageCode
  });
  // 配置生成的html文件
  const conf = {
    filename: pageCode + '.html',
    template: './index.html', // 模板路径
    favicon: './favicon.ico',
    inject: true,
    chunks: ['manifest', 'vendor', 'app', pageCode],   // 引入资源文件
    chunksSortMode: 'manual',       // 控制 chunk 的排序。none | auto(默认)| dependency(依赖)| manual(手动)| {function}
    pageData: pageData
  };
  if(!baseWebpackConfig.plugins) baseWebpackConfig.plugins = [];
  baseWebpackConfig.plugins.push(new HtmlWebpackPlugin(conf));
}
2、模板文件(index.html)
<%
    const page = htmlWebpackPlugin.options.pageData || { title:'vue cli2' };
%>


<html lang="en">

<head>
    <meta charset="utf-8">
    <meta name="viewport" content="width=device-width,initial-scale=1.0">
    <meta http-equiv="X-UA-Compatible" content="ie=edge">
    <title><%= page.title %>title>
head>

<body>
    <div id="app">
        <div id="<%= page.code %>">div>
    div>

body>

html>
3、页面参数配置文件(config/page.json)
{
    "index": {
        "title": "首页"
    },
    "shop": {
        "title": "商店"
    },
    "shopDetail": {
        "title": "商店详情"
    }
}
.
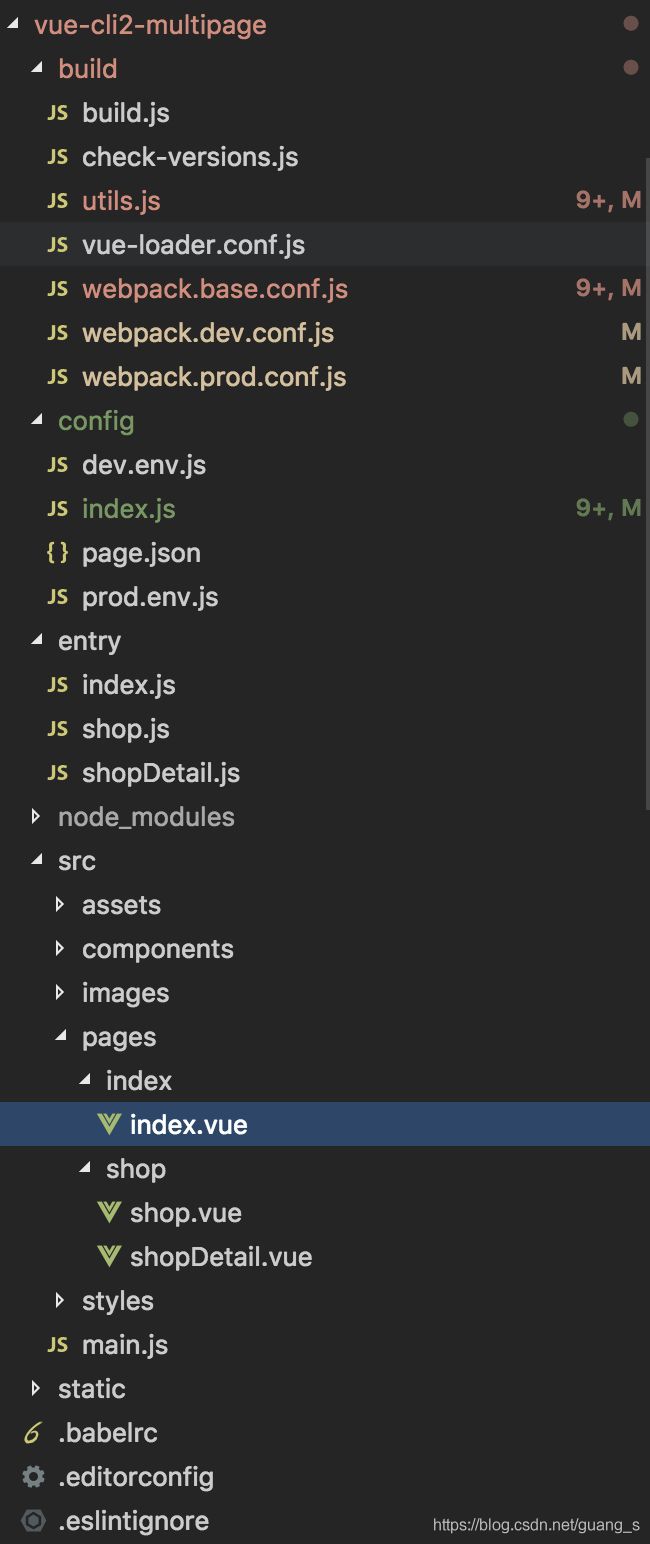
五、页面文件结构,如下:
- 如此,我们就只完成了模板文件和入口文件的自动化构建,现在我们就只需要新增src/pages/*.vue来创建页面了
.
六、项目地址(记得给星哦)
https://github.com/shiguang0116/vue-cli2-multipage
.
七、相关文章
vue-cli3构建多页面:提取通用模板和入口文件,自动构建多页配置
