vue多页面开发
在使用vue-cli构建项目时,默认模板都是用它的单页面应用,但有的时候需要我们做成多页面方式,要怎么操作和修改呢?先附上github上修改好的源代码链接:https://github.com/path2017/vue-multi-page。
大家都知道vue-cli结合webpack是最常用的模板,所以在想怎么解决vue的多页面应用时,可以通过修改webpack的配置入手。话不多说,先附一张项目目录文件图:
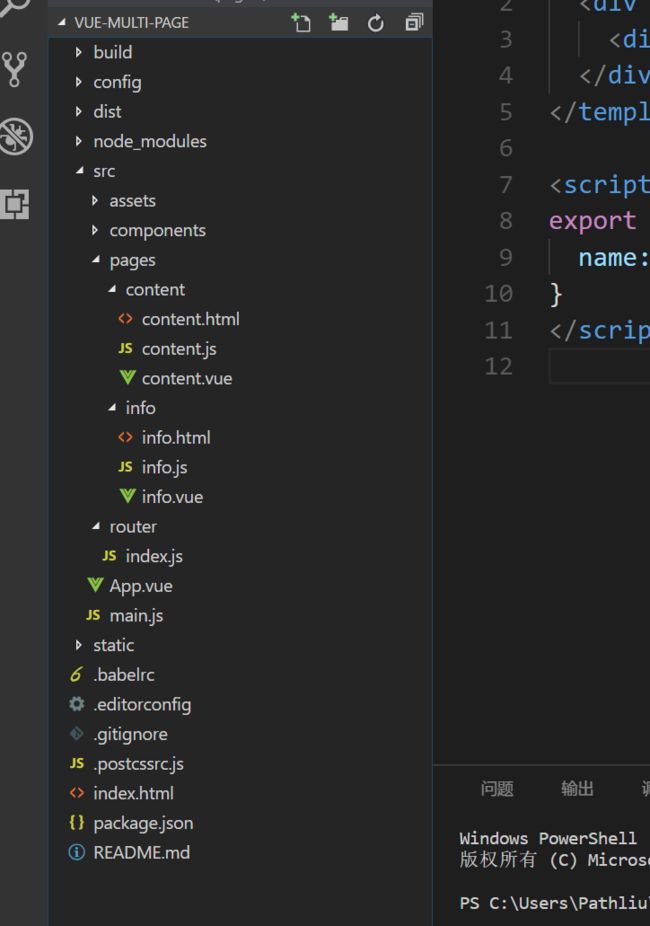
最外层有index.html,在src文件夹下,有pages文件夹分别包含content.html,info.html,此外你也可以扩展更多的page,这里就不多赘述。那么要怎么修改配置文件,实现多页面功能呢?
1. 修改打包入口文件地址
在build文件夹下,webpack.base.conf.js中,按如下修改
entry: {
    app: './src/main.js',
    info: './src/pages/info/info.js',
    content: './src/pages/content/content.js',
  },
2. 修改打包挂载页面路径
在config文件夹下,index.js中,按如下修改
 // Template for index.html
    index: path.resolve(__dirname, '../dist/index.html'),
    info: path.resolve(__dirname, '../dist/info.html'),
    content: path.resolve(__dirname, '../dist/content.html'),
3. 修改HtmlWebpackPlugin
在build文件夹下,webpack.dev.conf.js中,按如下修改
plugins: [
    new webpack.DefinePlugin({
      'process.env': require('../config/dev.env')
    }),
    new webpack.HotModuleReplacementPlugin(),
    new webpack.NamedModulesPlugin(), // HMR shows correct file names in console on update.
    new webpack.NoEmitOnErrorsPlugin(),
    // https://github.com/ampedandwired/html-webpack-plugin
    new HtmlWebpackPlugin({
      filename: 'index.html',
      template: 'index.html',
      inject: true,
      chunks: ['app']
    }),
    // info.html
    new HtmlWebpackPlugin({
      filename: 'info.html',
      template: './src/pages/info/info.html',
      inject: true,
      chunks: ['info']
    }),
    // content.html
    new HtmlWebpackPlugin({
      filename: 'content.html',
      template: './src/pages/content/content.html',
      inject: true,
      chunks: ['content']
    }),
    // copy custom static assets
    new CopyWebpackPlugin([
      {
        from: path.resolve(__dirname, '../static'),
        to: config.dev.assetsSubDirectory,
        ignore: ['.*']
      }
    ])
  ]
4.修改挂载的HtmlWebpackPlugin
在build文件夹下,webpack.prod.conf.js中修改和加入如下:
 new HtmlWebpackPlugin({
      filename: config.build.index,
      template: 'index.html',
      inject: true,
      minify: {
        removeComments: true,
        collapseWhitespace: true,
        removeAttributeQuotes: true
        // more options:
        // https://github.com/kangax/html-minifier#options-quick-reference
      },
      // necessary to consistently work with multiple chunks via CommonsChunkPlugin
      chunksSortMode: 'dependency',
      chunks: ['manifest', 'vendor', 'app']
    }),
    // info.html
    new HtmlWebpackPlugin({
      filename: config.build.info,
      template: './src/pages/info/info.html',
      inject: true,
      minify: {
        removeComments: true,
        collapseWhitespace: true,
        removeAttributeQuotes: true
      },
      chunksSortMode: 'dependency',
      chunks: ['manifest', 'vendor', 'info']
    }),
    // content.html
    new HtmlWebpackPlugin({
      filename: config.build.content,
      template: './src/pages/content/content.html',
      inject: true,
      minify: {
        removeComments: true,
        collapseWhitespace: true,
        removeAttributeQuotes: true
      },
      chunksSortMode: 'dependency',
      chunks: ['manifest', 'vendor', 'content']
    }),
以上步骤之后,就完成了webpack的多页面配置,接下来是多页面中,页面上的写法
比如info
info.html
info
info.js
import Vue from 'vue'
import info from './info.vue'

Vue.config.productionTip = false

new Vue({
  el: '#info', // 这里参考info.html和info.vue的根节点id,保持三者一致
  render: h => h(info)
})
info.vue
this is info page
在页面上,可以通过
info.html使用页面。
github上述项目源码地址:https://github.com/path2017/vue-multi-page。本文结。