OpenSSL的使用
SSL是Secure Sockets Layer(安全套接层协议)的缩写。OpenSSL整个软件包大概可以分成三个主要的功能部分:SSL协议库、应用程序以及密码算法库。OpenSSL的目录结构自然也是围绕这三个功能部分进行规划的。
作为一个基于密码学的安全开发包,OpenSSL提供的功能相当强大和全面,囊括了主要的密码算法、常用的密钥和证书封装管理功能以及SSL协议,并提供了丰富的应用程序供测试或其它目的使用。
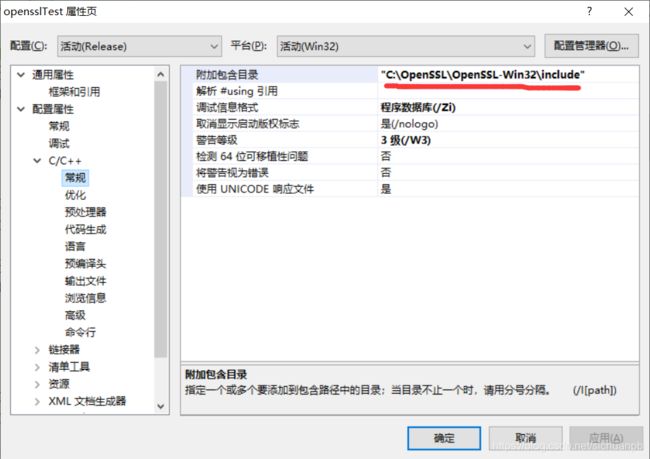
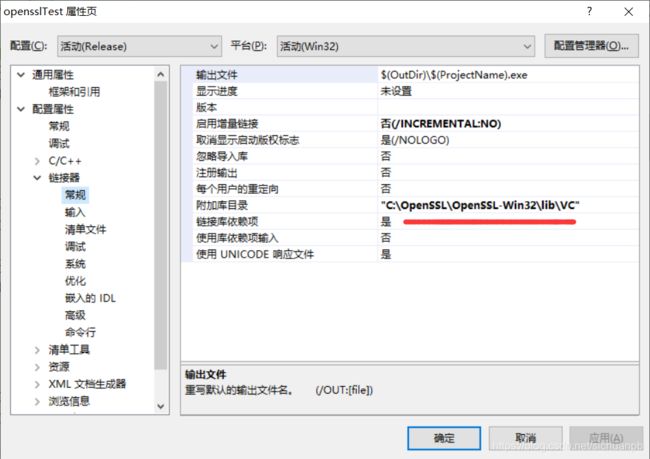
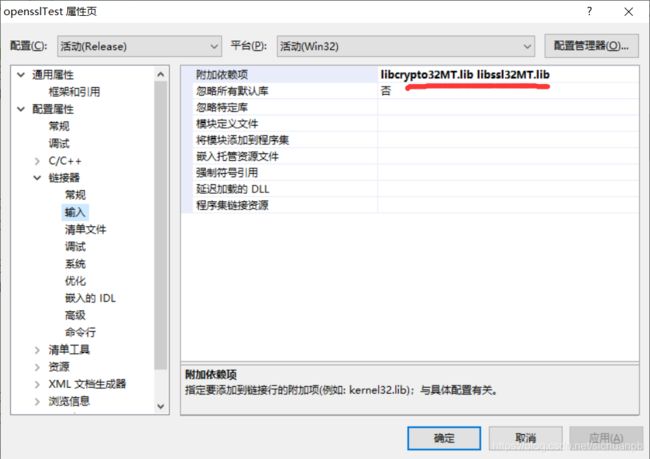
首先是OpenSSL的配置
1 使用 WxpRsaLic::generateRSAKey(); 产生公钥文件pubkey.pem和私钥文件prikey.pem,
2 然后使用公钥加密数据,并把数据写入文件
string www;
CString strMfc("");
GetDlgItemText(IDC_EDIT1,strMfc);
www = strMfc.GetBuffer(0);
string str2=WxpRsaLic::testPEMReadRSA("pubkey.pem");
www=WxpRsaLic::rsa_pub_encrypt(www,str2);
WxpRsaLic::testWriteEnData("pwd.txt",www);
//如果产生的密文长度不等于64,则操作会失败
3 然后用私钥解密并显示
string www = WxpRsaLic::testPEMReadRSA("pwd.txt");
string str2=WxpRsaLic::testPEMReadRSA("prikey.pem");
www=WxpRsaLic::rsa_pri_decrypt(www,str2);
strMfc=CString(www.c_str());
SetDlgItemText(IDC_EDIT3,strMfc);
验证界面
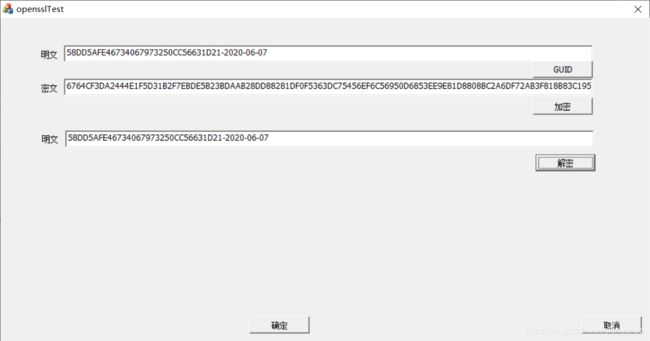
产生明文:
void CopensslTestDlg::OnBnClickedGUID()
{
    WxpRsaLic::generateRSAKey();

	CString strMfc("");
	GUID guid;
	CoInitialize(NULL);
	if ( S_OK == ::CoCreateGuid(&guid) )
		strMfc.Format("%08X%04X%04X%02X%02X%02X%02X%02X%02X%02X%02X-",
		guid.Data1,guid.Data2,guid.Data3,
		guid.Data4[0],guid.Data4[1],guid.Data4[2],guid.Data4[3],
		guid.Data4[4],guid.Data4[5],guid.Data4[6],guid.Data4[7]);

	CoUninitialize();

	CTime tm=CTime::GetCurrentTime();
	CString str=tm.Format("%Y-%m-%d");

	strMfc.Append(str);

	SetDlgItemText(IDC_EDIT1,strMfc);
}
2 加密
void CopensslTestDlg::OnBnClickedjiami()
{
	string www;
	CString strMfc("");
	GetDlgItemText(IDC_EDIT1,strMfc);
	www = strMfc.GetBuffer(0);
	string str2=WxpRsaLic::testPEMReadRSA("pubkey.pem");

	www=WxpRsaLic::rsa_pub_encrypt(www,str2);

	WxpRsaLic::testWriteEnData("pwd.txt",www);

	www=WxpRsaLic::testPEMReadRSA("pwd.txt");

    CString tem;
	tem.Format("%d",www.length());
    if(www.length()!=64)
	{
		AfxMessageBox("加密失败,请重新加密"+tem);
		return ;
	}
	strMfc="";


	for(int i=0;i
3 解密
void CopensslTestDlg::OnBnClickedJiemi()
{
	string www;
	CString strMfc("");

	SetDlgItemText(IDC_EDIT3,strMfc);
	www = WxpRsaLic::testPEMReadRSA("pwd.txt");

	strMfc.Format("%d",www.length());
	if(www.length()!=64)
	{
		AfxMessageBox("解密失败!"+strMfc);
		return ;
	}

	string str2=WxpRsaLic::testPEMReadRSA("prikey.pem");

	www=WxpRsaLic::rsa_pri_decrypt(www,str2);
	strMfc=CString(www.c_str());

	SetDlgItemText(IDC_EDIT3,strMfc);

	AfxMessageBox("解密成功");

}
//密码控制类
#pragma once
#include "openssl/rsa.h"
#include "openssl/pem.h"
#include
#include
using namespace std;

class WxpRsaLic
{
public:
	WxpRsaLic(void);
	~WxpRsaLic(void);

	//产生公钥和私钥
	static void generateRSAKey();

	//用公钥加密
	static string rsa_pub_encrypt(const string &clearText, const string &pubKey);

	//用私钥解密
	static string rsa_pri_decrypt(const string &cipherText, const string &priKey);

	//读取文件
	static string testPEMReadRSA(string fileName);

	//写入加密文件
	static void testWriteEnData(string fileName,string fileData);

};
实现文件:
#include "StdAfx.h"
#include "WxpRsaLic.h"

#define KEY_LENGTH    512             // 密钥长度
#define PUB_KEY_FILE "pubkey.pem"    // 公钥路径
#define PRI_KEY_FILE "prikey.pem"    // 私钥路径

WxpRsaLic::WxpRsaLic(void){}

WxpRsaLic::~WxpRsaLic(void){}

void WxpRsaLic::generateRSAKey()
{
	// 公私密钥对
	size_t pri_len;
	size_t pub_len;
	char *pri_key = NULL;
	char *pub_key = NULL;

	// 生成密钥对
	RSA *keypair = RSA_generate_key(KEY_LENGTH, RSA_3, NULL, NULL);

	BIO *pri = BIO_new(BIO_s_mem());
	BIO *pub = BIO_new(BIO_s_mem());

	PEM_write_bio_RSAPrivateKey(pri, keypair, NULL, NULL, 0, NULL, NULL);
	PEM_write_bio_RSAPublicKey(pub, keypair);

	// 获取长度
	pri_len = BIO_pending(pri);
	pub_len = BIO_pending(pub);

	// 密钥对读取到字符串
	pri_key = (char *)malloc(pri_len + 1);
	pub_key = (char *)malloc(pub_len + 1);

	BIO_read(pri, pri_key, pri_len);
	BIO_read(pub, pub_key, pub_len);

	pri_key[pri_len] = '\0';
	pub_key[pub_len] = '\0';

	// 存储密钥对
    string strKey[2];
	strKey[0] = pub_key;
	strKey[1] = pri_key;

	// 存储到磁盘(这种方式存储的是begin rsa public key/ begin rsa private key开头的)
	FILE *pubFile = fopen(PUB_KEY_FILE, "w");
	if (pubFile == NULL)
	{
		// assert(false);
		return;
	}
	fputs(pub_key, pubFile);
	fclose(pubFile);

	FILE *priFile = fopen(PRI_KEY_FILE, "w");
	if (priFile == NULL)
	{
		//assert(false);
		return;
	}
	fputs(pri_key, priFile);
	fclose(priFile);

	// 内存释放
	RSA_free(keypair);
	BIO_free_all(pub);
	BIO_free_all(pri);

	free(pri_key);
	free(pub_key);
}


// 公钥加密
string WxpRsaLic::rsa_pub_encrypt(const string &clearText, const string &pubKey)
{
	string strRet;
	RSA *rsa = NULL;
	BIO *keybio = BIO_new_mem_buf((unsigned char *)pubKey.c_str(), -1);
	// 此处有三种方法
	// 1, 读取内存里生成的密钥对,再从内存生成rsa
	// 2, 读取磁盘里生成的密钥对文本文件,在从内存生成rsa
	// 3,直接从读取文件指针生成rsa

	RSA* pRSAPublicKey = RSA_new();
	rsa = PEM_read_bio_RSAPublicKey(keybio, &rsa, NULL, NULL);

	int len = RSA_size(rsa);
	char *encryptedText = (char *)malloc(len + 1);
	memset(encryptedText, 0, len + 1);

	// 加密函数
	int ret = RSA_public_encrypt(clearText.length(), (const unsigned char*)clearText.c_str(), (unsigned char*)encryptedText, rsa, RSA_PKCS1_PADDING);
	if (ret >= 0)
		strRet = std::string(encryptedText, ret);

	// 释放内存
	free(encryptedText);
	BIO_free_all(keybio);
	RSA_free(rsa);

	return strRet;
}

// 私钥解密
string WxpRsaLic::rsa_pri_decrypt(const string &cipherText, const string &priKey)
{

	std::string strRet;
    RSA *rsa = RSA_new();
    BIO *keybio;
    keybio = BIO_new_mem_buf((unsigned char *)priKey.c_str(), -1);


	//-------------------------

    //keybio = BIO_new_file(PRI_KEY_FILE, "rb");

   	//-------------------

	// 此处有三种方法
	// 1, 读取内存里生成的密钥对,再从内存生成rsa
	// 2, 读取磁盘里生成的密钥对文本文件,在从内存生成rsa
	// 3,直接从读取文件指针生成rsa
	rsa = PEM_read_bio_RSAPrivateKey(keybio, &rsa, NULL, NULL);

	int len = RSA_size(rsa);
	char *decryptedText = (char *)malloc(len + 1);
	memset(decryptedText, 0, len + 1);

	// 解密函数
	int ret = RSA_private_decrypt(cipherText.length(), (const unsigned char*)cipherText.c_str(), (unsigned char*)decryptedText, rsa, RSA_PKCS1_PADDING);
	if (ret >= 0)
		strRet = std::string(decryptedText, ret);

	// 释放内存
	free(decryptedText);
	BIO_free_all(keybio);
	RSA_free(rsa);

	return strRet;
}
//读取文件数据
string WxpRsaLic::testPEMReadRSA(string fileName)
{

  	fstream f;
	f.open(fileName.c_str(),ios::in);

	//按字节读入并输出
     char ch;
	 string str("");

     while(EOF != (ch= f.get()))
		 str+=ch;

	 f.close();

	return str;

}

//写入加密文件
 void WxpRsaLic::testWriteEnData(string fileName,string fileData)
 {
	fstream f(fileName.c_str(),ios::out);
    f<