maskrcnn-benchmark训练自己数据集用于视觉分割
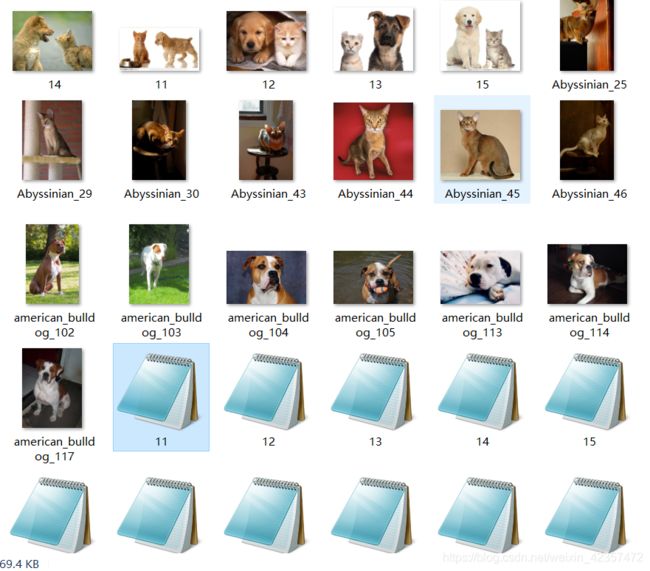
1、标记数据用labelme,建议用ubuntu版本去做,因为window可能因为这个需要环境改变影响其他,自己犯过这个问题
https://github.com/wkentaro/labelme
2、labelme转化成coco数据集用于分割任务
labelme2coco.py进行转化
# -*- coding:utf-8 -*-

import argparse
import json
import matplotlib.pyplot as plt
import skimage.io as io
# import cv2
from labelme import utils
import numpy as np
import glob
import PIL.Image


class MyEncoder(json.JSONEncoder):
    def default(self, obj):
        if isinstance(obj, np.integer):
            return int(obj)
        elif isinstance(obj, np.floating):
            return float(obj)
        elif isinstance(obj, np.ndarray):
            return obj.tolist()
        else:
            return super(MyEncoder, self).default(obj)


class labelme2coco(object):
    def __init__(self, labelme_json=[], save_json_path='./tran.json'):
        '''
        :param labelme_json: 所有labelme的json文件路径组成的列表
        :param save_json_path: json保存位置
        '''
        self.labelme_json = labelme_json
        self.save_json_path = save_json_path
        self.images = []
        self.categories = []
        self.annotations = []
        # self.data_coco = {}
        self.label = []
        self.annID = 1
        self.height = 0
        self.width = 0

        self.save_json()

    def data_transfer(self):

        for num, json_file in enumerate(self.labelme_json):
            with open(json_file, 'r') as fp:
                data = json.load(fp)  # 加载json文件
                self.images.append(self.image(data, num))
                for shapes in data['shapes']:
                    label = shapes['label']
                    if label not in self.label:
                        self.categories.append(self.categorie(label))
                        self.label.append(label)
                    points = shapes['points']  # 这里的point是用rectangle标注得到的,只有两个点,需要转成四个点
                    points.append([points[0][0], points[1][1]])
                    points.append([points[1][0], points[0][1]])
                    self.annotations.append(self.annotation(points, label, num))
                    self.annID += 1

    def image(self, data, num):
        image = {}
        img = utils.img_b64_to_arr(data['imageData'])  # 解析原图片数据
        # img=io.imread(data['imagePath']) # 通过图片路径打开图片
        # img = cv2.imread(data['imagePath'], 0)
        height, width = img.shape[:2]
        img = None
        image['height'] = height
        image['width'] = width
        image['id'] = num + 1
        image['file_name'] = data['imagePath'].split('/')[-1]

        self.height = height
        self.width = width

        return image

    def categorie(self, label):
        categorie = {}
        categorie['supercategory'] = 'Cancer'
        categorie['id'] = len(self.label) + 1  # 0 默认为背景
        categorie['name'] = label
        return categorie

    def annotation(self, points, label, num):
        annotation = {}
        annotation['segmentation'] = [list(np.asarray(points).flatten())]
        annotation['iscrowd'] = 0
        annotation['image_id'] = num + 1
        # annotation['bbox'] = str(self.getbbox(points)) # 使用list保存json文件时报错(不知道为什么)
        # list(map(int,a[1:-1].split(','))) a=annotation['bbox'] 使用该方式转成list
        annotation['bbox'] = list(map(float, self.getbbox(points)))
        annotation['area'] = annotation['bbox'][2] * annotation['bbox'][3]
        # annotation['category_id'] = self.getcatid(label)
        annotation['category_id'] = self.getcatid(label)  # 注意,源代码默认为1
        annotation['id'] = self.annID
        return annotation

    def getcatid(self, label):
        for categorie in self.categories:
            if label == categorie['name']:
                return categorie['id']
        return 1

    def getbbox(self, points):
        # img = np.zeros([self.height,self.width],np.uint8)
        # cv2.polylines(img, [np.asarray(points)], True, 1, lineType=cv2.LINE_AA)  # 画边界线
        # cv2.fillPoly(img, [np.asarray(points)], 1)  # 画多边形 内部像素值为1
        polygons = points

        mask = self.polygons_to_mask([self.height, self.width], polygons)
        return self.mask2box(mask)

    def mask2box(self, mask):
        '''从mask反算出其边框
        mask:[h,w]  0、1组成的图片
        1对应对象,只需计算1对应的行列号(左上角行列号,右下角行列号,就可以算出其边框)
        '''
        # np.where(mask==1)
        index = np.argwhere(mask == 1)
        rows = index[:, 0]
        clos = index[:, 1]
        # 解析左上角行列号
        left_top_r = np.min(rows)  # y
        left_top_c = np.min(clos)  # x

        # 解析右下角行列号
        right_bottom_r = np.max(rows)
        right_bottom_c = np.max(clos)

        # return [(left_top_r,left_top_c),(right_bottom_r,right_bottom_c)]
        # return [(left_top_c, left_top_r), (right_bottom_c, right_bottom_r)]
        # return [left_top_c, left_top_r, right_bottom_c, right_bottom_r]  # [x1,y1,x2,y2]
        return [left_top_c, left_top_r, right_bottom_c - left_top_c,
                right_bottom_r - left_top_r]  # [x1,y1,w,h] 对应COCO的bbox格式

    def polygons_to_mask(self, img_shape, polygons):
        mask = np.zeros(img_shape, dtype=np.uint8)
        mask = PIL.Image.fromarray(mask)
        xy = list(map(tuple, polygons))
        PIL.ImageDraw.Draw(mask).polygon(xy=xy, outline=1, fill=1)
        mask = np.array(mask, dtype=bool)
        return mask

    def data2coco(self):
        data_coco = {}
        data_coco['images'] = self.images
        data_coco['categories'] = self.categories
        data_coco['annotations'] = self.annotations
        return data_coco

    def save_json(self):
        self.data_transfer()
        self.data_coco = self.data2coco()
        # 保存json文件
        json.dump(self.data_coco, open(self.save_json_path, 'w'), indent=4, cls=MyEncoder)  # indent=4 更加美观显示


labelme_json = glob.glob(r'C:\Users\lonng\Desktop\cat\*.json')
# labelme_json=['./1.json']

labelme2coco(labelme_json, '.\\new.json')
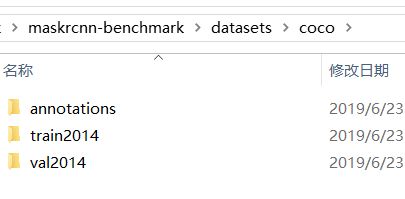
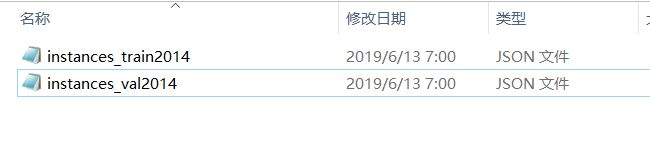
3、转化完成就在maskrcnn-benchmark目录下创建datasets文件夹,然后安装下列目录格式创建coco、然后在下面3个文件夹,这里train2014和val2014就是放置图片的这里我两个放的完全一样用于演示,annotations文件夹放刚上面转化成的coco数据json格式,
4、训练前需要更改下配置文件
a、configs下e2e_mask_rcnn_R_101_FPN_1x.yaml
DATASETS:
  TRAIN: ("coco_2014_train", )
  TEST: ("coco_2014_val",)
b、maskrcnn_benchmark\config下的defaults.py,更改下分类,batchsize,学习率、训练迭代数据等
_C.MODEL.ROI_BOX_HEAD = CN()
_C.MODEL.ROI_BOX_HEAD.FEATURE_EXTRACTOR = "ResNet50Conv5ROIFeatureExtractor"
_C.MODEL.ROI_BOX_HEAD.PREDICTOR = "FastRCNNPredictor"
_C.MODEL.ROI_BOX_HEAD.POOLER_RESOLUTION = 14
_C.MODEL.ROI_BOX_HEAD.POOLER_SAMPLING_RATIO = 0
_C.MODEL.ROI_BOX_HEAD.POOLER_SCALES = (1.0 / 16,)
_C.MODEL.ROI_BOX_HEAD.NUM_CLASSES = 3   #分类数量需要对应更改,默认81
# Hidden layer dimension when using an MLP for the RoI box head
_C.MODEL.ROI_BOX_HEAD.MLP_HEAD_DIM = 1024
# GN
_C.MODEL.ROI_BOX_HEAD.USE_GN = False
# Dilation
_C.MODEL.ROI_BOX_HEAD.DILATION = 1
_C.MODEL.ROI_BOX_HEAD.CONV_HEAD_DIM = 256
_C.MODEL.ROI_BOX_HEAD.NUM_STACKED_CONVS = 4


# ---------------------------------------------------------------------------- #
# Solver
# ---------------------------------------------------------------------------- #
_C.SOLVER = CN()
_C.SOLVER.MAX_ITER = 400

_C.SOLVER.BASE_LR = 0.0001  #基础学习率
_C.SOLVER.BIAS_LR_FACTOR = 2

_C.SOLVER.MOMENTUM = 0.9

_C.SOLVER.WEIGHT_DECAY = 0.0005
_C.SOLVER.WEIGHT_DECAY_BIAS = 0

_C.SOLVER.GAMMA = 0.1
_C.SOLVER.STEPS = (30000,)

_C.SOLVER.WARMUP_FACTOR = 1.0 / 3
_C.SOLVER.WARMUP_ITERS = 500
_C.SOLVER.WARMUP_METHOD = "linear"

_C.SOLVER.CHECKPOINT_PERIOD = 200  #每200次保持下

# Number of images per batch
# This is global, so if we have 8 GPUs and IMS_PER_BATCH = 16, each GPU will
# see 2 images per batch
_C.SOLVER.IMS_PER_BATCH = 2    #更改下batch。预防内存不够

# ---------------------------------------------------------------------------- #
# Specific test options
# ---------------------------------------------------------------------------- #
_C.TEST = CN()
_C.TEST.EXPECTED_RESULTS = []
_C.TEST.EXPECTED_RESULTS_SIGMA_TOL = 4
# Number of images per batch
# This is global, so if we have 8 GPUs and IMS_PER_BATCH = 16, each GPU will
# see 2 images per batch
_C.TEST.IMS_PER_BATCH = 2    #更改下batch。预防内存不够
# Number of detections per image
_C.TEST.DETECTIONS_PER_IMG = 50

# ---------------------------------------------------------------------------- #
# Test-time augmentations for bounding box detection
# See configs/test_time_aug/e2e_mask_rcnn_R-50-FPN_1x.yaml for an example
# ---------------------------------------------------------------------------- #
_C.TEST.BBOX_AUG = CN()

# Enable test-time augmentation for bounding box detection if True
_C.TEST.BBOX_AUG.ENABLED = False

# Horizontal flip at the original scale (id transform)
_C.TEST.BBOX_AUG.H_FLIP = False

# Each scale is the pixel size of an image's shortest side
_C.TEST.BBOX_AUG.SCALES = ()

# Max pixel size of the longer side
_C.TEST.BBOX_AUG.MAX_SIZE = 4000

# Horizontal flip at each scale
_C.TEST.BBOX_AUG.SCALE_H_FLIP = False


# ---------------------------------------------------------------------------- #
# Misc options
# ---------------------------------------------------------------------------- #
_C.OUTPUT_DIR = "."

_C.PATHS_CATALOG = os.path.join(os.path.dirname(__file__), "paths_catalog.py")

# ---------------------------------------------------------------------------- #
# Precision options
# ---------------------------------------------------------------------------- #

# Precision of input, allowable: (float32, float16)
_C.DTYPE = "float32"

# Enable verbosity in apex.amp
_C.AMP_VERBOSE = False
c、maskrcnn_benchmark\config下的paths_catalog.py,DatasetCatalog的数据目录结构改下
class DatasetCatalog(object):
    DATA_DIR = "datasets"
    DATASETS = {
        "coco_2014_train": {
            "img_dir": "coco/train2014",  # 这里是訪数据集的主目录,称其为root,訪root会和标注文件中images字段中的file_name指定的路径进行拼接得到图片的完整路径
            "ann_file":"coco/annotations/instances_train2014.json",  # 标注文件路径
        },
        "coco_2014_val":{
            "img_dir": "coco/val2014",  # 同上
            "ann_file":"coco/annotations/instances_val2014.json"  # 同上
        },
    }
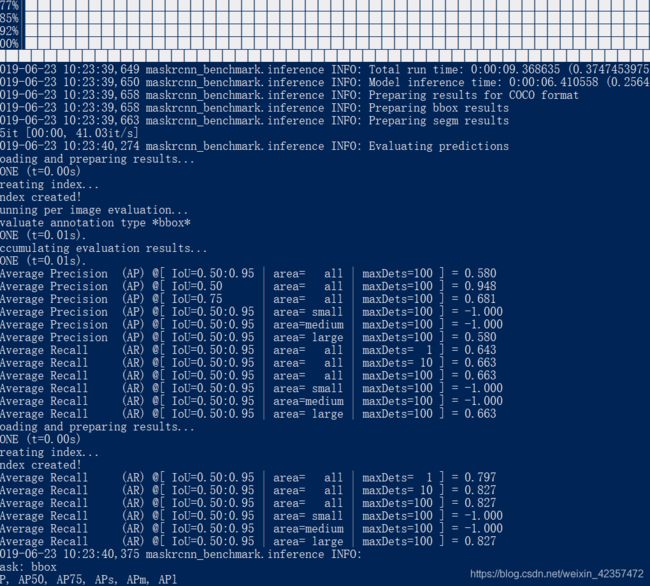
5、然后就可以训练和进行验证
 训练:python tools/train_net.py --config-file configs/e2e_mask_rcnn_R_101_FPN_1x.yaml
  验证:python tools/test_net.py --config-file configs/e2e_mask_rcnn_R_101_FPN_1x.yaml

6、预测图片
a、需要先更改下maskrcnn-benchmark\configs的e2e_mask_rcnn_R_101_FPN_1x.yaml权重,用已经训练后的权重、
WEIGHT: "catalog://ImageNetPretrained/MSRA/R-101"改成
WEIGHT: "../model_0000800.pth"
b\需要更改demo下的predictor.py的分类问题,COCODemo改成如下
class COCODemo(object):
    # COCO categories for pretty print
    CATEGORIES = [
        "__background",
        "cat",
        "dog",
    ]
c、预测代码,在demo下创立的predictor1.py,直接运行python predictor1
import matplotlib.pyplot as plt
import matplotlib.pylab as pylab

import requests
from io import BytesIO
from PIL import Image
import numpy as np

pylab.rcParams['figure.figsize'] = 20, 12

from maskrcnn_benchmark.config import cfg
from predictor import COCODemo

# 参数配置文件
config_file = r"C:\Users\lonng\Desktop\mask\maskrcnn-benchmark\configs\e2e_mask_rcnn_R_101_FPN_1x.yaml"

# update the config options with the config file
cfg.merge_from_file(config_file)
# manual override some options
cfg.merge_from_list(["MODEL.DEVICE", "cuda"])
# cfg.MODEL.WEIGHT = '../pretrained/e2e_mask_rcnn_R_101_FPN_1x.pth'

coco_demo = COCODemo(cfg, min_image_size=800, confidence_threshold=0.7, )

# if False:
#     pass
# else:
#imgurl = "http://farm3.staticflickr.com/2469/3915380994_2e611b1779_z.jpg"
# response = requests.get(imgurl)
# pil_image = Image.open(BytesIO(response.content)).convert("RGB")

imgfile = r'C:\Users\lonng\Desktop\mask\maskrcnn-benchmark\demo\test\13.jpg'

pil_image = Image.open(imgfile).convert("RGB")
pil_image.show()
image = np.array(pil_image)[:, :, [2, 1, 0]]
print(image)
# forward predict
predictions = coco_demo.run_on_opencv_image(image)
print(predictions)

# vis
plt.subplot(1, 2, 1)
plt.imshow(image[:, :, ::-1])
plt.axis('off')

plt.subplot(1, 2, 2)
plt.imshow(predictions[:, :, ::-1])
plt.axis('off')
plt.show()

